从零开始学keras之生成对抗网络GAN
生成对抗网络主要分为生成器网络和判别器网络。
- 生成器网络:他以一个随机向量(潜在空间的一个随机点)作为输入,并将其解码成一张合成图像。
- 判别器网络:以一张图像(真实的或合成的均可)作为输入,并预测该图像是来自训练集还是生成器网络创建。
本节将会介绍如何用 Keras 来实现形式最简单的 GAN。GAN 属于高级应用,所以本书不会深入介绍其技术细节。我们具体实现的是一个深度卷积生成式对抗网络(DCGAN,deep convolutional GAN),即生成器和判别器都是深度卷积神经网络的 GAN。特别地,它在生成器中使用 Conv2DTranspose 层进行图像上采样。 我们将在 CIFAR10 数据集的图像上训练 GAN,这个数据集包含 50 000 张 32×32 的 RGB图像,这些图像属于 10 个类别(每个类别 5000 张图像)。为了简化,我们只使用属于“frog”(青蛙)类别的图像。
GAN 的简要实现流程如下所示。
- (1) generator 网络将形状为 (latent_dim,) 的向量映射到形状为 (32, 32, 3) 的图像。
- (2) discriminator 网络将形状为 (32, 32, 3) 的图像映射到一个二进制分数,用于评估图像为真的概率。
- (3) gan 网络将 generator 网络和 discriminator 网络连接在一起:gan(x) = discriminator (generator(x))。生成器将潜在空间向量解码为图像,判别器对这些图像的真实性进 行评估,因此这个 gan 网络是将这些潜在向量映射到判别器的评估结果。
- (4) 我们使用带有“真”/“假”标签的真假图像样本来训练判别器,就和训练普通的图像 分类模型一样。
- (5) 为了训练生成器,我们要使用 gan 模型的损失相对于生成器权重的梯度。这意味着,在每一步都要移动生成器的权重,其移动方向是让判别器更有可能将生成器解码的图像划分为“真”。换句话说,我们训练生成器来欺骗判别器。
训练gan的技巧
训练 GAN 和调节 GAN 实现的过程非常困难。你应该记住一些公认的技巧。与深度学习中的大部分内容一样,这些技巧更像是炼金术而不是科学,它们是启发式的指南,并没有理论 的支持。这些技巧得到了一定程度的来自对现象的直观理解的支持,经验告诉我们,它们的效果都很好,但不一定适用于所有情况。
下面是本节实现 GAN 生成器和判别器时用到的一些技巧。这里并没有列出与 GAN 相关的 全部技巧,更多技巧可查阅关于 GAN 的文献。
- 我们使用 tanh 作为生成器最后一层的激活,而不用 sigmoid,后者在其他类型的模型中更加常见。
- 我们使用正态分布(高斯分布)对潜在空间中的点进行采样,而不用均匀分布。
- 随机性能够提高稳健性。训练 GAN 得到的是一个动态平衡,所以 GAN 可能以各种方式“卡住”。在训练过程中引入随机性有助于防止出现这种情况。我们通过两种方式引入随机性: 一种是在判别器中使用 dropout,另一种是向判别器的标签添加随机噪声。
- 稀疏的梯度会妨碍 GAN 的训练。在深度学习中,稀疏性通常是我们需要的属性,但在GAN 中并非如此。有两件事情可能导致梯度稀疏:最大池化运算和 ReLU 激活。我们推荐使用步进卷积代替最大池化来进行下采样,还推荐使用 LeakyReLU 层来代替 ReLU 激活。LeakyReLU 和 ReLU 类似,但它允许较小的负数激活值,从而放宽了稀疏性限制。
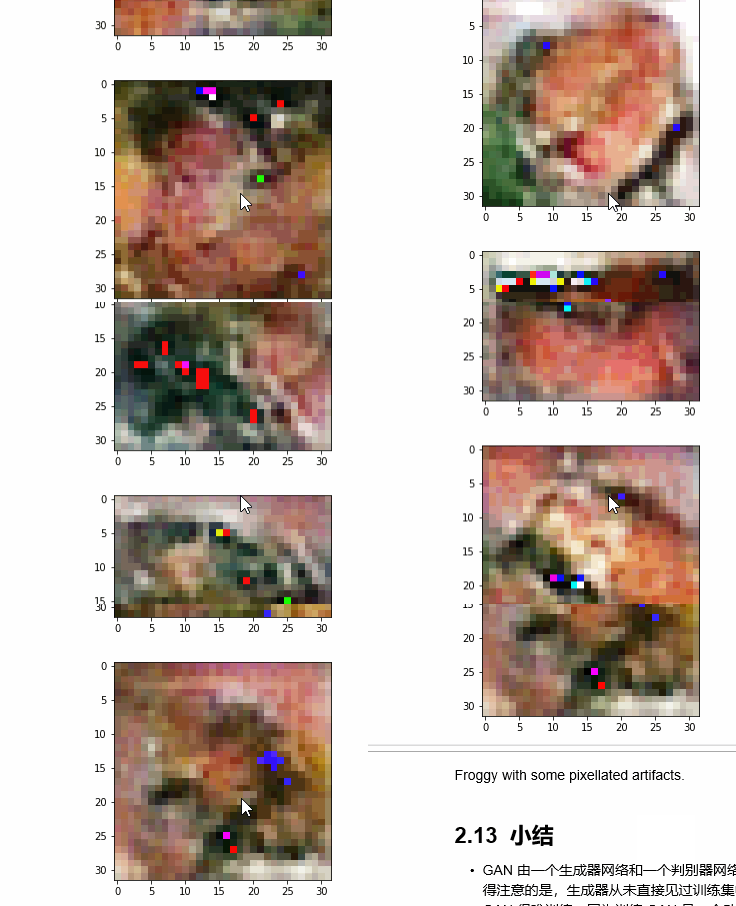
- 在生成的图像中,经常会见到棋盘状伪影,这是由生成器中像素空间的不均匀覆盖导致的。为了解决这个问题,每当在生成器和判别器中都使用步进的 Conv2DTranpose 或 Conv2D 时,使用的内核大小要能够被步幅大小整除。
生成器
首先,我们来开发 generator 模型,它将一个向量(来自潜在空间,训练过程中对其随机采样)转换为一张候选图像。GAN 常见的诸多问题之一,就是生成器“卡在”看似噪声的生成图像上。一种可行的解决方案是在判别器和生成器中都使用 dropout。
-
import keras
-
from keras import layers
-
import numpy as np
-
-
latent_dim = 32
-
height = 32
-
width = 32
-
channels = 3
-
-
generator_input = keras.Input(shape=(latent_dim,))
-
-
# First, transform the input into a 16x16 128-channels feature map
-
# 将输入转换为大小为 16×16 的128 个通道的特征图
-
-
x = layers.Dense(128 * 16 * 16)(generator_input)
-
x = layers.LeakyReLU()(x)
-
x = layers.Reshape((16, 16, 128))(x)
-
-
# Then, add a convolution layer(添加一个卷积层)
-
x = layers.Conv2D(256, 5, padding='same')(x)
-
x = layers.LeakyReLU()(x)
-
-
# Upsample to 32x32(上采样为 32×32)
-
x = layers.Conv2DTranspose(256, 4, strides=2, padding='same')(x)
-
x = layers.LeakyReLU()(x)
-
-
# Few more conv layers
-
x = layers.Conv2D(256, 5, padding='same')(x)
-
x = layers.LeakyReLU()(x)
-
x = layers.Conv2D(256, 5, padding='same')(x)
-
x = layers.LeakyReLU()(x)
-
-
# Produce a 32x32 1-channel feature map(生成一个大小为 32×32 的单通道特征图(即 CIFAR10 图像的形状))
-
x = layers.Conv2D(channels, 7, activation='tanh', padding='same')(x)
-
generator = keras.models.Model(generator_input, x)
-
#将生成器模型实例化,它将形状为 (latent_dim,)的输入映射到形状为 (32, 32, 3) 的图像
-
generator.summary()
判别器
接下来,我们来开发 discriminator 模型,它接收一张候选图像(真实的或合成的)作为输入,并将其划分到这两个类别之一:“生成图像”或“来自训练集的真实图像”
-
discriminator_input = layers.Input(shape=(height, width, channels))
-
x = layers.Conv2D(128, 3)(discriminator_input)
-
x = layers.LeakyReLU()(x)
-
x = layers.Conv2D(128, 4, strides=2)(x)
-
x = layers.LeakyReLU()(x)
-
x = layers.Conv2D(128, 4, strides=2)(x)
-
x = layers.LeakyReLU()(x)
-
x = layers.Conv2D(128, 4, strides=2)(x)
-
x = layers.LeakyReLU()(x)
-
x = layers.Flatten()(x)
-
-
# One dropout layer - important trick!
-
# 一个 dropout 层:这是很重要的技巧
-
x = layers.Dropout(0.4)(x)
-
-
# Classification layer(判别层)
-
x = layers.Dense(1, activation='sigmoid')(x)
-
-
discriminator = keras.models.Model(discriminator_input, x)
-
discriminator.summary()
-
-
# To stabilize training, we use learning rate decay
-
# and gradient clipping (by value) in the optimizer.
-
# 将判别器模型实例化,它将形状为 (32, 32, 3)的输入转换为一个二进制分类决策(真 / 假)
-
-
discriminator_optimizer = keras.optimizers.RMSprop(lr=0.0008, clipvalue=1.0, decay=1e-8)
-
-
# clipvalue=1.0:在优化器中使用梯度裁剪(限制梯度值的范围)
-
# decay=1e-8:为了稳定训练过程,使用学习率衰减
-
discriminator.compile(optimizer=discriminator_optimizer, loss='binary_crossentropy')
对抗网络
最后,我们要设置 GAN,将生成器和判别器连接在一起。训练时,这个模型将让生成器向某个方向移动,从而提高它欺骗判别器的能力。这个模型将潜在空间的点转换为一个分类决策(即 “真”或“假”),它训练的标签都是“真实图像”。因此,训练 gan 将会更新 generator 的权重, 使得 discriminator 在观察假图像时更有可能预测为“真”。请注意,有一点很重要,就是在训练过程中需要将判别器设置为冻结(即不可训练),这样在训练 gan 时它的权重才不会更新。 如果在此过程中可以对判别器的权重进行更新,那么我们就是在训练判别器始终预测“真”,但这并不是我们想要的!
-
# 将判别器权重设置为不可训练(仅应用于 gan 模型)
-
discriminator.trainable = False
-
-
gan_input = keras.Input(shape=(latent_dim,))
-
gan_output = discriminator(generator(gan_input))
-
gan = keras.models.Model(gan_input, gan_output)
-
-
gan_optimizer = keras.optimizers.RMSprop(lr=0.0004, clipvalue=1.0, decay=1e-8)
-
gan.compile(optimizer=gan_optimizer, loss='binary_crossentropy')
如何训练DCGAN
现在开始训练。再次强调一下,训练循环的大致流程如下所示。每轮都进行以下操作。
- (1) 从潜在空间中抽取随机的点(随机噪声)。
- (2) 利用这个随机噪声用 generator 生成图像。
- (3) 将生成图像与真实图像混合。
- (4) 使用这些混合后的图像以及相应的标签(真实图像为“真”,生成图像为“假”)来训练discriminator。
- (5) 在潜在空间中随机抽取新的点。
- (6) 使用这些随机向量以及全部是“真实图像”的标签来训练 gan。这会更新生成器的权重(只更新生成器的权重,因为判别器在 gan 中被冻结),其更新方向是使得判别器能够将生成图像预测为“真实图像”。这个过程是训练生成器去欺骗判别器。
-
import os
-
from keras.preprocessing import image
-
-
# Load CIFAR10 data(加载 CIFAR10数据)
-
(x_train, y_train), (_, _) = keras.datasets.cifar10.load_data()
-
-
# Select frog images (class 6)(选择青蛙图像(类别编号为 6))
-
x_train = x_train[y_train.flatten() == 6]
-
-
# Normalize data(数据标准化)
-
x_train = x_train.reshape(
-
(x_train.shape[0],) + (height, width, channels)).astype('float32') / 255.
-
-
iterations = 10000
-
batch_size = 20
-
save_dir = 'data/gan_images/'
-
# 指定保存生成 图像的目录
-
-
# Start training loop(开始循环)
-
start = 0
-
for step in range(iterations):
-
# Sample random points in the latent space(在潜在空间中采样随机点)
-
random_latent_vectors = np.random.normal(size=(batch_size, latent_dim))
-
-
# Decode them to fake images(将这些点解码为虚假图像)
-
generated_images = generator.predict(random_latent_vectors)
-
-
# Combine them with real images(将这些虚假图像与真实图像合在一起)
-
stop = start + batch_size
-
real_images = x_train[start: stop]
-
combined_images = np.concatenate([generated_images, real_images])
-
-
# Assemble labels discriminating real from fake images
-
#合并标签,区分真实和虚假的图像
-
-
labels = np.concatenate([np.ones((batch_size, 1)),
-
np.zeros((batch_size, 1))])
-
# Add random noise to the labels - important trick!
-
#向标签中添加随机噪声,这是一个很重要的技巧
-
labels += 0.05 * np.random.random(labels.shape)
-
-
# Train the discriminator(训练判别器)
-
d_loss = discriminator.train_on_batch(combined_images, labels)
-
-
# sample random points in the latent space(在潜在空间中采样随机点)
-
random_latent_vectors = np.random.normal(size=(batch_size, latent_dim))
-
-
# Assemble labels that say "all real images"(合并标签,全部是“真实图像”(这是在撒谎,通过 gan 模型)
-
misleading_targets = np.zeros((batch_size, 1))
-
-
# Train the generator (via the gan model,
-
# where the discriminator weights are frozen)
-
#来训练生成器(此时冻结判别器权重)
-
-
a_loss = gan.train_on_batch(random_latent_vectors, misleading_targets)
-
-
start += batch_size
-
if start > len(x_train) - batch_size:
-
start = 0
-
-
# Occasionally save / plot
-
if step % 100 == 0:
-
# Save model weights(保存模型权重)
-
gan.save_weights('gan.h5')
-
-
# Print metrics(将指标打印出来)
-
print('discriminator loss at step %s: %s' % (step, d_loss))
-
print('adversarial loss at step %s: %s' % (step, a_loss))
-
-
# Save one generated image(保存一张生成图像)
-
img = image.array_to_img(generated_images[0] * 255., scale=False)
-
img.save(os.path.join(save_dir, 'generated_frog' + str(step) + '.png'))
-
-
# Save one real image, for comparison(保存一张真实图像,用于对比)
-
img = image.array_to_img(real_images[0] * 255., scale=False)
-
img.save(os.path.join(save_dir, 'real_frog' + str(step) + '.png'))
下面展示生成的图像
-
import matplotlib.pyplot as plt
-
-
# sample random points in the latent space(在潜在空间中采样随机点)
-
random_latent_vectors = np.random.normal(size=(10, latent_dim))
-
-
# Decode them to fake images(将这些点解码为虚假图像)
-
generated_images = generator.predict(random_latent_vectors)
-
-
for i in range(generated_images.shape[0]):
-
img = image.array_to_img(generated_images[i] * 255., scale=False)
-
plt.figure()
-
plt.imshow(img)
-
-
plt.show()

文章来源: blog.csdn.net,作者:小小谢先生,版权归原作者所有,如需转载,请联系作者。
原文链接:blog.csdn.net/xiewenrui1996/article/details/103604491
- 点赞
- 收藏
- 关注作者


评论(0)