Linux 性能调优之资源限制(ulimit&Cgroup)

1写在前面
-
考试整理相关笔记 -
博文内容涉及 Linux 中资源限制的两种方式简单介绍 -
用户 会话资源限制 -
进程资源限制
-
-
理解不足小伙伴帮忙指正
对每个人而言,真正的职责只有一个:找到自我。然后在心中坚守其一生,全心全意,永不停息。所有其它的路都是不完整的,是人的逃避方式,是对大众理想的懦弱回归,是随波逐流,是对内心的恐惧 ——赫尔曼·黑塞《德米安》
Part1使用 Cgroups 和 ulimit 管理资源限制
在 Linux 中,资源控制有两种方式:
-
一种是基于 POSIX(依赖于PAM模块),用户会话资源限制 -
一种基于 Cgroup,主要用于进程资源限制
通过资源限制,可以对单个进程或者用户会话的资源的使用进行管理,保证系统的稳定性,以及系统上其他的用户和进程的 QOS,所以调整合理的资源限制也可以达到调优的作用。
2ulimit 会话资源限制
对于多用户的系统不限制资源本身可能就是一种不公平, 限制系统资源比较老的方式是使用 ulimit,由 PAM 模块在登录和会话启动时强制实施,ulimit 命令是bash 内置命令,主要限制了 shell 及其子进程可用的资源
ulimit 如何限制资源
在/etc/pam.d/system-auth 文件中调用了 pam_limits 模块,此模块读取 /etc/security/limits.conf 和 /etc/security/limits.d/,按配置文件设置资源限制。 查看模块帮助文档 man pam limits
/etc/pam.d/system-auth 是什么?
/etc/pam.d/system-auth 是一个 PAM(Pluggable Authentication Modules)配置文件。在 Linux 系统中,PAM 提供了一种灵活的方式来配置用户认证、授权和会话管理
该文件是一个包含 PAM 配置行的文本文件,用于定义不同的认证、授权和会话模块及其参数。PAM 模块负责处理用户登录、密码验证、权限检查等操作。
查看文件中资源限制相关的模块,有时候我们做一些基线整改,可能需要修改该文件的相关配置
┌──[root@liruilongs.github.io]-[~]
└─$cat /etc/pam.d/system-auth  | grep pam_limits
session     required                                     pam_limits.so
┌──[root@liruilongs.github.io]-[~]
└─$
在PAM配置中,pam_limits.so 模块被要求进行会话限制
PAM(Pluggable Authentication Modules)是一个用于对用户进行认证的系统级框架。pam_limits.so 模块是 PAM 框架的一部分,它用于设置会话级别的资源限制,例如进程可打开的文件数、进程可使用的内存等。
ulimit 命令是用于限制用户级别资源的工具,它通常用于控制 shell 进程及其子进程的资源使用。修改 ulimit 值只会对当前 shell 会话有效,对其他用户或系统进程不会产生影响(不一定)
通过 ulimit 是限制系统资源的一种途径,ulimit 支持 hard 和 soft 限制
#<type> can have the two values:
#        - "soft" for enforcing the soft limits
#        - "hard" for enforcing hard limits
#
#<item> can be one of the following:
#        - core - limits the core file size (KB)
#        - data - max data size (KB)
#        - fsize - maximum filesize (KB)
#        - memlock - max locked-in-memory address space (KB)
#        - nofile - max number of open file descriptors
#        - rss - max resident set size (KB)
#        - stack - max stack size (KB)
#        - cpu - max CPU time (MIN)
#        - nproc - max number of processes
#        - as - address space limit (KB)
#        - maxlogins - max number of logins for this user
#        - maxsyslogins - max number of logins on the system
#        - priority - the priority to run user process with
#        - locks - max number of file locks the user can hold
#        - sigpending - max number of pending signals
#        - msgqueue - max memory used by POSIX message queues (bytes)
#        - nice - max nice priority allowed to raise to values: [-20, 19]
#        - rtprio - max realtime priority
普通用户可以设置自己的软限制,但不能高于硬限制。可以使用 ulimit -a 查看资源限制列表
软限制 (soft maxlogins):软限制是一个警告阈值,当达到或超过该限制时,系统会发出警告信息,但不会阻止用户登录。 硬限制 (hard maxlogins):硬限制是一个严格的限制,当达到或超过该限制时,系统将阻止用户登录。
┌──[root@liruilongs.github.io]-[~]
└─$ulimit -Hn #限制数
262144
┌──[root@liruilongs.github.io]-[~]
└─$ulimit -Sn #限制数
1024
┌──[root@liruilongs.github.io]-[~]
└─$
当指定限制数时限制,不指定时输出当前设置
通过配置文件的方式对登录次数进行限制,配置 kiosk 组 在多个终端中只能同时登录 2 次
┌──[root@liruilongs.github.io]-[~]
└─$cat /etc/security/limits.conf | grep -v ^# | grep -v ^$
@kiosk soft maxlogins 2
@kiosk hard maxlogins 2
┌──[root@liruilongs.github.io]-[~]
└─$
其他的一些资源限制
-
core:核心文件大小限制(以 KB 为单位) -
data:最大数据大小限制(以 KB 为单位) -
fsize:最大文件大小限制(以 KB 为单位) -
memlock:最大锁定内存地址空间限制(以 KB 为单位) -
nofile:最大打开文件描述符数限制 -
rss:最大常驻集大小限制(以 KB 为单位) -
stack:最大堆栈大小限制(以 KB 为单位) -
cpu:最大 CPU 时间限制(以分钟为单位) -
nproc:最大进程数限制 -
as:地址空间限制(以 KB 为单位) -
maxlogins:此用户的最大登录数限制(单个用户) -
maxsyslogins:系统上的最大登录数限制(系统所有用户) -
priority:以给定优先级运行用户进程 -
locks:用户可以持有的最大文件锁数限制 -
sigpending:最大待处理信号数限制 -
msgqueue:POSIX 消息队列使用的最大内存限制(以字节为单位) -
nice:允许提高到的最大 nice 优先级值(范围:-20 到 19) -
rtprio:最大实时优先级
依次来看一下:
core - limits the core file size (KB):
corefile 文件是对正在运行的进程的内存镜像(主要目的是当进程崩溃后,可以通过 corefile 排错),默认值为 0(禁止 corefile)
核心文件是在程序发生崩溃或异常终止时生成的一种特殊文件。它包含了程序崩溃时的内存转储信息,可以用于调试和分析程序故障。通过设置 core 参数,你可以控制系统允许生成的核心文件的最大大小.
# Example limits.conf entry
*      soft    core    0
*      hard    core    unlimited
soft core 0 表示对所有用户(通配符 *)的核心文件大小进行软限制,将其限制为 0 KB。这意味着禁止生成任何核心文件。 hard core unlimited 表示对所有用户的核心文件大小进行硬限制,允许生成无限大小的核心文件。
使用 ulimit -c 命令可以查看当前用户允许生成的核心文件的最大大小。如果该值为非零,则表示核心文件是启用的,并且发生崩溃时将在当前工作目录中生成。
┌──[root@liruilongs.github.io]-[~]
└─$ulimit -c
unlimited
┌──[root@liruilongs.github.io]-[~]
└─$
核心文件的处理程序和命名规则,核心文件将由 /usr/lib/systemd/systemd-coredump 程序进行处理,该程序根据提供的参数将核心转储保存到相应的位置。%P:进程 ID(PID),%e:错误代码 ...
保存位置参数
┌──[root@liruilongs.github.io]-[~]
└─$cat /proc/sys/kernel/core_pattern
|/usr/lib/systemd/systemd-coredump %P %u %g %s %t %c %h %e
┌──[root@liruilongs.github.io]-[~]
└─$
核心转储文件的保存位置:systemd-coredump 可以根据配置将核心转储文件保存到指定的位置。通常情况下,它们会被保存在 /var/lib/systemd/coredump/ 目录下
┌──[root@liruilongs.github.io]-[~]
└─$cd /var/lib/systemd/coredump/
┌──[root@liruilongs.github.io]-[/var/lib/systemd/coredump]
└─$ls
data - max data size (KB)
用于限制单个进程的数据段(data segment)的最大大小,以 KB 为单位。数据段是进程在运行过程中存储全局变量、静态变量和堆分配的内存的区域。
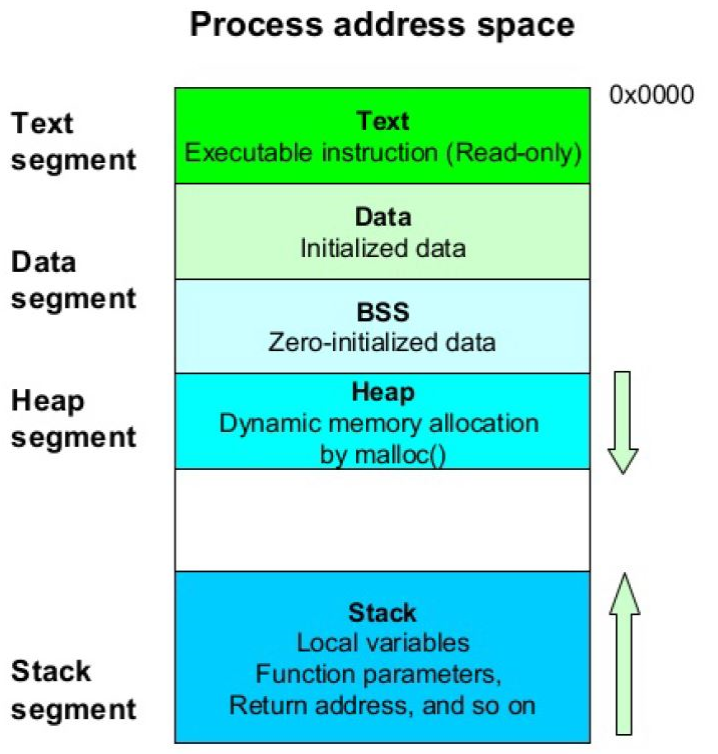 在这里插入图片描述
-
Text(文本): 存储可执行的代码: -
Data(数据): Data 初始化数据 (如变量)BSS 初始化 0 数据(初始化数据为 0) -
Heap(堆): 通过内存的 malloc 方法,动态内存分配(一般放数据) -
Stack (栈): 存储局部变量,函数等
查看当前用户限制值,并且修改
┌──[root@liruilongs.github.io]-[~]
└─$ulimit -d
unlimited
┌──[root@liruilongs.github.io]-[~]
└─$ulimit -d 4194305
┌──[root@liruilongs.github.io]-[~]
└─$ulimit -d
4194305
查看当前系统中的 data - max data size 参数值
┌──[root@liruilongs.github.io]-[~]
└─$sysctl kernel.pid_max
kernel.pid_max = 4194304
┌──[root@liruilongs.github.io]-[~]
└─$
stack - max stack size (KB)
用于限制单个进程的栈(stack)的最大大小,以 KB 为单位。栈是用于存放函数调用和局部变量的内存区域。
查看配置 栈大小
┌──[root@liruilongs.github.io]-[~]
└─$ulimit -s
8192
┌──[root@liruilongs.github.io]-[~]
└─$ulimit -s6
┌──[root@liruilongs.github.io]-[~]
└─$ulimit -s
6
这里我们配置 单个进程栈大小为 16
┌──[root@liruilongs.github.io]-[~]
└─$ulimit -s 16
┌──[root@liruilongs.github.io]-[~]
└─$ulimit  -a | grep stack
stack size              (kbytes, -s) 16
运行 ls /etc/ 命令时,发生了段错误,并生成了一个核心转储文件。
┌──[root@liruilongs.github.io]-[~]
└─$ls /etc/
Segmentation fault (core dumped)
因为我们上面设置了 栈的大小,执行的命令存在栈溢出的情况,所以提示
Segmentation fault (core dumped) 是一个错误消息,通常表示程序在访问无效的内存区域时发生了段错误。这可能是由于编程错误、内存损坏、栈溢出或其他原因导致的。
这里正好遇到第一个看到的 限制参数 corefile , 一起排查一下
到 corefile 的文件位置,可以看到生成了一个崩溃文件
┌──[root@liruilongs.github.io]-[/var/lib/systemd/coredump]
└─$ls
core.ls.0.b8a76ac3ad1b411385973f9bcd0358e5.6767.1695224215000000.lz4
也可以通过命令行的方式查看 coredumpctl list
┌──[root@liruilongs.github.io]-[/var/lib/systemd/coredump]
└─$coredumpctl list
TIME                            PID   UID   GID SIG COREFILE  EXE
Wed 2023-09-20 23:36:55 CST    6767     0     0  11 present   /usr/bin/ls
运行以下命令以启动 gdb 并加载核心转储文件
┌──[root@liruilongs.github.io]-[/var/lib/systemd/coredump]
└─$coredumpctl gbd 6767
Unknown operation gbd.
┌──[root@liruilongs.github.io]-[/var/lib/systemd/coredump]
└─$coredumpctl gdb 6767
           PID: 6767 (ls)
           UID: 0 (root)
           GID: 0 (root)
        Signal: 11 (SEGV)
     Timestamp: Wed 2023-09-20 23:36:55 CST (2min 38s ago)
    Executable: /usr/bin/ls
 Control Group: /user.slice/user-0.slice/session-5.scope
          Unit: session-5.scope
         Slice: user-0.slice
       Session: 5
     Owner UID: 0 (root)
       Boot ID: b8a76ac3ad1b411385973f9bcd0358e5
    Machine ID: 84136345e7d24e3286fd7c657f4e1cda
      Hostname: liruilongs.github.io
       Storage: /var/lib/systemd/coredump/core.ls.0.b8a76ac3ad1b411385973f9bcd0358e5.6767.1695224215000000.lz4
       Message: Process 6767 (ls) of user 0 dumped core.

                Stack trace of thread 6767:
                #0  0x00007fb8c122a53b n/a (n/a)

Failed to invoke gdb: No such file or directory
被告知 没有 gdb 这个文件,所有我们安装一下, 通过上面的输出信息,可以看到
-
Signal 11 (SEGV)关键字,表示发生了段错误。段错误通常是由于程序访问了无效的内存地址导致的。 -
Executable: /usr/bin/ls: 错误发生在 ls 可执行文件(/usr/bin/ls)中
┌──[root@liruilongs.github.io]-[/var/lib/systemd/coredump]
└─$yum -y install gdb
Updating Subscription Management repositories.
Unable to read consumer identity
This system is not registered to Red Hat Subscription Management. You can use subscription-manager to register.
Last metadata expiration check: 1:39:24 ago on Wed 20 Sep 2023 10:02:04 PM CST.
Dependencies resolved.
=======================================================================================================
 Package              Arch        Version              Repository                                 Size
=======================================================================================================
Installing:
 gdb                  x86_64      8.2-11.el8           ucf-rhel-8-for-x86_64-appstream-rpms      297 k
Installing dependencies:
 annobin              x86_64      8.90-1.el8           ucf-rhel-8-for-x86_64-appstream-rpms      202 k
 cpp                  x86_64      8.3.1-5.el8          ucf-rhel-8-for-x86_64-appstream-rpms       10 M
 gc                   x86_64      7.6.4-3.el8          ucf-rhel-8-for-x86_64-appstream-rpms      109 k
 gcc                  x86_64      8.3.1-5.el8          ucf-rhel-8-for-x86_64-appstream-rpms       23 M
 gdb-headless         x86_64      8.2-11.el8           ucf-rhel-8-for-x86_64-appstream-rpms      3.7 M
 .....................
安装好之后在次运行
┌──[root@liruilongs.github.io]-[/var/lib/systemd/coredump]
└─$coredumpctl gdb 6767
           PID: 6767 (ls)
           UID: 0 (root)
           GID: 0 (root)
        Signal: 11 (SEGV)
     Timestamp: Wed 2023-09-20 23:36:55 CST (5min ago)
    Executable: /usr/bin/ls
 Control Group: /user.slice/user-0.slice/session-5.scope
          Unit: session-5.scope
         Slice: user-0.slice
       Session: 5
     Owner UID: 0 (root)
       Boot ID: b8a76ac3ad1b411385973f9bcd0358e5
    Machine ID: 84136345e7d24e3286fd7c657f4e1cda
      Hostname: liruilongs.github.io
       Storage: /var/lib/systemd/coredump/core.ls.0.b8a76ac3ad1b411385973f9bcd0358e5.6767.1695224215000000.lz4
       Message: Process 6767 (ls) of user 0 dumped core.

                Stack trace of thread 6767:
                #0  0x00007fb8c122a53b n/a (n/a)

GNU gdb (GDB) Red Hat Enterprise Linux 8.2-11.el8
Copyright (C) 2018 Free Software Foundation, Inc.
License GPLv3+: GNU GPL version 3 or later <http://gnu.org/licenses/gpl.html>
This is free software: you are free to change and redistribute it.
There is NO WARRANTY, to the extent permitted by law.
Type "show copying" and "show warranty" for details.
This GDB was configured as "x86_64-redhat-linux-gnu".
Type "show configuration" for configuration details.
For bug reporting instructions, please see:
<http://www.gnu.org/software/gdb/bugs/>.
Find the GDB manual and other documentation resources online at:
    <http://www.gnu.org/software/gdb/documentation/>.

For help, type "help".
Type "apropos word" to search for commands related to "word"...
Reading symbols from /usr/bin/ls...Reading symbols from .gnu_debugdata for /usr/bin/ls...(no debugging symbols found)...done.
(no debugging symbols found)...done.
[New LWP 6767]
Core was generated by `ls --color=auto /etc LS_COLORS=rs=0:di=38;5;33:ln=38;5;51:mh=00:pi=40;38;5;11:s'.
Program terminated with signal SIGSEGV, Segmentation fault.
#0  0x00007fb8c122a53b in ?? ()
Missing separate debuginfos, use: yum debuginfo-install coreutils-8.30-6.el8.x86_64
(gdb) bt
#0  0x00007fb8c122a53b in ?? ()
Backtrace stopped: Cannot access memory at address 0x7ffc1adcfdb8
(gdb)
堆栈跟踪显示崩溃发生在地址 0x00007fb8c122a53b 处,但该地址没有可用的符号信息。使用 gdb 调试器分析核心转储文件。
当在 gdb 中执行 bt 命令时,它试图提供程序在崩溃点处的执行回溯。然而,在这种情况下,它无法访问地址 0x7ffc1adcfdb8 处的内存
OK ,先看到这里,我们还原一下配置
┌──[root@liruilongs.github.io]-[~]
└─$ulimit -s8192
fsize - maximum filesize (KB)
fsize 通常是指文件大小的最大限制。文件大小通常以字节为单位进行表示
查看修改配置
┌──[root@liruilongs.github.io]-[~]
└─$ulimit -f
unlimited
修改配置
┌──[root@liruilongs.github.io]-[~]
└─$ulimit -f 1500
┌──[root@liruilongs.github.io]-[~]
└─$ulimit -Hf
1500
设置软限制大于硬限制,提示无法调整(软限制不可以超过硬限制)
┌──[root@liruilongs.github.io]-[~]
└─$ulimit -Sf 1600
-bash: ulimit: file size: cannot modify limit: Invalid argument
如果配置太小的话,创建一个文件会提示 超过了文件大小限制
┌──[root@liruilongs.github.io]-[~]
└─$dd if=/dev/zero of=a bs=3M count=1
File size limit exceeded (core dumped)
┌──[root@liruilongs.github.io]-[~]
└─$
查看文件大小的限制的 软限制和硬限制
┌──[root@liruilongs.github.io]-[~]
└─$ulimit -f 1500
┌──[root@liruilongs.github.io]-[~]
└─$ulimit -H -f
1500
┌──[root@liruilongs.github.io]-[~]
└─$ulimit -S -f
1500
┌──[root@liruilongs.github.io]-[~]
└─$
memlock - max locked-in-memory address space (KB)
memlock 参数用于设置进程的最大锁定内存地址空间(locked-in-memory address space)的大小。锁定内存是指将内存页固定在物理内存中,防止其被交换到磁盘上,从而提高对这些内存页的访问速度。
查看设置 memlock 配置
┌──[root@liruilongs.github.io]-[/usr/lib/tuned]
└─$ulimit  -l
64
┌──[root@liruilongs.github.io]-[/usr/lib/tuned]
└─$ulimit  -Hl
64
┌──[root@liruilongs.github.io]-[/usr/lib/tuned]
└─$ulimit  -Sl
64
┌──[root@liruilongs.github.io]-[/usr/lib/tuned]
└─$ulimit  -l 1500
┌──[root@liruilongs.github.io]-[/usr/lib/tuned]
└─$ulimit  -Hl
1500
┌──[root@liruilongs.github.io]-[/usr/lib/tuned]
└─$
nofile - max number of open file descriptors
nofile 参数用于设置进程的最大打开文件描述符数(max number of open file descriptors)。文件描述符是用于访问文件或输入/输出设备的整数标识符。
修改进程打开文件描述符为 3
┌──[root@liruilongs.github.io]-[~]
└─$ulimit -n
1024
┌──[root@liruilongs.github.io]-[~]
└─$ulimit -n 3
查看文件直接保存
┌──[root@liruilongs.github.io]-[~]
└─$cat /et-bash: /dev/null: Too many open files
-bash: redirection error: cannot duplicate fd: Too many open files
-bash: 2: Too many open files
-bash: /dev/null: Too many open files
-bash: redirection error: cannot duplicate fd: Too many open files
-bash: 2: Too many open files

-bash: start_pipeline: pgrp pipe: Too many open files
cat: error while loading shared libraries: libc.so.6: cannot open shared object file: Error 24
系统中打开的文件描述符数量已达到或超过了限制,导致无法再打开更多的文件
恢复配置,正常生产情况下 nofile 会配置相对大一点,尤其部署了数据库相关应用
┌──[root@liruilongs.github.io]-[~]
└─$ulimit -n 1024
┌──[root@liruilongs.github.io]-[~]
└─$cat /etc/
Display all 289 possibilities? (y or n)^C
┌──[root@liruilongs.github.io]-[~]
└─$
rss - max resident set size (KB)
rss 参数用于设置进程的最大驻留集大小(max resident set size)。驻留集是指进程当前在物理内存中使用的内存量
┌──[kiosk@liruilongs.github.io]-[~]
└─$ulimit  -m
1000
┌──[kiosk@liruilongs.github.io]-[~]
└─$ulimit -m 500
┌──[kiosk@liruilongs.github.io]-[~]
└─$ulimit  -m
500
┌──[kiosk@liruilongs.github.io]-[~]
└─$ulimit  -Hm
500
┌──[kiosk@liruilongs.github.io]-[~]
└─$ulimit  -Sm
500
cpu - max CPU time (MIN)
ulimit -t <minutes> 限制进程能够使用的 CPU 时间,设置的最大 CPU 时间限制,以分钟为单位
看一个 Demo,,这个 Demo 中,我们设置 最大 CPU 时间为 1 分钟,但是我们写了一个 特别消耗 CPU 的 脚本
┌──[root@liruilongs.github.io]-[~]
└─$ulimit  -t 1
┌──[root@liruilongs.github.io]-[~]
└─$ulimit  -Ht
1
┌──[root@liruilongs.github.io]-[~]
└─$python3 cpu_demo.py
Killed
┌──[root@liruilongs.github.io]-[~]
└─$cat /var/log/messages | grep -i  Killed
Oct  1 12:37:27 liruilongs rhsmd[60537]: rhsmd process exceeded runtime and was killed.
执行时间超过一分钟,所以会被 Kill 掉。我们可以看日志提示,超过运行时间被 Kill 掉
测试的 py 脚本
┌──[root@liruilongs.github.io]-[~]
└─$cat cpu_demo.py
#!/usr/bin/env python
# -*- encoding: utf-8 -*-
"""
@File    :   cpu_demo.py
@Time    :   2023/10/20 07:07:04
@Author  :   Li Ruilong
@Version :   1.0
@Contact :   liruilonger@gmail.com
@Desc    :   CPU 限制测试脚本
"""
import time

def cpu_intensive_task():
    start_time = time.time()
    while True:
        # 模拟计算密集型任务
        for i in range(1000000):
            result = i * i
        elapsed_time = time.time() - start_time
        if elapsed_time >= 70:  # 设置运行时间为1分钟多一点
            break

if __name__ == '__main__':
    cpu_intensive_task()
修改 cpu 参数时间为 15 分钟,脚本顺利执行。
┌──[root@liruilongs.github.io]-[~]
└─$ulimit  -t 15
┌──[root@liruilongs.github.io]-[~]
└─$ulimit  -Ht
15
┌──[root@liruilongs.github.io]-[~]
└─$python3 cpu_demo.py
┌──[root@liruilongs.github.io]-[~]
└─$
nproc - max number of processes
最大进程数设置,对普通用户有效,设置运行的最大进程数,超过最大进程数,会提示资源暂时不可用。
这里写个 shell,创建 30 个 sleep 进程
$cat demo.sh
#!/bin/bash

for i in `seq 30`
do
        sleep 100 &
done
┌──[kiosk@liruilongs.github.io]-[~]
└─$
修改最大进程数为 5 ,运行脚本,提示资源暂时不可用。
┌──[root@liruilongs.github.io]-[~]
└─$ulimit -u 5
┌──[root@liruilongs.github.io]-[~]
└─$chmod 777 demo.sh
┌──[root@liruilongs.github.io]-[~]
└─$./demo.sh
┌──[root@liruilongs.github.io]-[~]
└─$cp demo.sh /home/kiosk/
┌──[root@liruilongs.github.io]-[~]
└─$su kiosk
┌──[kiosk@liruilongs.github.io]-[/root]
└─$cd ~
┌──[kiosk@liruilongs.github.io]-[~]
└─$./demo.sh
./demo.sh: fork: retry: Resource temporarily unavailable
./demo.sh: fork: retry: Resource temporarily unavailable
./demo.sh: fork: retry: Resource temporarily unavailable
^C
调整 nproc 的参数,可以顺利执行。
┌──[kiosk@liruilongs.github.io]-[~]
└─$exit
┌──[root@liruilongs.github.io]-[~]
└─$ulimit -u 158240
┌──[root@liruilongs.github.io]-[~]
└─$su kiosk
┌──[kiosk@liruilongs.github.io]-[/root]
└─$cd ~
┌──[kiosk@liruilongs.github.io]-[~]
└─$./demo.sh
这是一个生产中比较常见的一个场景,一般是开发代码的有问题,比如 SFTP 连接一直创建,不关闭
as - address space limit (KB)
进程的虚拟地址空间限制,以 KB 为单位
┌──[root@liruilongs.github.io]-[~]
└─$ulimit -v 8186
┌──[root@liruilongs.github.io]-[~]
└─$ls
ls: error while loading shared libraries: libc.so.6: failed to map segment from shared object
修改 as 的大小之后,提示 ls 命令无法加载共享库 libc.so.6,并且无法从共享对象映射段
在此调整提示段错误,可能存在内存溢出,
┌──[root@liruilongs.github.io]-[~]
└─$ulimit -v 1024
┌──[root@liruilongs.github.io]-[~]
└─$ls
Segmentation fault
出现了段错误,调整为默认值,可以正常展示
┌──[root@liruilongs.github.io]-[~]
└─$ulimit -v unlimited
┌──[root@liruilongs.github.io]-[~]
└─$ls
a                                                         Documents                                                  Public
anaconda-ks.cfg                                           Downloads                                                  report.out
ClassPrep-8.x-7.r2020120320gitbe9ba2b.txt                 foundation0-config-8.x-
.............
┌──[root@liruilongs.github.io]-[~]
└─$
maxlogins - max number of logins for this user
用户的最大登录数限制 ,这个我们前面有讲到,用于限制单个用户的最多登录次数,
这个没有快捷方式,只能通配置文件的方式,需要修改配置文件 /etc/security/limits.conf
<username> hard maxlogins <value>
maxsyslogins - max number of logins on the system
系统最多允许几个人登录,只对普通用户有效。没有快捷方式,只能通过配置文件的方式
* hard maxlogins <number>
priority - the priority to run user process with(scheduling priority)
限制 nice 优先级的范围,这个值仅对 普通用户有效,管理员无效,在用户启动进程的时候,可以通过 nice 命令调整进程的优先级。
这个 Demo 有问题,没有做出来,时间关系之后在看下一下
nice - max nice priority allowed to raise to values: [-20, 19]
允许调节的 nice 值的范围,默认值为 -20 到 19, 对普通用户有效,这个值和上面的值不太明白
locks - max number of file locks the user can hold
每个用户最多可以拥有多少个文件锁
sigpending - max number of pending signals
最大挂起的信号数量,对所有用户有效,信号已经产生但未处理的信号为挂起信号
当前 Linux 支持的所有的信号
┌──[root@liruilongs.github.io]-[~]
└─$kill -l
 1) SIGHUP       2) SIGINT       3) SIGQUIT      4) SIGILL       5) SIGTRAP
 6) SIGABRT      7) SIGBUS       8) SIGFPE       9) SIGKILL     10) SIGUSR1
11) SIGSEGV     12) SIGUSR2     13) SIGPIPE     14) SIGALRM     15) SIGTERM
16) SIGSTKFLT   17) SIGCHLD     18) SIGCONT     19) SIGSTOP     20) SIGTSTP
21) SIGTTIN     22) SIGTTOU     23) SIGURG      24) SIGXCPU     25) SIGXFSZ
26) SIGVTALRM   27) SIGPROF     28) SIGWINCH    29) SIGIO       30) SIGPWR
31) SIGSYS      34) SIGRTMIN    35) SIGRTMIN+1  36) SIGRTMIN+2  37) SIGRTMIN+3
38) SIGRTMIN+4  39) SIGRTMIN+5  40) SIGRTMIN+6  41) SIGRTMIN+7  42) SIGRTMIN+8
43) SIGRTMIN+9  44) SIGRTMIN+10 45) SIGRTMIN+11 46) SIGRTMIN+12 47) SIGRTMIN+13
48) SIGRTMIN+14 49) SIGRTMIN+15 50) SIGRTMAX-14 51) SIGRTMAX-13 52) SIGRTMAX-12
53) SIGRTMAX-11 54) SIGRTMAX-10 55) SIGRTMAX-9  56) SIGRTMAX-8  57) SIGRTMAX-7
58) SIGRTMAX-6  59) SIGRTMAX-5  60) SIGRTMAX-4  61) SIGRTMAX-3  62) SIGRTMAX-2
63) SIGRTMAX-1  64) SIGRTMAX
┌──[root@liruilongs.github.io]-[~]
└─$
msgqueue - max memory used by POSIX message queues (bytes)
设置消息队列能够使用的内存大小,也就是最大创建多大的消息队列(默认 800KB )
消息队列是IPC(进程间通信)的一种方式,如管道就可以实现进程间通信,消息队列也可以实现进程间通信。
进程间通信的方式:管道,共享内存,socket,消息队列,堆栈,信号
但不同的是,管道要求发送消息时,对方进程必须在监听管道接受消息而消息队列允许一个进程发送消息到队列(第一个进程可以关闭了),随后任意时间另一个进程启动,接着到队列中读取消息.
rtprio - max realtime priority
rtprio 是一个与实时优先级相关的参数,在 Linux 系统中用于设定最大实时优先级。
3Systemd 使用Cgroup进行资源限制
Systemd 是 Linux 中第一个启动的进程,PID 为 1 ,可以看做是其他进程的引导进程,通过 systemd 可以实现下面三种种方式的资源限制,这里实际上是都是基于 Cgroup 来做的。
-
直接把限制的配置文件写到 unit文件中 -
通过 drop-in文件设置参数 -
使用 systemctl set-property限制
关于 Cgroup 是什么这里不多介绍,文末会简单说明一下
通过 unit 单元文件进行限制
先来看第一种,直接把配置文件写到 unit 文件中,创建下面的 service unit 配置文件
┌──[root@liruilongs.github.io]-[~]
└─$systemctl cat demo.service
# /etc/systemd/system/demo.service
[Unit]
Description=Demo Service,这是一个 资源限制的Demo服务
After=network.target

[Service]
ExecStart= sleep 300
CPUAccounting=true
MemoryLimit=1G

[Install]
WantedBy=multi-user.target

┌──[root@liruilongs.github.io]-[~]
└─$
这里我们对 CPU 和内存做了限制,启用了 CPU 账户和内存限制,运行服务后,查看服务状态
┌──[root@liruilongs.github.io]-[~]
└─$systemctl status demo.service
● demo.service - Demo Service,这是一个 资源限制的Demo服务
   Loaded: loaded (/etc/systemd/system/demo.service; disabled; vendor preset: disabled)
   Active: active (running) since Tue 2023-10-03 17:27:32 CST; 2min 24s ago
 Main PID: 20256 (sleep)
    Tasks: 1 (limit: 253184)
   Memory: 168.0K (limit: 1.0G)
      CPU: 1ms
   CGroup: /system.slice/demo.service
           └─20256 /usr/bin/sleep 300

Oct 03 17:27:32 liruilongs.github.io systemd[1]: Started Demo Service,这是一个 资源限制的Demo服务.
从服务状态的信息中可以看到,默认如果没有定义 slice 的话,当前 service 文件会在当前系统的 slice 下面。
也可以通过下面查看对应的层级关系
┌──[root@liruilongs.github.io]-[~]
└─$systemctl show demo.service -p Slice
Slice=system.slice
┌──[root@liruilongs.github.io]-[~]
└─$systemctl status system.slice | grep -A 1 demo
           ├─demo.service
           │ └─20560 /usr/bin/sleep 300
┌──[root@liruilongs.github.io]-[~]
└─$
如果希望查看对应的 cgroup 限制,可以在 /proc 目录下找对对应的 CGROUP 信息
┌──[root@liruilongs.github.io]-[~]
└─$cat /proc/20256/cgroup
12:devices:/system.slice
11:perf_event:/
10:rdma:/
9:blkio:/system.slice
8:hugetlb:/
7:net_cls,net_prio:/
6:cpuset:/
5:pids:/system.slice/demo.service
4:freezer:/
3:cpu,cpuacct:/system.slice/demo.service
2:memory:/system.slice/demo.service
1:name=systemd:/system.slice/demo.service
┌──[root@liruilongs.github.io]-[~]
└─$systemctl show demo.service -p Slice
Slice=system.slice
我们在 demo.service 中定义了对应的 CPU 和内存的资源限制,所以可以看到 cpu ,memory 的资源限制都是由 demo.service 来控制的。其他一些限制有 Cgroup 父层级 system.slice 控制。
当然,也可以定义自己的 slice,在一般情况下,为了对进程进行独立控制,都会创建独立的 slice 。在看一个 Demo
┌──[root@liruilongs.github.io]-[~]
└─$systemctl  cat demo.slice
# /etc/systemd/system/demo.slice
[Unit]
Description=Demo Service Slice

[Slice]
CPUAccounting=true
MemoryLimit=2G

[Install]
WantedBy=multi-user.target
创建了一个 slice
┌──[root@liruilongs.github.io]-[~]
└─$systemctl  cat demo.service
# /etc/systemd/system/demo.service
[Unit]
Description=Demo Service,这是一个 资源限制的Demo服务
After=network.target

[Service]
ExecStart= sleep 300
Slice=demo.slice


[Install]
WantedBy=multi-user.target

┌──[root@liruilongs.github.io]-[~]
└─$
我们重写了 serivce unit 单元文件,并且添加了对应的 demo.slice 文件,重启服务
┌──[root@liruilongs.github.io]-[~]
└─$systemctl status demo.service
● demo.service - Demo Service,这是一个 资源限制的Demo服务
   Loaded: loaded (/etc/systemd/system/demo.service; disabled; vendor preset: disabled)
   Active: active (running) since Tue 2023-10-03 18:03:18 CST; 28s ago
 Main PID: 21189 (sleep)
    Tasks: 1 (limit: 253184)
   Memory: 164.0K
   CGroup: /demo.slice/demo.service
           └─21189 /usr/bin/sleep 300

Oct 03 18:03:18 liruilongs.github.io systemd[1]: Started Demo Service,这是一个 资源限制的Demo服务.
可以发现 dmoe.service 的上层 Cgroup 为 demo.slice ,不是前面的 system.slice
查看 Cgroup slice 相关配置
┌──[root@liruilongs.github.io]-[~]
└─$systemctl show demo.service -p Slice
Slice=demo.slice
┌──[root@liruilongs.github.io]-[~]
└─$cat /proc/21189/cgroup
12:devices:/demo.slice
11:perf_event:/
10:rdma:/
9:blkio:/demo.slice
8:hugetlb:/
7:net_cls,net_prio:/
6:cpuset:/
5:pids:/demo.slice/demo.service
4:freezer:/
3:cpu,cpuacct:/demo.slice
2:memory:/demo.slice/demo.service
1:name=systemd:/demo.slice/demo.service
这里 demo.slice 这个 Cgroup 层级只是为 demo.service 服务的,所以我们可以直接查看
┌──[root@liruilongs.github.io]-[~]
└─$systemctl status demo.slice
● demo.slice - Demo Service Slice
   Loaded: loaded (/etc/systemd/system/demo.slice; disabled; vendor preset: disabled)
   Active: active since Tue 2023-10-03 18:03:18 CST; 1min 23s ago
    Tasks: 1
   Memory: 164.0K (limit: 2.0G)
      CPU: 1ms
   CGroup: /demo.slice
           └─demo.service
             └─21189 /usr/bin/sleep 300

Oct 03 18:03:18 liruilongs.github.io systemd[1]: Created slice Demo Service Slice.
┌──[root@liruilongs.github.io]-[~]
└─$
通过 drop-in 文件进行设置
在限制之前,我们看一个服务的单元文件。下面为 k8s 中 kubelet 服务的单元文件,在 k8s 中 kubelet 可以看做是一个 Node 上的代理服务,用于计算节点和控制节点交互。
┌──[root@vms82.liruilongs.github.io]-[~]
└─$systemctl status kubelet.service
● kubelet.service - kubelet: The Kubernetes Node Agent
   Loaded: loaded (/usr/lib/systemd/system/kubelet.service; enabled; vendor preset: disabled)
  Drop-In: /usr/lib/systemd/system/kubelet.service.d
           └─10-kubeadm.conf
   Active: active (running) since Sun 2022-06-12 14:58:48 CST; 1 months 1 days ago
     Docs: https://kubernetes.io/docs/
 Main PID: 970 (kubelet)
   Memory: 194.4M
   CGroup: /system.slice/kubelet.service
           └─970 /usr/bin/kubelet --bootstrap-kubeconfig=/etc/kubernetes/bootstrap-kubelet.conf --kubeconfig=/etc/kubernetes/kubelet.conf --pod-manifest-path=/etc/kubernetes/kubelet.d --config=/var/lib/kubelet/config.yaml --network-plugin=cni --pod-infra-container-image=registry.aliyuncs.com/google_containers/pause:3.5
可以看到,区别于其他的配置文件,这里多了一个 下面的配置,这就是 drop-in 的方式,
 Drop-In: /usr/lib/systemd/system/kubelet.service.d
           └─10-kubeadm.conf
Drop-In目录 /usr/lib/systemd/system/kubelet.service.d 。这个目录中所有后缀为 ".conf" 的文件将在单元文件本身被解析之后被解析,所以说 kubelet.service 单元文件的值可能会被覆盖。
看一个 Demo ,任然使用之前的 demo.service 服务
新建对应服务的目录,然后创建对应的 *.conf 文件
┌──[root@liruilongs.github.io]-[~]
└─$mkdir /etc/systemd/system/demo.service.d/
┌──[root@liruilongs.github.io]-[~]
└─$vim /etc/systemd/system/demo.service.d/demo.conf
┌──[root@liruilongs.github.io]-[~]
└─$systemctl daemon-reload
┌──[root@liruilongs.github.io]-[~]
└─$systemctl start demo.service
┌──[root@liruilongs.github.io]-[~]
└─$systemctl status demo.service
● demo.service - Demo Service,这是一个 资源限制的Demo服务
   Loaded: loaded (/etc/systemd/system/demo.service; disabled; vendor preset: disabled)
  Drop-In: /etc/systemd/system/demo.service.d
           └─demo.conf
   Active: active (running) since Tue 2023-10-03 18:46:32 CST; 9s ago
 Main PID: 21879 (sleep)
    Tasks: 1 (limit: 253184)
   Memory: 164.0K
   CGroup: /demo.slice/demo.service
           └─21879 /usr/bin/sleep 300

Oct 03 18:46:32 liruilongs.github.io systemd[1]: Started Demo Service,这是一个 资源限制的Demo服务.
可以看到加载了 prod-in 配置文件,通过 systemctl cat 命令我们可以查看全部的配置信息
┌──[root@liruilongs.github.io]-[~]
└─$systemctl  cat demo.service
# /etc/systemd/system/demo.service
[Unit]
Description=Demo Service,这是一个 资源限制的Demo服务
After=network.target

[Service]
ExecStart= sleep 300
Slice=demo.slice


[Install]
WantedBy=multi-user.target


# /etc/systemd/system/demo.service.d/demo.conf
[Service]
LimitCPU=20s
添加了一个 CPU 使用时间的限制
使用 systemctl set-property 方式
使用命令列来限定 httpd.service 的 CPU 和内存占用量
# 如需使用命令列来限定 httpd.service 的 CPU 和内存占用量,请输入:
systemctl set-property httpd.service CPUShares=600 MemoryLimit=500M
此更改为临时更改,请添加 --runtime
# 如希望此更改为临时更改,请添加 --runtime 选项:
systemctl set-property --runtime httpd.service CPUShares=600 MemoryLimit=500M
查看修改,我们会发现没有直接写入httpd.service配置文件,而是写入到目录下的文件里
┌──[root@liruilongs.github.io]-[~]
└─$ systemctl set-property httpd.service BlockIOAccounting=true
┌──[root@liruilongs.github.io]-[~]
└─$ systemctl set-property httpd.service CPUShares=600 MemoryLimit=500M
┌──[root@liruilongs.github.io]-[~]
└─$ cat  /etc/systemd/system/httpd.service.d/50-CPUShares.conf
[Service]
CPUShares=600
┌──[root@liruilongs.github.io]-[~]
└─$ cat  /etc/systemd/system/httpd.service.d/50-MemoryLimit.conf
[Service]
MemoryLimit=524288000
┌──[root@liruilongs.github.io]-[~]
└─$ cat  /etc/systemd/system/httpd.service.d/50-BlockIOAccounting.conf
[Service]
BlockIOAccounting=yes
┌──[root@liruilongs.github.io]-[~]
└─$
4Cgroup(Control Groups)
Cgroup(Control Groups)最早由 google 开发,后来内置到了 Linux 内核中,是Linux kernel(Linux内核)的一项功能,目前是很多虚拟化容器技术的底层核心技术。
容器内存限制:-m 200M
┌──[root@liruilongs.github.io]-[/]
└─$ docker run -itd --name=c2 -m 200M  centos
3b2df1738e84159f4fa02dadbfc285f6da8ddde4d94cb449bc775c9a70eaa4ea
┌──[root@liruilongs.github.io]-[/]
└─$ docker stats
CONTAINER ID   NAME      CPU %     MEM USAGE / LIMIT     MEM %     NET I/O     BLOCK I/O         PIDS
3b2df1738e84   c2        0.00%     528KiB / 200MiB       0.26%     648B / 0B   0B / 0B           1
55e45b34d93d   c1        0.00%     8.684MiB / 3.843GiB   0.22%     648B / 0B   30.5MB / 11.5MB   2
对容器CPU的限制:-cpuset-cpus 0
┌──[root@liruilongs.github.io]-[/]
└─$ ps mo pid,psr $(pgrep cat)
┌──[root@liruilongs.github.io]-[/]
└─$ docker run -itd --name=c3 --cpuset-cpus 0 -m 200M  centos
a771eed8c7c39cd410bd6f43909a67bfcf181d87fcafffe57001f17f3fdff408
在一个系统中运行的层级制进程组,Cgroup 可对其进行资源分配(如CPU时间、系统内存、网络带宽或者这些资源的组合)。
通过使用cgroup ,系统管理员在分配、排序、拒绝、管理和监控系统资源等方面,可以进行精细化控制。硬件资源可以在应用程序和用户间智能分配,从而增加整体效率。
Cgroup可对进程进行层级式分组并标记,并对其可用资源进行限制。
传统情况下,所有的进程分得的系统资源数量相近,管理员用进程niceness值进行调节。
但是用niceness值进行调节,包含大量进程的应用程序可以比包含少量进程的应用程序获得更多资源,这与应用程序的重要程度无关。
通过将cgroup层级系统与systemd单位树捆绑, Linux 可以把资源管理设置从进程级别移至应用程序级别。
可以使用systemctl指令,或者通过修改systemd单位文件来管理系统资源。
为了控制重要的内核资源,systemd 会自动挂载/sys/fs/cgroup 目录实现 cgroup 分层架构,Linux 内核的资源管理器,也叫 CGroup 子系统,代表某一种单一资源(如 CPU 时间或内存等
Linux 内核提供了一系列资源管理器,由 systemd 自动挂载。如果需要查看已经挂载的资源管理器列表,可以参考/proc/cgroups
可用的资源管理器:
可以进行限制的资源列表
-
blkio: 对块设备的输入、输出进行限制 -
cpu: 使用 CPU 调度程序让 cgruop 的任务可用获取合理的 CPU 时间,她与 cpuacct 管理器一起挂载在同一目录上。 -
cpuacct:自动生成 cgruop 中任务占用 CPU 资源的报告 -
cpuset: 给 cgroup 中的任务分配独立的 CPU 和内存节点 -
devices:允许或禁止 cgroup 中的任务读写设备。 -
freezer: 暂停或恢复 cgroup 中的任务。 -
memory: 对 cgroup 中的任务使用内存量进行限制,并且自动生成任务占用内存资源的报告 -
net_cls: 使用等级标识符(classid)标记网络数据包,可以让 Linux 流量控制器识别特定 cgroup 任务的数据包。 -
perf-event:许使用 pef 工具监控cgroup。 -
hugetlb:允许使用大的虚拟内存页,并为这些内存设置强制可用资源量
在安装了 kernel-doc 软件包后,可以在/usr/share/doc/kernel-doc-<version>/Documentation/cgroup 目录下找相关管理器的说明文档,从而配置合适的资源限制
┌──[root@liruilongs.github.io]-[/usr/share/doc/kernel-doc-4.18.0/Documentation/cgroup-v1]
└─$ls
00-INDEX              cgroups.txt  cpusets.txt  freezer-subsystem.txt  memcg_test.txt  net_cls.txt   pids.txt
blkio-controller.txt  cpuacct.txt  devices.txt  hugetlb.txt            memory.txt      net_prio.txt  rdma.txt
┌──[root@liruilongs.github.io]-[/usr/share/doc/kernel-doc-4.18.0/Documentation/cgroup-v1]
└─$ll
total 184
-r--r--r--. 1 root root   939 Mar 27  2020 00-INDEX
-r--r--r--. 1 root root 15532 Mar 27  2020 blkio-controller.txt
-r--r--r--. 1 root root 26828 Mar 27  2020 cgroups.txt
-r--r--r--. 1 root root  1972 Mar 27  2020 cpuacct.txt
-r--r--r--. 1 root root 37219 Mar 27  2020 cpusets.txt
-r--r--r--. 1 root root  4370 Mar 27  2020 devices.txt
-r--r--r--. 1 root root  4909 Mar 27  2020 freezer-subsystem.txt
-r--r--r--. 1 root root  1714 Mar 27  2020 hugetlb.txt
-r--r--r--. 1 root root  8480 Mar 27  2020 memcg_test.txt
-r--r--r--. 1 root root 37743 Mar 27  2020 memory.txt
-r--r--r--. 1 root root  1267 Mar 27  2020 net_cls.txt
-r--r--r--. 1 root root  2513 Mar 27  2020 net_prio.txt
-r--r--r--. 1 root root  3108 Mar 27  2020 pids.txt
-r--r--r--. 1 root root  4410 Mar 27  2020 rdma.txt
简单的信息可以通过索引文件的了解
┌──[root@liruilongs.github.io]-[/usr/share/doc/kernel-doc-4.18.0/Documentation/cgroup-v1]
└─$cat 00-INDEX
00-INDEX
        - this file
blkio-controller.txt
        - Description for Block IO Controller, implementation and usage details.
cgroups.txt
        - Control Groups definition, implementation details, examples and API.
cpuacct.txt
        - CPU Accounting Controller; account CPU usage for groups of tasks.
cpusets.txt
        - documents the cpusets feature; assign CPUs and Mem to a set of tasks.
admin-guide/devices.rst
        - Device Whitelist Controller; description, interface and security.
freezer-subsystem.txt
        - checkpointing; rationale to not use signals, interface.
hugetlb.txt
        - HugeTLB Controller implementation and usage details.
memcg_test.txt
        - Memory Resource Controller; implementation details.
memory.txt
        - Memory Resource Controller; design, accounting, interface, testing.
net_cls.txt
        - Network classifier cgroups details and usages.
net_prio.txt
        - Network priority cgroups details and usages.
pids.txt
        - Process number cgroups details and usages.
┌──[root@liruilongs.github.io]-[/usr/share/doc/kernel-doc-4.18.0/Documentation/cgroup-v1]
└─$
关于 Linux 资源限制就和小伙伴分享到这里,生活加油哦 ^_^
5博文部分内容参考
© 文中涉及参考链接内容版权归原作者所有,如有侵权请告知 :)
《 Red Hat Performance Tuning 442 》
© 2018-2023 liruilonger@gmail.com, All rights reserved. 保持署名-非商用-相同方式共享(CC BY-NC-SA 4.0)

- 点赞
- 收藏
- 关注作者
评论(0)