dlib人脸对齐

【摘要】 dlib人脸对齐(python)
注意:程序都是0开始编号关键点的
这个人脸对齐是平面的对齐,只能图片中的人脸换成垂直的,不能获取人脸3维姿态,比如侧脸,低头,抬头.
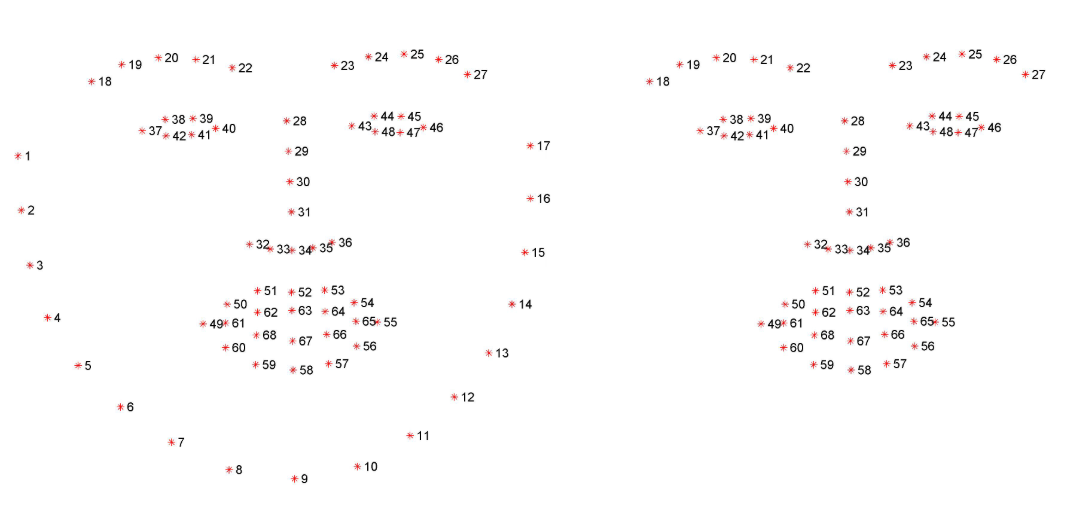
1 68 和 51 关键点
2 人脸对齐
a 定位图片中的人脸
b 提取人脸区域的图片并保存
c 人脸对齐操作并保存
 ...
dlib人脸对齐(python)
注意:程序都是0开始编号关键点的
这个人脸对齐是平面的对齐,只能图片中的人脸换成垂直的,不能获取人脸3维姿态,比如侧脸,低头,抬头.
1 68 和 51 关键点
2 人脸对齐
a 定位图片中的人脸
b 提取人脸区域的图片并保存
c 人脸对齐操作并保存
3 代码
-
import dlib
-
import face_recognition
-
import math
-
import numpy as np
-
import cv2
-
-
def rect_to_bbox(rect):
-
-
"""获得人脸矩形的坐标信息"""
-
-
# print(rect)
-
x = rect[3]
-
-
y = rect[0]
-
-
w = rect[1] - x
-
-
h = rect[2] - y
-
-
return (x, y, w, h)
-
-
-
-
-
-
def face_alignment(faces):
-
-
# 预测关键点
-
-
predictor = dlib.shape_predictor("dat/shape_predictor_68_face_landmarks.dat")
-
-
faces_aligned = []
-
-
for face in faces:
-
-
rec = dlib.rectangle(0, 0, face.shape[0], face.shape[1])
-
-
shape = predictor(np.uint8(face), rec)
-
-
# left eye, right eye, nose, left mouth, right mouth
-
-
order = [36, 45, 30, 48, 54]
-
-
for j in order:
-
-
x = shape.part(j).x
-
-
y = shape.part(j).y
-
-
# 计算两眼的中心坐标
-
-
eye_center =((shape.part(36).x + shape.part(45).x) * 1./2, (shape.part(36).y + shape.part(45).y) * 1./2)
-
-
dx = (shape.part(45).x - shape.part(36).x)
-
-
dy = (shape.part(45).y - shape.part(36).y)
-
-
# 计算角度
-
-
angle = math.atan2(dy, dx) * 180. / math.pi
-
-
# 计算仿射矩阵
-
-
RotateMatrix = cv2.getRotationMatrix2D(eye_center, angle, scale=1)
-
-
# 进行仿射变换,即旋转
-
-
RotImg = cv2.warpAffine(face, RotateMatrix, (face.shape[0], face.shape[1]))
-
-
faces_aligned.append(RotImg)
-
-
return faces_aligned
-
-
-
-
-
-
def test(img_path):
-
-
unknown_image = face_recognition.load_image_file(img_path)
-
-
# 定位图片中的人脸
-
-
face_locations = face_recognition.face_locations(unknown_image)
-
-
# 提取人脸区域的图片并保存
-
-
src_faces = []
-
-
src_face_num = 0
-
-
for (i, rect) in enumerate(face_locations):
-
-
src_face_num = src_face_num + 1
-
-
(x, y, w, h) = rect_to_bbox(rect)
-
-
detect_face = unknown_image[y:y+h, x:x+w]
-
-
src_faces.append(detect_face)
-
-
detect_face = cv2.cvtColor(detect_face, cv2.COLOR_RGBA2BGR)
-
-
cv2.imwrite("face_align_result/face_" + str(src_face_num) + ".jpg", detect_face)
-
-
# 人脸对齐操作并保存
-
-
faces_aligned = face_alignment(src_faces)
-
-
face_num = 0
-
-
for faces in faces_aligned:
-
-
face_num = face_num + 1
-
-
faces = cv2.cvtColor(faces, cv2.COLOR_RGBA2BGR)
-
-
cv2.imwrite("face_align_result/face_align_" + str(face_num) + ".jpg", faces)
-
-
-
if __name__ == '__main__':
-
test("8.jpg")
-
print(" SUCCEED !!! ")
-
pass
5 原图及结果
原图:

结果:

文章来源: blog.csdn.net,作者:网奇,版权归原作者所有,如需转载,请联系作者。
原文链接:blog.csdn.net/jacke121/article/details/102880110

【版权声明】本文为华为云社区用户转载文章,如果您发现本社区中有涉嫌抄袭的内容,欢迎发送邮件进行举报,并提供相关证据,一经查实,本社区将立刻删除涉嫌侵权内容,举报邮箱:
cloudbbs@huaweicloud.com
- 点赞
- 收藏
- 关注作者
评论(0)