神经网络之风格迁移【TF-Hub开源项目】
前言
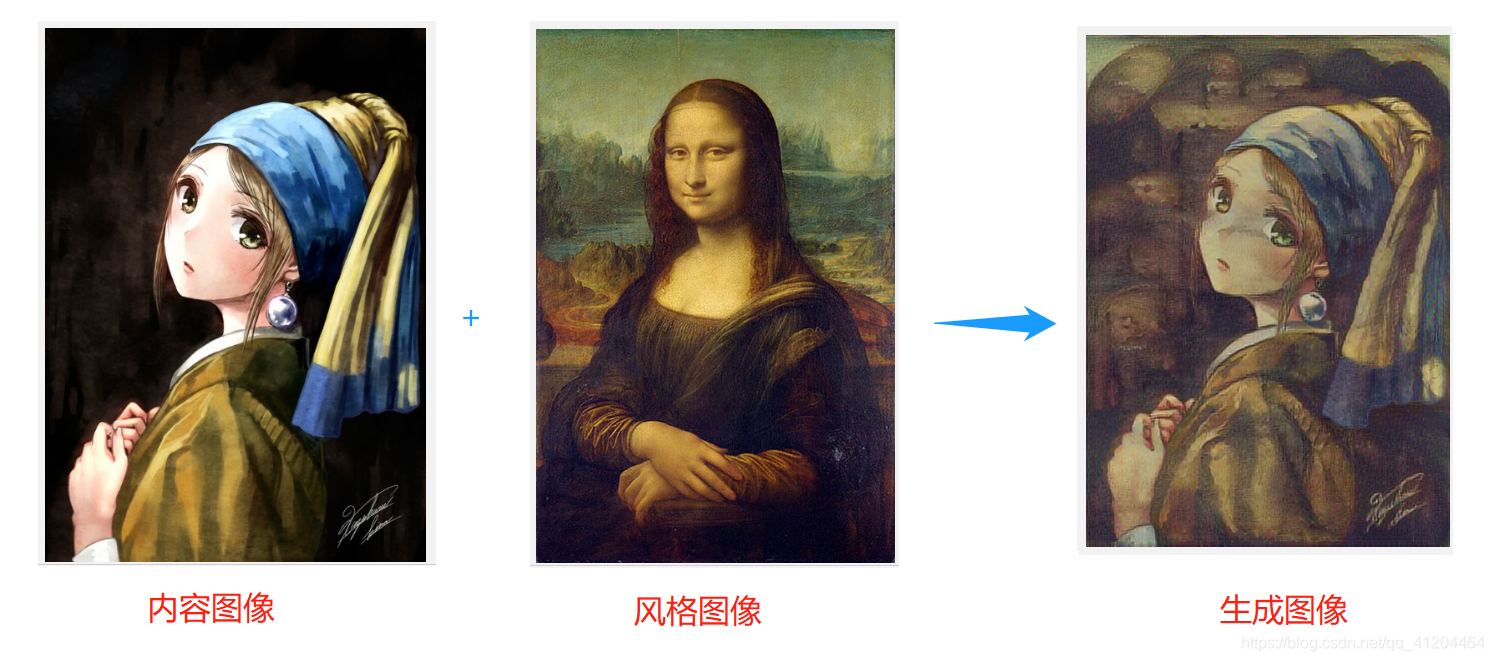
风格迁移,基于A图像内容,参考B图像的风格(名画,像毕加索或梵高一样绘画),创造出一幅新图像。
本文基于TF-Hub开源项目进行开发,60多行代码快速实现神经网络的风格迁移,为方便大家使用,已经整理相关代码和模型到Github中,直接下载即可使用。
一、模型效果
Style_transfer_V2版本

二、原理
风格迁移是基于生成对抗网络实现的,是一种优化技术,用于将两个图像,A图像内容和B图像风格,混合再一起,是输出的图像看起来像A图像,但是也参考了B图像的风格。
通过优化输出图像,以匹配A图像的内容统计数和B图像的风格统计数据。这些统计数据可以使用卷积网络从图像中提取。
三、项目实践
3.1、下载项目
大家点击这里Github下载代码和模型
模型V1(Style_transfer)
模型V2(Style_transfer_V2)效果更好一些,模型更大;

3.2、运行环境
主要用到几个依赖库:Tensorflow2.x、tensorflow_hub、numpy、PIL、matplotlib
参考:
搭建Tensorflow2.x环境:Python 3.8、TensorFlow2.3、anacoda
安装tensorflow_hub:pip install tensorflow-hub
3.3、运行模型
首先选择内容图像,content_image;风格图像,style_image;填写对应的图像路径。
然后直接运行代码 Style_transfer.py,运行成功后生成Style_transfer_Output.png。
四、源代码
-
'''
-
基于Tensorflow2,TF-Hub开源项目——神经网络风格迁移
-
'''
-
-
# 导入和配置模块
-
import tensorflow as tf
-
import tensorflow_hub as hub
-
import numpy as np
-
import PIL.Image
-
import matplotlib.pyplot as plt
-
import time
-
-
# 张量转化为图像,保存图片
-
def tensor_to_image(tensor):
-
tensor = tensor*255
-
tensor = np.array(tensor, dtype=np.uint8)
-
if np.ndim(tensor)>3:
-
assert tensor.shape[0] == 1
-
tensor = tensor[0]
-
# 保存图片
-
img = tf.image.encode_png(tensor)
-
with tf.io.gfile.GFile("./Style_transfer_Output.png", 'wb') as file:
-
file.write(img.numpy())
-
return PIL.Image.fromarray(tensor)
-
-
# 定义一个加载图像的函数,并将其最大尺寸限制为 512 像素
-
def load_img(path_to_img):
-
max_dim = 512
-
img = tf.io.read_file(path_to_img)
-
img = tf.image.decode_image(img, channels=3)
-
img = tf.image.convert_image_dtype(img, tf.float32)
-
-
shape = tf.cast(tf.shape(img)[:-1], tf.float32)
-
long_dim = max(shape)
-
scale = max_dim / long_dim
-
-
new_shape = tf.cast(shape * scale, tf.int32)
-
-
img = tf.image.resize(img, new_shape)
-
img = img[tf.newaxis, :]
-
return img
-
-
# 创建一个简单的函数来显示图像
-
def imshow(image, title=None):
-
if len(image.shape) > 3:
-
image = tf.squeeze(image, axis=0)
-
plt.imshow(image)
-
if title:
-
plt.title(title)
-
-
content_image = load_img("./test_picture/girl.jpg")
-
style_image = load_img("./test_picture/MonaLisa.jpg")
-
-
plt.subplot(1, 2, 1)
-
imshow(content_image, 'Content Image')
-
plt.subplot(1, 2, 2)
-
imshow(style_image, 'Style Image')
-
-
# 使用 TF-Hub 进行快速风格迁移
-
hub_module = hub.load('./model/magenta_arbitrary-image-stylization-v1-256_2')
-
stylized_image = hub_module(tf.constant(content_image), tf.constant(style_image))[0]
-
tensor_to_image(stylized_image)
如果觉得不错,后续继续更新开源项目~
文章来源: guo-pu.blog.csdn.net,作者:一颗小树x,版权归原作者所有,如需转载,请联系作者。
原文链接:guo-pu.blog.csdn.net/article/details/117048238
- 点赞
- 收藏
- 关注作者


评论(0)