用 Flask 来写个轻博客 (25) — 使用 Flask-Principal 实现角色权限功能

Blog 项目源码:https://github.com/JmilkFan/JmilkFan-s-Blog
目录
前文列表
用 Flask 来写个轻博客 (1) — 创建项目
用 Flask 来写个轻博客 (2) — Hello World!
用 Flask 来写个轻博客 (3) — (M)VC_连接 MySQL 和 SQLAlchemy
用 Flask 来写个轻博客 (4) — (M)VC_创建数据模型和表
用 Flask 来写个轻博客 (5) — (M)VC_SQLAlchemy 的 CRUD 详解
用 Flask 来写个轻博客 (6) — (M)VC_models 的关系(one to many)
用 Flask 来写个轻博客 (7) — (M)VC_models 的关系(many to many)
用 Flask 来写个轻博客 (8) — (M)VC_Alembic 管理数据库结构的升级和降级
用 Flask 来写个轻博客 (9) — M(V)C_Jinja 语法基础快速概览
用 Flask 来写个轻博客 (10) — M(V)C_Jinja 常用过滤器与 Flask 特殊变量及方法
用 Flask 来写个轻博客 (11) — M(V)C_创建视图函数
用 Flask 来写个轻博客 (12) — M(V)C_编写和继承 Jinja 模板
用 Flask 来写个轻博客 (13) — M(V)C_WTForms 服务端表单检验
用 Flask 来写个轻博客 (14) — M(V)C_实现项目首页的模板
用 Flask 来写个轻博客 (15) — M(V)C_实现博文页面评论表单
用 Flask 来写个轻博客 (16) — MV(C)_Flask Blueprint 蓝图
用 Flask 来写个轻博客 (17) — MV(C)_应用蓝图来重构项目
用 Flask 来写个轻博客 (18) — 使用工厂模式来生成应用对象
用 Flask 来写个轻博客 (19) — 以 Bcrypt 密文存储账户信息与实现用户登陆表单
用 Flask 来写个轻博客 (20) — 实现注册表单与应用 reCAPTCHA 来实现验证码
用 Flask 来写个轻博客 (21) — 结合 reCAPTCHA 验证码实现用户注册与登录
用 Flask 来写个轻博客 (22) — 实现博客文章的添加和编辑页面
用 Flask 来写个轻博客 (23) — 应用 OAuth 来实现 Facebook 第三方登录
用 Flask 来写个轻博客 (24) — 使用 Flask-Login 来保护应用安全
扩展阅读
Flask Principal — Flask Principal 0.4.0 documentation
Flask-Login — Flask-Login 0.4.0 documentation
Flask-Principal
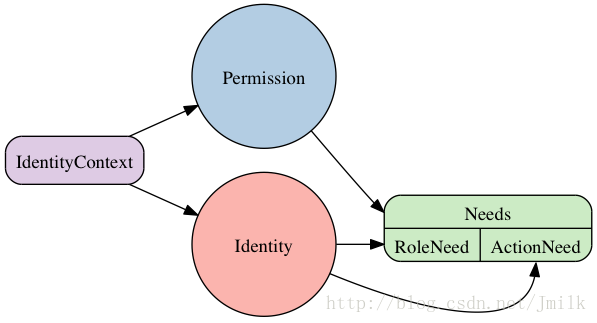
Flask-Principal 是一个 Flask 扩展(用户权限框架), 框架主要部分包含身份(Identity),需求(Needs),权限(Permission),和包含身份信息的上下文环境(IdentityContext)。
Flask 中的每一个 user 都会拥有一种 Identity, 而每一种 Identity 又会被关联到一个 Needs. Flask-Principal 提供了两种 Needs(RoleNeed/UserNeed). Needs 本质上是一个 namedtuple(具名元组) EG. ("role", "admin"), 其定义了在这个 Identity 能做什么事情. 也就是说 Permission 其实是通过 Needs 来定义和初始化的, 其中 Permission 可以是一个权限的集合.
除此之外, Flask-Principal 是通过信号(signal)来与 Flask 应用进行交互的,满足了低耦合的理念。其定义了两个重要的signal:
identity_changed:一般在用户身份变化时发送该信号, 在用户登录认证成功后,通过发送
identity_changed信号告知 Flask-Principal 用户登录成功, 需要对用户的权限进行改变identity_loaded:一般在用户权限需要被载入时发送该信息. 通常在用户身份改变时, 就需要载入相应的权限.
使用 Flask-Principal 来实现角色权限功能
添加 Role Model
而且 Role 和 User 应该是 many to many 的关系.
- models.py
users_roles = db.Table('users_roles', db.Column('user_id', db.String(45), db.ForeignKey('users.id')), db.Column('role_id', db.String(45), db.ForeignKey('roles.id')))


class User(db.Model): """Represents Proected users.""" # Set the name for table __tablename__ = 'users' id = db.Column(db.String(45), primary_key=True) username = db.Column(db.String(255)) password = db.Column(db.String(255)) # one to many: User ==> Post  # Establish contact with Post's ForeignKey: user_id posts = db.relationship( 'Post', backref='users', lazy='dynamic') roles = db.relationship( 'Role', secondary=users_roles, backref=db.backref('users', lazy='dynamic')) def __init__(self, id, username, password): self.id = id self.username = username self.password = self.set_password(password) # Setup the default-role for user. default = Role.query.filter_by(name="default").one() self.roles.append(default) def __repr__(self): """Define the string format for instance of User.""" return "<Model User `{}`>".format(self.username) def set_password(self, password): """Convert the password to cryptograph via flask-bcrypt""" return bcrypt.generate_password_hash(password) def check_password(self, password): return bcrypt.check_password_hash(self.password, password) def is_authenticated(self): """Check the user whether logged in.""" # Check the User's instance whether Class AnonymousUserMixin's instance. if isinstance(self, AnonymousUserMixin): return False else: return True def is_active(): """Check the user whether pass the activation process.""" return True def is_anonymous(self): """Check the user's login status whether is anonymous.""" if isinstance(self, AnonymousUserMixin): return True else: return False def get_id(self): """Get the user's uuid from database.""" return unicode(self.id)


class Role(db.Model): """Represents Proected roles.""" __tablename__ = 'roles' id = db.Column(db.String(45), primary_key=True) name = db.Column(db.String(255), unique=True) description = db.Column(db.String(255)) def __init__(self, id, name): self.id = id self.name = name def __repr__(self): return "<Model Role `{}`>".format(self.name)
- 1
- 2
- 3
- 4
- 5
- 6
- 7
- 8
- 9
- 10
- 11
- 12
- 13
- 14
- 15
- 16
- 17
- 18
- 19
- 20
- 21
- 22
- 23
- 24
- 25
- 26
- 27
- 28
- 29
- 30
- 31
- 32
- 33
- 34
- 35
- 36
- 37
- 38
- 39
- 40
- 41
- 42
- 43
- 44
- 45
- 46
- 47
- 48
- 49
- 50
- 51
- 52
- 53
- 54
- 55
- 56
- 57
- 58
- 59
- 60
- 61
- 62
- 63
- 64
- 65
- 66
- 67
- 68
- 69
- 70
- 71
- 72
- 73
- 74
- 75
- 76
- 77
- 78
- 79
- 80
- 81
- 82
- 83
- 84
- 85
- 86
- 87
NOTE: 这样的话我们可以为 user 指定一个 role 集. 用来代表该用户所拥有的 Identity, 这也是之后为 user 对象绑定 Needs 所需要的前提.
在 Manager shell 中手动的添加角色
- 创建 roles 数据表
(env) jmilkfan@JmilkFan-Devstack:/opt/JmilkFan-s-Blog$ python manage.py shell
>>> db.create_all()
- 1
- 2
- 创建新用户
>>> from uuid import uuid4
>>> user = User(id=str(uuid4()), username='jmilkfan_2016', password="fanguiju")
>>> db.session.add(user)
>>> db.session.commit()
- 1
- 2
- 3
- 4
- 创建新角色并与新用户建立关联
>>> role_admin = Role(id=str(uuid4()), name="admin")
>>> role_poster = Role(id=str(uuid4()), name="poster")
>>> role_default = Role(id=str(uuid4()), name="default")

>>> user
<Model User `jmilkfan_2016`>
>>> role_admin.users = [user]
>>> role_poster.users = [user]
>>> db.session.add(role_admin)
>>> db.session.add(role_poster)
>>> db.session.add(role_default)
>>> db.session.commit()
- 1
- 2
- 3
- 4
- 5
- 6
- 7
- 8
- 9
- 10
- 11
- 12
初始化 Flask-Principal 和 Permission
- extensions.py
from flask.ext.principal import Principal, Permission, RoleNeed


# Create the Flask-Principal's instance
principals = Principal()

# 这里设定了 3 种权限, 这些权限会被绑定到 Identity 之后才会发挥作用.
# Init the role permission via RoleNeed(Need).
admin_permission = Permission(RoleNeed('admin'))
poster_permission = Permission(RoleNeed('poster'))
default_permission = Permission(RoleNeed('default'))
- 1
- 2
- 3
- 4
- 5
- 6
- 7
- 8
- 9
- 10
- 11
实现权限载入信号逻辑
- jmilkfannsblog.__init__.py
def create_app(object_name): """Create the app instance via `Factory Method`""" app = Flask(__name__) # Set the config for app instance app.config.from_object(object_name) # Will be load the SQLALCHEMY_DATABASE_URL from config.py to db object db.init_app(app) # Init the Flask-Bcrypt via app object bcrypt.init_app(app) # Init the Flask-OpenID via app object openid.init_app(app) # Init the Flask-Login via app object login_manager.init_app(app) # Init the Flask-Prinicpal via app object principals.init_app(app) @identity_loaded.connect_via(app) def on_identity_loaded(sender, identity): """Change the role via add the Need object into Role. Need the access the app object. """ # Set the identity user object identity.user = current_user # Add the UserNeed to the identity user object if hasattr(current_user, 'id'): identity.provides.add(UserNeed(current_user.id)) # Add each role to the identity user object if hasattr(current_user, 'roles'): for role in current_user.roles: identity.provides.add(RoleNeed(role.name)) # Register the Blueprint into app object app.register_blueprint(blog.blog_blueprint) app.register_blueprint(main.main_blueprint) return app
- 1
- 2
- 3
- 4
- 5
- 6
- 7
- 8
- 9
- 10
- 11
- 12
- 13
- 14
- 15
- 16
- 17
- 18
- 19
- 20
- 21
- 22
- 23
- 24
- 25
- 26
- 27
- 28
- 29
- 30
- 31
- 32
- 33
- 34
- 35
- 36
- 37
- 38
- 39
- 40
- 41
- 42
NOTE 1: 因为
identity_loaded信号实现函数,需要访问 app 对象, 所以直接在__init\_\_.create_app()中实现.NOTE 2:
on_identity_loaded()函数在用户身份发生了变化, 需要重载权限的时候被调用. 首先将当前的用户绑定到一个 Identity 的实例化对象中, 然后将该用户 id 的 UserNeed 和该用户所拥有的 roles 对应的 RoleNeed 绑定到该 Identity 中. 实现了将数据库中 user 所拥有的 roles 都以 Needs 的形式绑定到其自身中.
实现身份改变信号逻辑
- jmilkfsnsblog.controllers.main.py
from flask.ext.principal import Identity, AnonymousIdentity, identity_changed, current_app


@main_blueprint.route('/login', methods=['GET', 'POST'])
@openid.loginhandler
def login(): """View function for login. Flask-OpenID will be receive the Authentication-information from relay party. """
... # Will be check the account whether rigjt. if form.validate_on_submit(): # Using session to check the user's login status # Add the user's name to cookie. # session['username'] = form.username.data user = User.query.filter_by(username=form.username.data).one() # Using the Flask-Login to processing and check the login status for user # Remember the user's login status.  login_user(user, remember=form.remember.data) identity_changed.send( current_app._get_current_object(), identity=Identity(user.id)) flash("You have been logged in.", category="success") return redirect(url_for('blog.home'))

...
- 1
- 2
- 3
- 4
- 5
- 6
- 7
- 8
- 9
- 10
- 11
- 12
- 13
- 14
- 15
- 16
- 17
- 18
- 19
- 20
- 21
- 22
- 23
- 24
- 25
- 26
- 27
- 28
- 29
- 30
- 31
- 32
- 33
- 34
NOTE 1:
identity_changed一般在用户的身份发生变化时发送, 所以我们一般选择login()视图函数中实现.NOTE 2:
identity_changed.send()函数会将 sender:current_app._get_current_object()当前应用对象 app 和身份对象 identity:Identity(user.id)当前要登录的用户对象, 以信号的新式发送出去, 表示应用 app 对象中的 user 用户对象的 identity 被改变了.NOTE 3: 在
identity_changed信息被发送之后, 被装饰器identity_loaded.connect_via(app)装饰的函数on_identity_loaded(sender, identity)就会接受该信号, 并为 user 绑定应有 Needs, 以此来赋予其权限.
NOTE 4: 在用户认证通过后,Flask-Principal 会将用户的身份(identity) 存储在 session 中。
除了登录的时候用户身份会被改变, 登出也是一样的.
@main_blueprint.route('/logout', methods=['GET', 'POST'])
def logout(): """View function for logout.""" # Remove the username from the cookie. # session.pop('username', None) # Using the Flask-Login to processing and check the logout status for user. logout_user() identity_changed.send( current_app._get_current_object(), identity=AnonymousIdentity()) flash("You have been logged out.", category="success") return redirect(url_for('main.login'))
- 1
- 2
- 3
- 4
- 5
- 6
- 7
- 8
- 9
- 10
- 11
- 12
- 13
- 14
- 15
NOTE: 用户登出系统后清理 session,Flask-Principal 会将用户的身份变为 AnonymousIdentity(匿名身份)。
实现只有文章作者才能编辑文章
- jmilkfansblog.controllers.blog.py
@blog_blueprint.route('/edit/<string:id>', methods=['GET', 'POST'])
@login_required
@poster_permission.require(http_exception=403)
def edit_post(id): """View function for edit_post.""" post = Post.query.get_or_404(id) # Ensure the user logged in. if not current_user: return redirect(url_for('main.login')) # Only the post onwer can be edit this post. if current_user != post.users: return redirect(url_for('blog.post', post_id=id)) # 当 user 是 poster 或者 admin 时, 才能够编辑文章 # Admin can be edit the post. permission = Permission(UserNeed(post.users.id)) if permission.can() or admin_permission.can(): form = PostForm() #if current_user != post.users: # abort(403) if form.validate_on_submit(): post.title = form.title.data post.text = form.text.data post.publish_date = datetime.now() # Update the post db.session.add(post) db.session.commit() return redirect(url_for('blog.post', post_id=post.id)) else: abort(403) # Still retain the original content, if validate is false. form.title.data = post.title form.text.data = post.text return render_template('edit_post.html', form=form, post=post)
- 1
- 2
- 3
- 4
- 5
- 6
- 7
- 8
- 9
- 10
- 11
- 12
- 13
- 14
- 15
- 16
- 17
- 18
- 19
- 20
- 21
- 22
- 23
- 24
- 25
- 26
- 27
- 28
- 29
- 30
- 31
- 32
- 33
- 34
- 35
- 36
- 37
- 38
- 39
- 40
- 41
- 42
实现效果
以具有 poster identity 的 jmilkfan_2016 登录
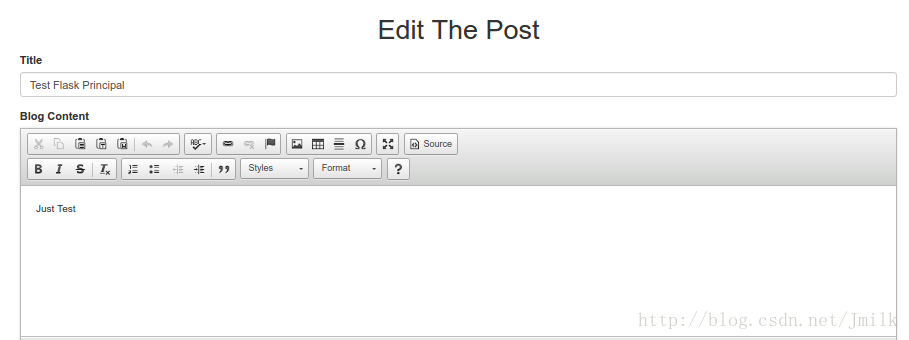
创建新的文章

在
jmilkfansblog.controllers.blog:edit_port()中打个断点, 我们来看看此时 permision 和 admin_permission 对象的值.

(Pdb) l
165 return redirect(url_for('blog.post', post_id=id))
166 167 import pdb
168 pdb.set_trace()
169 # Admin can be edit the post.
170  -> permission = Permission(UserNeed(post.users.id))
171 if permission.can() or admin_permission.can():
172 form = PostForm()
173 174 #if current_user != post.users:
175 # abort(403)
(Pdb) n
> /opt/JmilkFan-s-Blog/jmilkfansblog/controllers/blog.py(171)edit_post()
-> if permission.can() or admin_permission.can():
(Pdb) permission
<Permission needs=set([Need(method='id', value=u'b003f813-abfa-46d6-babc-2033b0b43f7e')]) excludes=set([])>
(Pdb) permission.can()
True
- 1
- 2
- 3
- 4
- 5
- 6
- 7
- 8
- 9
- 10
- 11
- 12
- 13
- 14
- 15
- 16
- 17
- 18
- 19
可以看见 permission 对象所对应的 user id == b003f813-abfa-46d6-babc-2033b0b43f7e, 而该 user 在数据库中对应的 roles == [87d180cc-bfa5-4c6a-87d4-01decb9c8649, 4b8b5c13-76fa-47e1-8403-623d284b2db7], 所以 user 在登录时由于其自身 Identity 的改变而触发了 on_identity_loaded() 方法, 将 admin/poster 两个 roles 对应的 RoleNeed 绑定到 user 自身的 identity 对象上, 从而拥有了编辑文章的权限.
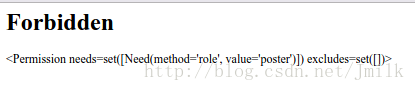
否则, 如果是匿名用户想要编辑该文章的话就会触发 403
文章来源: is-cloud.blog.csdn.net,作者:范桂飓,版权归原作者所有,如需转载,请联系作者。
原文链接:is-cloud.blog.csdn.net/article/details/53542686

- 点赞
- 收藏
- 关注作者
评论(0)