金鱼哥RHCA回忆录:CL210云应用程序自动化(练习+章节实验)

CL210云应用程序自动化(练习+章节实验)
🎹 个人简介:大家好,我是 金鱼哥,CSDN运维领域新星创作者,华为云·云享专家,阿里云社区·专家博主
📚个人资质:CCNA、HCNP、CSNA(网络分析师),软考初级、中级网络工程师、RHCSA、RHCE、RHCA、RHCI、ITIL😜
💬格言:努力不一定成功,但要想成功就必须努力🔥🎈支持我:可点赞👍、可收藏⭐️、可留言📝
课本练习
-
编辑编排模板以启动多层堆栈。
-
使用编排模板启动堆栈。
[student@workstation ~]$ lab orchestration-heat-templates setup
Setting up workstation for lab exercise work:

 • Installing required packages on: workstation................  SUCCESS
 • Downloading scripts for the template on: workstation........  SUCCESS
 . Ensuring finance project exists.............................  SUCCESS
 . Ensuring developer1 user exists.............................  SUCCESS
 . Ensuring architect1 user exists.............................  SUCCESS
 . Ensuring environment file exists: developer1................  SUCCESS
 . Ensuring keystonerc file exists: architect1.................  SUCCESS
 • Verifying internal network: finance-network1................  SUCCESS
 • Verifying internal subnet: finance-subnet1..................  SUCCESS
 • Verifying external network: provider-datacentre.............  SUCCESS
 . Verifying router: finance-router1...........................  SUCCESS
 • Verifying keypair: example-keypair..........................  SUCCESS
 • Verifying flavor: default...................................  SUCCESS
 . Verifying image: rhel7-web..................................  SUCCESS
 . Verifying image: rhel7-db...................................  SUCCESS
1. 改写tab
编辑YAML文件时,必须使用空格而不是制表符来缩进。如果使用vi进行文本编辑,请确认.vimrc文件设置自动缩进,并将ts和sw变量设置为两个空格用于YAML文件。
[student@workstation ~]$ cat .vimrc
autocmd FileType yaml setlocal ai ts=2 sw=2 et
[student@workstation ~]$ source .vimrc
2. 编辑编排模板以启动自定义实例。
下载http://materials.example.com/heat/finance-app1.yaml文件到/home/student/heat-templates目录。
编辑模板必须包括以下项目:
-
finance-web实例必须部署一个与MariaDB database交互的PHP web页面。运行webserver.sh脚本作为user-data脚本,用于在finance-web实例上部署PHP web页面。
-
finance-db实例必须配置一个MariaDB数据库。运行dbserver.sh脚本作为user-data脚本,用于部署MariaDB数据库和创建名为mydb的数据库。
-
必须将以下参数传递到webserver.sh脚本使用user_data属性:
-
web_private_ip变量必须分别用finance-web实例的外部和私有IP地址初始化。必须用finance-db实例的私有ip地址初始化$db_private_ip变量。这些变量使用webserver.sh脚本。
-
编排堆栈必须重试一次才能执行user-data脚本。user-data脚本在成功执行时必须返回成功。将超时时间设置为600秒,超过600秒后,webserver.sh将启动超时必须返回失败结果,并将超时时间设置为800秒,之后dbserver.sh脚本必须返回失败的结果。
2.1下载http://materials.example.com/heat/finance-app1.yaml将编排模板文件放到/home/student/heat-templates目录中。
[student@workstation ~]$ cd heat-templates/
[student@workstation heat-templates]$ ll
total 8
-rw-rw-r--. 1 student student  551 Oct 31 13:46 dbserver.sh
-rw-rw-r--. 1 student student 1394 Oct 31 13:46 webserver.sh

[student@workstation heat-templates]$ wget http://materials.example.com/heat/finance-app1.yaml
--2020-10-31 14:12:51--  http://materials.example.com/heat/finance-app1.yaml
Resolving materials.example.com (materials.example.com)... 172.25.254.254
Connecting to materials.example.com (materials.example.com)|172.25.254.254|:80... connected.
HTTP request sent, awaiting response... 200 OK
Length: 5036 (4.9K) [text/plain]
Saving to: ‘finance-app1.yaml’
100%[=====================================>] 5,036       --.-K/s   in 0s
2020-10-31 14:12:51 (38.0 MB/s) - ‘finance-app1.yaml’ saved [5036/5036]
2.2 使用user_data属性定义/home/student/heat-templates/webserver.sh user-data脚本部署PHP web页面到finance-web。
将os::Nova::Server资源类型的user_data_format属性设置为RAW。
  web_server:
    type: OS::Nova::Server
    properties:
      name: { get_param: web_instance_name }
      image: { get_param: web_image_name }
      flavor: { get_param: instance_flavor }
      key_name: { get_param: key_name }
      networks:
        - port: { get_resource: web_net_port }
      user_data_format: RAW
      user_data:
        str_replace:
          template: { get_file: /home/student/heat-templates/webserver.sh }
2.3.该web页面使用 db_private_ip和作为参数传递的$web_public_ip变量。
这些参数是使用str_replace内部函数的params属性定义的。
db_private_ip变量使用db_net_port资源属性,fixed_ips来检索与db_server资源关联的第一个ip地址。$web_public_ip变量使用web_floating_ip资源属性,即浮动ip地址,来设置与web_ server资源相关联的公共ip地址。
  web_server:
    type: OS::Nova::Server
    properties:
      name: { get_param: web_instance_name }
      image: { get_param: web_image_name }
      flavor: { get_param: instance_flavor }
      key_name: { get_param: key_name }
      networks:
        - port: { get_resource: web_net_port }
      user_data_format: RAW
      user_data:
        str_replace:
          template: { get_file: /home/student/heat-templates/webserver.sh }
          params:
            $web_private_ip: {get_attr: [web_net_port,fixed_ips,0,ip_address]}
            $db_private_ip: {get_attr: [db_net_port,fixed_ips,0,ip_address]}
            $web_public_ip: {get_attr: [web_floating_ip,floating_ip_address]}
2.4 使用WaitHandlecondition资源发送关于user-data脚本状态的信号。
wc_notify变量。如果脚本部署的web页面是可访问的(HTTP状态码200),则$wc_notify变量返回一个成功的状态。当WaitConditionHandle资源发出成功信号时,web服务器资源状态被标记为CREATE_COMPLETE。
如果web页面在600秒后超时而无法访问,WaitConditionHandle将返回失败。然后web_server资源状态被标记为CREATE_FAILED。
  web_server:
    type: OS::Nova::Server
    properties:
      name: { get_param: web_instance_name }
      image: { get_param: web_image_name }
      flavor: { get_param: instance_flavor }
      key_name: { get_param: key_name }
      networks:
        - port: { get_resource: web_net_port }
      user_data_format: RAW
      user_data:
        str_replace:
          template: { get_file: /home/student/heat-templates/webserver.sh }
          params:
            $web_private_ip: {get_attr: [web_net_port,fixed_ips,0,ip_address]}
            $db_private_ip: {get_attr: [db_net_port,fixed_ips,0,ip_address]}
            $web_public_ip: {get_attr: [web_floating_ip,floating_ip_address]}
            $wc_notify: {get_attr: [web_wait_handle,curl_cli]}
2.5 使用user_data属性定义/home/student/heat-templates/dbserver.sh user-data脚本,以在finance-db上配置MariaDB服务器。
将OS::Nova::Server资源类型的user_data_format属性设置为RAW。
使用WaitHandleCondition资源发送关于user-data脚本状态的信号。使用db_wait_handle资源的curl_cli属性将$db_wc_notify变量设置为等待句柄URL。
  db_server:
    type: OS::Nova::Server
    properties:
      name: { get_param: db_instance_name }
      image: { get_param: db_image_name }
      flavor: { get_param: instance_flavor }
      key_name: { get_param: key_name }
      networks:
        - port: { get_resource: db_net_port }
      user_data_format: RAW
      user_data:
        str_replace:
          template: { get_file: /home/student/heat-templates/dbserver.sh }
          params:
            $db_wc_notify: {get_attr: [db_wait_handle,curl_cli]}
3.创造/home/student/heat-templates/environment.yaml环境文件。
输入在/home/student/heat-templates/finance-app1.yaml中定义的所有输入参数的值。
[student@workstation heat-templates]$ vim environment.yaml
parameters:
  web_image_name: rhel7-web
  db_image_name: rhel7-db
  web_instance_name: finance-server1
  db_instance_name: finance-server2
  key_name: example-keypair
  instance_flavor: default
  public_net: provider-datacentre
  private_net: finance-network1
  private_subnet: finance-subnet1
4. 启动堆栈,并通过访问部署在实例上的web页面来验证它。使用developer1用户凭证启动堆栈。
4.1 使用developer1用户凭证来执行一次演练堆栈部署,并检查在启动堆栈时将创建的资源。
在进行下一步之前,纠正所有错误。
使用finance-app1.yaml模板文件和环境。用于创建堆栈的environment.yaml环境文件。将堆栈命名为finance-app1。
在运行之前,可下载对应的文件进行比较,查自己编写的文件是否正常而继续进行下一部操作( wget http://materials.example.com/heat/finance-app1.yaml-final)
[student@workstation heat-templates(developer1-finance)]$ openstack stack create --environment environment.yaml --template finance-app1.yaml --dry-run -c description finance-app1
+-------------+---------------------------+
| Field       | Value                     |
+-------------+---------------------------+
| description | multi-tier stack template |
+-------------+---------------------------+
4.2 使用finance-app1.yaml启动堆栈。
[student@workstation heat-templates(developer1-finance)]$ openstack stack create --environment environment.yaml --template finance-app1.yaml finance-app1 --wait
4.3 列出finance-app1堆栈返回的输出。
[student@workstation heat-templates(developer1-finance)]$ openstack stack output list finance-app1
+----------------+----------------------------------------------------------------------+
| output_key     | description
+----------------+----------------------------------------------------------------------+
| web_private_ip | Private IP address of the web server
| web_public_ip  | External IP address of the web server
| website_url    | This URL is the "external" URL that can be used to access the web server.
| db_private_ip  | Private IP address of the DB server
+----------------+----------------------------------------------------------------------+
4.4 检查堆栈的website_url输出值。
output_value字段中的IP地址可能有所不同。
[student@workstation heat-templates(developer1-finance)]$ openstack stack output show finance-app1 website_url
+--------------+------------------------------------------------------------------------+
| Field        | Value
+--------------+------------------------------------------------------------------------+
| description  | This URL is the "external" URL that can be used to access the web server.
| output_key   | website_url
| output_value | http://172.25.250.110/index.php
+--------------+------------------------------------------------------------------------+
4.5 通过访问作为website_url输出值返回的URL,验证多层堆栈已经创建,user-data脚本已经在两个实例上成功执行。

清除实验
[student@workstation ~]$ lab orchestration-heat-templates cleanup
章节实验
-
编辑编排模板以启动多个自定义web服务器。
-
使用OS::Heat::ResourceGroup资源类型提供相同的资源。
-
使用编排模板启动堆栈。
[student@workstation ~]$ lab orchestration-review setup
Setting up workstation for lab exercise work:

 . Verifying project: production...............................  SUCCESS
 . Verifying user: operator1...................................  SUCCESS
 . Verifying admin: architect1.................................  SUCCESS
 . Verifying role: heat_stack_owner............................  SUCCESS
 . Verifying heat_stack_owner role: operator1..................  SUCCESS
 . Ensuring environment file exists: operator1.................  SUCCESS
 . Ensuring environment file exists: architect1................  SUCCESS
 • Verifying flavor: default...................................  SUCCESS
 . Verifying image: rhel7-web..................................  SUCCESS
 • Verifying internal network: production-network1.............  SUCCESS
 • Verifying internal subnet: production-subnet1...............  SUCCESS
 . Verifying external network: provider-datacentre.............  SUCCESS
 . Verifying router: production-router1........................  SUCCESS
 • Verifying keypair: example-keypair..........................  SUCCESS
 . Creating base directory: /home/student/heat-templates.......  SUCCESS
辅助参考文件:
wget http://materials.example.com/heat/production-stack.yaml-final
1.编辑/home/student/heat-templates/production-stack.yaml编排模板。
在parameters部分添加一个名为instance_count的新输入参数。参数必须定义约束来指定一个最小实例和两个最大实例。
parameters:
…………
  instance_count:
    type: number
    description: count of servers to be provisioned
    constraints:
      - range: { min: 1, max: 2 }
2. 编辑/home/student/heat-templates/production-stack.yaml编排模板。
添加一个名为production_resource的资源,根据用户输入启动相同的资源。使用OS::Heat::ResourceGroup资源类型。
设置count属性以使用instance_count输入参数。
resources:
  production_resource:
    type: OS::Heat::ResourceGroup
    properties:
      count: { get_param: instance_count }
3. 编辑/home/student/heat-templates/production-environment.yaml环境文件将instance_count输入参数设置为2。
parameters:
  image_name: "rhel7-web"
  instance_name: "production-server"
  instance_flavor: "default"
  key_name: "example-keypair"
  public_net: "provider-datacentre"
  private_net: "production-network1"
  private_subnet: "production-subnet1"
  instance_count: 2
4. 编辑/home/student/heat-templates/production-environment.yaml环境文件来定义一个自定义资源类型,名为Production::custom::WebServer。
这个自定义资源类型必须指向/home/student/heat-templates/production-app1.yaml模板。
resource_registry:
  Production::Custom::WebServer: /home/student/heat-templates/production-app1.yaml
parameters:
  image_name: "rhel7-web"
  instance_name: "production-server"
  instance_flavor: "default"
  key_name: "example-keypair"
  public_net: "provider-datacentre"
  private_net: "production-network1"
  private_subnet: "production-subnet1"
  instance_count: 2
5. 编辑/home/student/heat-templates/production-stack.yaml编排模板。
设置production_resource资源的资源定义来使用Production::Custom::WebServer自定义资源类型。设置启动自定义资源所需的属性。
使用list_join内部函数和OS::Heat::ResourceGroup的index_var属性的%index%默认值连接实例名和资源组的索引作为后缀。设置资源的instance_name属性,以使用连接的名称。将实例命名为production-server0和production-server1。
设置production_resource资源类型的resource_def属性使用Production::Custom::WebServer自定义资源类型。Production::custom::WebServer自定义资源类型使用提供实例所需的输入参数。编辑文件以添加以下突出显示的内容:
resources:
  production_resource:
    type: OS::Heat::ResourceGroup
    properties:
      count: { get_param: instance_count }
      resource_def:
        type: Production::Custom::WebServer
        properties:
          instance_name:
            list_join: [ '', [ {get_param: instance_name}, "%index%" ] ]
          instance_flavor: { get_param: instance_flavor }
          image_name: { get_param: image_name }
          key_name: { get_param: key_name }
          public_net: { get_param: public_net }
          private_net: { get_param: private_net }
          private_subnet: { get_param: private_subnet }
6. 加载源/home/student/operator1-production-rc身份环境文件,以operator1的形式启动堆栈。
使用生产堆栈启动production-stack.yaml模板文件和production.yaml环境文件。名字堆栈production-webstack。
[student@workstation heat-templates(operator1-production)]$ openstack stack create --environment production-environment.yaml --template production-stack.yaml --dry-run production-webstack --max-width 80
+-----------------------+------------------------------------------------------+
| Field                 | Value                                                |
+-----------------------+------------------------------------------------------+
| capabilities          | []                                                   |
| creation_time         | 2020-11-03T04:47:33Z                                 |
| deletion_time         | None                                                 |
| description           | Launch multiple custom webservers                    |
| disable_rollback      | True                                                 |
| id                    | None                                                 |
| links                 | http://172.25.250.50:8004/v1/294ad7735e6646d7bb908e3 |
|                       | 2de8582c3/stacks/production-webstack/None (self)     |
…………
[student@workstation heat-templates(operator1-production)]$ openstack stack create --environment production-environment.yaml --template production-stack.yaml  production-webstack --wait
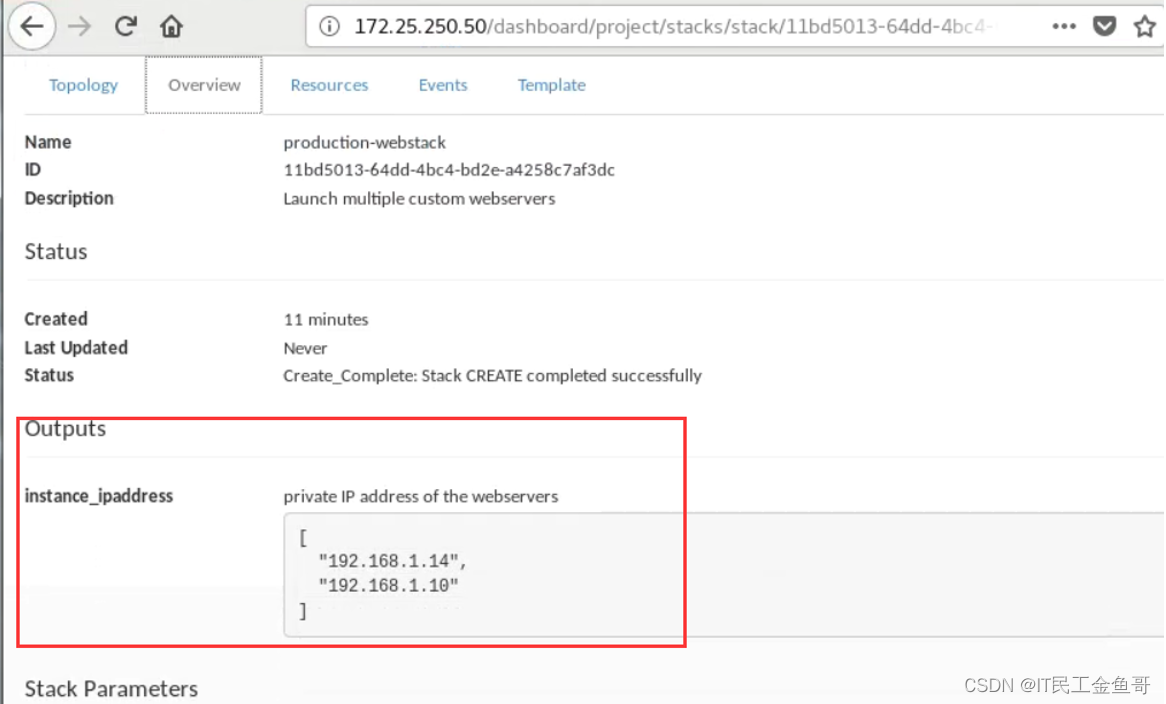
7. 验证production-webstack堆栈是否提供了两个实例。
使用production-webstack堆栈的instance_ipaddress输出参数来检索附加到实例的私有IP地址。
[student@workstation heat-templates(operator1-production)]$ openstack server list -c Name -c Status -c Networks
+--------------------+--------+----------------------------------+
| Name               | Status | Networks                         |
+--------------------+--------+----------------------------------+
| production-server0 | ACTIVE | production-network1=192.168.1.14 |
| production-server1 | ACTIVE | production-network1=192.168.1.10 |
+--------------------+--------+----------------------------------+
[student@workstation heat-templates(operator1-production)]$ openstack stack output show production-webstack instance_ipaddress
+--------------+--------------------------------------+
| Field        | Value                                |
+--------------+--------------------------------------+
| description  | private IP address of the webservers |
| output_key   | instance_ipaddress                   |
| output_value | [u'192.168.1.14', u'192.168.1.10']   |
+--------------+--------------------------------------+
评分脚本
[student@workstation ~]$ lab orchestration-review grade
Grading the student's work on workstation:

 . Checking the production-webstack stack is created...........  PASS
 . Checking number of instances launched.......................  PASS
 . Checking private IP addresses match stack output............  PASS

Overall lab grade..............................................  PASS
清除实验
[student@workstation ~]$ lab orchestration-review cleanup
💡总结
-
编排服务(heat)为开发人员和系统管理员提供了一种简单且可重复的方法,用于创建和管理相关的OpenStack资源集合。
-
编排APl服务通过AMQP使用远程过程调用(rpc)将请求转发给编排引擎服务。
-
编排引擎服务解释编排模板并启动堆栈。
-
使用构建在彼此之上的多层堆栈是组织编排堆栈的最佳方法。
-
您应该执行堆栈部署的演练,以验证更新堆栈后对基础设施的任何更改。
-
heat编排模板中的内部函数将值分配给在创建堆栈期间可用的属性。
-
使用OS::Heat::SoftwareDeployment资源类型允许在一个实例的整个生命周期中应用任意数量的软件配置变化。
-
当使用openstack stack update命令更改用户数据和更新编排堆栈时,将删除实例并使用更新后的user-data脚本重新创建实例。
RHCA认证需要经历5门的学习与考试,还是需要花不少时间去学习与备考的,好好加油,可以噶🤪。

以上就是【金鱼哥】对 第八章 云应用程序自动化(练习+章节实验) 的简述和讲解。希望能对看到此文章的小伙伴有所帮助。
💾红帽认证专栏系列:
RHCSA专栏:戏说 RHCSA 认证
RHCE专栏:戏说 RHCE 认证
此文章收录在RHCA专栏:RHCA 回忆录
如果这篇【文章】有帮助到你,希望可以给【金鱼哥】点个赞👍,创作不易,相比官方的陈述,我更喜欢用【通俗易懂】的文笔去讲解每一个知识点。
如果有对【运维技术】感兴趣,也欢迎关注❤️❤️❤️ 【金鱼哥】❤️❤️❤️,我将会给你带来巨大的【收获与惊喜】💕💕!


- 点赞
- 收藏
- 关注作者
评论(0)