PG连接池工具之Pgbouncer

通常,连接池的目的是降低打开新的PostgreSQL(或其他)数据库连接的性能影响。使用连接池能够降低服务器的内存开销,并且有效复用数据库连接,提供了良好的数据库连接性能管理。
Pgbouncer简介
https://pgbouncer.github.io/install.html
https://pgbouncer.github.io/usage.html
https://pgbouncer.github.io/config.html
https://github.com/pgbouncer/pgbouncer
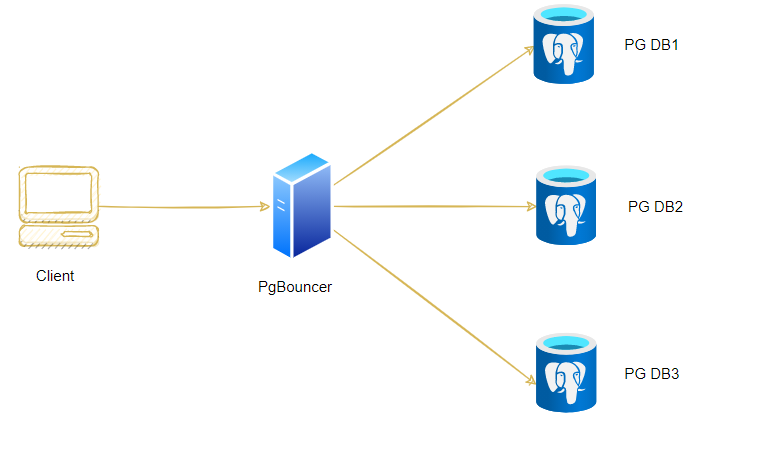
Pgbouncer是一个针对PostgreSQL数据库的轻量级连接池,
任何目标应用都可以把 pgbouncer 当作一个 PostgreSQL 服务器来连接,
然后pgbouncer 会处理与服务器连接,或者是重用已存在的连接。
pgbouncer 的目标是降低因为新建到 PostgreSQL 的连接而导致的性能损失。
PgBouncer的作用
- PgBouncer可以在后端数据库和前端应用间建立连接桥梁,由PgBouncer去处理和后端数据库的连接关系。
- 对客户端连接进行限制,预防过多或者恶意的连接请求。
- 主要工作还是每一个数据节点对数据的存取,pgbouncer只是提供给客户端数据节点的分配和链接以及限制客户端连接的数量。整体上实现了对数据的负载均衡。
- 能够缓存和PostgreSQL的连接,当有连接请求进来的时候,直接分配空闲进程,而不需要PostgreSQL fork出新进程来建立连接,以节省创建新进程,创建连接的资源消耗。
- 能够有效提高连接的利用率,避免过多的无效连接,导致数据库消耗资源过大,CPU占用过高。
轻量级体现在:使用libevent进行socket通信、C语言编写,效率高,每个连接仅消耗2kB内存 。
PgBouncer的优点
内存消耗低(默认为2k/连接),因为Bouncer不需要每次都接受完整的数据包
可以把不同的数据库连接到一个机器上,而对客户端保持透明
支持在线的重新配置而无须重启
pgbouncer 可以限制每一对用户+数据库 到PostgreSQL Cluster的总连接数
PgBouncer的缺点
仅支持V3协议,因此后端版本须>=7.4
并没有真正实现数据库的负载均衡,如果单一的对一个数据库操作会使某个数据节点读写量增大
当某个数据库down掉后,就不能通过pgbouncer连接起来,缺少了数据库备份的功能
PgBouncer 支持三种连接池模型
1.session(会话连接池)
会话级连接,在它的连接生命周期内,连接池分配给它一个数据库连接。客户端断开时,数据库连接会放回连接池中。
2.transaction(事务连接池)
事务级别连接,当客户端的每个事务结束时,数据库连接就会重新释放回连接池中,再次执行一个事务时,需要再从连接池中获取一个连接。
3.statement(语句连接池)
每执行完一个SQL时,连接就会重新释放回连接池中,再次执行一个SQL 时,需要再次从连接池中获得连接。这种模式意味着在客户端强制autocomit模式。
下载安装
http://www.pgbouncer.org/downloads/
http://www.pgbouncer.org/install.html
yum安装
在Linux发行版中,包含已经编译好的PgBouncer,可以直接安装。
RHEL/CentOS平台直接使用yum命令来安装。
Debian/Ubuntu平台下,直接使用apt-get命令安装。
yum install -y pgbouncer
apt-get install -y pgbouncer
编译安装
在官网http://www.pgbouncer.org/downloads/上下载源码编译安装,需要先安装libevent-devel这个rpm包。
wget  http://www.pgbouncer.org/downloads/files/1.16.1/pgbouncer-1.16.1.tar.gz
tar -zxvf pgbouncer-1.16.1.tar.gz
cd pgbouncer-1.16.1

yum install -y libevent-devel

./configure --prefix=/usr/local --with-systemd
make
make install
编译安装 默认PgBouncer是安装到 /usr/local/bin 目录下的。
安装完成:
[root@lhrpgall /]# cd /usr/local/bin/
[root@lhrpgall bin]# ll
total 1884
-rwxr-xr-x 1 root root 1925408 Jan 18 18:45 pgbouncer

[root@lhrpgall ~]# pgbouncer -h
pgbouncer is a connection pooler for PostgreSQL.

Usage:
  pgbouncer [OPTION]... CONFIG_FILE

Options:
  -d, --daemon         run in background (as a daemon)
  -q, --quiet          run quietly
  -R, --reboot         do an online reboot
  -u, --user=USERNAME  assume identity of USERNAME
  -v, --verbose        increase verbosity
  -V, --version        show version, then exit
  -h, --help           show this help, then exit

Report bugs to <https://github.com/pgbouncer/pgbouncer/issues>.
PgBouncer home page: <https://www.pgbouncer.org/>
配置文件
使用系统自带工具(yum或apt-get)安装的PgBouncer的配置文件路径是/etc/pgbouncer/pgbouncer.ini
源码安装后,在/usr/local/share/doc/pgbouncer目录下有一个示例的配置文件pgbouncer.ini,可作为配置文件的模板。
默认的配置和含义如下:
[databases]
appdb = host=172.72.6.30 dbname=lhrdb port=5432

[pgbouncer]
logfile = /var/log/pgbouncer/pgbouncer.log          # 日志文件位置
pidfile = /var/run/pgbouncer/pgbouncer.pid          # pid文件位置
listen_addr = 127.0.0.1                             # 监听的地址
listen_port = 6432                                  # 监听的端口
auth_type = trust                                   # 认证方式
auth_file = /etc/pgbouncer/userlist.txt             	#  认证文件
admin_users = postgres                              # 管理员用户名
stats_users = stats, postgres                      	 #  状态用户?stats和postgres
pool_mode = session                                 # 池的模式,默认session级别
server_reset_query = DISCARD ALL                    #
max_client_conn = 100            	# 最大连接用户数,客户端到pgbouncer的链接数量
default_pool_size = 20                         # 默认池大小,表示建立多少
pool_size = 20				#配置连接池的大小,如果没有配置此项,连接池的大小将使用default_pool_size配置项的值。
默认情况下不配置任何数据库信息,从上面还可以看到,配置主要分为两部分:
第一部分是[databases]区域,是用来配置数据库连接相关信息的。
第二部分是[pgbouncer],是pgbouncer自身的配置。
其中,
[databases]
appdb = host=172.72.6.30 dbname=lhrdb port=5432
本句话说明该pgbouncer创建了针对172.72.6.30的lhrdb的一个连接池,该链接池对调用方的呈现的数据库名称是appdb,它映射到本机的lhrdb数据库上。所有访问pgbouncer上的appdb的请求都会转到lhrdb上完成。
这意味着,客户端通过pgbouncer单次连接时,只能连接到某台主机上的某个数据库。
配置示例
官方配置示例:http://www.pgbouncer.org/config.html
cat > /etc/pgbouncer/pgbouncer.ini <<"EOF"
[databases]
appdb = host=172.72.6.30 dbname=lhrdb port=5432

[pgbouncer]
logfile = /var/log/pgbouncer/pgbouncer.log
pidfile = /var/run/pgbouncer/pgbouncer.pid
listen_addr = *
listen_port = 6432
auth_type = md5
auth_file = /etc/pgbouncer/userlist.txt
admin_users = postgres


;; resolve: unsupported startup parameter: extra_float_digits
ignore_startup_parameters = extra_float_digits

EOF


-- 若使用源码编译安装,则还需要创建如下目录
mkdir -p /etc/pgbouncer/
mkdir -p /var/log/pgbouncer/
mkdir -p /var/run/pgbouncer/
配置密码文件
[pgbouncer]区域使用默认配置,补充说明以下两个配置:
auth_type = trust                  # 认证方式
auth_file = /etc/pgbouncer/userlist.txt         # 认证文件
第一行是用于配置登录pgbouncer的认证方式,和PostgreSQL认证方式相同,默认是trust,即所有的都信任(不需要密码即可登录),还可以使用md5加密的形式。
第二行是用于配置认证用户的,即连接pgbouncer的用户名都保存在该文件中。
当第一行设置为md5加密时,则加密的密码也必须保存在第二行配置的文件中。
如果这个文件不存在,那么登录的时候,无论是哪个用户,都会提示下面的错误:
-bash-4.2$ psql -p 6432 testdb -h 127.0.0.1

psql: ERROR:  No such user: postgres

-bash-4.2$ psql -p 6432 testdb -h 127.0.0.1 -U dbuser
psql: ERROR:  No such user: dbuser
而这个认证文件默认情况下是没有的,因此需要手动生成。
从PostgreSQL的9.x开始,所有的用户密码都是保存在pg_shadow表里。
PostgreSQL 8.x版本则是保存在数据库目录下,可以直接复制过来使用。
生成这个认证文件有两种方式,如下:
1)SQL语句生成认证文件
之前我们说过,用户密码默认是保存在pg_shadow表里的,如下面所示:
appdb=# select usename, passwd from pg_shadow order by 1;
 usename  |               passwd
----------+-------------------------------------
 postgres | md5da3edeb741de62d06ab73785ed222494
(1 row)
usename和passwd两列里面保存的就是我们需要的账号和密码
我们使用copy命令将它们导出来(或者手动编辑也可以):
postgres=# copy (select usename, passwd from pg_shadow order by 1) to '/var/lib/pgsql/9.5/auth_file';

COPY 2
我们打开这个auth_file文件,内容如下:
dbuser md5baa6c789c3728a1a449b82005eb54a19
里面保存有postgres的账号,一般不要使用这个超级管理员的身份,最好删掉。
然后保留可以连接数据库的用户账号和加密后的密码,将这个文件转移到上面配置项指定的位置。并且文件名称要和上面变量里定义的文件名一致,否则会提示找不到这个文件。
最后还要注意的一点是,默认导出的文件里用户名和密码的格式pgbouncer无法识别,需要用双引号引起来才能正确识别
如下所示:
"dbuser" "md5baa6c789c3728a1a449b82005eb54a19"
2)使用mkauth.py来生成文件
这个文件是使用python编写的一个脚本,已经赋予了可执行权限。
执行的时候需要两个参数,基本格式是:
/etc/pgbouncer/mkauth.py 用户列表文件 “数据库连接参数”
示例:
/etc/pgbouncer/mkauth.py /etc/pgbouncer/userlist.txt "host=172.72.6.30 dbname=lhrdb port=5432 user=postgres password=lhr"
这里比较重要的是后面那一段参数,=号两边不能有空格,两个键值对之间要用空格隔开,不能用逗号,否则会报错。用户必须是有查询pg_shadow表权限的用户请记住这里的限制条件。
如果没有错误的话,就会在/etc/pgbouncer/目录下生成userlist.txt文件。
文件内容如下所示:
"dbuser" "md5baa6c789c3728a1a449b82005eb54a19" ""
"postgres" "" ""
默认会备份出PostgreSQL数据库的pg_shadow表里的所有数据库,包括postgres用户。所有的用户名和密码都会用双引号引起来,比手动备份更方便。这里唯一麻烦的就是脚本后面的连接字符串。
3)手动生成文件
配置密码文件,参考:http://www.pgbouncer.org/config.html#authentication-file-format ,密码需要以双引号引起来,然后用户名和密码之间使用空格隔开:
echo '"postgres" "lhr"' >> /etc/pgbouncer/userlist.txt
这样就是明文,不建议。
启动
不能以root启动,会报错:“FATAL PgBouncer should not run as root”。
当用户文件配置好以后,就可以启动pgbouncer来使用了。
使用linux发行版自带的包管理工具安装pgbouncer的时候,它会自动创建一个pgbouncer用户
如果是自己编译的话,则需要手动创建这个用户。创建完成以后。
需要切换到这个用户下来启动pgbouncer,pgbouncer是不允许在root用户下启动的。
-- 若是编译安装
useradd pgbouncer
chown -R pgbouncer.pgbouncer /etc/pgbouncer/
chown -R pgbouncer.pgbouncer /var/log/pgbouncer/
chown -R pgbouncer.pgbouncer /var/run/pgbouncer/

-- 启动,若生产环境使用,那么不建议加-v参数
su - pgbouncer
pgbouncer -d -v /etc/pgbouncer/pgbouncer.ini


-- 若是yum安装
systemctl start pgbouncer
systemctl enable pgbouncer
systemctl status pgbouncer


[root@lhrpgall /]# netstat -tulnp | grep pgb
tcp        0      0 0.0.0.0:6432            0.0.0.0:*               LISTEN      21140/pgbouncer
tcp6       0      0 :::6432                 :::*                    LISTEN      21140/pgbouncer
[root@lhrpgall /]# ps -ef|grep pgb
pg13     21140     0  0 19:25 ?        00:00:00 pgbouncer -d -v /etc/pgbouncer/pgbouncer.ini
pg13     21325 21098  0 19:29 pts/1    00:00:00 tailf /var/log/pgbouncer/pgbouncer.log
root     21389 21342  0 19:29 pts/2    00:00:00 grep --color=auto pgb


[root@lhrpgall ~]# ps -ef|grep pgb
pgbounc+  2173     1  0 10:06 ?        00:00:00 /usr/bin/pgbouncer /etc/pgbouncer/pgbouncer.ini
root      2207   468  0 10:07 pts/3    00:00:00 grep --color=auto pgb
停止
可以通过systemctl来操作,也可以通过kill命令来停止。
systemctl stop pgbouncer
kill命令格式是:
kill `cat /var/run/pgbouncer/pgbouncer.pid`
或
cat /var/run/pgbouncer/pgbouncer.pid | xargs kill -9
登录 pgbouncer虚拟库(管理员终端维护操作)
pgbouncer对外提供了一个虚拟数据库pgbouncer,之所以称为虚拟数据库,是因为它可以提供像PostgreSQL那样的数据库操作界面,但是这个数据库却并不是真实存在的,而是pgbouncer虚拟出来的一个命令行界面。
如果修改了一些配置参数,可以不用重启 pgbouncer 而是 reload 使其生效。
注意:
只有在配置了参数 admin_users 或者 stats_users才会连接到控制台。
登录命令是:
psql -p 6432 -d pgbouncer -U postgres -h 127.0.0.1
登录以后可以使用:
show help; 		#查看所有的帮助命令信息

show clients ;	 #用来查看客户端连接信息

show pools;	 #用来查看连接池信息
日志信息
/var/log/pgbouncer/pgbouncer.log
in B/s:每秒读入字节数。
out B/s:和in B/s一样,表示每秒读出的字节数。
query us:平均每个查询花费的时间,单位微秒(1S(秒)等于1000ms(毫秒),1ms等于1000us(微秒)。)。
wait us : 等待耗时 微秒
xacts/s: 每秒多少个事务操作
queries/s:每秒多少次请求数
xact us:每个事务耗时多少微秒
登陆验证
本地登陆验证
[root@lhrpgall /]# psql -U postgres -d appdb -h 127.0.0.1 -p 6432
Password for user postgres:
psql (13.3, server 13.4 (Debian 13.4-4.pgdg110+1))
Type "help" for help.

appdb=# \l
                                 List of databases
   Name    |  Owner   | Encoding |  Collate   |   Ctype    |   Access privileges
-----------+----------+----------+------------+------------+-----------------------
 lhrdb     | postgres | UTF8     | en_US.utf8 | en_US.utf8 |
 lhrdb2    | postgres | UTF8     | en_US.utf8 | en_US.utf8 |
 lhrdb3    | postgres | UTF8     | en_US.utf8 | en_US.utf8 |
 postgres  | postgres | UTF8     | en_US.utf8 | en_US.utf8 |
 template0 | postgres | UTF8     | en_US.utf8 | en_US.utf8 | =c/postgres          +
           |          |          |            |            | postgres=CTc/postgres
 template1 | postgres | UTF8     | en_US.utf8 | en_US.utf8 | =c/postgres          +
           |          |          |            |            | postgres=CTc/postgres
(6 rows)

appdb=# \c lhrdb
FATAL:  no such database: lhrdb
Previous connection kept
appdb=# \c lhrdb2
FATAL:  no such database: lhrdb2
Previous connection kept
appdb=# \d
          List of relations
 Schema |   Name   | Type  |  Owner
--------+----------+-------+----------
 public | t1       | table | postgres
 public | tb_test  | table | postgres
 public | tb_test2 | table | postgres
 public | tb_test3 | table | postgres
 public | test     | table | postgres
(5 rows)
远程登陆验证
C:\Users\lhrxxt>psql -U postgres -d appdb -h 1192.168.66.35 -p 15439
psql: error: could not translate host name "1192.168.66.35" to address: Unknown host

C:\Users\lhrxxt>psql -U postgres -d appdb -h 192.168.66.35 -p 15439
Password for user postgres:
psql (14.0, server 13.4 (Debian 13.4-4.pgdg110+1))
Type "help" for help.

appdb=# \l
                                 List of databases
   Name    |  Owner   | Encoding |  Collate   |   Ctype    |   Access privileges
-----------+----------+----------+------------+------------+-----------------------
 lhrdb     | postgres | UTF8     | en_US.utf8 | en_US.utf8 |
 lhrdb2    | postgres | UTF8     | en_US.utf8 | en_US.utf8 |
 lhrdb3    | postgres | UTF8     | en_US.utf8 | en_US.utf8 |
 postgres  | postgres | UTF8     | en_US.utf8 | en_US.utf8 |
 template0 | postgres | UTF8     | en_US.utf8 | en_US.utf8 | =c/postgres          +
           |          |          |            |            | postgres=CTc/postgres
 template1 | postgres | UTF8     | en_US.utf8 | en_US.utf8 | =c/postgres          +
           |          |          |            |            | postgres=CTc/postgres
(6 rows)


appdb=#
appdb=# create database lhdb4;
CREATE DATABASE
appdb=# \l
                                 List of databases
   Name    |  Owner   | Encoding |  Collate   |   Ctype    |   Access privileges
-----------+----------+----------+------------+------------+-----------------------
 lhdb4     | postgres | UTF8     | en_US.utf8 | en_US.utf8 |
 lhrdb     | postgres | UTF8     | en_US.utf8 | en_US.utf8 |
 lhrdb2    | postgres | UTF8     | en_US.utf8 | en_US.utf8 |
 lhrdb3    | postgres | UTF8     | en_US.utf8 | en_US.utf8 |
 postgres  | postgres | UTF8     | en_US.utf8 | en_US.utf8 |
 template0 | postgres | UTF8     | en_US.utf8 | en_US.utf8 | =c/postgres          +
           |          |          |            |            | postgres=CTc/postgres
 template1 | postgres | UTF8     | en_US.utf8 | en_US.utf8 | =c/postgres          +
           |          |          |            |            | postgres=CTc/postgres
(7 rows)


appdb=# \c lhrdb4
connection to server at "192.168.66.35", port 15439 failed: FATAL:  no such database: lhrdb4
Previous connection kept

- 点赞
- 收藏
- 关注作者
评论(0)