3天上手Ascend C编程 | Day3 Ascend C算子调试调优方法
本文分享自《 【2023 · CANN训练营第一季】——Ascend C算子开发入门——第三次课》,作者:dayao
Ascend C是CANN针对算子开发场景推出的编程语言,原生支持C和C++标准规范,最大化匹配用户开发习惯;通过多层接口抽象、自动并行计算、孪生调试等关键技术,极大提高算子开发效率,助力AI开发者低成本完成算子开发和模型调优部署。

固定shape算子改写成动态shape算子
1、什么是动态shape
动态shape和固定shape是一对概念。固定shape是指,在编译时指定shape大小,运行时不需要指定shape大小。在开发固定shape算子过程中,一个算子源代码可以支持多个固定shape,但需要在编译时明确了shape的实际值。而动态shape则是在编译时不指定shape大小,在运行时传入实际的shape大小,算子编译后的二进制文件支持任意shape,或者是一个或多个shape范围。

2、如何实现动态shape
课程的第2次课,讲述是采用固定shape的加法实例,本次课讲述,如何将固定shape改为动态shape的算子。也就是,将控制形状的BLOCK DIM,TOTAL LENGTH,TILE NUM这些变量做成tiling结构体,作为参数传给核函数。如下所示:

-
BLOCK_DIM:并行计算使用的核数 -
TOTAL_LENGTH:总共需要计算的数据个数 -
TILE_NUM:每个核上计算数据分块的个数
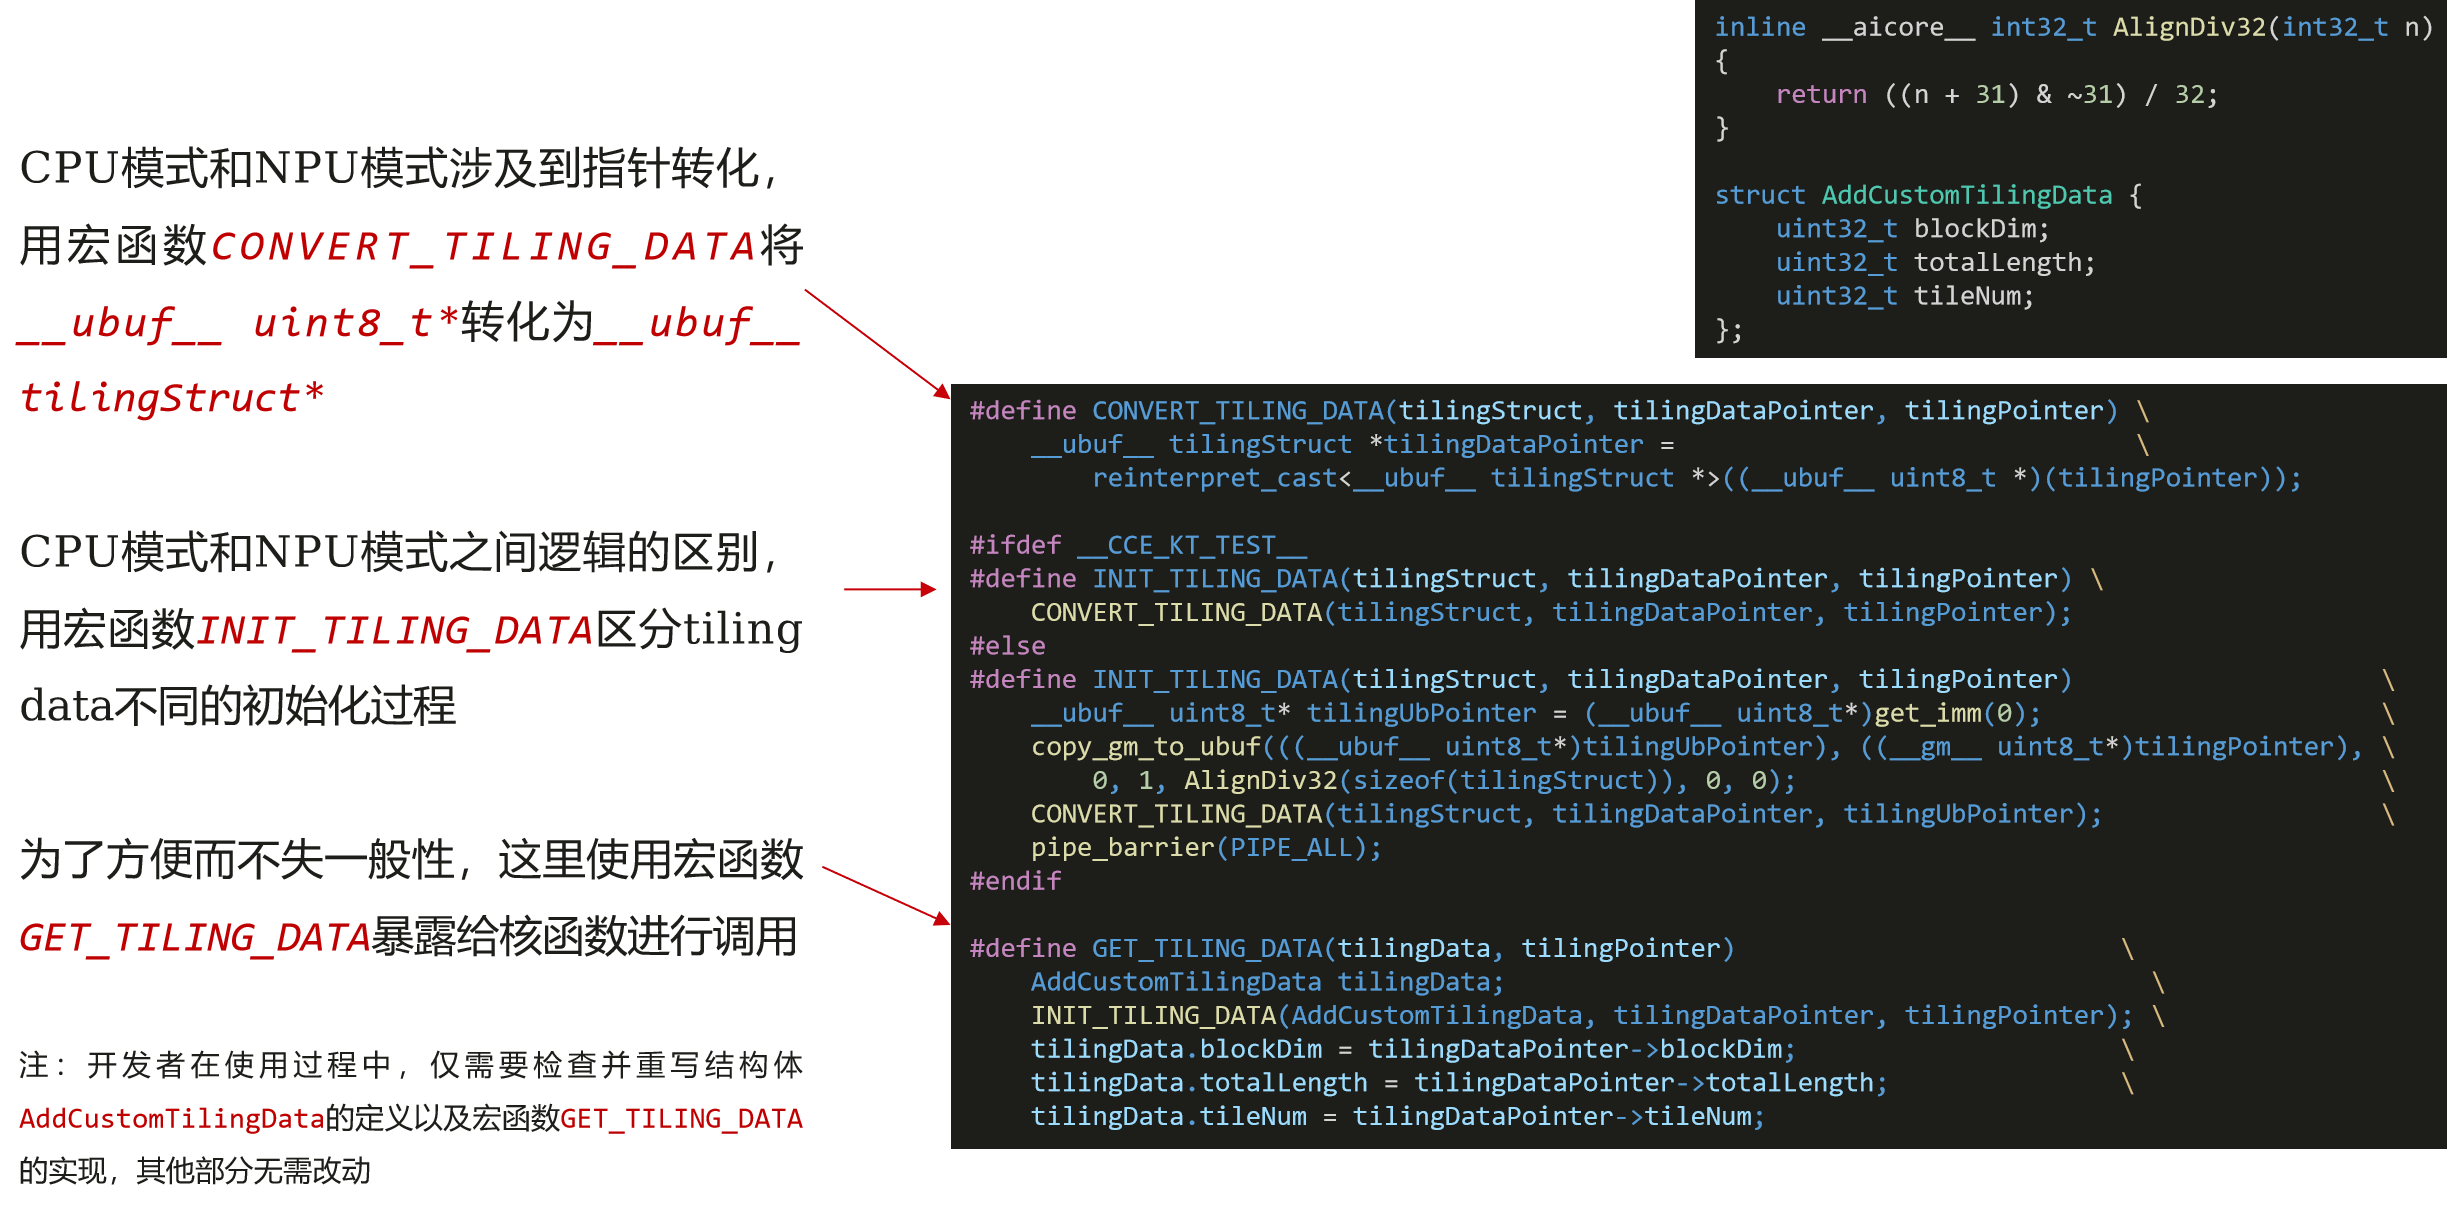
struct AddCustomTilingData {
    uint32_t blockDim;
    uint32_t totalLength;
    uint32_t tileNum;
};
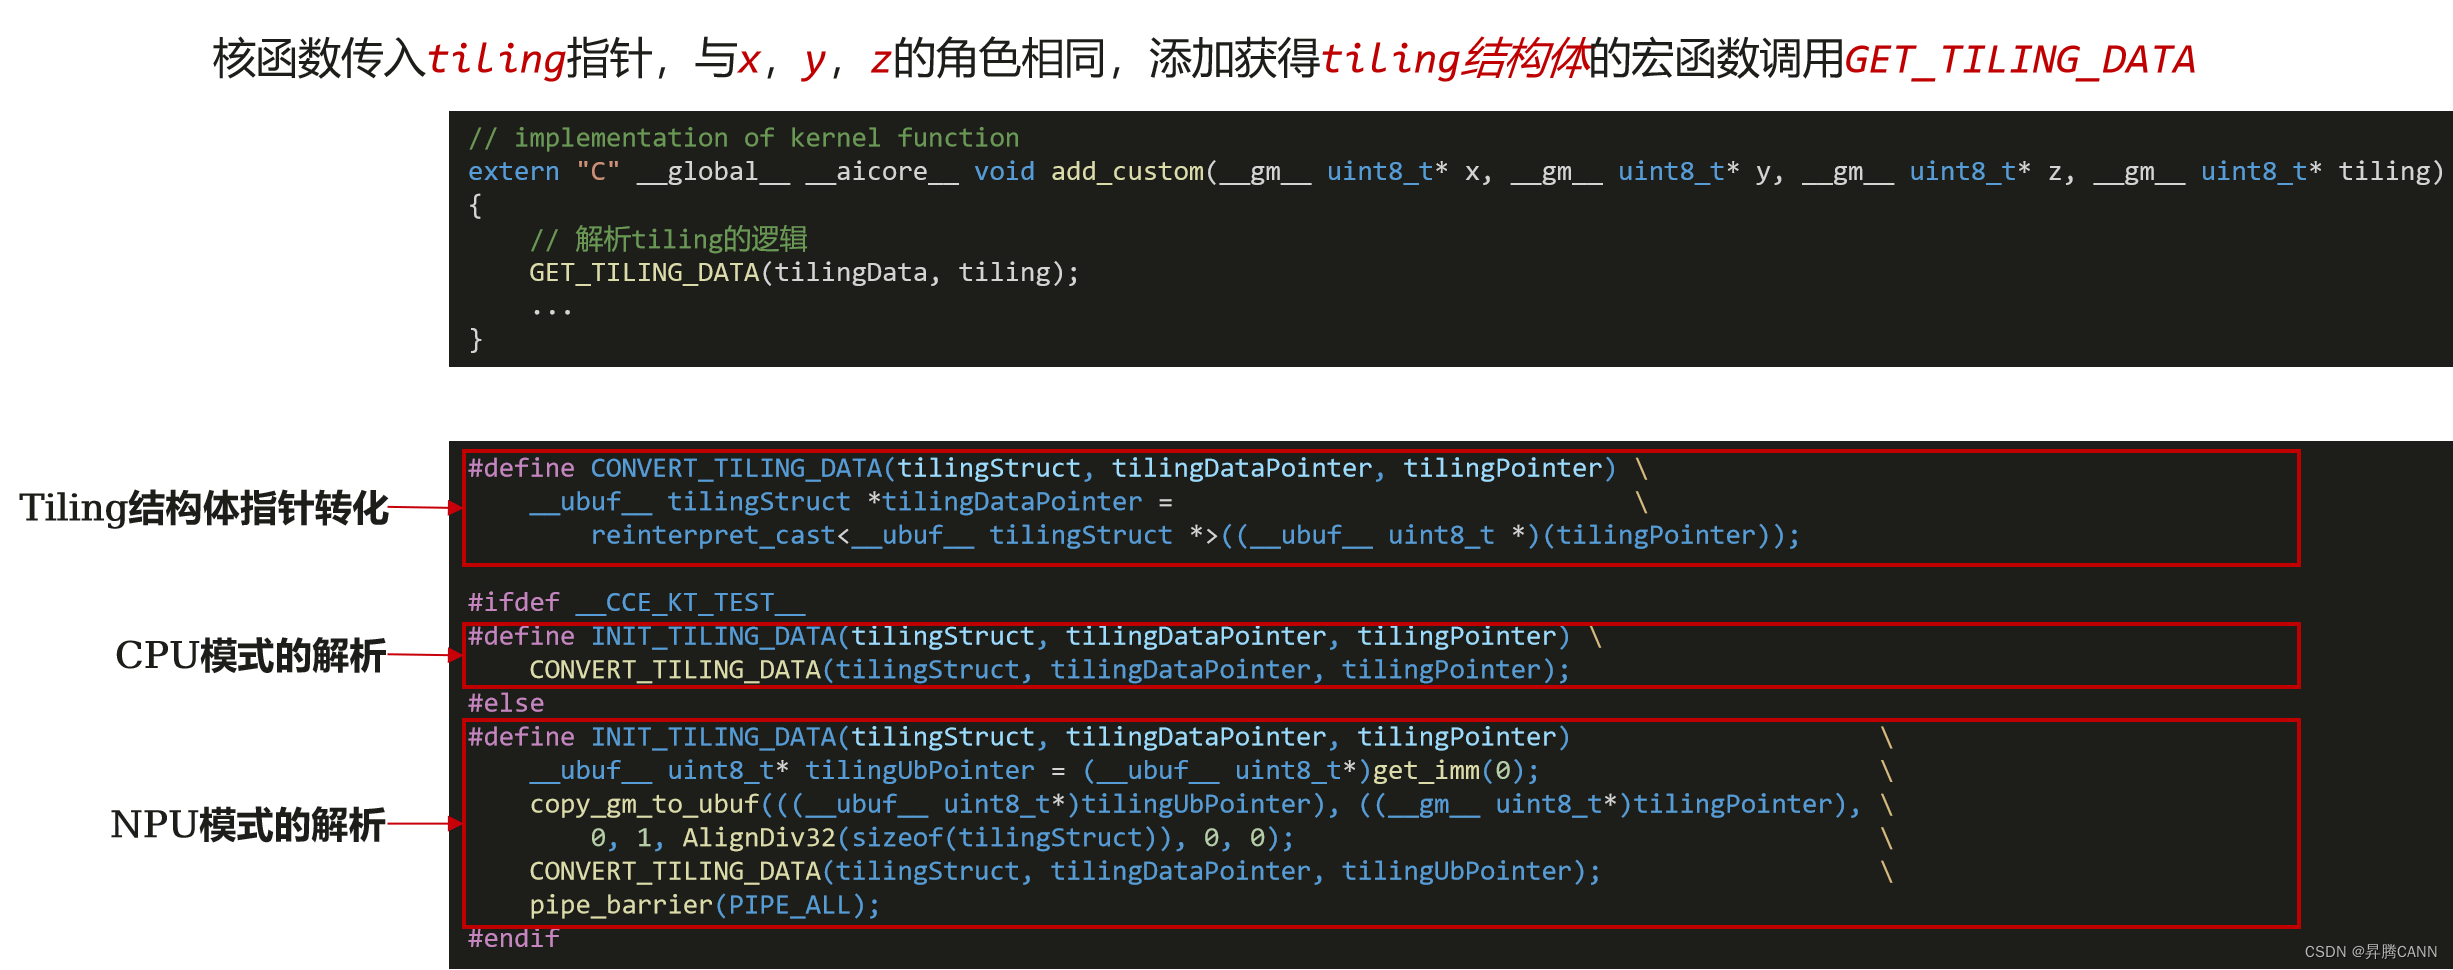
3)动态shape算子的tiling解析函数


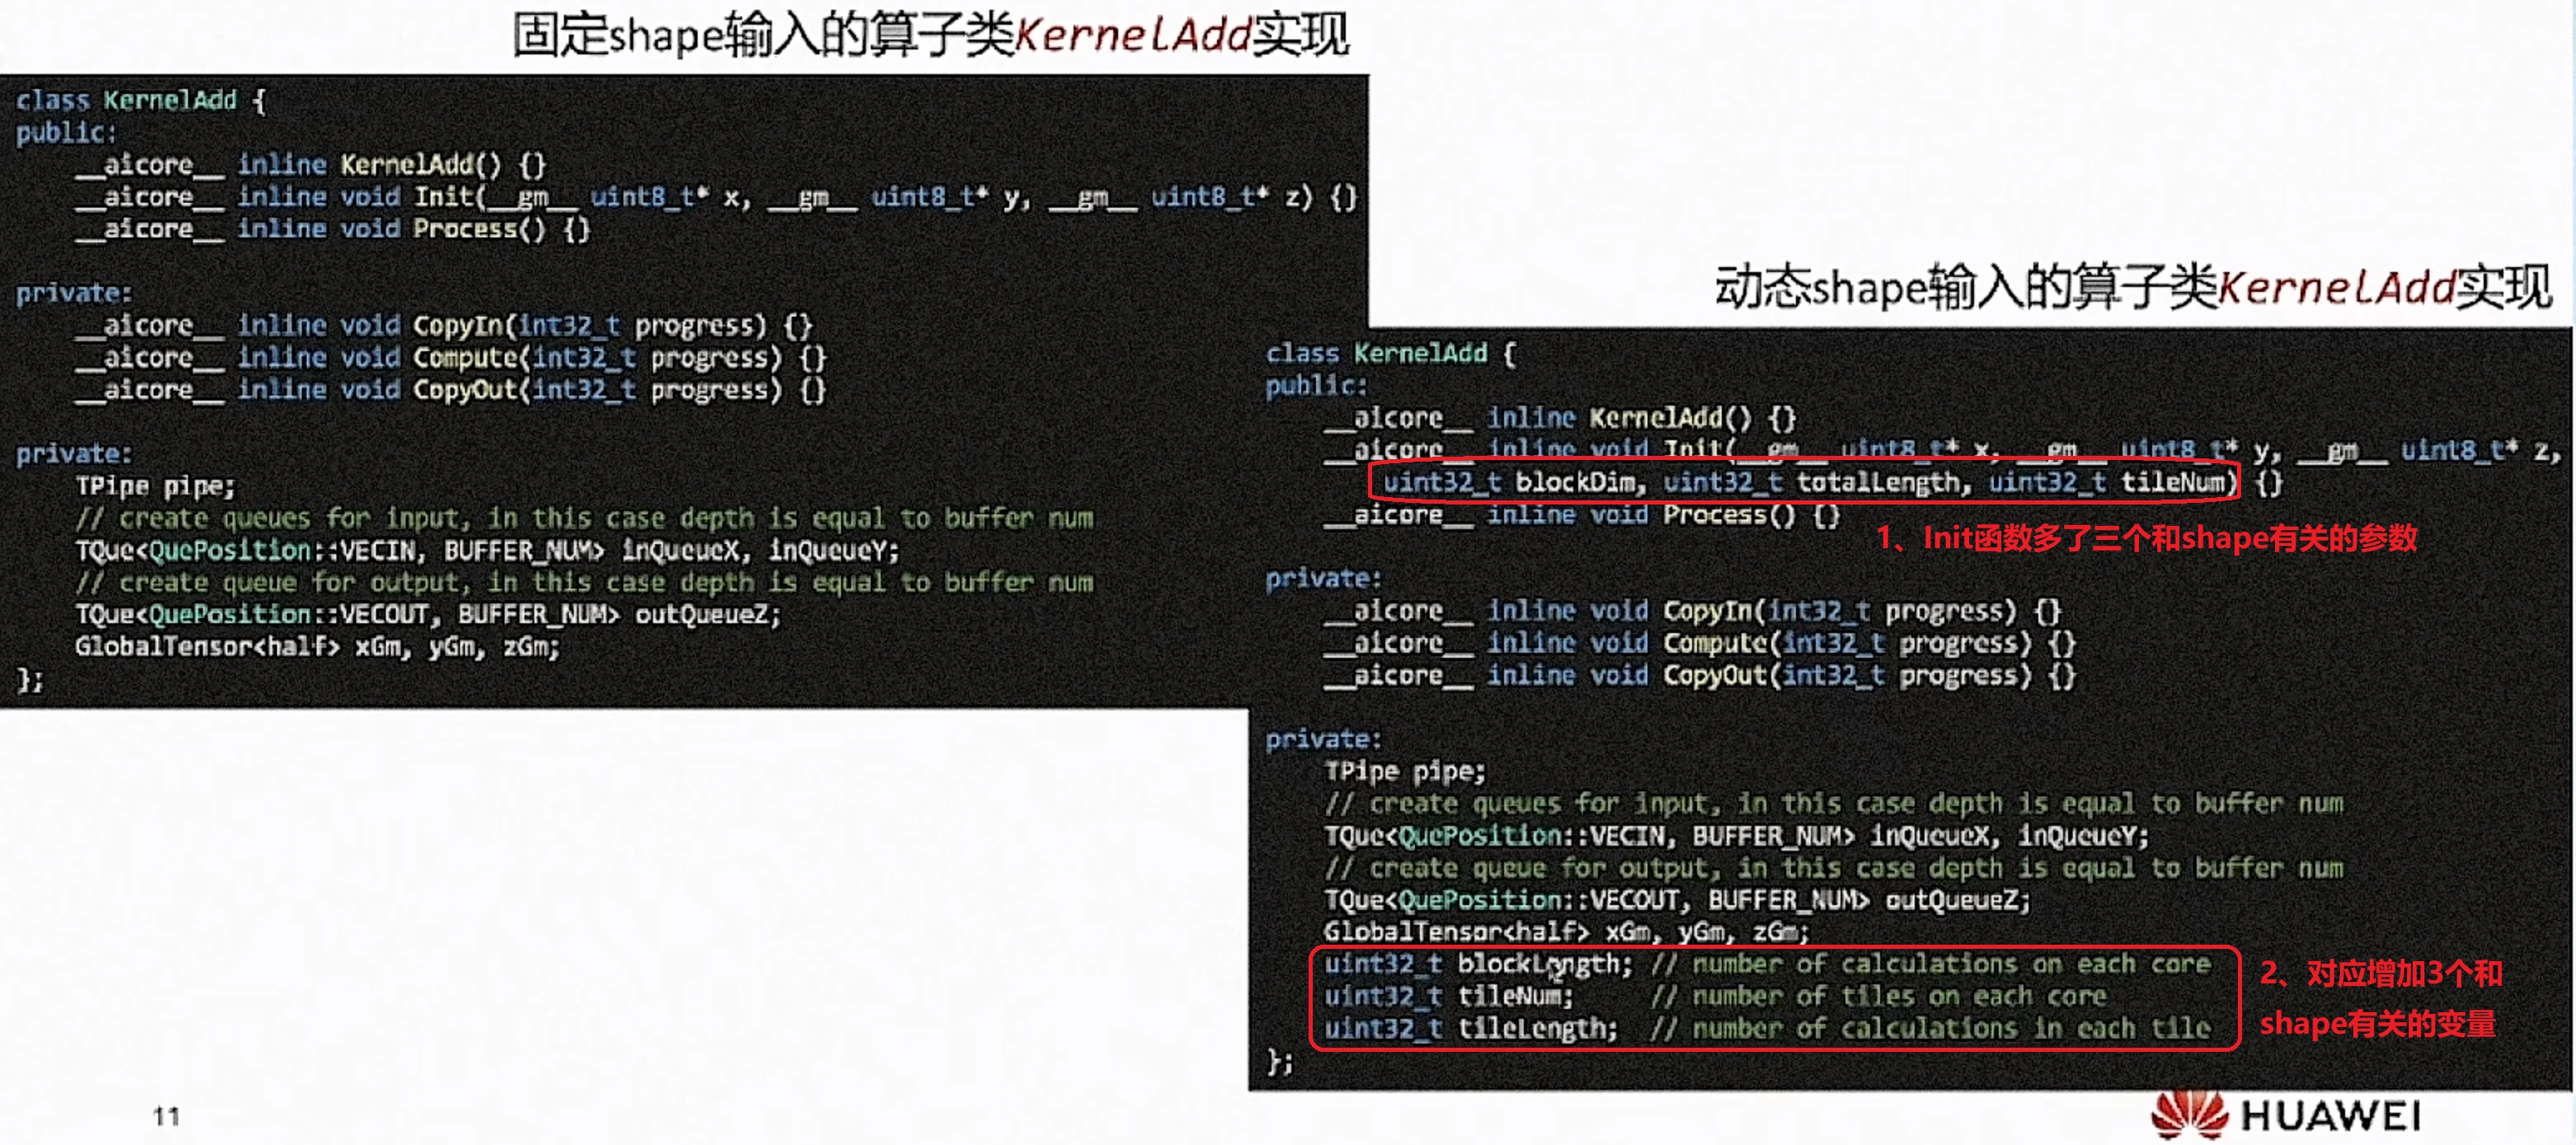
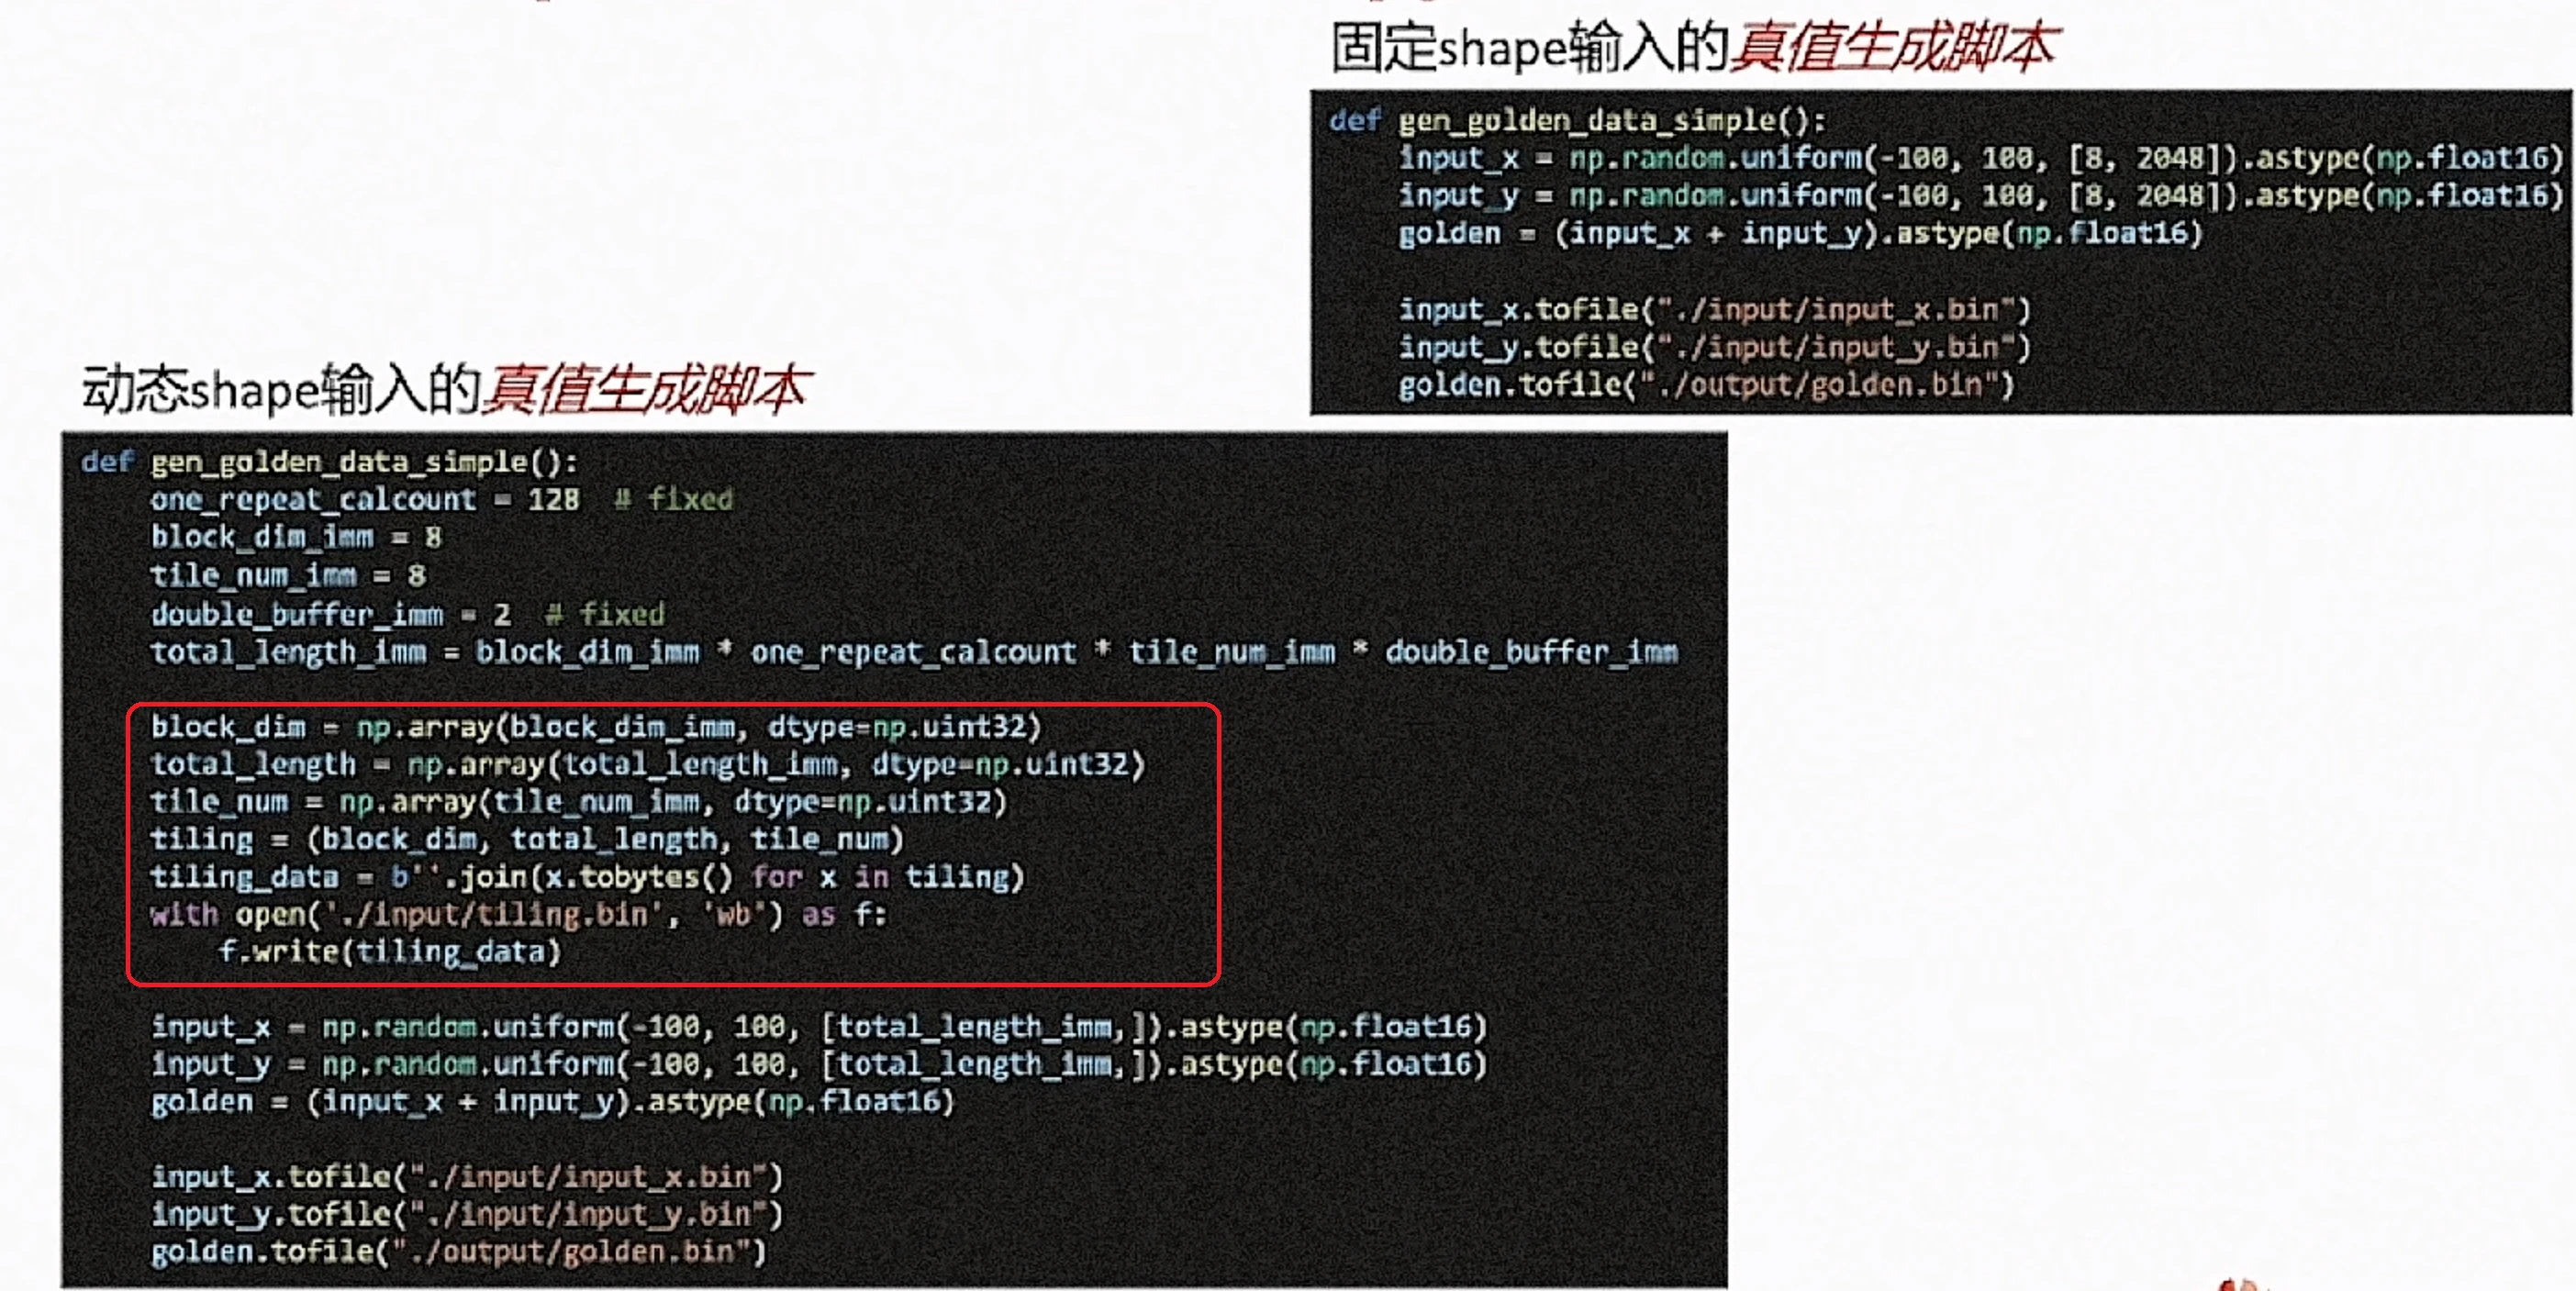
4、固定与动态shape实现对比
constexpr int32_t BLOCK_DIM = 8;                                      // num of core used
constexpr int32_t TOTAL_LENGTH = 8 * 2048;                            // total length of data
constexpr int32_t BLOCK_LENGTH = TOTAL_LENGTH / BLOCK_DIM;            // length computed of each core
constexpr int32_t TILE_NUM = 8;                                       // split data into 8 tiles for each core
constexpr int32_t BUFFER_NUM = 2;                                     // tensor num for each queue
constexpr int32_t TILE_LENGTH = BLOCK_LENGTH / TILE_NUM / BUFFER_NUM; // each tile length is separated to 2 part, due to double buffer

// implementation of kernel function
extern "C" __global__ __aicore__ void add_custom(__gm__ uint8_t* x, __gm__ uint8_t* y, __gm__ uint8_t* z)
{
    KernelAdd op;
    op.Init(x, y, z);
    op.Process();
}
动态shape输入的核函数实现:
constexpr int32_t BUFFER_NUM = 2; // tensor num for each queue

// implementation of kernel function
extern "C" __global__ __aicore__ void add_custom(__gm__ uint8_t* x, __gm__ uint8_t* y, __gm__ uint8_t* z, __gm__ uint8_t* tiling)
{
    GET_TILING_DATA(tilingData, tiling);
    KernelAdd op;
    op.Init(x, y, z, tilingData.blockDim, tilingData.totalLength, tilingData.tileNum);
    op.Process();
}
__aicore__ inline void Init(__gm__ uint8_t* x, __gm__ uint8_t* y, __gm__ uint8_t* z)
{
    // get start index for current core, core parallel
    xGm.SetGlobalBuffer((__gm__ half*)x + block_idx * BLOCK_LENGTH);
    yGm.SetGlobalBuffer((__gm__ half*)y + block_idx * BLOCK_LENGTH);
    zGm.SetGlobalBuffer((__gm__ half*)z + block_idx * BLOCK_LENGTH);
    // pipe alloc memory to queue, the unit is Bytes
    pipe.InitBuffer(inQueueX, BUFFER_NUM, TILE_LENGTH * sizeof(half));
    pipe.InitBuffer(inQueueY, BUFFER_NUM, TILE_LENGTH * sizeof(half));
    pipe.InitBuffer(outQueueZ, BUFFER_NUM, TILE_LENGTH * sizeof(half));
}__aicore__ inline void Init(__gm__ uint8_t* x, __gm__ uint8_t* y, __gm__ uint8_t* z,
uint32_t blockDim, uint32_t totalLength, uint32_t tileNum)
{
this->blockLength = totalLength / blockDim;
this->tileNum = tileNum;
this->tileLength = this->blockLength / tileNum / BUFFER_NUM;
// get start index for current core, core parallel
xGm.SetGlobalBuffer((__gm__ half*)x + block_idx * this->blockLength);
yGm.SetGlobalBuffer((__gm__ half*)y + block_idx * this->blockLength);
zGm.SetGlobalBuffer((__gm__ half*)z + block_idx * this->blockLength);
// pipe alloc memory to queue, the unit is Bytes
pipe.InitBuffer(inQueueX, BUFFER_NUM, this->tileLength * sizeof(half));
pipe.InitBuffer(inQueueY, BUFFER_NUM, this->tileLength * sizeof(half));
pipe.InitBuffer(outQueueZ, BUFFER_NUM, this->tileLength * sizeof(half));
}
size_t inputByteSize = 8 * 2048 * sizeof(uint16_t);
size_t outputByteSize = 8 * 2048 * sizeof(uint16_t);
uint32_t blockDim = 8;uint8_t* tiling = (uint8_t*)addcustom::GmAlloc(tilingSize);
ReadFile("./input/tiling.bin", tilingSize, tiling, tilingSize);uint32_t blockDim = (*(const uint32_t *)(tiling));
size_t inputByteSize = blockDim * 2048 * sizeof(uint16_t);
size_t outputByteSize = blockDim * 2048 * sizeof(uint16_t);
// =========================================
aclrtMallocHost((void**)(&tilingHost), tilingSize);
ReadFile("./input/tiling.bin", tilingSize, tilingHost, tilingSize);
uint32_t blockDim = (*(const uint32_t *)(tilingHost));
size_t inputByteSize = blockDim * 2048 * sizeof(uint16_t);
size_t outputByteSize = blockDim * 2048 * sizeof(uint16_t);
5、运行结果


CPU模式下算子调试技术
1、使用GDB进行调试
source /usr/local/Ascend/ascend-toolkit/set_env.sh
gdb --args add_custom_cpu
set follow-fork-mode child
break add_custom.cpp:45
run
list
backtrace
print i
break add_custom.cpp:56
continue
display xLocal
quit
由于cpu调测已转为多进程调试,每个核都是一个独立的子进程,故gdb需要转换成子进程调试的方式。
set follow-fork-mode child(gdb) set detach-on-fork off(gdb) show detach-on-fork(gdb) info inferiors
Num Description
* 1 process 19613(gdb) info inferiors
Num Description
* 1 process 19613
2 process 19626(gdb) inferior 2[Switching to inferior 2
[process 19626] ($HOME/demo)]
(gdb) info inferiors Num Description
1 process 19613
* 2 process 196262、使用printf或者std::cout
在CPU代码侧直接插入C/C++的打印命令,如printf、std:.cout,但注意NPU模式下不支持打印语句,所以需要添加内置宏__CCE KT TEST__ 予以区分。
性能数据采集与分析
1.设置环境变量(昇腾实际安装的位置):
source /usr/local/Ascend/ascend-toolkit/../set_env.sh2.测试NPU模式下的Ascend C算子,保证其精度正确,生成对应的二进制可执行文件:
bash run.sh add_tik2 ascend910 AiCore npu3.使用msprof工具采集性能,详细的介绍请参考昇腾社区文档:性能分析工具使用教程
用户可以根据自身的需要灵活组合性能分析指令,例如:
msprof --application="./add_custom_npu" --output="./out" --ai-core=on --aic-metrics="PipeUtilization"4.在当前目录会生成out文件夹,在device_0/summary/op_summary_0_1.csv能够看到一些具体的数据:
mte2类型指令(DDR->AICORE搬运类指令)的cycle数在所有指令的cycle数中的占用比
mte3类型指令(AICORE->DDR搬运类指令)的cycle数在所有指令的cycle数中的占用比
vector类型指令(向量类运算指令)的cycle数在所有指令的cycle数中的占用比
接下来就可以针对实际情况进行相应优化。
更多学习资源
3天上手Ascend C编程 | Day1 Ascend C基本概念及常用接口
3天上手Ascend C编程 | Day2 通过Ascend C编程范式实现一个算子实例
3天上手Ascend C编程 | Day3 Ascend C算子调试调优方法
- 点赞
- 收藏
- 关注作者


评论(0)