使用ORBSLAM2进行kineticV2稠密建图,实时转octomap建图以及导航

决定总结最近一个月的工作,这个月在orbslam2的基础上,使用kineticV2完成了稠密点云地图的重建,实现了点云的回环,并使用octomap转换成实时的八叉树地图,导航部分已经有了思路,打算下个月所一个基于octomap的航迹生成能用在视觉的导航上。
一、传感器和依赖包安装
PC性能:Dell xps13 内存16GB 硬盘SSD:500GB 显卡:Intel iris集显
操作系统:ubuntu16.04 ROS:kinetic版本
依赖库版本:eigen3.1.2 、pcl-1.7、opencv3.2、vtk6.2、octomap1.9、
安装顺序:
1、先安装eigen3.1.2(涉及到很多东西,所以先解决eigen问题)
2、安装pcl1.7、再安装opencv3.2
3、安装kineticV2的libfreenect2、iai_kinect2
4、最后安装octomap
安装eigen3.1.2
cd eigen-eigen-5097c01bcdc4
mkdir build &&cd build
cmake ..
sudo make install
查看eigen版本
pkg-config --modversion eigen3
注:安装eigen不要更改安装路径,这样更换版本时可以自动覆盖原来的路径
2、pcl
本代码使用pcl-1.7版本开发,删除其他版本pcl
locate pcl查看其他版本的pcl安装在哪里,一般存于像/usr/local/share/pcl-1.8 、/usr/local/lib/pkgconfig/等区域,sudo rm -rf 文件路径删除。
例:
sudo rm -rf /usr/local/share/pcl-1.8 /usr/local/lib/pkgconfig/pcl*
locate pcl后如果还有这个文件,打开文件夹的形式打开到那个目录下再看看。有时候多余文件夹或文件已经删了,但是通过命令行locate的还是会有。
cd pcl-pcl-1.7.2
mkdir build&&cd build
cmake ..
make -j8 (编译大概30分钟)
sudo make install
编译有问题的话百度下,基本上都是eigen或者各种依赖库版本不对导致的。
3、下载安装libfreenect(Kinect开源驱动)
安装方式参考https://github.com/OpenKinect/libfreenect2
git clone https://github.com/OpenKinect/libfreenect2.git

cd libfreenect2

sudo apt-get install build-essential cmake pkg-config

sudo apt-get install libusb-1.0-0-dev

sudo apt-get install libturbojpeg libjpeg-turbo8-dev

sudo apt-get install libglfw3-dev

sudo apt-get install libopenni2-dev

cd ..

mkdir build && cd build

cmake .. -DCMAKE_INSTALL_PREFIX=$HOME/freenect2

make

make install
设定udev rules:
libfreenect2目录下执行
sudo cp ../platform/linux/udev/90-kinect2.rules /etc/udev/rules.d/
重新插拔设备
运行Demo程序: libfreenect2目录下执行 ./build/bin/Protonect, 不出意外, 应该能够看到如下效果:
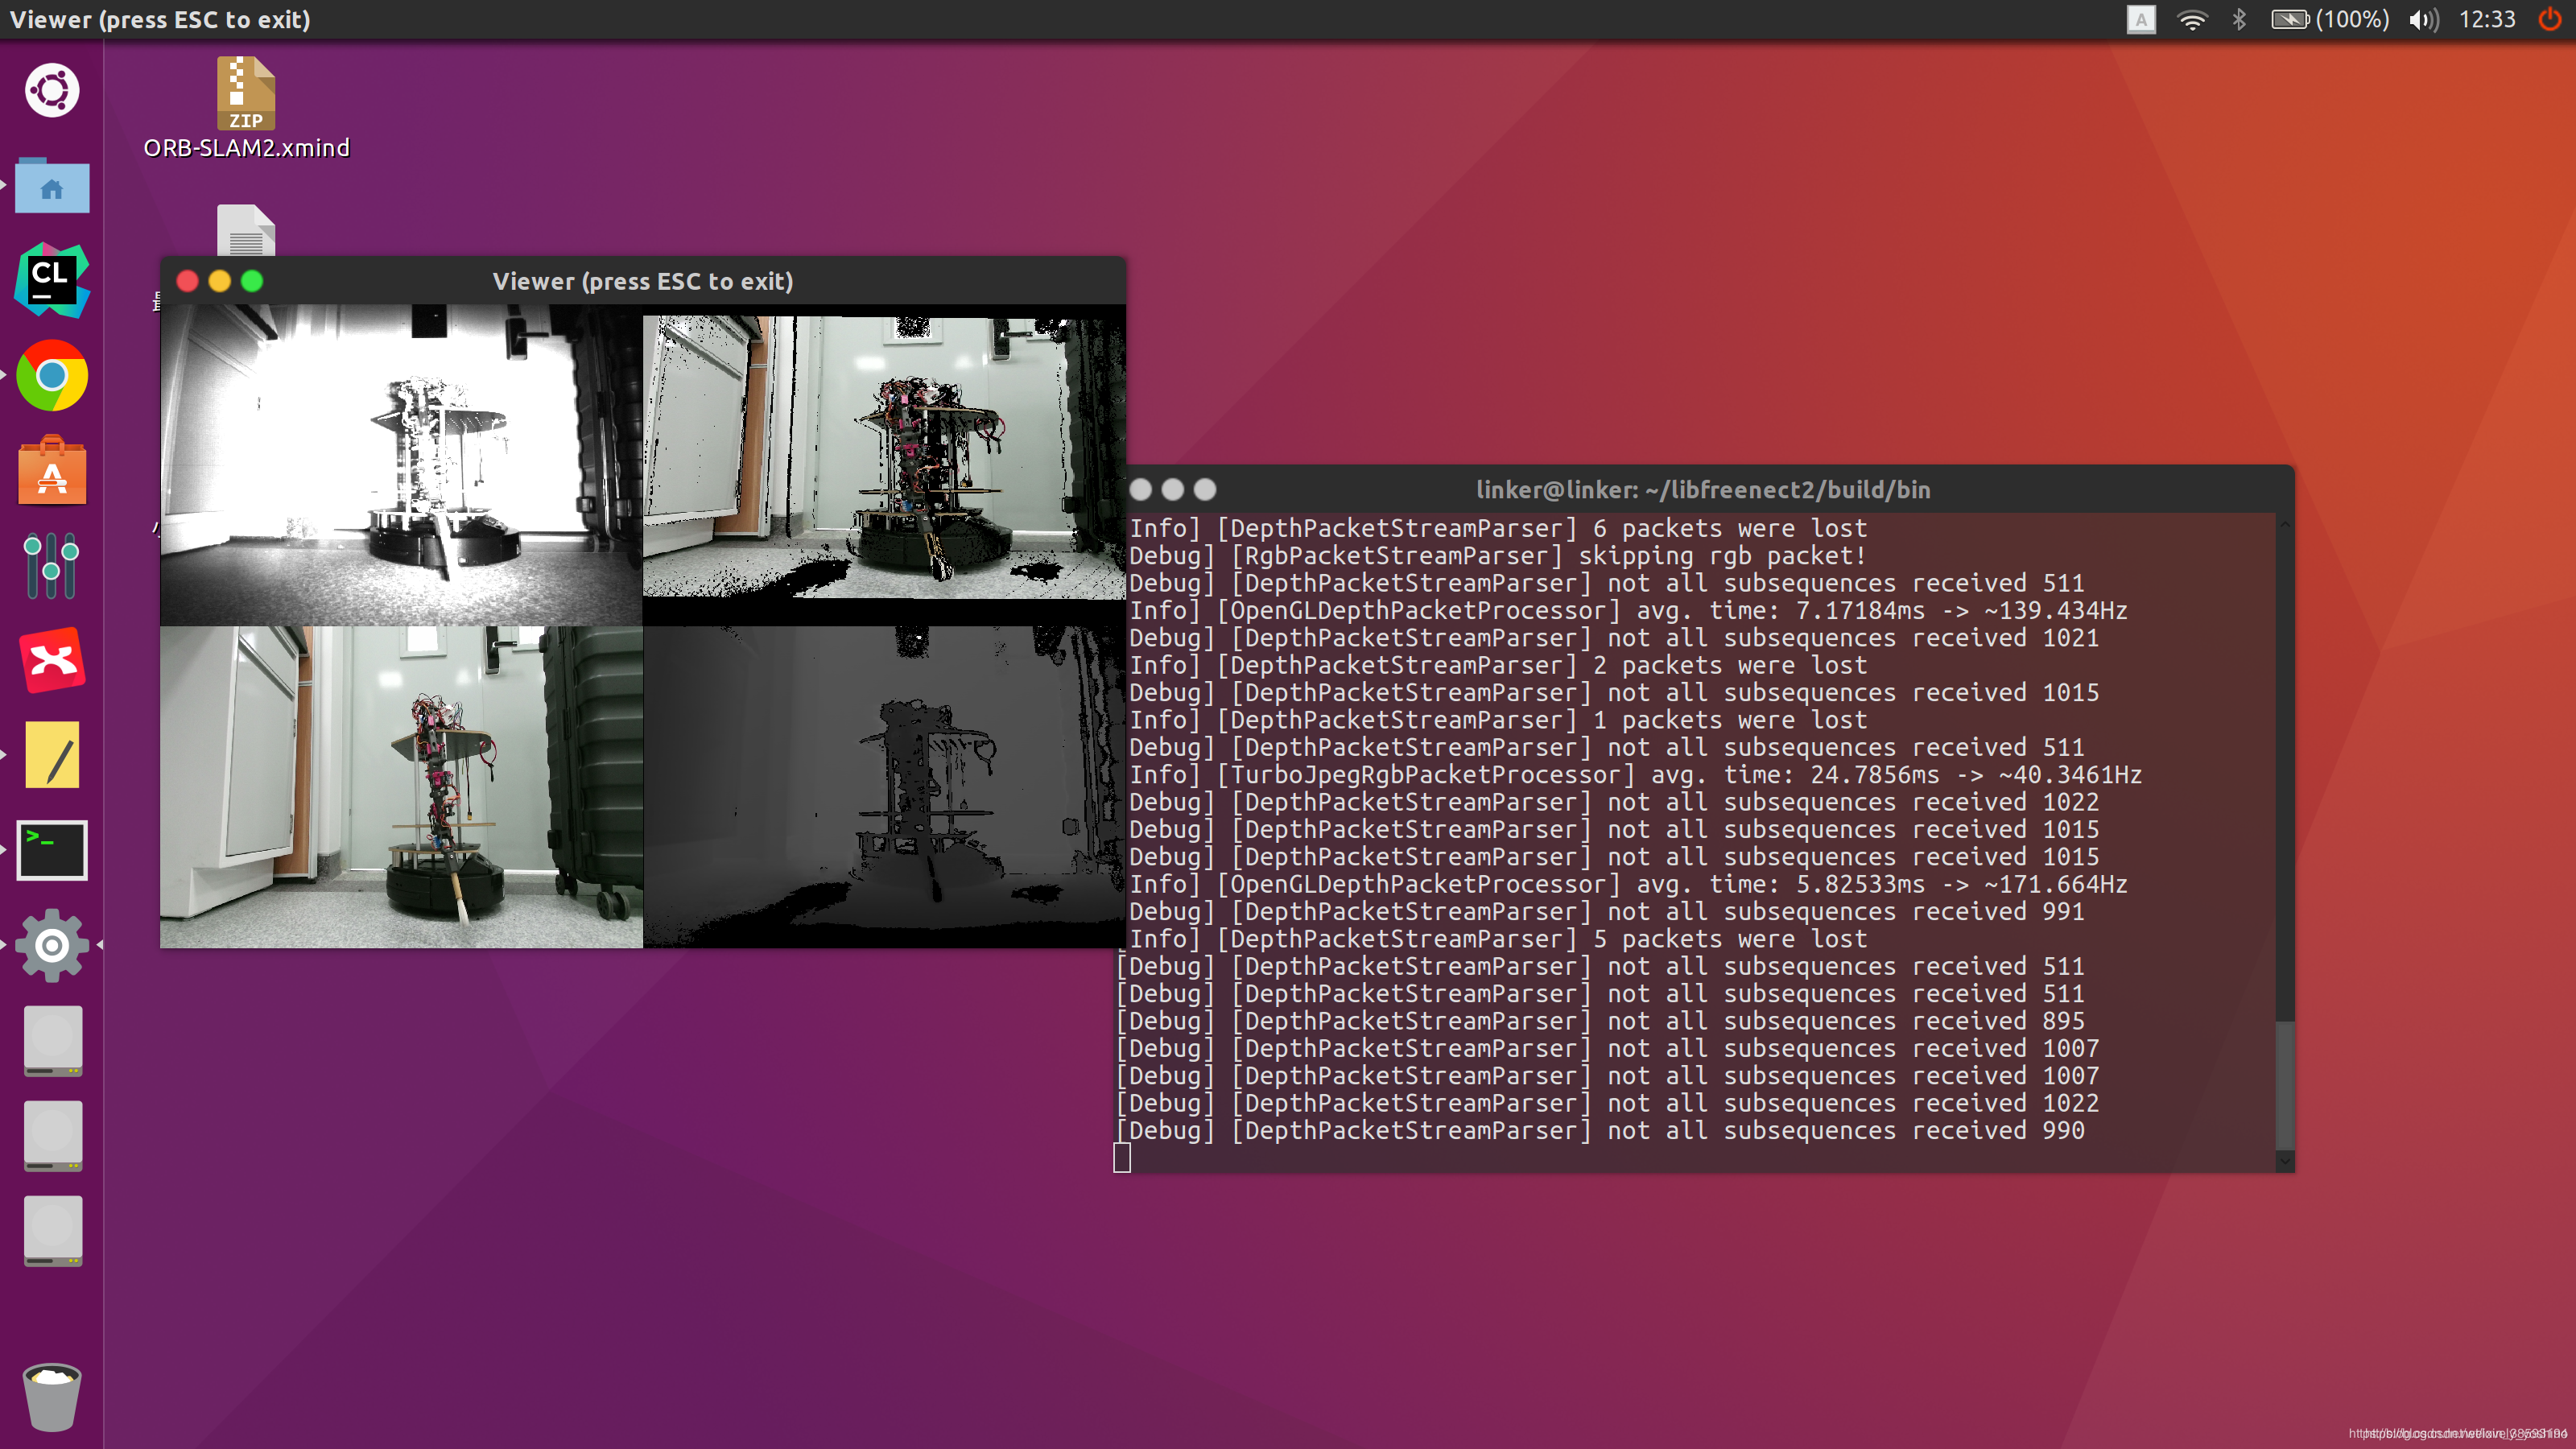
注意:这里要分别测测cpu、opengl、opencl模型下的情况
./build/bin/Protonect cpu

./build/bin/Protonect gl

./build/bin/Protonect cl
尤其是使用opengl和opencl跑的,NVIDIA和Intel需要先安装NVIDIA的cuda后再执行,opencl执行不过关会影响后面iai_kinect2安装后执行roslaunch kinect2_bridge kinect2_bridge.launch的效果,这里我们先测一下,只要有图像就行,如果gl、或者cl执行不出来问题先保留,在iai_kinect2安装后再给出对应解决方案。
4、iai_kinect2
利用命令行从Github上面下载工程源码到工作空间内src文件夹内:
cd ~/catkin_ws/src/

git clone https://github.com/code-iai/iai_kinect2.git

cd iai_kinect2

rosdep install -r --from-paths .

cd ~/catkin_ws

catkin_make -DCMAKE_BUILD_TYPE="Release"
安装iai-kinect2操作这一步"rosdep install -r --from-paths 出现错误
ERROR: the following packages/stacks could not have their rosdep keys resolved
to system dependencies:
kinect2_viewer: Cannot locate rosdep definition for [kinect2_bridge]
kinect2_calibration: Cannot locate rosdep definition for [kinect2_bridge]
kinect2_bridge: Cannot locate rosdep definition for [kinect2_registration]
Continuing to install resolvable dependencies…
解决办法:命令改写为:
rosdep install --from-paths ~/catkin_ws/src/iai_kinect2 --ignore-src -r
执行下面命令查看能否正常执行kineticV2
roslaunch kinect2_bridge kinect2_bridge.launch
如果安装正常是可以执行的,
…
[ INFO] [1565591147.113376730]: [DepthRegistration::New] Using CPU registration method!
[ INFO] [1565591147.113685492]: [DepthRegistration::New] Using CPU registration method!
[ INFO] [1565591147.192329239]: [Kinect2Bridge::main] waiting for clients to connect
这里最后一行显示等待客户端连接,这个是正常的,因为会产生大量的计算量,因此默认不会自动打开显示窗口,
执行rostopic list明显看到是有话题的,当订阅相关话题时才会有数据。执行:
rosrun rviz rviz
左下角add —— image 在Image Topic中选/kinect2/qhd/image_color_rect ,可以看到图像,则kinect2可以正常使用了
5、出错排雷
好,关于kineticV2该安装的都安装完了,接下来我讲讲我遇到过的问题,供各位朋友们参考
a、其实我遇到的核心问题就是双显卡状态下,cl不能执行的问题。一开始在我的台式机(双显卡)上执行./build/bin/Protonect cl,报错,找不到opencl设备;执行roslaunch kinect2_bridge kinect2_bridge.launch。报错如下:
[ INFO] [1565590436.239968384]: [DepthRegistration::New] Using OpenCL registration method!
[ INFO] [1565590436.240130258]: [DepthRegistration::New] Using OpenCL registration method!
beignet-opencl-icd: no supported GPU found, this is probably the wrong opencl-icd package for this hardware
(If you have multiple ICDs installed and OpenCL works, you can ignore this message)
[ INFO] [1565590436.245914876]: [DepthRegistrationOpenCL::init] devices:
[ERROR] [1565590436.245966385]: [DepthRegistrationOpenCL::init] could not find any suitable device
[Info] [Freenect2DeviceImpl] closing…
[Info] [Freenect2DeviceImpl] releasing usb interfaces…
[Info] [Freenect2DeviceImpl] deallocating usb transfer pools…
[Info] [Freenect2DeviceImpl] closing usb device…
[Info] [Freenect2DeviceImpl] closed
[ERROR] [1565590436.247492556]: [Kinect2Bridge::start] Initialization failed!
…
[Error] [OpenCLDepthPacketProcessorImpl] OpenCLDepthPacketProcessor is not initialized!
[Error] [OpenCLDepthPacketProcessorImpl] OpenCLDepthPacketProcessor is not initialized!
[Error] [OpenCLDepthPacketProcessorImpl] OpenCLDepthPacketProcessor is not initialized!
[Info] [Freenect2DeviceImpl] submitting rgb transfers…
[Info] [Freenect2DeviceImpl] submitting depth transfers…
[Error] [DepthPacketStreamParser] Packet buffer is NULL
[Error] [DepthPacketStreamParser] Packet buffer is NULL
查看错误信息我们可以得知问题出在opencl上,找不到opencl设备
解决方案:
a、查看https://github.com/OpenKinect/libfreenect2里关于双显卡的安装依赖包,下载nvidia对应显卡的cuda,两个显卡都安装后,重新编译,再执行其他操作。在xps13的笔记本上只有一个显卡,所以一遍通过。
b、如果不安装opencl,则可以通过opengl+cpu的形式执行,opengl用来计算深度图(depth),cpu用来计算(color)的方式,解决。
修改iai_kinect2/kinect2_bridge/launch下kinect2_bridge.launch
将
<arg name="depth_method" default="default"/>
<arg name="reg_method" default="default"/>
修改为
<arg name="depth_method" default="opengl"/>
<arg name="reg_method" default="cpu"/>
再次执行roslaunch kinect2_bridge kinect2_bridge.launch,报错
[Kinect2Bridge::initRegistration] CPU registration is not available! ".
参考解决方案:https://github.com/code-iai/iai_kinect2/issues/447
这里找不到cpu是因为eigen找不到的原因
locate FindEigen3.cmake
locate找到FindEigen3.cmake复制到iai_kinect2/kinect2_registration/cmake下,重新catkin_make整个iai_kinect2工程可解决问题。
6、安装octomap1.9
源码下载git clone https://github.com/OctoMap/octomap.git
cd octomap
mkdir build&&cd build
cmake …
make
sudo make install
传感器安装部分结束。安装参考博客https://blog.csdn.net/wuguangbin1230/article/details/77184032
二、基于ORBSLAM2的pcl-1.7点云拼接与三维稠密点云重建
先进行个稠密点云的三维重建,感谢高博做出的工作!https://github.com/gaoxiang12/ORBSLAM2_with_pointcloud_map
在高博基础上,另一位大佬给稠密地图加了回环https://github.com/tiantiandabaojian/ORB-SLAM2_RGBD_DENSE_MAP.git
我的工作是将kineticV2相机的稠密点云实时转换成octomap,并在rviz里进行展示。
原理:用单目、双目、RGBD都可以进行稠密地图的建立,建立全局地图是我们实现导航的第一步,通过相机图像将像素转换为点云(pointcloud)数据,进而进行拼接,在此基础上如果要恢复物体外观轮廓,就需要使用三角网格(mesh)、面片(surfel)进行建图,这样的生成的pcd点云地图往往很大,跑tum生成的数据集都可达到5、600MB的大小,用于导航的话非常不利于我们设备进行导航地图的导入,所以亦可以通过体素(voxel)占据网格地图(Occupancy Map)。
点云包含xyz和rgb信息
外点滤波器以及降采样滤波器。
数据集实现效果:
先抛出代码,后面解释
pointcloudmapping.c文件
/*
 * <one line to give the program's name and a brief idea of what it does.>
 * Copyright (C) 2016  <copyright holder> <email>
 *
 * This program is free software: you can redistribute it and/or modify
 * it under the terms of the GNU General Public License as published by
 * the Free Software Foundation, either version 3 of the License, or
 * (at your option) any later version.
 *
 * This program is distributed in the hope that it will be useful,
 * but WITHOUT ANY WARRANTY; without even the implied warranty of
 * MERCHANTABILITY or FITNESS FOR A PARTICULAR PURPOSE.  See the
 * GNU General Public License for more details.
 *
 * You should have received a copy of the GNU General Public License
 * along with this program.  If not, see <http://www.gnu.org/licenses/>.
 *
 */

#include "pointcloudmapping.h"
#include <KeyFrame.h>
#include <opencv2/highgui/highgui.hpp>
#include <pcl/visualization/cloud_viewer.h>
#include <pcl/filters/statistical_outlier_removal.h>
#include "Converter.h"
#include "PointCloude.h"
#include "System.h"


int currentloopcount = 0;
/*
 *
 * @param resolution_ :体素大小分辨率,分辨率越小,单个体素越小
 * @param meank_ : meank_ 为在进行统计时考虑查询邻近点个数
 * @param thresh_:设置距离阈值,其公式是 mean + global stddev_mult * global stddev,即mean+1.0*stddev
 * @return :无
 */
PointCloudMapping::PointCloudMapping(double resolution_,double meank_,double thresh_)
{
    this->resolution = resolution_;//分辨率
    this->meank = thresh_;
    this->thresh = thresh_;
    statistical_filter.setMeanK(meank);//统计估计滤波参数
    statistical_filter.setStddevMulThresh(thresh);
    voxel.setLeafSize( resolution, resolution, resolution);//设置每个体素子叶分辨率
    globalMap = boost::make_shared< PointCloud >( );

    viewerThread = make_shared<thread>( bind(&PointCloudMapping::viewer, this ) );
}

/*
 * void PointCloudMapping::shutdown()
 * \brief 关闭建图线程
 */
void PointCloudMapping::shutdown()
{
    {
        unique_lock<mutex> lck(shutDownMutex);
        shutDownFlag = true;
        keyFrameUpdated.notify_one();
    }
    //等待PointCloudMapping_viewer 本线程执行结束再执行系统主线程
    viewerThread->join();
}

//插入关键帧
/*
 *
 * @param kf    关键帧
 * @param color 关键帧彩色图
 * @param depth 关键帧深度图
 * @param idk   第idk个关键帧
 * @param vpKFs 获取全部关键帧
 * @function    在点云地图里插入关键帧
 */
void PointCloudMapping::insertKeyFrame(KeyFrame* kf, cv::Mat& color, cv::Mat& depth,int idk,vector<KeyFrame*> vpKFs)
{
    cout<<"receive a keyframe, id = "<<idk<<" 第"<<kf->mnId<<"个"<<endl;
    //cout<<"vpKFs数量"<<vpKFs.size()<<endl;
    unique_lock<mutex> lck(keyframeMutex);
    keyframes.push_back( kf );
    currentvpKFs = vpKFs;
    //colorImgs.push_back( color.clone() );
    //depthImgs.push_back( depth.clone() );
    PointCloude pointcloude;
    pointcloude.pcID = idk;
    pointcloude.T = ORB_SLAM2::Converter::toSE3Quat( kf->GetPose() );//获取关键帧位姿
    pointcloude.pcE = generatePointCloud(kf,color,depth);//迭代关键帧点云
    pointcloud.push_back(pointcloude);
    keyFrameUpdated.notify_one();//通知线程开锁
}

/**
 *
 * @param kf    关键帧
 * @param color 彩色图
 * @param depth 深度图
 * @return 关键帧点云
 */
pcl::PointCloud< PointCloudMapping::PointT >::Ptr PointCloudMapping::generatePointCloud(KeyFrame* kf, cv::Mat& color, cv::Mat& depth)//,Eigen::Isometry3d T
{
    //新建一个点云// point cloud is null ptr
    PointCloud::Ptr tmp( new PointCloud() );

    //对点云进行
    for ( int m=0; m<depth.rows; m+=2 )
    {
        for ( int n=0; n<depth.cols; n+=2 )
        {
            float d = depth.ptr<float>(m)[n];//获取(m,n)处的深度值
            if (d < 0.01 || d>5)//滤除设备可靠深度范围之外点
                continue;
            PointT p;

            //相机模型,只计算关键帧的点云
            //座标系与pcl座标系相反,所以可以p.z=-d
            p.z = d;
            p.x = ( n - kf->cx) * p.z / kf->fx;
            p.y = ( m - kf->cy) * p.z / kf->fy;

            //彩色图计算点云颜色
            p.b = color.ptr<uchar>(m)[n*3];
            p.g = color.ptr<uchar>(m)[n*3+1];
            p.r = color.ptr<uchar>(m)[n*3+2];

            tmp->points.push_back(p);
        }
    }

    //cout<<"generate point cloud for kf "<<kf->mnId<<", size="<<cloud->points.size()<<endl;
    return tmp;
}

/*
 * @brief 显示点云线程
 */
void PointCloudMapping::viewer()
{
    //创建显示点云窗口
    pcl::visualization::CloudViewer viewer("viewer");
    while(1)
    {

        {
            unique_lock<mutex> lck_shutdown( shutDownMutex );
            if (shutDownFlag)
            {
                break;
            }
        }
        {
            unique_lock<mutex> lck_keyframeUpdated( keyFrameUpdateMutex );
            keyFrameUpdated.wait( lck_keyframeUpdated );
        }

        // keyframe is updated
        size_t N=0;
        {
            unique_lock<mutex> lck( keyframeMutex );
            N = keyframes.size();
        }
        if(loopbusy || bStop)
        {
            //cout<<"loopbusy || bStop"<<endl;
            continue;
        }
        //cout<<lastKeyframeSize<<"    "<<N<<endl;
        if(lastKeyframeSize == N)
            cloudbusy = false;
        //cout<<"待处理点云个数 = "<<N<<endl;
        cloudbusy = true;
        for ( size_t i=lastKeyframeSize; i<N ; i++ )
        {


            PointCloud::Ptr p (new PointCloud);
            //将点云数据转换成ascii码形式存储在pcd文件中
            //1、源点云   2、转变后的点云   3、位姿变换矩阵
            pcl::transformPointCloud( *(pointcloud[i].pcE), *p, pointcloud[i].T.inverse().matrix());
            //  转换后的点云叠加存储在globalMap中
            *globalMap += *p;

        }

        // depth filter and statistical removal
        //这里的滤波只是显示上的滤波
        PointCloud::Ptr tmp1 ( new PointCloud );

        statistical_filter.setInputCloud(globalMap);    //对globalMap进行统计学去噪
        statistical_filter.filter( *tmp1 );             // 执行去噪计算并保存点到 tmp1

        //体素滤波器voxel filter进行降采样
        PointCloud::Ptr tmp(new PointCloud());
        voxel.setInputCloud( tmp1 );
        voxel.filter( *globalMap );
        //globalMap->swap( *tmp );
        viewer.showCloud( globalMap );

        cout<<"show global map, size="<<N<<"   "<<globalMap->points.size()<<endl;
        lastKeyframeSize = N;
        cloudbusy = false;

    }
}

/*
 * 保存pcd地图
 */
void PointCloudMapping::save()
{

    pcl::io::savePCDFile( "/home/linker/catkin_make/src/MYNT-EYE-ORB-SLAM2-Sample/result.pcd", *globalMap );
    cout<<"globalMap save finished"<<endl;
}

/*
 * 更新点云
 */
void PointCloudMapping::updatecloud()
{
    if(!cloudbusy)
    {
        loopbusy = true;
        cout<<"startloopmappoint"<<endl;
        PointCloud::Ptr tmp1(new PointCloud);
        for (int i=0;i<currentvpKFs.size();i++)
        {
            for (int j=0;j<pointcloud.size();j++)
            {
                if(pointcloud[j].pcID==currentvpKFs[i]->mnFrameId)
                {
                    Eigen::Isometry3d T = ORB_SLAM2::Converter::toSE3Quat(currentvpKFs[i]->GetPose() );
                    PointCloud::Ptr cloud(new PointCloud);
                    pcl::transformPointCloud( *pointcloud[j].pcE, *cloud, T.inverse().matrix());
                    *tmp1 +=*cloud;

                    continue;
                }
            }
        }
        cout<<"finishloopmap"<<endl;
        PointCloud::Ptr tmp2(new PointCloud());
        voxel.setInputCloud( tmp1 );
        voxel.filter( *tmp2 );
        globalMap->swap( *tmp2 );
        loopbusy = false;
        loopcount++;

    }
}

//获取全局点云地图点,智能指针,return 回来
pcl::PointCloud<PointCloudMapping::PointT>::Ptr PointCloudMapping::getGlobalMap() {

    return this->globalMap;
}
pointcloudmapping.h
/*
 * <one line to give the program's name and a brief idea of what it does.>
 * Copyright (C) 2016  <copyright holder> <email>
 *
 * This program is free software: you can redistribute it and/or modify
 * it under the terms of the GNU General Public License as published by
 * the Free Software Foundation, either version 3 of the License, or
 * (at your option) any later version.
 *
 * This program is distributed in the hope that it will be useful,
 * but WITHOUT ANY WARRANTY; without even the implied warranty of
 * MERCHANTABILITY or FITNESS FOR A PARTICULAR PURPOSE.  See the
 * GNU General Public License for more details.
 *
 * You should have received a copy of the GNU General Public License
 * along with this program.  If not, see <http://www.gnu.org/licenses/>.
 *
 */

#ifndef POINTCLOUDMAPPING_H
#define POINTCLOUDMAPPING_H

#include "System.h"
#include "PointCloude.h"
#include <pcl/common/transforms.h>
#include <pcl/point_types.h>
#include <pcl/filters/voxel_grid.h>
#include <condition_variable>
#include <pcl/io/pcd_io.h>
#include <pcl/filters/statistical_outlier_removal.h>


using namespace std;
using namespace ORB_SLAM2;


class PointCloudMapping
{
public:
    //定义点云类型
    typedef pcl::PointXYZRGBA PointT;
    typedef pcl::PointCloud<PointT> PointCloud;

    PointCloudMapping( double resolution_,double meank_,double thresh_ );
    void save();

    // 插入一个keyframe,会更新一次地图
    void insertKeyFrame( KeyFrame* kf, cv::Mat& color, cv::Mat& depth,int idk,vector<KeyFrame*> vpKFs );
    void shutdown();
    void viewer();
    void inserttu( cv::Mat& color, cv::Mat& depth,int idk);
    int loopcount = 0;

    vector<KeyFrame*> currentvpKFs;
    bool cloudbusy;
    bool loopbusy;
    void updatecloud();
    bool bStop = false;

    PointCloud::Ptr getGlobalMap();
protected:
    PointCloud::Ptr globalMap;

    PointCloud::Ptr generatePointCloud(KeyFrame* kf, cv::Mat& color, cv::Mat& depth);

    //PointCloud::Ptr globalMap;
    shared_ptr<thread>  viewerThread;

    bool    shutDownFlag    =false;
    mutex   shutDownMutex;

    condition_variable  keyFrameUpdated;
    mutex               keyFrameUpdateMutex;
    vector<PointCloude>     pointcloud;
    // data to generate point clouds
    vector<KeyFrame*>       keyframes;
    vector<cv::Mat>         colorImgs;
    vector<cv::Mat>         depthImgs;
    vector<cv::Mat>         colorImgks;
    vector<cv::Mat>         depthImgks;
    vector<int>             ids;
    mutex                   keyframeMutex;
    uint16_t                lastKeyframeSize =0;

    double resolution = 0.04;
    double meank = 50;
    double thresh = 1;

    pcl::VoxelGrid<PointT>  voxel;
    pcl::StatisticalOutlierRemoval<PointT> statistical_filter;
};

#endif // POINTCLOUDMAPPING_H
void System::Shutdown()
{
    mpLocalMapper->RequestFinish();
    mpLoopCloser->RequestFinish();
    mpPointCloudMapping->shutdown();

    if(mpViewer)
    {
        mpViewer->RequestFinish();
        while(!mpViewer->isFinished())
            usleep(5000);
    }

    // Wait until all thread have effectively stopped
    while(!mpLocalMapper->isFinished() || !mpLoopCloser->isFinished() || mpLoopCloser->isRunningGBA())
    {
        usleep(5000);
    }

    if(mpViewer)
        pangolin::BindToContext("ORB-SLAM2: Map Viewer");
}
void System::save()
{
    mpPointCloudMapping->save();
}

pcl::PointCloud<PointCloudMapping::PointT>::Ptr System::getGlobalMap() {

    return mpPointCloudMapping->getGlobalMap();
}
int System::getloopcount()
{
    return mpLoopCloser->loopcount;
}
}
track.cc中void Tracking::CreateNewKeyFrame()函数添加
    // insert Key Frame into point cloud viewer
    vector<KeyFrame*> vpKFs = mpMap->GetAllKeyFrames();
    mpPointCloudMapping->insertKeyFrame( pKF, this->mImRGB, this->mImDepth  ,idk,vpKFs);
LoopClousing.cc的void LoopClosing::RunGlobalBundleAdjustment(unsigned long nLoopKF)添加代码
//稠密建图
            loopcount++;
            while(loopcount!=mpPointCloudMapping->loopcount)
                mpPointCloudMapping->updatecloud();
            cout<<"mpPointCloudMapping->loopcount="<<mpPointCloudMapping->loopcount<<endl;
接下来我将生成的稠密点云通过ros_octomap映射到ros话题中,octomap原理高博在书中已经讲的很详细了。
在ros里进行展示
ros_rgbd.cc
int main(int argc, char **argv)
{
    ros::init(argc, argv, "RGBD");
    ros::start();

    if(argc != 3)
    {
        cerr << endl << "Usage: rosrun ORB_SLAM2 RGBD path_to_vocabulary path_to_settings" << endl;
        ros::shutdown();
        return 1;
    }

    // Create SLAM system. It initializes all system threads and gets ready to process frames.
    ORB_SLAM2::System SLAM(argv[1],argv[2],ORB_SLAM2::System::RGBD,true);

    ImageGrabber igb(&SLAM);

    ros::NodeHandle nh;
    //原代码
//    message_filters::Subscriber<sensor_msgs::Image> rgb_sub(nh, "/camera/rgb/image_raw", 1);
//    message_filters::Subscriber<sensor_msgs::Image> depth_sub(nh, "camera/depth_registered/image_raw", 1);

    //修改为kinect2
    message_filters::Subscriber<sensor_msgs::Image> rgb_sub(nh, "/kinect2/qhd/image_color", 1);
    message_filters::Subscriber<sensor_msgs::Image> depth_sub(nh, "/kinect2/qhd/image_depth_rect", 1);

    typedef message_filters::sync_policies::ApproximateTime<sensor_msgs::Image, sensor_msgs::Image> sync_pol;
    message_filters::Synchronizer<sync_pol> sync(sync_pol(10), rgb_sub,depth_sub);
    sync.registerCallback(boost::bind(&ImageGrabber::GrabRGBD,&igb,_1,_2));

    //TODO OCTOMAP添加

    pcl::PointCloud<pcl::PointXYZRGBA>::Ptr global_map(new pcl::PointCloud<pcl::PointXYZRGBA>);
    global_map = SLAM.mpPointCloudMapping->getGlobalMap();

    pcl::PointCloud<pcl::PointXYZRGB>::Ptr global_map_copy(new pcl::PointCloud<pcl::PointXYZRGB>);
    //数据格式转换
    cout<<"-----------------------------------------------------------"<<endl;
    cout <<"ros is running "<<endl;
    while (ros::ok())
    {

        pcl::copyPointCloud(*global_map, *global_map_copy);

        ros::Publisher pcl_pub = nh.advertise<sensor_msgs::PointCloud2> ("/orbslam2_with_kinect2/output", 10);

        sensor_msgs::PointCloud2 output;

        pcl::toROSMsg(*global_map_copy,output);// 转换成ROS下的数据类型 最终通过topic发布

        output.header.stamp=ros::Time::now();
        output.header.frame_id  ="camera_rgb_frame";
        //output.header.frame_id  ="map";

        ros::Rate loop_rate(10);

        pcl_pub.publish(output);
        ros::spinOnce();
        loop_rate.sleep();
    }
    //TODO 结束


    //ros::spin();
    SLAM.save();

    // Stop all threads
    SLAM.Shutdown();


    // Save camera trajectory
    SLAM.SaveKeyFrameTrajectoryTUM("KeyFrameTrajectory.txt");

    ros::shutdown();

    return 0;
}
之后存在几种方法去实现导航:
1、octomap_server是ROS中的一个基于octomap的功能包。我在查阅资料的时候,发现所有的介绍、博客等资料都是在介绍其将点云地图转化为基于Octree的OctoMap的功能。由于之前一直在查找三维点云地图转化为二维地图的方法,所以之前试过这个包的三维转换功能后就没有在继续使用,由于之前使用其他方法将二维占据栅格地图生成了,然后准备回过头来再看一下octomap_server的三维概率地图,然后在不经意间就发现了它也有转化为二维地图的功能
首先简单介绍下octomap_server【设置】的安装。
打开一个终端.(ctrl+alt+T)输入下面指令安装octomap.
sudo apt-get install ros-kinetic-octomap-ros #安装octomap
sudo apt-get install ros-kinetic-octomap-msgs
sudo apt-get install ros-kinetic-octomap-server

安装octomap 在 rviz 中的插件
sudo apt-get install ros-kinetic-octomap-rviz-plugins
安装上这个插件以后你可以启动 rviz ,这时候点开Add选项,会多一个octomap_rviz_plugins模组.如下图所示:
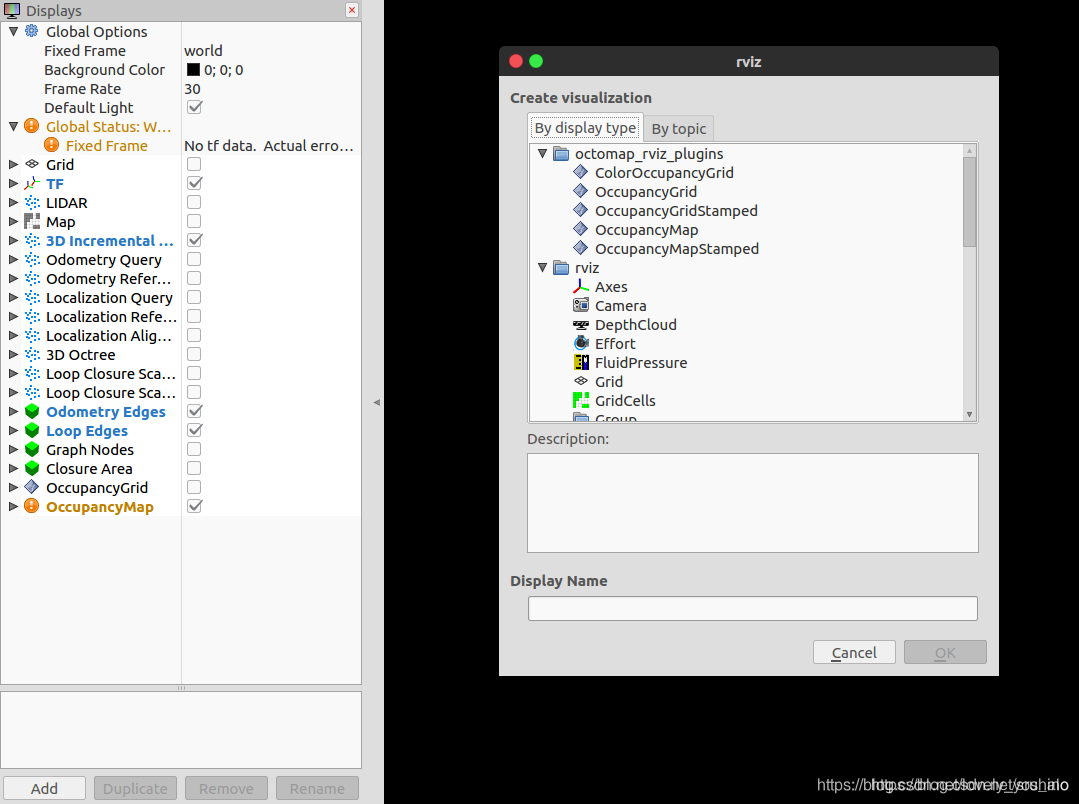
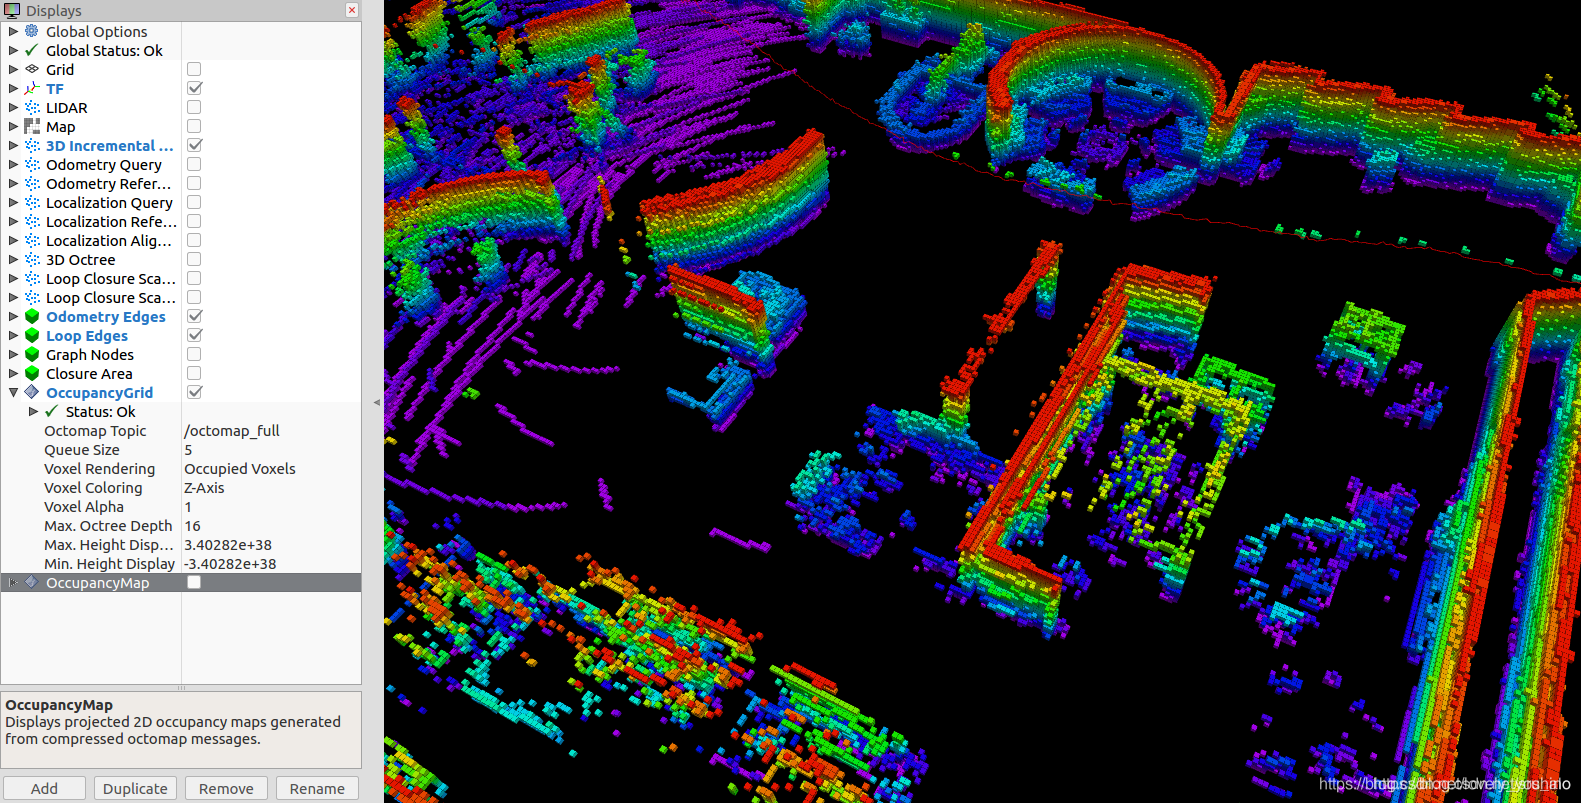
其中的OccupancyGrid是显示三维概率地图,也就是octomap地图。OccupancyMap是显示二维占据栅格地图。
可以通过一个launch文件启动octomap_server节点,如下:
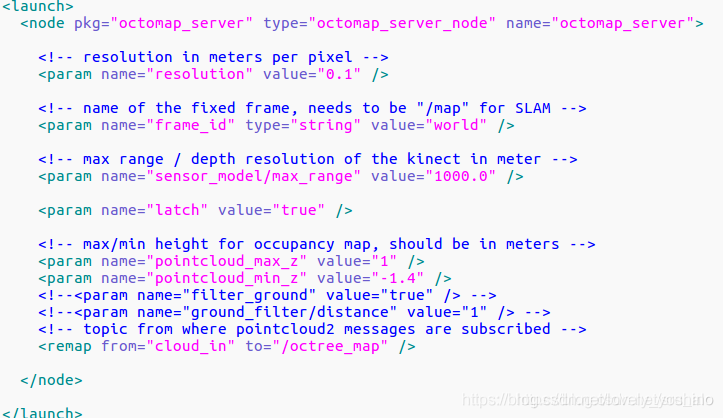
其中的param都是可以修改的,具体的修改细节见这里。/octotree_map修改为自己的PointCloud2点云即可。
运行此launch文件会有如下话题:
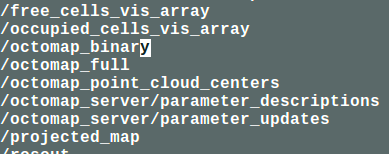
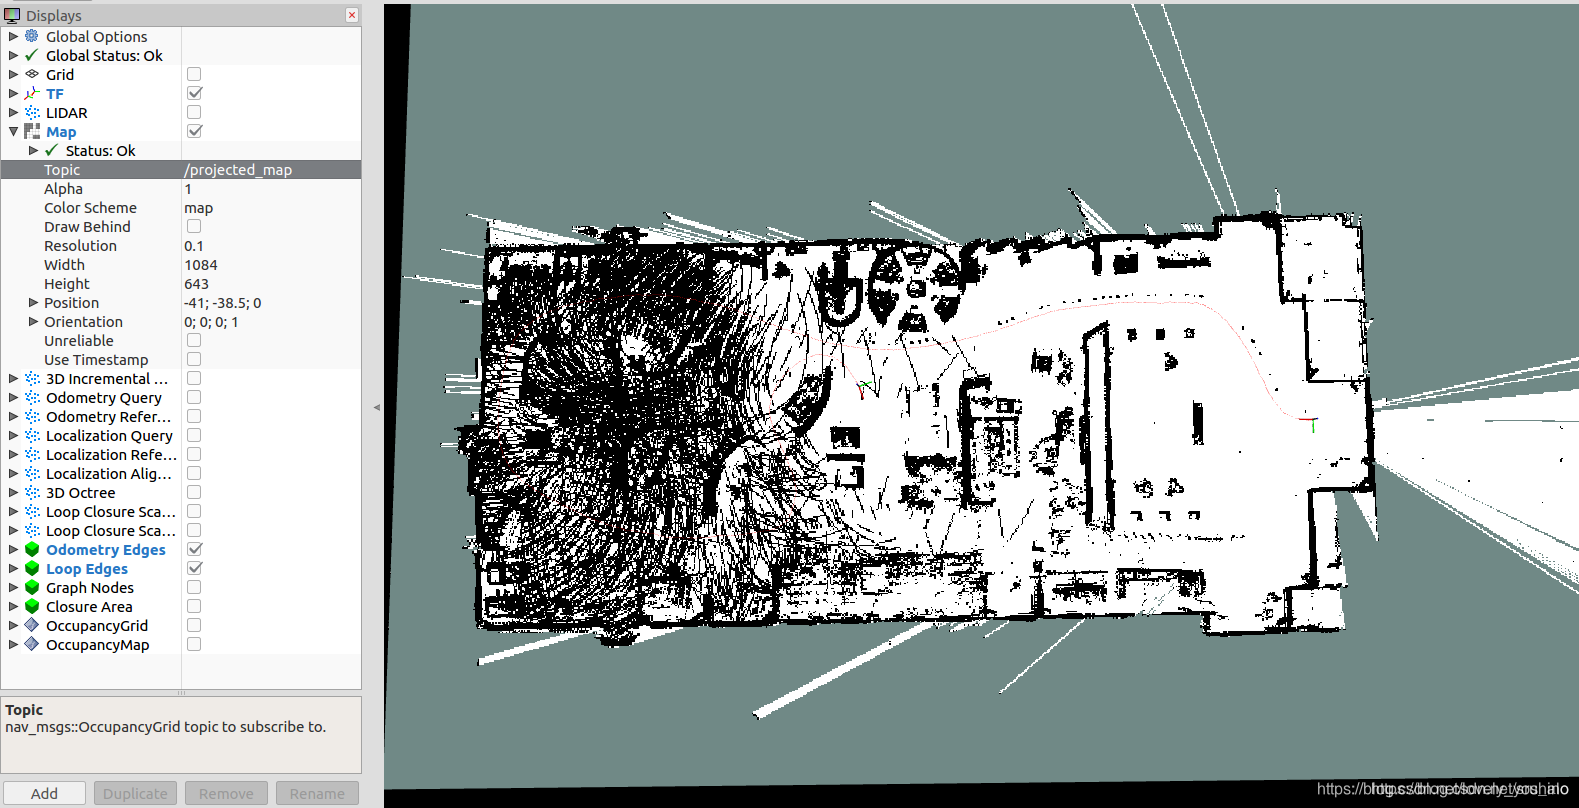
打开rviz,在里面添加OccupancyGrid,OccupancyMap,Map显示选项,显示话题选择octomap_full或者octomap_binary。
注意:param中的frame_id要和rviz的Fixed Frame一致。
Map:
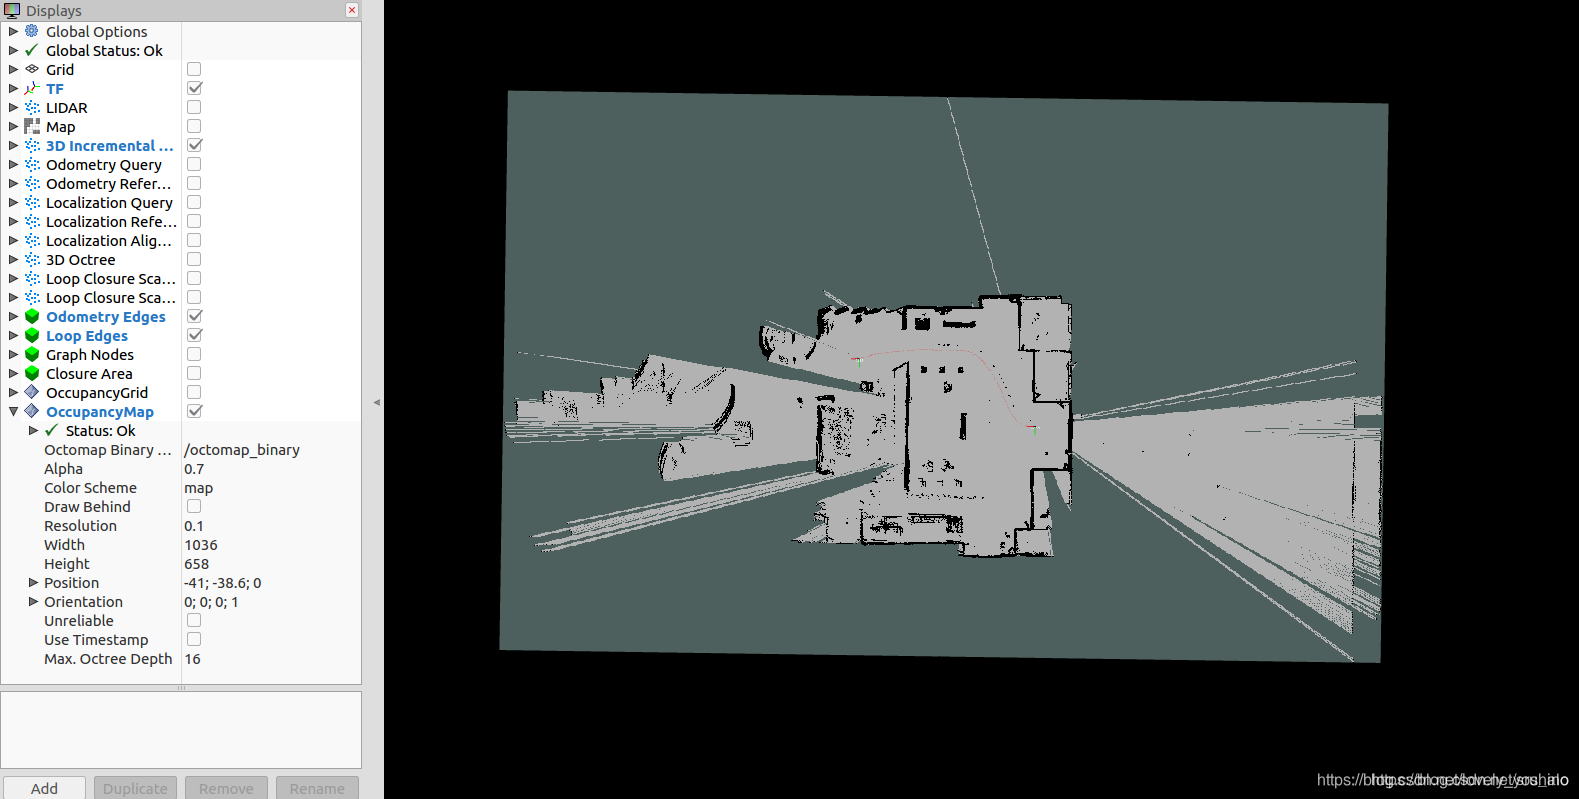
OccupancyMap:
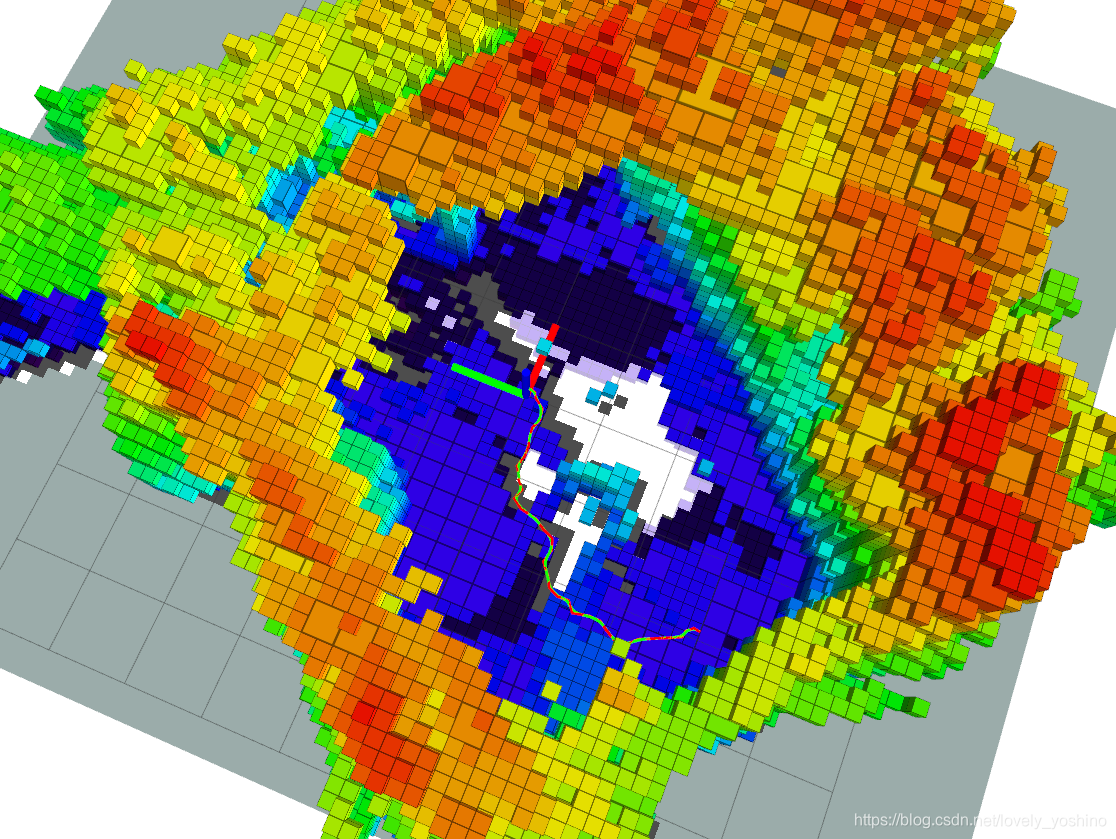
OccupancyGrid:
对应的参考代码:https://github.com/306327680/PointCloud-to-grid-map【参考注释】
或者北达科他大学( North Dakota State University)cloud_to_map学习代码:https://download.csdn.net/download/sru_alo/12277545
2、使用3D稠密点云图,并使用octomap进行压缩滤除地面信息。然后通过2D投影生成占据格地图最后利用costmap进行全局和局部路径规划导航实时避障。【参考代码】
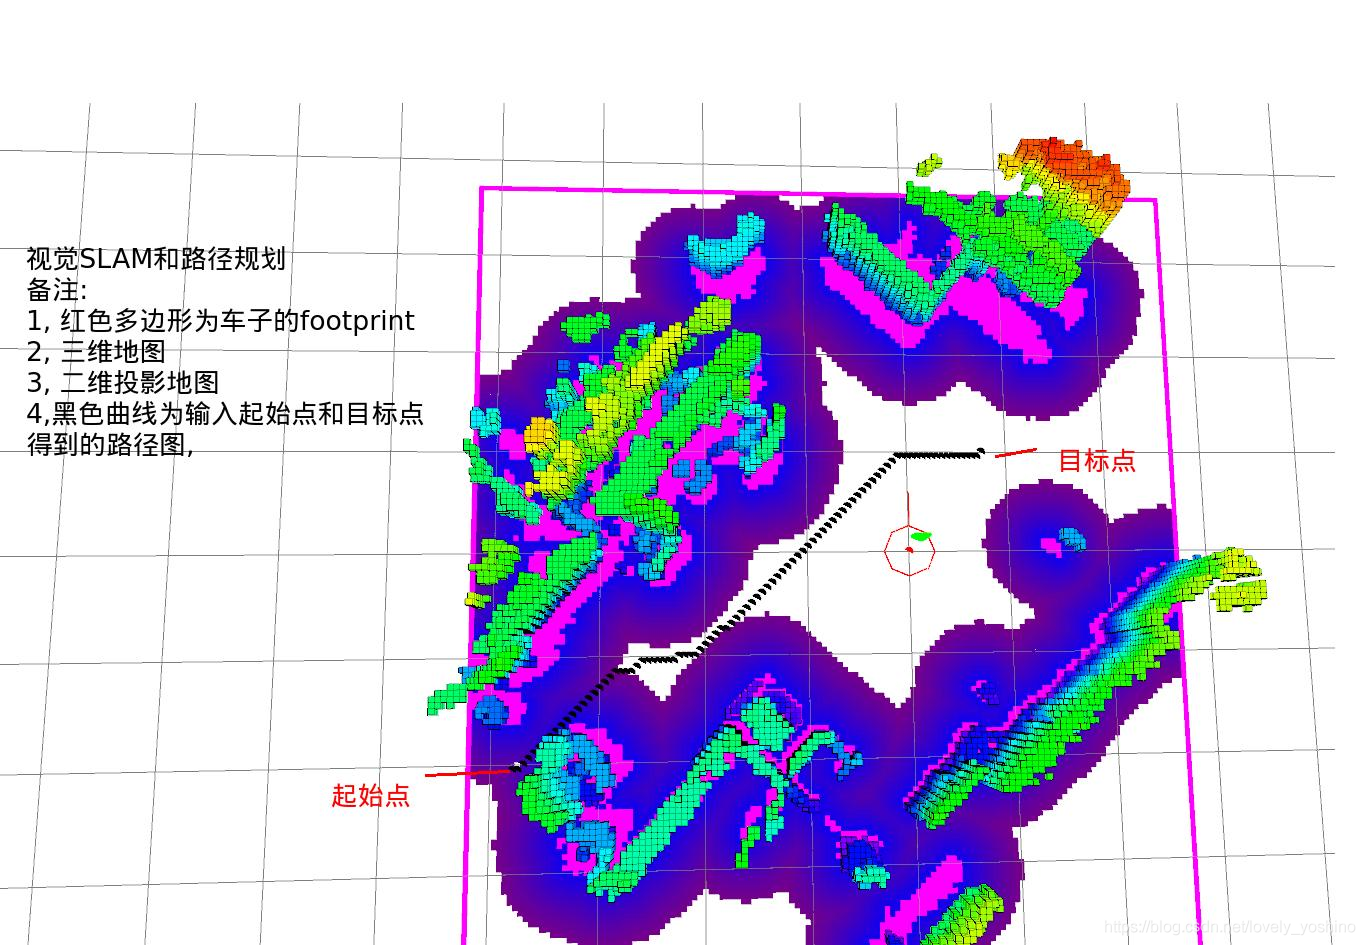
然后参考OctoMap中3D-RRT路径规划

- 点赞
- 收藏
- 关注作者
评论(0)