Playwright进阶指南 (6) | 自动化测试实战

【摘要】 2025企业测试新范式:基于Playwright构建高可用体系。从分层架构、数据工厂到API Mock,结合Docker与CI/CD流水线,实现千级并发、快速反馈的自动化测试方案,显著降低维护成本,提升交付质量与效率。
2025企业级测试解决方案:从单测到千级并发,打造高可用测试体系
一、为什么传统自动化测试难以落地?
根据2025年最新行业调研,测试项目失败的三大核心原因:
|
|
|
|
|---|---|---|
| 维护成本过高 |
|
|
| 环境依赖性 |
|
|
| 执行效率低下 |
|
|
Playwright通过智能选择器、容器化环境和分布式执行,将测试成功率提升至92%!
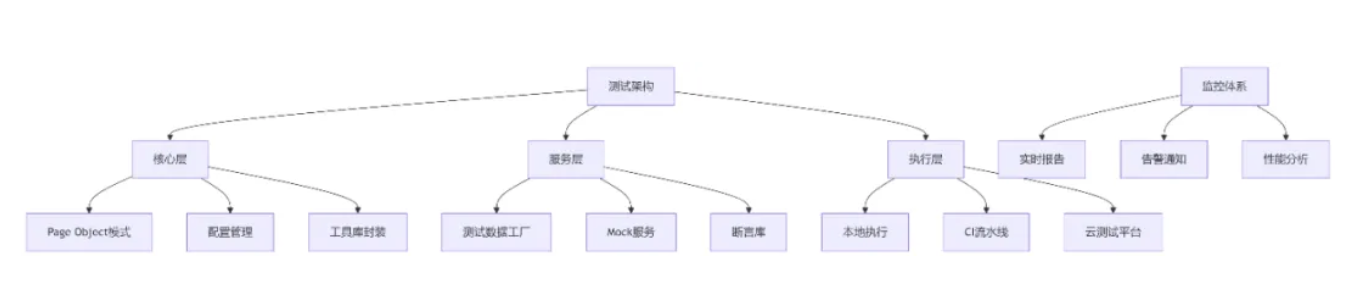
二、企业级测试架构设计
测试金字塔实践配比
UI测试(10%)      - 关键业务流程
集成测试(20%)     - 模块间交互
单元测试(70%)     - 核心业务逻辑
三、实战:电商系统测试框架搭建
1. 项目结构设计
tests/
├── pages/           # 页面对象模型
│   ├── login-page.ts
│   ├── product-page.ts
│   └── cart-page.ts
├── fixtures/        # 测试夹具
│   ├── test-data.ts
│   └── mock-api.ts
├── specs/           # 测试用例
│   ├── checkout-flow.spec.ts
│   └── search-functionality.spec.ts
├── utils/           # 工具函数
│   ├── assertions.ts
│   └── reporters.ts
└── config/          # 配置文件
    ├── base.config.ts
    └── ci.config.ts
2. 高级Page Object模式
// pages/base-page.ts - 基础页面类
exportabstractclass BasePage {
constructor(protected page: Page) {}

// 通用等待方法
protectedasync waitForState(
    selector: string,
    state: 'visible' | 'hidden' = 'visible',
    timeout = 15000
  ) {
    const locator = this.page.locator(selector);
    await locator.waitFor({ state, timeout });
    return locator;
  }

// 截图方法
async takeScreenshot(name: string) {
    const path = `screenshots/${name}-${new Date().getTime()}.png`;
    awaitthis.page.screenshot({ path, fullPage: true });
    return path;
  }
}

// pages/login-page.ts - 登录页面
exportclass LoginPage extends BasePage {
// 元素定位器
private readonly usernameInput = this.page.getByLabel('用户名');
private readonly passwordInput = this.page.getByPlaceholder('密码');
private readonly submitButton = this.page.getByRole('button', { name: '登录' });

// 操作封装
async login(username: string, password: string) {
    awaitthis.usernameInput.fill(username);
    awaitthis.passwordInput.fill(password);
    awaitthis.submitButton.click();

    // 等待登录完成
    awaitthis.page.waitForURL(/dashboard/);
  }

// 业务方法
async loginAsAdmin() {
    returnthis.login(
      process.env.ADMIN_USERNAME!,
      process.env.ADMIN_PASSWORD!
    );
  }
}
3. 测试数据工厂
// fixtures/test-data.ts
exportclass TestDataFactory {
static createUser(role: 'admin' | 'customer' | 'vip' = 'customer') {
    const baseUser = {
      email: `testuser+${Date.now()}@example.com`,
      password: 'Password123!',
      firstName: 'Test',
      lastName: 'User'
    };

    const roles = {
      admin: { ...baseUser, permissions: ['all'] },
      customer: { ...baseUser, vip: false },
      vip: { ...baseUser, vip: true, discountRate: 0.2 }
    };

    return roles[role];
  }

static createProduct(category: string) {
    const categories = {
      electronics: { price: 599.99, tags: ['tech', 'gadget'] },
      clothing: { price: 49.99, tags: ['fashion'] },
      book: { price: 19.99, tags: ['education'] }
    };

    return {
      name: `Test Product ${Date.now()}`,
      description: 'Automated test product',
      ...categories[category],
      stock: Math.floor(Math.random() * 100)
    };
  }
}
四、核心测试场景实战
1. 结账流程测试
// specs/checkout-flow.spec.ts
import { test, expect } from'@playwright/test';
import { LoginPage } from'../pages/login-page';
import { ProductPage } from'../pages/product-page';
import { CheckoutPage } from'../pages/checkout-page';

test.describe('结账流程', () => {
  test('完整购物流程 @smoke', async ({ page }) => {
    const loginPage = new LoginPage(page);
    const productPage = new ProductPage(page);
    const checkoutPage = new CheckoutPage(page);

    // 登录
    await loginPage.loginAsCustomer();

    // 搜索并添加商品
    await productPage.searchProduct('iPhone 15');
    await productPage.addToCart();

    // 结账
    await checkoutPage.startCheckout();
    await checkoutPage.fillShippingInfo({
      address: '123 Test Street',
      city: 'Test City',
      zipCode: '100001'
    });
    await checkoutPage.selectPaymentMethod('credit_card');

    // 验证订单完成
    await expect(page.getByText('订单创建成功')).toBeVisible();
    await expect(page).toHaveURL(/order-confirmation/);
  });

  test('库存不足场景 @regression', async ({ page }) => {
    // 模拟库存不足
    await page.route('**/api/inventory*', route => route.fulfill({
      status: 200,
      body: JSON.stringify({ available: 0 })
    }));

    // 尝试购买
    await productPage.addToCart();

    // 验证错误提示
    await expect(page.getByText('库存不足')).toBeVisible();
  });
});
2. API Mocking实战
// fixtures/mock-api.ts
exportclass MockAPI {
staticasync setupMocks(page: Page) {
    // Mock登录API
    await page.route('**/api/auth/login', async route => {
      const data = route.request().postData();
      const { username } = JSON.parse(data!);

      if (username === 'admin') {
        return route.fulfill({
          status: 200,
          body: JSON.stringify({ token: 'admin-token', role: 'admin' })
        });
      }

      route.continue();
    });

    // Mock支付API
    await page.route('**/api/payment/process', route => route.fulfill({
      status: 200,
      body: JSON.stringify({ success: true, transactionId: 'txn_12345' })
    }));
  }
}

// 在测试中使用
test.beforeEach(async ({ page }) => {
await MockAPI.setupMocks(page);
});
五、高级测试策略
1. 视觉回归测试
// utils/visual-regression.ts
exportclass VisualTester {
staticasync compareScreenshot(page: Page, name: string, threshold = 0.1) {
    const screenshot = await page.screenshot({ fullPage: true });
    const baselinePath = `baselines/${name}.png`;

    if (!fs.existsSync(baselinePath)) {
      fs.writeFileSync(baselinePath, screenshot);
      returntrue;
    }

    const baseline = fs.readFileSync(baselinePath);
    const diff = pixelmatch(screenshot, baseline, null, 800, 600, { threshold });

    return diff < (800 * 600 * threshold);
  }
}

// 在测试中使用
test('页面布局验证', async ({ page }) => {
await page.goto('/product/123');
const isMatch = await VisualTester.compareScreenshot(page, 'product-page');
  expect(isMatch).toBeTruthy();
});
2. 性能测试集成
// utils/performance-monitor.ts
exportclass PerformanceMonitor {
staticasync measureMetrics(page: Page, url: string) {
    const metrics = {};

    // 启动跟踪
    await page.context().tracing.start({ screenshots: true, snapshots: true });

    // 导航并测量
    await page.goto(url, { waitUntil: 'networkidle' });

    // 获取性能指标
    const perf = await page.evaluate(() =>
      JSON.stringify(window.performance.timing)
    );

    // 停止跟踪
    await page.context().tracing.stop({ path: 'trace.zip' });

    return {
      ...JSON.parse(perf),
      ...metrics
    };
  }
}
六、企业级执行方案
1. Docker化测试环境
# Dockerfile.test
FROM mcr.microsoft.com/playwright:v1.45.0

WORKDIR /tests
COPY package.json .
COPY tests/ tests/

RUN npm ci
RUN npx playwright install --with-deps

# 健康检查
HEALTHCHECK --interval=30s CMD node healthcheck.js

CMD ["npx", "playwright", "test", "--config=ci.config.ts"]
2. CI/CD流水线集成
# .github/workflows/test.yml
name:PlaywrightTests

on:[push,pull_request]

jobs:
test:
    timeout-minutes:60
    runs-on:ubuntu-latest
    strategy:
      matrix:
        shard:[1,2,3,4]

    steps:
    -uses:actions/checkout@v4
    -uses:actions/setup-node@v4

    -name:Installdependencies
      run:npmci

    -name:InstallPlaywright
      run:npxplaywrightinstall--with-deps

    -name:Runtests
      run:npxplaywrighttest--shard=${{matrix.shard}}/${{strategy.job-total}}

    -name:Uploadreport
      uses:actions/upload-artifact@v4
      if:always()
      with:
        name:playwright-report
        path:playwright-report/
        retention-days:30
3. 分布式测试执行
# 使用Browsertack进行跨浏览器测试
npx playwright test --config=browserstack.config.ts

# 分片执行(千级并发)
npx playwright test --shard=1/4 & npx playwright test --shard=2/4 &
npx playwright test --shard=3/4 & npx playwright test --shard=4/4 &

# 合并结果
npx playwright merge-reports --reporter=html ./report-1 ./report-2
七、测试报告与监控
1. 多维度报告配置
// config/ci.config.ts
import { defineConfig } from'@playwright/test';

exportdefault defineConfig({
  reporter: [
    ['list'],
    ['html', { outputFolder: 'playwright-report', open: 'never' }],
    ['json', { outputFile: 'results.json' }],
    ['github'],
    ['@testomatio/reporter', { apiKey: process.env.TESTOMATIO_KEY }]
  ],

// 全局超时
  globalTimeout: 60 * 60 * 1000, // 1小时

// 每个测试超时
  timeout: 30 * 1000,
});
2. 实时监控看板
// utils/live-dashboard.ts
exportclass TestDashboard {
staticasync startLiveMonitoring() {
    const io = require('socket.io')(3001);

    io.on('connection', (socket: any) => {
      socket.on('test-start', (data: any) => {
        this.broadcast('test-status', {
          ...data,
          status: 'running',
          startTime: newDate()
        });
      });

      socket.on('test-end', (data: any) => {
        this.broadcast('test-status', {
          ...data,
          status: data.passed ? 'passed' : 'failed',
          duration: Date.now() - data.startTime
        });
      });
    });
  }
}
八、最佳实践与性能优化
1. 测试执行优化策略
|
|
|
|
|---|---|---|
| 测试分片 | --shard=1/4 |
|
| 并行执行 | --workers=8 |
|
| 智能重试 | retries: 2 |
|
| 依赖缓存 |
|
|
2. 资源使用优化
// 内存优化配置
exportdefault defineConfig({
  workers: process.env.CI ? 4 : 8,

  use: {
    // 减少视频内存占用
    video: 'on-first-failure',

    // 优化截图策略
    screenshot: 'only-on-failure',

    // 限制Trace大小
    trace: {
      mode: 'on-first-failure',
      sources: false,
      snapshots: true
    }
  }
});
九、常见问题解决方案
1. 稳定性问题处理
// utils/flaky-handler.ts
exportclass FlakyTestHandler {
staticasync retryFlakyTest(
    testFunction: () =>Promise<void>,
    maxAttempts = 3
  ) {
    for (let attempt = 1; attempt <= maxAttempts; attempt++) {
      try {
        await testFunction();
        return;
      } catch (error) {
        if (attempt === maxAttempts) throw error;

        // 等待后重试
        awaitnewPromise(resolve =>
          setTimeout(resolve, attempt * 1000)
        );
      }
    }
  }
}

// 使用示例
test('不稳定的测试', async () => {
await FlakyTestHandler.retryFlakyTest(async () => {
    // 测试逻辑
  });
});
2. 环境问题诊断
# 环境诊断命令
npx playwright diagnose
npx playwright check
npx playwright debug

# 网络问题诊断
npx playwright show-trace trace.zip
npx playwright test --debug
十、AI在测试中的应用
1. 智能测试生成
// ai-test-generator.ts
exportclass AITestGenerator {
staticasync generateFromUserFlow(userActions: UserAction[]) {
    const prompt = `
      根据用户操作生成Playwright测试代码:
      操作序列:${JSON.stringify(userActions)}
      要求:使用Page Object模式,包含断言
    `;

    const response = await openAI.chat.completions.create({
      model: "gpt-4-code",
      messages: [{ role: "user", content: prompt }]
    });

    return response.choices[0].message.content;
  }
}
2. 自愈测试系统
// self-healing-tests.ts
exportclass SelfHealingSystem {
staticasync healLocator(page: Page, originalLocator: string) {
    // 分析DOM变化
    const newLocator = awaitthis.analyzeDOMChanges(
      page,
      originalLocator
    );

    // 验证新定位器
    const isValid = awaitthis.validateLocator(page, newLocator);

    if (isValid) {
      // 更新测试代码
      awaitthis.updateTestCode(originalLocator, newLocator);
      return newLocator;
    }

    thrownewError('无法自动修复定位器');
  }
}
🚀 2025测试工程师核心能力:
测试架构设计而非用例编写 效率工具开发而非手动执行 质量数据分析而非结果统计 AI技术应用而非重复劳动

【声明】本内容来自华为云开发者社区博主,不代表华为云及华为云开发者社区的观点和立场。转载时必须标注文章的来源(华为云社区)、文章链接、文章作者等基本信息,否则作者和本社区有权追究责任。如果您发现本社区中有涉嫌抄袭的内容,欢迎发送邮件进行举报,并提供相关证据,一经查实,本社区将立刻删除涉嫌侵权内容,举报邮箱:
cloudbbs@huaweicloud.com
- 点赞
- 收藏
- 关注作者
评论(0)