Hexo 优化配置汇总【GitHub Actions 看板娘 数学公式 标签云 README 转义问题】

服务器 快到期了,这几天迁移到
GitHub上,用免费的GitHub Pages重新部署下 杰森的博客 。以下样式及优化配置基于Hexo,主题Next
GitHub Actions 自动化部署

本文最具价值的配置莫过于此,没有用到 GitHub Actions 前,每次发文需要将 markdown 文件放入 _post 文件夹下,然后执行 hexo clean && hexo g && hexo s && hexo g一连串命令,执行无报错还好说,万一本地环境出现错误,还得花时间找错,非常麻烦
使用 GitHub Actions 后,发文只需要在博客的源文件仓库中拖拽源文件或者 push 源文件到仓库,GitHub Actions 即可监测仓库状态,自动执行部署操作到指定位置,不必担心本地环境出错等系列问题
效果 预览地址
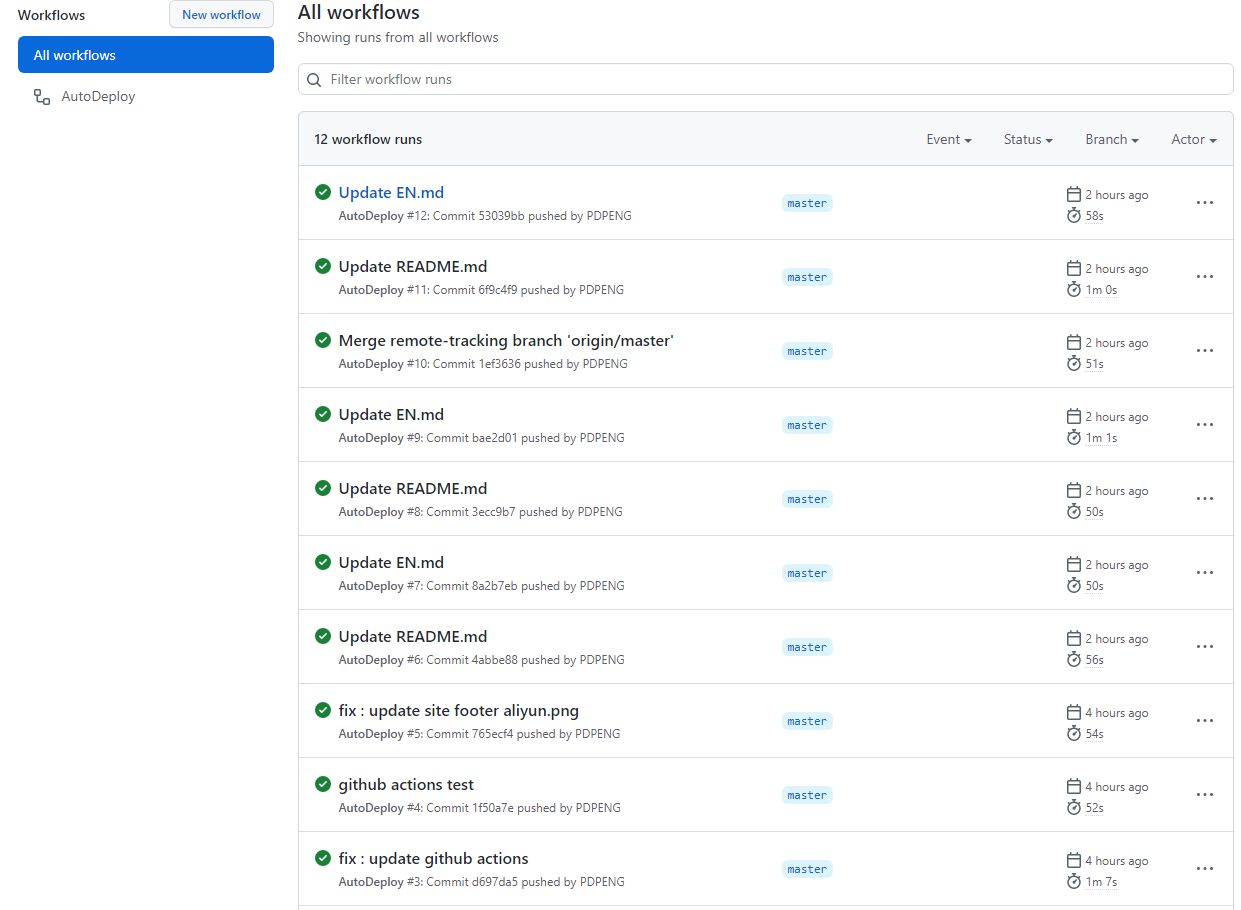
有关介绍和详细令牌、密钥配置请 参考此处,以下主要是 .github/workflows/deploy.yml 文件 的配置
# Action's Name
name: AutoDeploy

on:
  # Triggering Condition 1 Main Branch Performs The Task After Receiving Push
  push:
    branches:
      - master
  # Triggering Condition 2 Manual Button
  workflow_dispatch:

# Putting Environment Variables Here You Need To Replace It With Your Own
env:
  # After Hexo Compiles Use This Git User To Deploy To The Github Warehouse
  GIT_USER: PDPENG
  # After Hexo Compiles Use This Git Mailbox To Deploy To The Github Warehouse
  GIT_EMAIL: jason.peng.code@gmail.com
  # The Git Hub Warehouse To Be Deployed After Hexo Compiles
  GIT_DEPLOY_REPO: PDPENG/pdpeng.github.io
  # Hexo Compiles The Branch To Deploy After Compilation
  GIT_DEPLOY_BRANCH: master

  # After Hexo Compiles Use This Gitee User To Deploy To The Gitee Warehouse
  GITEE_USER: Coder-Jason
  # The Gitee Warehouse To Be Deployed After Hexo Compiles
  GITEE_DEPLOY_REPO: Coder-Jason/Coder-Jason
  # Hexo Compiles The Branch To Deploy After Compilation
  GITEE_DEPLOY_BRANCH: master

  # Pay Attention To Replacing Your Github Source Warehouse Address
  GIT_SOURCE_REPO: git@github.com:PDPENG/pdpeng.github.io.git
  # Pay Attention To Replacement To Your Gitee Target Warehouse Address
  GITEE_DESTINATION_REPO: git@gitee.com:Coder-Jason/coder-jason.git

jobs:
  build:
    name: Build on node ${{ matrix.node_version }} and ${{ matrix.os }}
    runs-on: ubuntu-latest
    if: github.event.repository.owner.id == github.event.sender.id
    strategy:
      matrix:
        os: [ubuntu-latest]
        node_version: [16.x]

    steps:
      - name: Checkout
        uses: actions/checkout@v2

      - name: Checkout deploy repo
        uses: actions/checkout@v2
        with:
          repository: ${{ env.GIT_DEPLOY_REPO }}
          ref: ${{ env.GIT_DEPLOY_BRANCH }}
          path: .deploy_git

      - name: Use Node.js ${{ matrix.node_version }}
        uses: actions/setup-node@v1
        with:
          node-version: ${{ matrix.node_version }}

      - name: Configuration environment
        env:
          HEXO_DEPLOY_PRI: ${{secrets.HEXO_DEPLOY_PRI}}
        run: |
          sudo timedatectl set-timezone "Asia/Shanghai"
          mkdir -p ~/.ssh/
          echo "$HEXO_DEPLOY_PRI" > ~/.ssh/id_rsa
          chmod 600 ~/.ssh/id_rsa
          ssh-keyscan -t rsa github.com >> ~/.ssh/known_hosts
          # coding Cancelled Synchronization
          ssh-keyscan -t rsa e.coding.net >> ~/.ssh/known_hosts
          ssh-keyscan -t rsa gitee.com >> ~/.ssh/known_hosts
          git config --global user.name $GIT_USER
          git config --global user.email $GIT_EMAIL

      - name: Install dependencies
        run: |
          npm install hexo-cli -g
		  # Install According To The Components You Installed
         npm install - gulp gulp-uglify hexo hexo-deployer-git hexo-generator-archive hexo-generator-category hexo-generator-feed hexo-generator-index hexo-generator-search hexo-generator-searchdb hexo-generator-sitemap hexo-generator-tag hexo-leancloud-counter-security hexo-renderer-ejs hexo-renderer-marked hexo-renderer-pug hexo-renderer-stylus hexo-server hexo-tag-cloud hexo-word-counter readable-stream uglify-es --save

      - name: Deploy hexo
        run: |
          npm run deploy

      # The Following Is The Release To Gitee
      - name: Sync to Gitee
        uses: wearerequired/git-mirror-action@master
        env:
          # Using Hexo Deploy Pri Directly
          SSH_PRIVATE_KEY: ${{ secrets.HEXO_DEPLOY_PRI }}
        with:
          # GitHub Source Warehouse Address
          source-repo: ${{ env.GIT_SOURCE_REPO }}
          # Gitee Target Warehouse Address
          destination-repo: ${{ env.GITEE_DESTINATION_REPO }}

      - name: Build Gitee Pages
        uses: yanglbme/gitee-pages-action@main
        with:
          # Your Gitee Username
          gitee-username: ${{ env.GITEE_USER }}
          # Note At Settings Secrets Configuration Gitee Password
          gitee-password: ${{ secrets.GITEE_PASSWORD }}
          # Your Gitee Warehouse The Warehouse Name Is Strictly Distinguished Please Fill In It Accurately Otherwise There Will Be An Error
          gitee-repo: ${{ env.GITEE_DEPLOY_REPO }}
          # To Deploy Branches The Default Is Master If It Is Other Branches You Need To Specify The Specified Branch Must Exist
          branch: ${{ env.GITEE_DEPLOY_BRANCH }}
在配置完令牌及密钥后,可以直接复制 该文件 使用,如果仅需要同步 Github,则不必配置 Gitee 同步字段配置
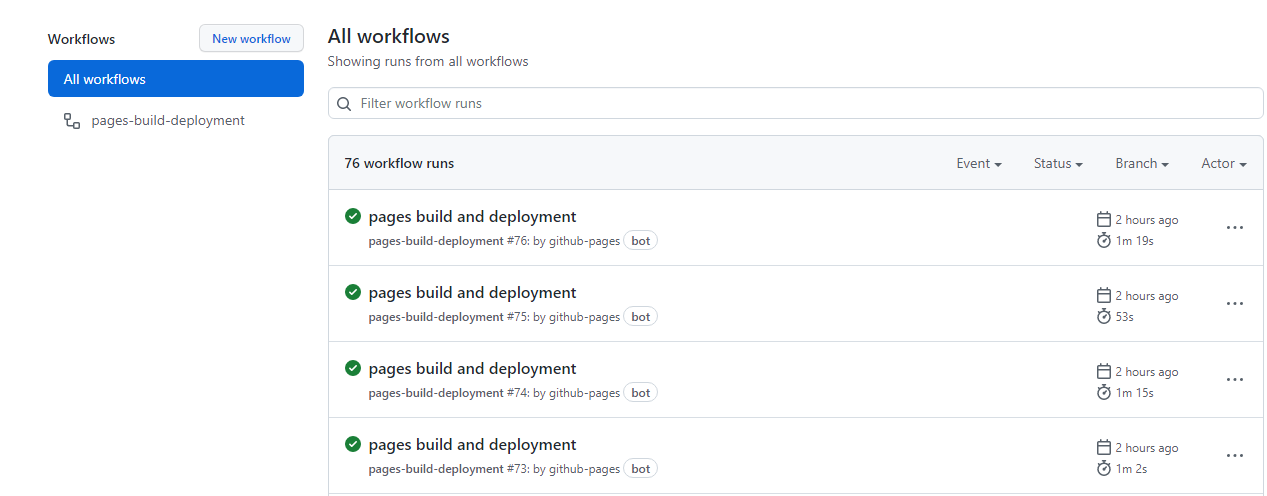
杰森的仓库分布是
https://github.com/PDPENG/MyBlog 私有仓库 (actions 部署位置)
https://github.com/PDPENG/pdpeng.github.io 公共仓库 (actions 部署后推送的位置)
配置完成后,GitHub Actions 一旦检测到 MyBlog 仓库下的变动后,将会自动部署至 pdpeng.github.io 仓库
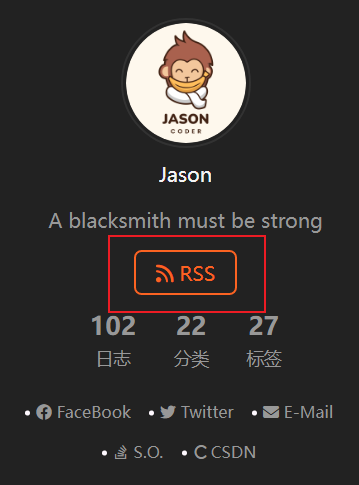
RSS 订阅按钮
这里默认您已经添加了
RSS相关插件,站点已具备生成atom.xml文件能力
效果图,预览地址
将下面的代码
<html>
<head>
    <style>
        .rss-button div {
            display: block;
            margin-top: 5px;
            background-color: transparent;
            position: relative;
            font-family: 'Lato', "PingFang SC", "Microsoft YaHei", sans-serif;
            font-size: 14px;
            line-height: 2;
        }

        .feed-link a {
            display: inline-block;
            padding: 0 15px;
            color: #fc6423;
            border: 2px solid #fc6423;
            border-radius: 6px;
            text-decoration: none;
        }

        .feed-link a:hover {
            background-color: #fc6423;
            border-bottom-color: #fc6423;
            color: #fff;
        }
    </style>
</head>

<body class="rss-button">
    <div class="feed-link" title="RSS → /atom.xml">
        <a href="/atom.xml">
            <i class="fa fa-rss"> </i> RSS
        </a>
    </div>
</body>
</html>
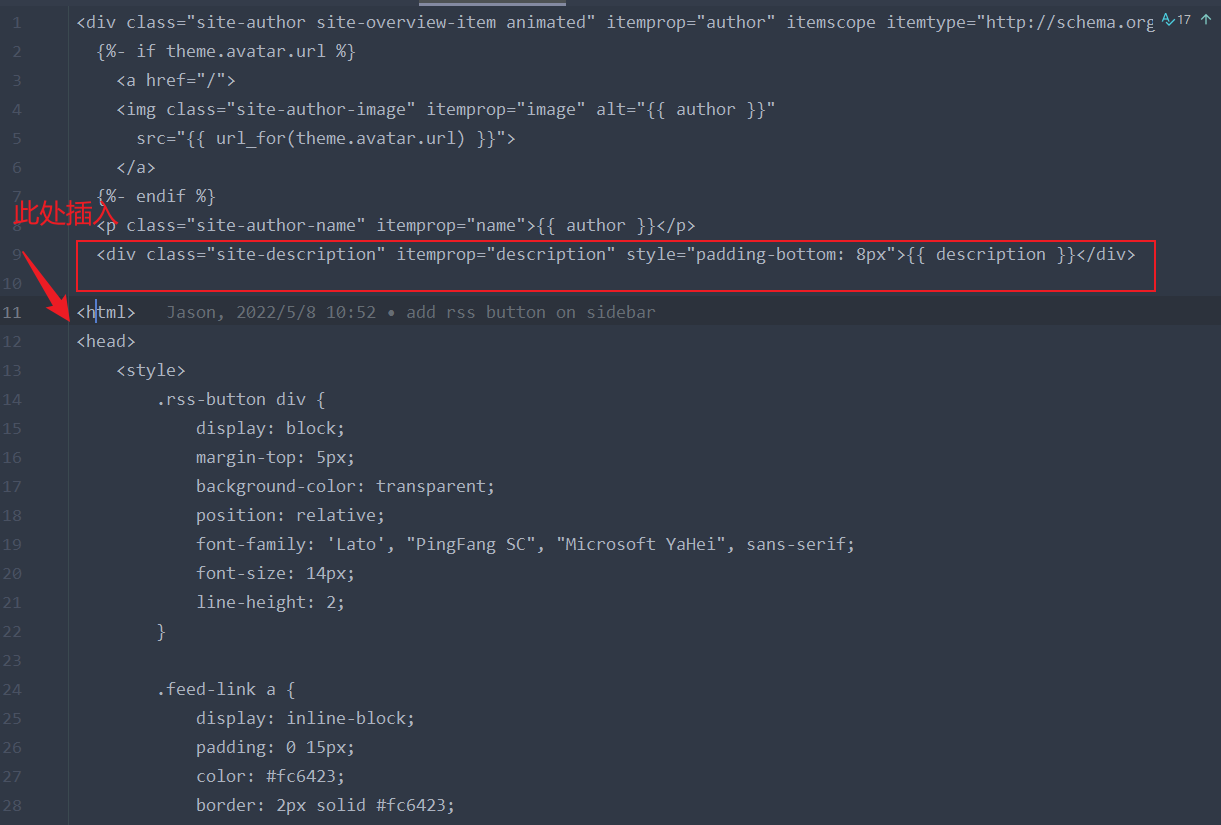
插入到 MyBlog\themes\next\layout\_partials\sidebar\site-overview.njk 文件图示位置中
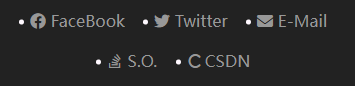
社交图标加入 CSDN
效果图,预览地址
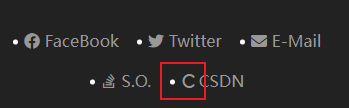
Next 最新版的主题,没有找到引用阿里巴巴图标库的方法(总提示请求无效),如果你有不错的解决方案,欢迎评论区留言
这里给出一个和 CSDN 比较类似的图标
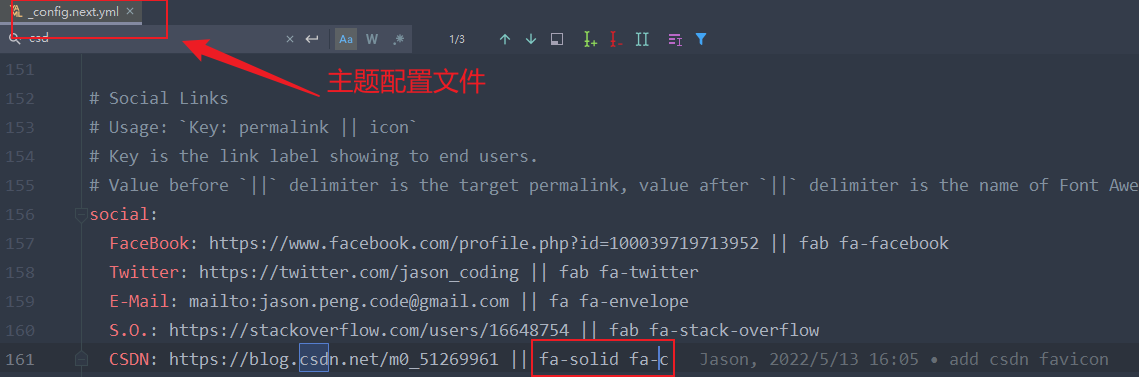
social:
  CSDN: https://blog.csdn.net/m0_51269961 || fa-solid fa-c
点击头像返回主页效果
这个比较简单,在头像的位置添加 <a></a> 标签就好。可能定位比较麻烦,文件位置是 MyBlog\themes\next\layout\_partials\sidebar\site-overview.njk
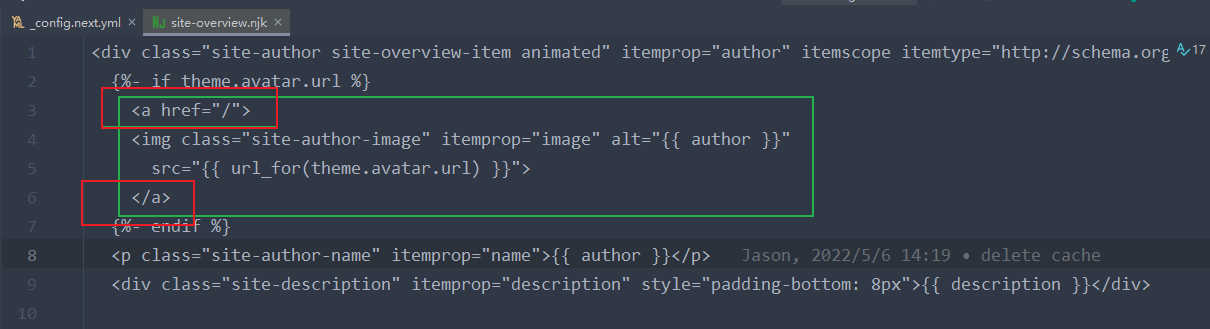
  {%- if theme.avatar.url %}
    <a href="/">
    <img class="site-author-image" itemprop="image" alt="{{ author }}"
      src="{{ url_for(theme.avatar.url) }}">
    </a>
  {%- endif %}
删除社交链接底部横线
效果图,预览地址
文件位置是MyBlog\themes\next\source\css\_schemes\Muse\_sidebar.styl ,找到 a 标签的 css 样式,添加 border-bottom 0px; 即可

加入看板娘
效果图,预览地址
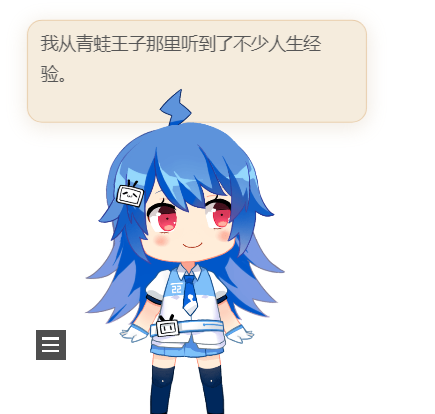
如果你的站点开启了侧边栏 始终显示,在进行下述操作后,请隐藏侧边栏后查看效果
图示路径下
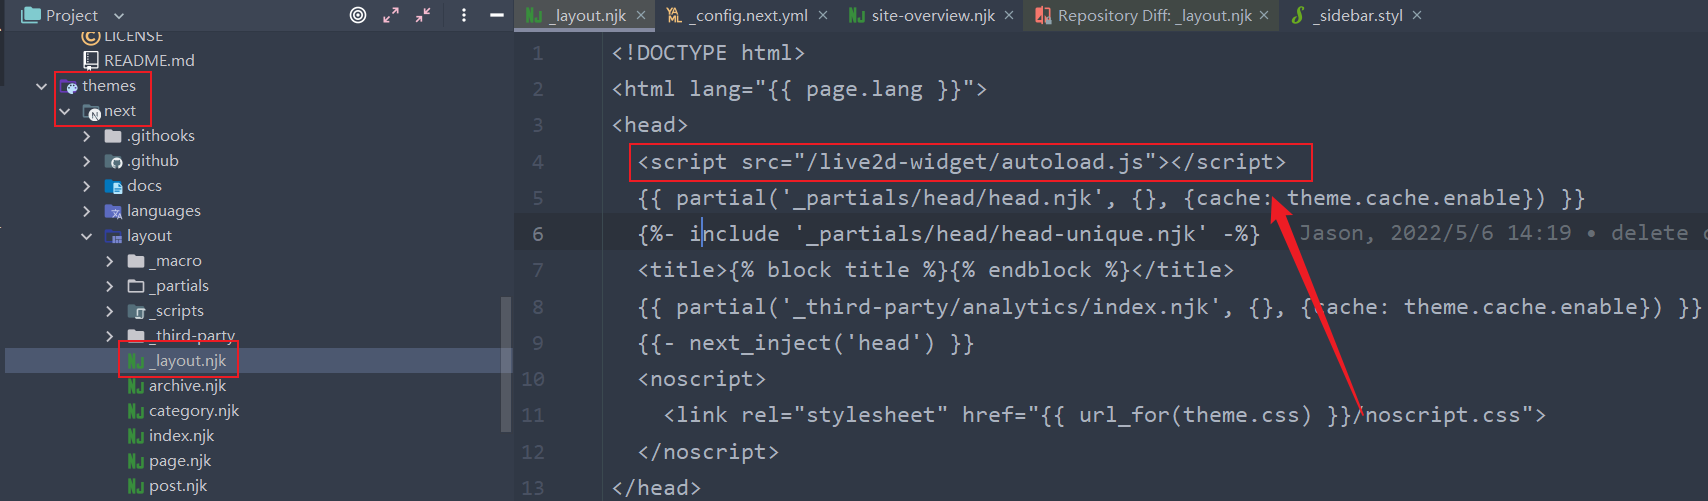
加入这段代码
<script src="/live2d-widget/autoload.js"></script>
然后在主题配置文件末尾加入下列配置项
# 自定义看板娘 https://github.com/PDPENG/live2d-widget
live2d:
  enable: true
效果即可显示
如果你需要更高级的自定义,可继续完成下面的配置
切换到主题的 source 文件夹下,克隆项目到本地(删除项目 .git 文件,避免推送报错),项目地址
git clone https://github.com/stevenjoezhang/live2d-widget
*注意:live2d_path 参数应使用 绝对路径
更多自定义配置参见,live2d-widget 自定义配置
自定义 404 页面
效果图,预览地址
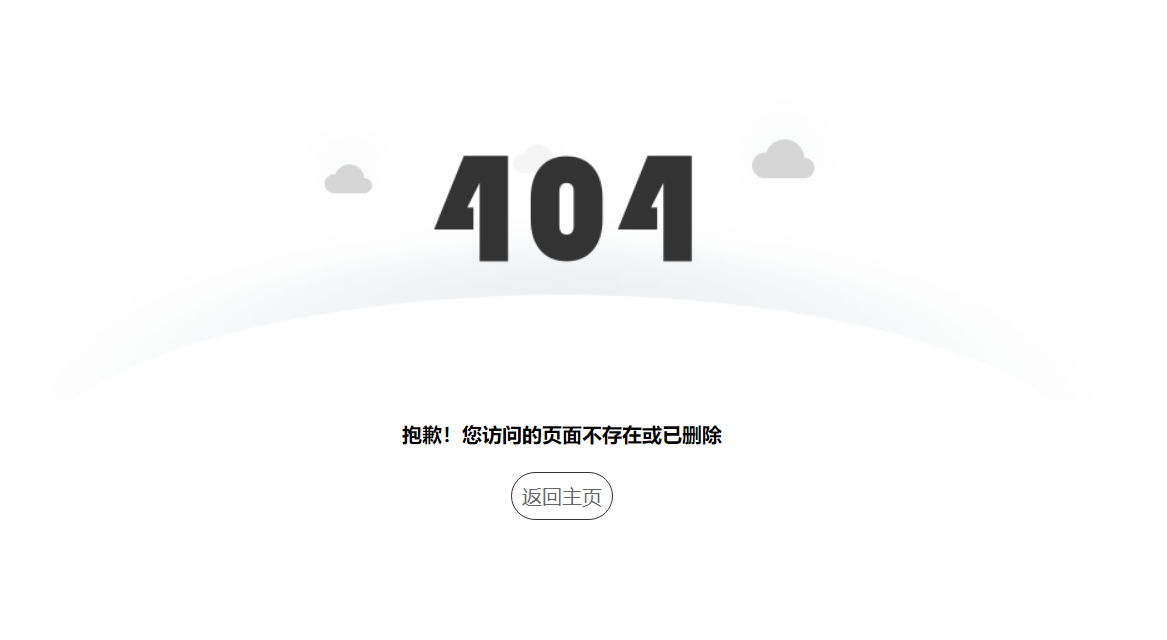
之前部署在服务器时,站点是配置了 404 页面的,但是在 Github Pages 中只有访问 /404 时,才能定向到页面,并不能实现真正的 404 效果
查看了官方文档后,实现也比较容易,只需要在站点资源文件夹(source 目录下)添加 404.md 或 404.html 即可

下面放上杰森的页面配置,供大家参考
---
title: 404
date: 2022-01-29 18:14:03
comments: false
layout: false
---

<!DOCTYPE html>
<html>
<head>
	<meta charset="UTF-8">
	<title>页面走丢啦~</title>
	<link rel="shortcut icon" href="/images/favicon-32x32.png" type=image/x-icon>
</head>
<style type="text/css">
	.error{
		position: absolute;
		top:50%;
		margin-top:-250px;
		width:100%;
		height:400px;
		/*border:1px solid red;*/
		overflow: hidden;
	}
	.error img{
		display: block;
		margin:0 auto;
	}
	.error p{
		text-align: center;
		font-size: 16px ! important;
		font-weight: 600
	}
	.back{
		display: block;
		width:80px;
		text-align: center;
		margin:20px auto;
		padding:8px 0;
		border:1px solid #333;
		border-radius: 100px;
		cursor: pointer;
        text-decoration: none;
        color: #666;
	}
	.back:hover{
		color:#fff;
		background: #000000;
		border:0px solid #333;
	}

	/* base.css */

	body,html{
	     height: 100%;
	     width: 100%;
	     min-width: 950px;
	}

	html,body,div,span,applet,object,iframe,h1,h2,h3,h4,h5,h6,p,blockquote,pre,a,abbr, acronym,address,big,cite,code,del,dfn,em,font,img,ins,kbd,q,s,samp,small,strike, sub,sup,tt,var,u,i,center,dl,dt,dd,ol,ul,li,fieldset,form,label,legend,table,caption, tbody,tfoot,thead,tr,th,td,p,span{
	    align:baseline;
	    background:transparent;
	    margin: 0;
	    padding:0;
	    -moz-box-sizing:border-box; /* Firefox */
	    -webkit-box-sizing:border-box; /* Safari */
	    box-sizing:border-box;
	    list-style-type:none;
	    font-family: Microsoft YaHei,microsoft yahei ui,微软雅黑,SimSun,楷体,楷体_GB2312;
	    font-size: 13px;
	}

	option,input,button,select,textarea{
	    border:0;
	    outline:none;
	    appearance:none;
	    -moz-appearance:none;
	    -webkit-appearance:none;
	    background: none;
	    webkit-appearance: none;
	    background:none;
	}
	body, td, div,span,a{
	    line-height:1;
	    letter-spacing:0;
	    margin:0;
	    padding:0;
	    -moz-font-smoothing:antialiased;
	    -webkit-font-smoothing: antialiased;
	    font-smoothing:antialiased;
	}
	    blockquote,q{
	    quotes:none;
	}
	    blockquote:before,blockquote:after,q:before,q:after{
	    content:none;
	}
	    :focus{
	    outline:0;
	}
	    ins{
	    text-decoration:none;
	}
	    del{
	    text-decoration:line-through;
	}
	    table{
	    border-collapse:collapse;
	    border-spacing:0;
	}

	img{
	    border:0px;
	}
	.banner{
	    width: 1004px;
	    height:232px;
	    margin: 10px auto 0 auto;
	    border-radius: 6px;
	    overflow: hidden;
	}
	.banner img{
	    width: 100%;
	}
	a{
	    text-decoration:none;
	    cursor:pointer;
	    outline:none;
	    text-decoration-line: none;
	    color:#666;
	}
	a, area {
	    outline:none;
	    blr:expression(this.onFocus=this.blur())
	}
	a:hover{
	    text-decoration:none;
	}

</style>

<body>
	<div class="error">
		<img src="/images/404.png">
		<p>抱歉!您访问的页面不存在或已删除</p>
		<a class="back" href="/">返回主页</a>
	</div>
</body>
</html>
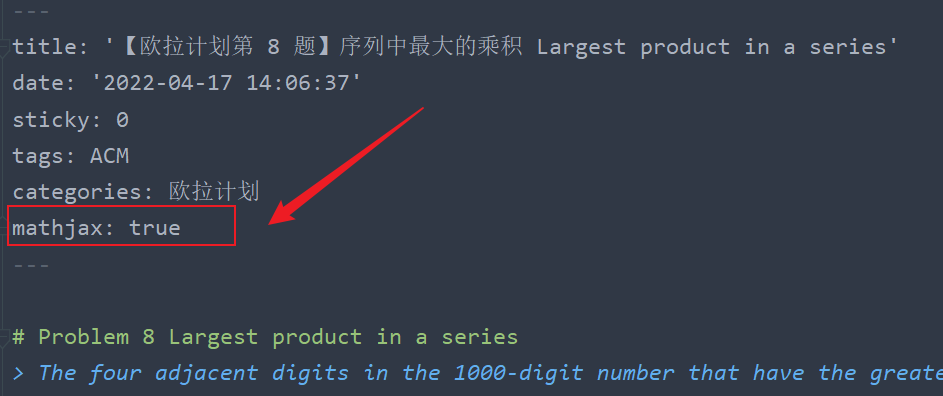
数学公式支持
效果图,预览地址
主题配置文件中,该字段配置,详情参考 Math Equations
# Math Formulas Render Support
# Warning: Please install / uninstall the relevant renderer according to the documentation.
# See: https://theme-next.js.org/docs/third-party-services/math-equations
# Server-side plugin: https://github.com/next-theme/hexo-filter-mathjax
math:
  # Default (false) will load mathjax / katex script on demand.
  # That is it only render those page which has `mathjax: true` in front-matter.
  # If you set it to true, it will load mathjax / katex script EVERY PAGE.
  every_page: false

  mathjax:
    enable: true
    # Available values: none | ams | all
    tags: none

  katex:
    enable: true
    # See: https://github.com/KaTeX/KaTeX/tree/master/contrib/copy-tex
    copy_tex: true
如依照上述配置,日后发文请在需要加载数学公式渲染文章的 front-matter 处添加 mathjax: true。例如
本地搜索功能排错指南
效果图,预览地址
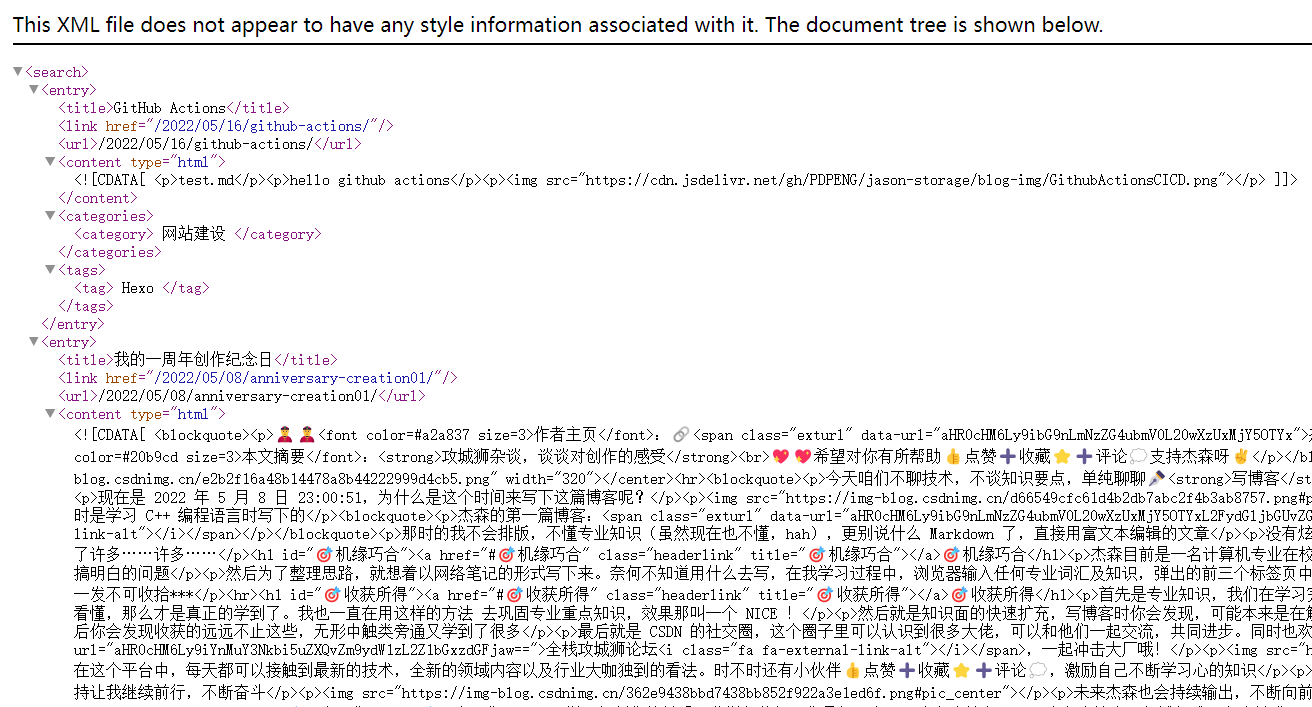
部署完成后,发现本地搜索功能失效,直接 访问站点 search.xml 浏览器显示
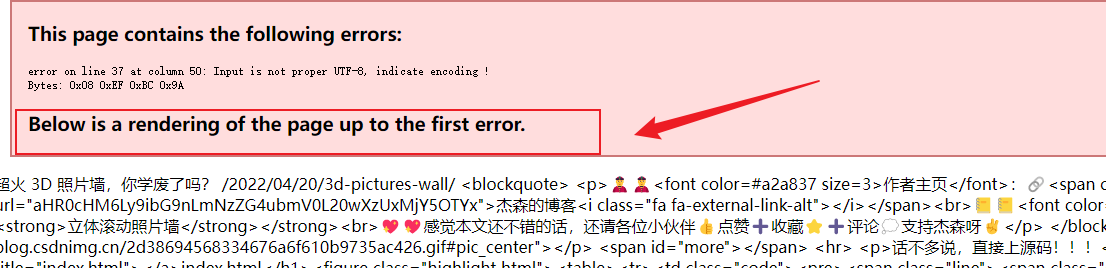
这里在保证插件配置正常的前提下,给出排除字符错误的解决方案
我们将 search.xml 保存到本地用 vscode 打开,根据浏览器报错的行、列指示,发现字符转义错误。在文章页面下删除该类字符后重新部署,搜索功能恢复
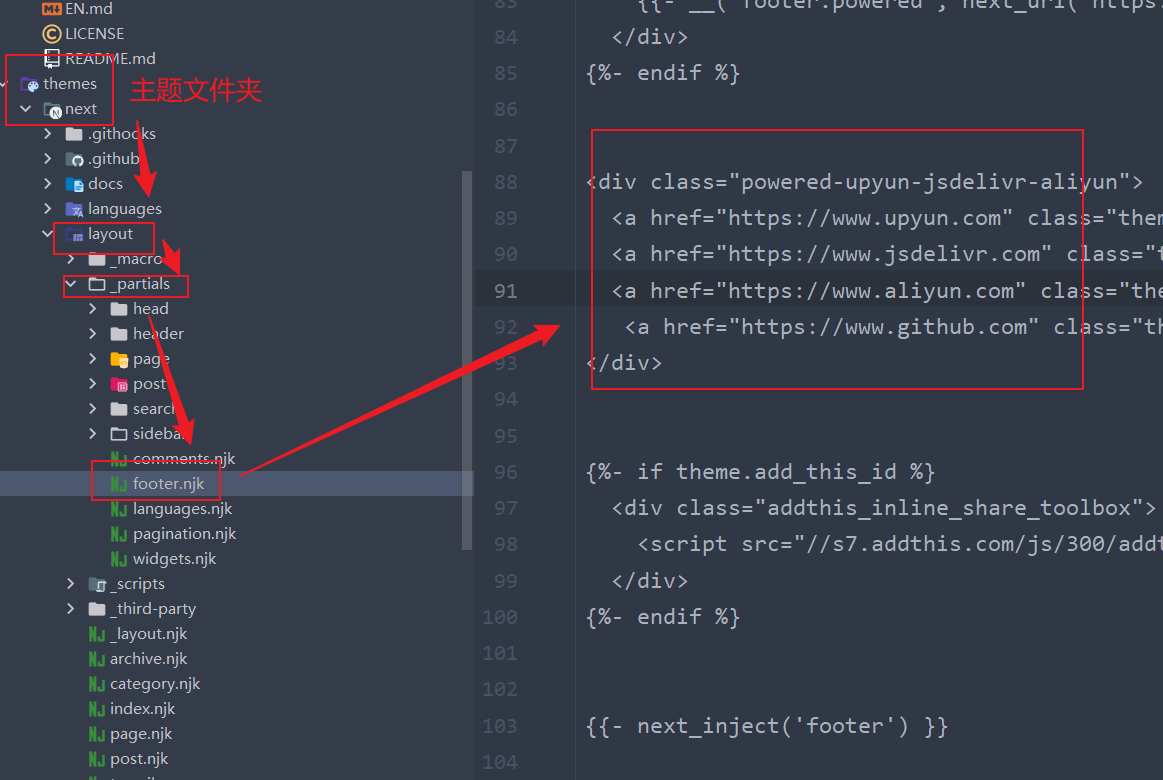
自定义站点页脚
效果图,预览地址
路径如图,按需修改
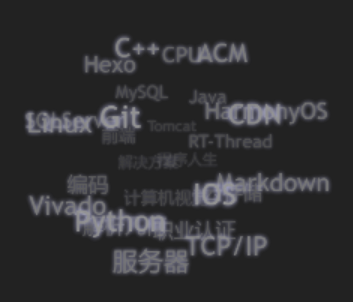
加入标签云
效果图,预览地址
- 进入到
hexo的根目录,然后在package.json中添加依赖:"hexo-tag-cloud": "2.1.*" - 然后执行
npm install命令
打开路径 next/layout/_macro/sidebar.swig,添加如下配置
{% if site.tags.length > 1 %}
<script type="text/javascript" charset="utf-8" src="{{ url_for('/js/tagcloud.js') }}"></script>
<script type="text/javascript" charset="utf-8" src="{{ url_for('/js/tagcanvas.js') }}"></script>
<div class="widget-wrap">
   <div id="myCanvasContainer" class="widget tagcloud">
        <canvas width="250" height="250" id="resCanvas" style="width:100%">
            {{ list_tags() }}
        </canvas>
    </div>
</div>
{% endif %}
- 完成安装和显示,可以通过
hexo clean && hexo g && hexo s来进行本地预览, hexo clean 为必须选项。 - *注:不要使用
hexo g -d 或者 hexo d -g这类组合命令,详见
README 转义问题
效果图,预览地址

当我们为项目配置 README.md 文件时,发布后会发现文件会被 hexo 转义成 .html 文件,详见 Hexo 配置
这里以站点添加中英双语介绍文件为例,将项目 README.md 及 EN.md 放在 source 目录下
然后在图示位置根据 glob 语法规则添加值即可
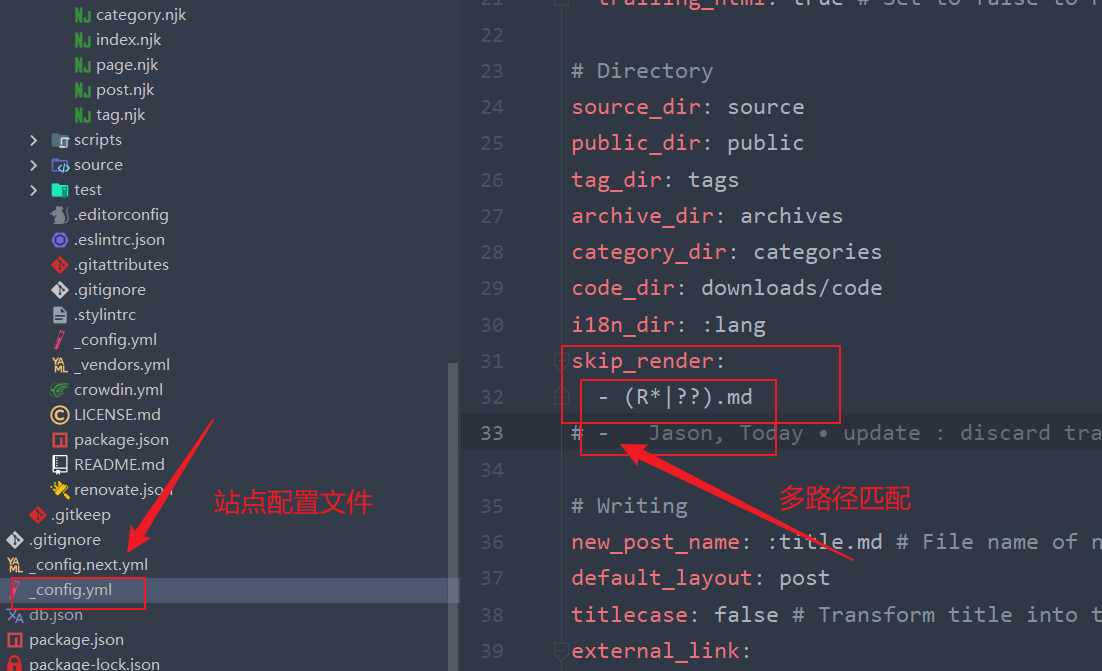
这样 hexo 就不会渲染匹配到的文件,显示正常
参考资料:

- 点赞
- 收藏
- 关注作者
评论(0)