神经网络_Sequential使用
【摘要】 @[toc] nn.Sequentialnn.Sequential是一个有序的容器,用于搭建神经网络的模块被按照被传入构造器的顺序添加到nn.Sequential()容器中。import torch.nn as nnfrom collections import OrderedDict# Using Sequential to create a small model. When `mod...
@[toc]
nn.Sequential
nn.Sequential是一个有序的容器,用于搭建神经网络的模块被按照被传入构造器的顺序添加到nn.Sequential()容器中。

import torch.nn  as nn
from collections import OrderedDict
# Using Sequential to create a small model. When `model` is run,
# input will first be passed to `Conv2d(1,20,5)`. The output of
# `Conv2d(1,20,5)` will be used as the input to the first
# `ReLU`; the output of the first `ReLU` will become the input
# for `Conv2d(20,64,5)`. Finally, the output of
# `Conv2d(20,64,5)` will be used as input to the second `ReLU`
model = nn.Sequential(
          nn.Conv2d(1,20,5),
          nn.ReLU(),
          nn.Conv2d(20,64,5),
          nn.ReLU()
        )

# Using Sequential with OrderedDict. This is functionally the
# same as the above code
model = nn.Sequential(OrderedDict([
          ('conv1', nn.Conv2d(1,20,5)),
          ('relu1', nn.ReLU()),
          ('conv2', nn.Conv2d(20,64,5)),
          ('relu2', nn.ReLU())
        ]))
print(model)
Sequential(
  (conv1): Conv2d(1, 20, kernel_size=(5, 5), stride=(1, 1))
  (relu1): ReLU()
  (conv2): Conv2d(20, 64, kernel_size=(5, 5), stride=(1, 1))
  (relu2): ReLU()
)
搭建小实战
还是以 为例

- 输入图像是3通道的32×32的
- 先后经过卷积层(5×5的卷积核)
- 最大池化层(2×2的池化核)
- 卷积层(5×5的卷积核)
- 最大池化层(2×2的池化核)
- 卷积层(5×5的卷积核)
- 最大池化层(2×2的池化核)
- 拉直(flatten)
- 全连接层的处理,
- 最后输出的大小为10
基于以上的介绍,后续将利用Pytorch构建模型,实现
参数说明:in_channels: int、out_channels: int,kernel_size: Union由input、特征图以及卷积核即可看出,而stride、padding需要通过公式计算得到。
特得到的具体的特征图尺寸的计算公式如下:

inputs : 3@32x32,3通道32x32的图片,5*5的kernel --> 特征图(Feature maps) : 32@32x32
即经过32个3@5x5的卷积层,输出尺寸没有变化(有x个卷积核即由x个卷积核,卷积核的通道数与输入的通道数相等)
由上述的计算公式来计算出 和

卷积层中的stride默认为1
池化层中的stride默认为kernel_size的大小
import torch
import torch.nn as nn
import torchvision
from torch.utils.data import DataLoader
from torch.utils.tensorboard import SummaryWriter
class BS(nn.Module):

    def __init__(self):
        super().__init__()
        self.conv1 = nn.Conv2d(in_channels=3,
                               out_channels=32,
                               kernel_size=5,
                               stride=1,
                               padding=2)  #stride和padding计算得到
        self.maxpool1 = nn.MaxPool2d(kernel_size=2)
        self.conv2 = nn.Conv2d(in_channels=32,
                               out_channels=32,
                               kernel_size=5,
                               stride=1,
                               padding=2)
        self.maxpool2 = nn.MaxPool2d(kernel_size=2)
        self.conv3 = nn.Conv2d(in_channels=32,
                               out_channels=64,
                               kernel_size=5,
                               padding=2)
        self.maxpool3 = nn.MaxPool2d(kernel_size=2)
        self.flatten = nn.Flatten()  #变为63*4*4=1024
        self.linear1 = nn.Linear(in_features=1024, out_features=64)
        self.linear2 = nn.Linear(in_features=64, out_features=10)


    def forward(self,x):
        x = self.conv1(x)
        x = self.maxpool1(x)
        x = self.conv2(x)
        x = self.maxpool2(x)
        x = self.conv3(x)
        x = self.maxpool3(x)
        x = self.flatten(x)
        x = self.linear1(x)
        x = self.linear2(x)
        return x

bs = BS()
bs
BS(
  (conv1): Conv2d(3, 32, kernel_size=(5, 5), stride=(1, 1), padding=(2, 2))
  (maxpool1): MaxPool2d(kernel_size=2, stride=2, padding=0, dilation=1, ceil_mode=False)
  (conv2): Conv2d(32, 32, kernel_size=(5, 5), stride=(1, 1), padding=(2, 2))
  (maxpool2): MaxPool2d(kernel_size=2, stride=2, padding=0, dilation=1, ceil_mode=False)
  (conv3): Conv2d(32, 64, kernel_size=(5, 5), stride=(1, 1), padding=(2, 2))
  (maxpool3): MaxPool2d(kernel_size=2, stride=2, padding=0, dilation=1, ceil_mode=False)
  (flatten): Flatten(start_dim=1, end_dim=-1)
  (linear1): Linear(in_features=1024, out_features=64, bias=True)
  (linear2): Linear(in_features=64, out_features=10, bias=True)
)
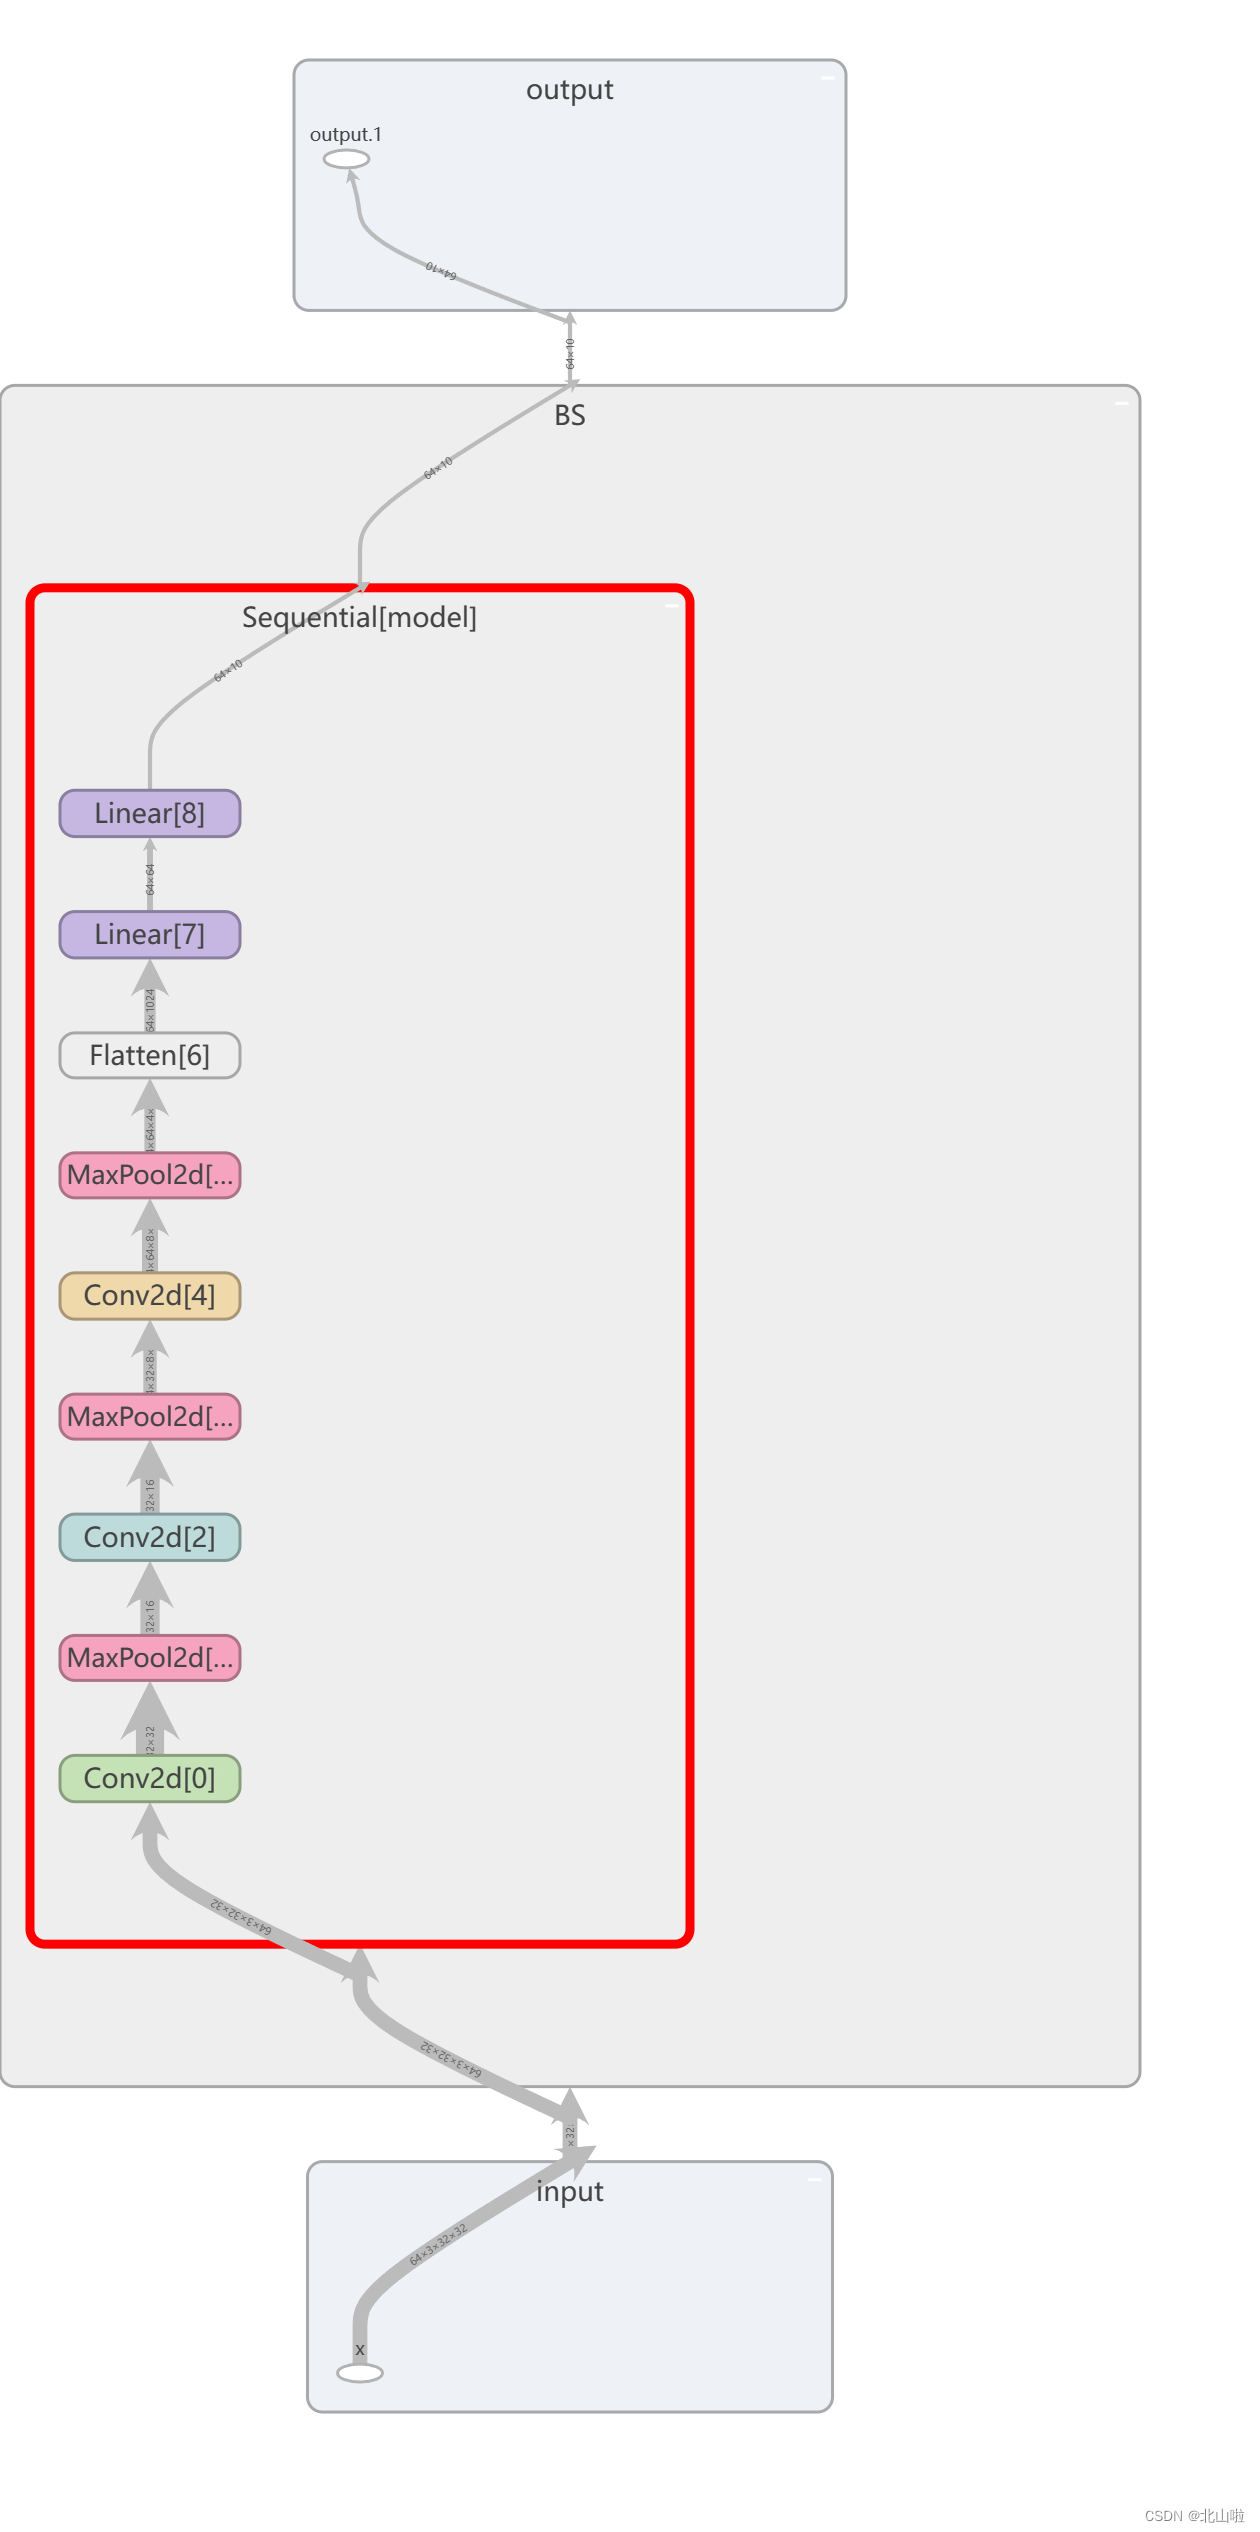
利用Sequential优化代码,并在tensorboard显示
.add_graph函数用于将PyTorch模型图添加到TensorBoard中。通过这个函数,您可以以可视化的方式展示模型的计算图,使其他人更容易理解您的模型结构和工作流程。
add_graph(model, input_to_model, strip_default_attributes=True)
- model:要添加的PyTorch模型。
- input_to_model:用于生成模型图的输入数据。
- strip_default_attributes:是否删除模型中的默认属性,默认为True。
class BS(nn.Module):

    def __init__(self):
        super().__init__()
        self.model = nn.Sequential(
            nn.Conv2d(in_channels=3,
                               out_channels=32,
                               kernel_size=5,
                               stride=1,
                               padding=2),  #stride和padding计算得到
            nn.MaxPool2d(kernel_size=2),
            nn.Conv2d(in_channels=32,
                                   out_channels=32,
                                   kernel_size=5,
                                   stride=1,
                                   padding=2),
            nn.MaxPool2d(kernel_size=2),
            nn.Conv2d(in_channels=32,
                                   out_channels=64,
                                   kernel_size=5,
                                   padding=2),
            nn.MaxPool2d(kernel_size=2),
            nn.Flatten(),  #变为64*4*4=1024
            nn.Linear(in_features=1024, out_features=64),
            nn.Linear(in_features=64, out_features=10),
        )

    def forward(self,x):
        x = self.model(x)
        return x

bs = BS()
print(bs)
BS(
  (model): Sequential(
    (0): Conv2d(3, 32, kernel_size=(5, 5), stride=(1, 1), padding=(2, 2))
    (1): MaxPool2d(kernel_size=2, stride=2, padding=0, dilation=1, ceil_mode=False)
    (2): Conv2d(32, 32, kernel_size=(5, 5), stride=(1, 1), padding=(2, 2))
    (3): MaxPool2d(kernel_size=2, stride=2, padding=0, dilation=1, ceil_mode=False)
    (4): Conv2d(32, 64, kernel_size=(5, 5), stride=(1, 1), padding=(2, 2))
    (5): MaxPool2d(kernel_size=2, stride=2, padding=0, dilation=1, ceil_mode=False)
    (6): Flatten(start_dim=1, end_dim=-1)
    (7): Linear(in_features=1024, out_features=64, bias=True)
    (8): Linear(in_features=64, out_features=10, bias=True)
  )
)
# 在tensorboard中显示
input_ = torch.ones((64,3,32,32))
writer = SummaryWriter(".logs")
writer.add_graph(bs, input_)  # 定义的模型,数据
writer.close()
利用tensorboard可视化网络结构graph如下

【声明】本内容来自华为云开发者社区博主,不代表华为云及华为云开发者社区的观点和立场。转载时必须标注文章的来源(华为云社区)、文章链接、文章作者等基本信息,否则作者和本社区有权追究责任。如果您发现本社区中有涉嫌抄袭的内容,欢迎发送邮件进行举报,并提供相关证据,一经查实,本社区将立刻删除涉嫌侵权内容,举报邮箱:
cloudbbs@huaweicloud.com
- 点赞
- 收藏
- 关注作者


评论(0)