linux驱动开发 使用设备树编写一个led驱动程序

【摘要】 @TOC 前言本文将带大家学习如何使用设备树编写一个LED的驱动程序。我这里使用的开发板是百问网的imx6ull。 一、设备树的配置1.进入设备树目录查看设备树文件2.添加led子节点的信息3.返回源码目录生成dtb文件4.将生成的dtb文件拷贝到开发板的网络文件系统5.将dtb文件拷贝到开发板的/boot目录下重新启动开发板 二、重新启动后查看设备信息 1.查看创建出的平台设备进入/sys...
@TOC
前言
本文将带大家学习如何使用设备树编写一个LED的驱动程序。
我这里使用的开发板是百问网的imx6ull。
一、设备树的配置
1.进入设备树目录查看设备树文件

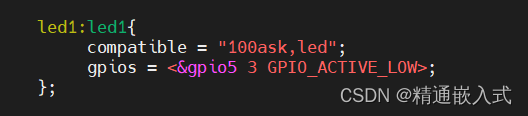
2.添加led子节点的信息
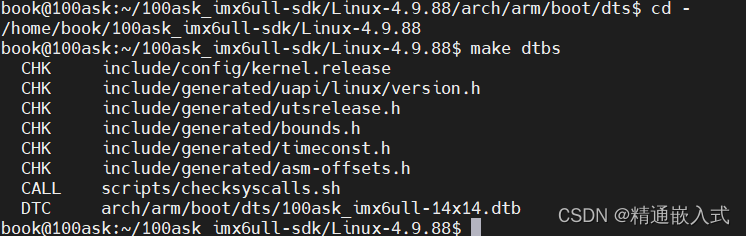
3.返回源码目录生成dtb文件
4.将生成的dtb文件拷贝到开发板的网络文件系统

5.将dtb文件拷贝到开发板的/boot目录下重新启动开发板
二、重新启动后查看设备信息
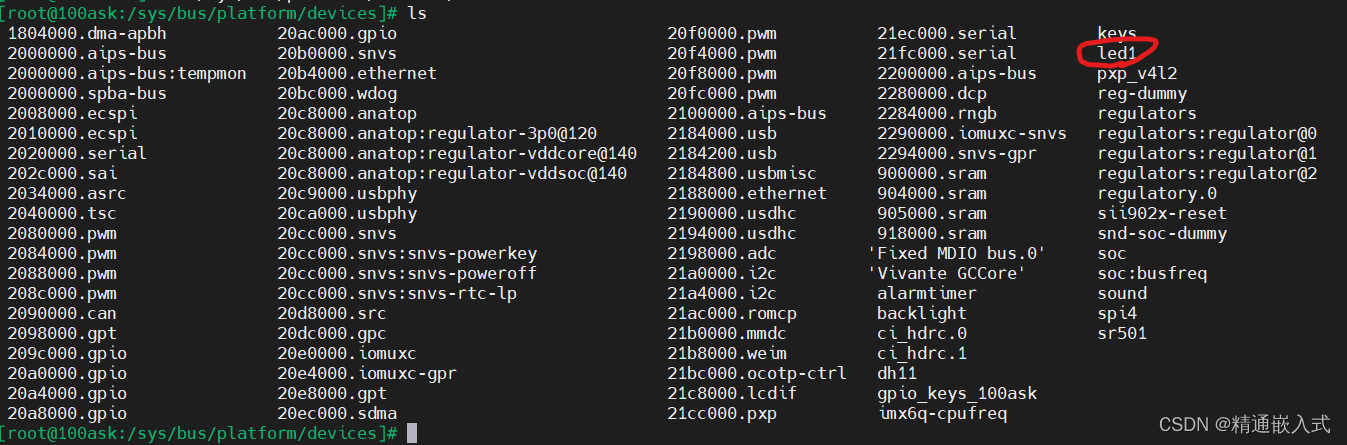
1.查看创建出的平台设备
进入/sys/bus/platform/devices/目录可以查看根据设备树生成的平台设备
2.查看节点
进入/sys/firmware/devicetree/base目录查看生成的节点

3.编写驱动程序
#include <linux/module.h>
#include <linux/poll.h>

#include <linux/fs.h>
#include <linux/errno.h>
#include <linux/miscdevice.h>
#include <linux/kernel.h>
#include <linux/major.h>
#include <linux/mutex.h>
#include <linux/proc_fs.h>
#include <linux/seq_file.h>
#include <linux/stat.h>
#include <linux/init.h>
#include <linux/device.h>
#include <linux/tty.h>
#include <linux/kmod.h>
#include <linux/gfp.h>
#include <linux/gpio/consumer.h>
#include <linux/platform_device.h>
#include <linux/of_gpio.h>
#include <linux/of_irq.h>
#include <linux/interrupt.h>
#include <linux/irq.h>
#include <linux/slab.h>
#include <linux/fcntl.h>
#include <linux/timer.h>
#include <linux/workqueue.h>
#include <asm/current.h>
#include <linux/delay.h>
#include <linux/timex.h>


int major=0;
static struct class *led_class;
static struct gpio_desc *led_gpio;


static ssize_t led_read (struct file *file, char __user *buf, size_t size, loff_t *off)
{
	return 0;

}

static int led_open (struct inode *inode, struct file *file)
{
	gpiod_direction_output(led_gpio, 0);
	printk("%s %s line %d\n", __FILE__, __FUNCTION__, __LINE__);
	return 0;
}

static ssize_t led_write (struct file *file, const char __user *buf, size_t size, loff_t *off)
{
	char val;
	int err;
	err = copy_from_user(&val, buf, 1);
	gpiod_set_value(led_gpio, val);
	printk("%s %s line %d\n", __FILE__, __FUNCTION__, __LINE__);

	return 1;
}


static struct file_operations led_ops={
	.owner		= THIS_MODULE,
	.open		= led_open,
	.read		= led_read,
	.write		= led_write,
};


static int led_probe(struct platform_device *pdev)
{
	printk("%s %s line %d\n", __FILE__, __FUNCTION__, __LINE__);

	/*1.获取硬件信息*/
	led_gpio=gpiod_get(&pdev->dev, NULL, 0);
	if (IS_ERR(led_gpio)) {
		printk("%s %s line %d\n", __FILE__, __FUNCTION__, __LINE__);
	}

	/*2.创建设备节点*/
	device_create(led_class,NULL, MKDEV(major, 0), NULL, "100askled");


    return 0;

}

static int led_remove(struct platform_device *pdev)
{
	printk("%s %s line %d\n", __FILE__, __FUNCTION__, __LINE__);
	gpiod_put(led_gpio);
	return 0;
}

static const struct of_device_id my_led[] = {
    { .compatible = "100ask,led" },
    { },
};


static struct platform_driver led={
	.driver = {
		.name = "led",
		.of_match_table = my_led,
	},
	.probe = led_probe,
	.remove	= led_remove,
};


static int __init led_init(void)
{
	int err;
	printk("%s %s line %d\n", __FILE__, __FUNCTION__, __LINE__);
	/*确定主设备号*/
	major=register_chrdev(major, "myled", &led_ops);
	/*创建类*/
	led_class=class_create(THIS_MODULE, "led");
	if (IS_ERR(led_class)) {
		printk("%s %s line %d\n", __FILE__, __FUNCTION__, __LINE__);
		unregister_chrdev(major, "myled");
		return PTR_ERR(led_class);
	}
	err=platform_driver_register(&led);
	return 0;
}

static void __exit led_exit(void)
{
	printk("%s %s line %d\n", __FILE__, __FUNCTION__, __LINE__);
	device_destroy(led_class, MKDEV(major, 0));
	class_destroy(led_class);
	unregister_chrdev(major, "myled");
	platform_driver_unregister(&led);
}

module_init(led_init);
module_exit(led_exit);

MODULE_LICENSE("GPL");
总结
使用设备树来编写驱动程序极大的方便了我们写驱动程序,如果不使用设备树去编写驱动程序的话那只能使用寄存器操作硬件。
有了设备树后操作硬件就变得非常简单了。

【声明】本内容来自华为云开发者社区博主,不代表华为云及华为云开发者社区的观点和立场。转载时必须标注文章的来源(华为云社区)、文章链接、文章作者等基本信息,否则作者和本社区有权追究责任。如果您发现本社区中有涉嫌抄袭的内容,欢迎发送邮件进行举报,并提供相关证据,一经查实,本社区将立刻删除涉嫌侵权内容,举报邮箱:
cloudbbs@huaweicloud.com
- 点赞
- 收藏
- 关注作者
评论(0)