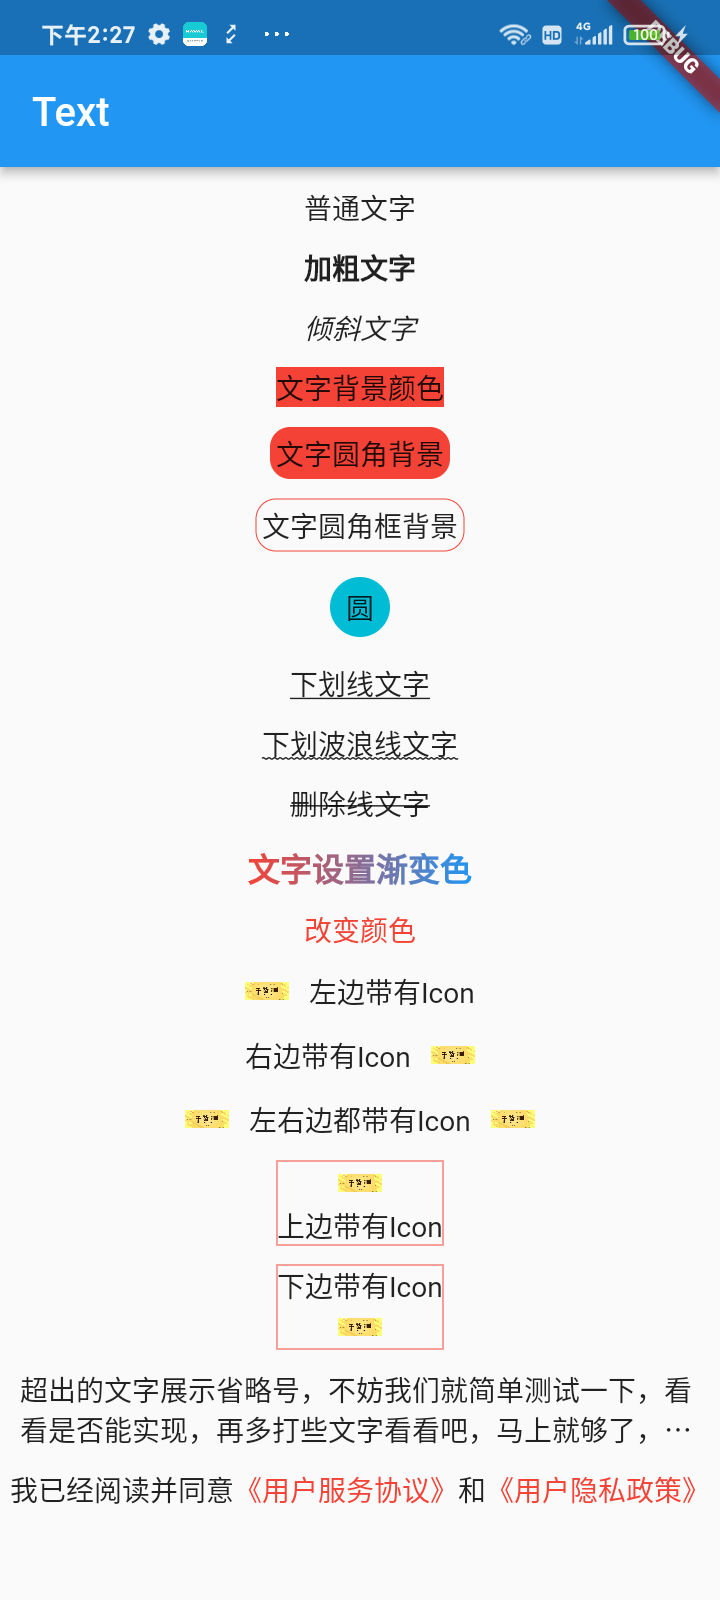
前边的文章,我们简单针对Widget做了一个基类封装,拓展出了很多常见又易用的属性,比如宽高,内外边距等等,很方便的为接下来的各个基础组件的封装,提供极大的便利,在上篇文章中,诉说了BaseWidget可以单独使用,也可以让别的组件继承使用,目的就是为了拓展,而本篇文章就是基于上篇,我们拓展一下Text组件。
本篇文章的内容大概如下:
1、实际的效果一览
2、Text相关属性分析
3、源码和具体使用
4、相关总结
一、实际的效果一览
文本Text比较简单,除了基类BaseWidget所提供的属性之外,又简单的扩展了部分属性,比如图文和富文本,都是系统原生的提供的,做了简单的封装。

二、Text相关属性分析
关于文本的属性,为什么要去继承BaseWidget,也就是上篇封装的基类,一个重要的原因就是,拓展文本的点击,内外边距和相关背景等属性,方便在实际的开发中进行调用。
文本所提供的常见属性,如文字的大小,颜色等,我们可以原封不动的抛出去,毕竟这都是基本的属性,我们没必要再一一自己实现,为了更好的符合实际的开发需要,比如富文本,带有Icon等等,我们尽量也拓展一下。
自定义的文本属性相对不是很多,大致如下,这些属性,还是那句话,需要根据实际的需求和业务,我们选择性进行使用。
属性 |
类型 |
概述 |
text |
String |
文本内容 |
style |
TextStyle |
文本样式 |
leftIcon |
String |
左边的图片 |
leftIconWidth |
double |
左边的图片宽度 |
leftIconHeight |
double |
左边的图片高度 |
iconMarginRight |
double |
图片距离右边的文字距离 |
rightIcon |
String |
右边的图片 |
rightIconWidth |
double |
右边的图片宽度 |
rightIconHeight |
double |
右边的图片高度 |
iconMarginLeft |
double |
图片距离左边的文字距离 |
topIcon |
String |
上边的图片 |
topIconWidth |
double |
上边的图片宽度 |
topIconHeight |
double |
上边的图片高度 |
iconMarginBottom |
double |
图片距离下边的文字距离 |
bottomIcon |
String |
下边的图片 |
bottomIconWidth |
double |
下边的图片宽度 |
bottomIconHeight |
double |
下边的图片高度 |
iconMarginTop |
double |
图片距离上边的文字距离 |
mainAxisAlignment |
MainAxisAlignment |
文字的相对父位置 |
textOverflow |
TextOverflow |
文字溢出方式 |
textAlign |
TextAlign |
文字位置 |
maxLines |
int |
最大行数 |
richList |
List<TextRichBean> |
富文本数据 |
onRichClick |
Function(int, TextRichBean) |
富文本点击事件 |
三、源码和具体使用
源码相对比较简单,毕竟都是系统的Api,无非就是做了一个简单的封装,首先是继承了BaseWidget,实现了getWidget方法,这个很重要,因为所有的组件效果,都是从这个方法里进行渲染的。
关于这个Text类,需要注意是,如果你想把基类的属性拓展出去,那么就可以在构造方法里进行super一下,具体需要拓展哪些,完全按实际的业务去走,并不是所有的属性都需要拓展。
相关注释已经标记,大家可以直接使用。
自定义文本源码
import 'package:flutter/gestures.dart';
import 'package:flutter/material.dart';

import '../../base/base_widget.dart';
import '../../data/bean/text_rich_bean.dart';

///AUTHOR:AbnerMing
///DATE:2023/5/19
///INTRODUCE:文本控件 Text

class VipText extends BaseWidget {
  final String text; //文本内容
  final TextStyle? style; //文本样式
  final String? leftIcon; //左边的图片
  final double? leftIconWidth; //左边的图片宽度
  final double? leftIconHeight; //左边的图片高度
  final double? iconMarginRight; //图片距离右边的文字距离
  final String? rightIcon; //右边的图片
  final double? rightIconWidth; //右边的图片宽度
  final double? rightIconHeight; //右边的图片高度
  final double? iconMarginLeft; //图片距离左边的文字距离
  final String? topIcon; //上边的图片
  final double? topIconWidth; //上边的图片宽度
  final double? topIconHeight; //上边的图片高度
  final double? iconMarginBottom; //图片距离下边的文字距离
  final String? bottomIcon; //下边的图片
  final double? bottomIconWidth; //下边的图片宽度
  final double? bottomIconHeight; //下边的图片高度
  final double? iconMarginTop; //图片距离上边的文字距离
  final MainAxisAlignment? mainAxisAlignment; //文字的位置
  final TextOverflow? textOverflow; //文字溢出方式
  final TextAlign? textAlign;//文字位置
  final int? maxLines;//最大行数
  final List<TextRichBean>? richList; //富文本数据
  final Function(int, TextRichBean)? onRichClick; //富文本点击事件

  const VipText(this.text,
      {super.key,
      this.style,
      this.leftIcon,
      this.leftIconWidth = 22,
      this.leftIconHeight = 22,
      this.iconMarginRight = 0,
      this.rightIcon,
      this.rightIconWidth = 22,
      this.rightIconHeight = 22,
      this.iconMarginLeft = 0,
      this.topIcon,
      this.topIconWidth = 22,
      this.topIconHeight = 22,
      this.iconMarginBottom = 0,
      this.bottomIcon,
      this.bottomIconWidth = 22,
      this.bottomIconHeight = 22,
      this.iconMarginTop = 0,
      this.mainAxisAlignment = MainAxisAlignment.center,
      this.textOverflow,
      this.textAlign,
      this.maxLines,
      this.richList,
      this.onRichClick,
      super.width,
      super.height,
      super.margin,
      super.marginLeft,
      super.marginTop,
      super.marginRight,
      super.marginBottom,
      super.padding,
      super.paddingLeft,
      super.paddingTop,
      super.paddingRight,
      super.paddingBottom,
      super.backgroundColor,
      super.strokeWidth,
      super.strokeColor,
      super.solidColor,
      super.radius,
      super.isCircle,
      super.leftTopRadius,
      super.rightTopRadius,
      super.leftBottomRadius,
      super.rightBottomRadius,
      super.childWidget,
      super.alignment,
      super.onClick,
      super.onDoubleClick,
      super.onLongPress});

  /*
  * 返回图片的组件
  * */
  Widget getImageWidget(String icon, double width, double height) {
    if (icon.contains("http")) {
      return Image.network(icon, width: width, height: height);
    } else {
      return Image.asset(icon, width: width, height: height);
    }
  }

  @override
  Widget getWidget(BuildContext context) {
    List<Widget> widgets = [];
    //左边的Icon
    if (leftIcon != null) {
      widgets.add(getImageWidget(leftIcon!, leftIconWidth!, leftIconHeight!));
    }
    //水平中间的文字
    if (leftIcon != null || rightIcon != null) {
      widgets.add(Container(
        margin: EdgeInsets.only(left: iconMarginRight!, right: iconMarginLeft!),
        child: getTextWidget(),
      ));
    }

    //右边的Icon
    if (rightIcon != null) {
      widgets
          .add(getImageWidget(rightIcon!, rightIconWidth!, rightIconHeight!));
    }

    if (widgets.isNotEmpty) {
      return Row(
        mainAxisAlignment: mainAxisAlignment!,
        children: widgets,
      );
    }

    //上边的icon
    if (topIcon != null) {
      widgets.add(getImageWidget(topIcon!, topIconWidth!, topIconHeight!));
    }
    //垂直中间的文字
    if (topIcon != null || bottomIcon != null) {
      widgets.add(Container(
        margin: EdgeInsets.only(top: iconMarginBottom!, bottom: iconMarginTop!),
        child: getTextWidget(),
      ));
    }
    //下面的icon
    if (bottomIcon != null) {
      widgets.add(
          getImageWidget(bottomIcon!, bottomIconWidth!, bottomIconHeight!));
    }
    if (widgets.isNotEmpty) {
      return Column(
        mainAxisAlignment: mainAxisAlignment!,
        children: widgets,
      );
    }

    //富文本
    if (richList != null && richList!.isNotEmpty) {
      List<TextSpan> list = [];
      for (var a = 0; a < richList!.length; a++) {
        var richBean = richList![a];
        var textSpan = TextSpan(
            text: richBean.text,
            recognizer: TapGestureRecognizer()
              ..onTap = () {
                //点击事件
                if (onRichClick != null) {
                  onRichClick!(a, richBean);
                }
              },
            style: TextStyle(
                fontSize: richBean.textSize, color: richBean.textColor));
        list.add(textSpan);
      }
      //富文本
      return Text.rich(TextSpan(children: list));
    }
    return getTextWidget();
  }

  Widget getTextWidget() {
    return Text(
      text,
      overflow: textOverflow,
      textAlign: textAlign,
      maxLines: maxLines,
      style: style,
    );
  }
}
TextRichBean
用于富文本数据渲染
import 'package:flutter/material.dart';

///AUTHOR:AbnerMing
///DATE:2023/5/19
///INTRODUCE:文本控件之富文本对象

class TextRichBean {
  String? text; //文字
  Color? textColor; //文字颜色
  double? textSize; //文字大小
  String? link; //文字链接
  TextRichBean({this.text, this.textColor, this.textSize, this.link});
}
具体使用
简单的就可以如下使用,需要什么属性,直接书写即可,比如内外边距,点击事件等等。
 VipText("普通文字", marginTop: 10, onClick: () {
   print("普通文字");
 })
所有使用方式案例(可直接复制使用)
import 'package:flutter/material.dart';

import '../../data/bean/text_rich_bean.dart';
import '../widget/vip_text.dart';

///AUTHOR:AbnerMing
///DATE:2023/5/19
///INTRODUCE:文本Text效果

class TextPage extends StatefulWidget {
  const TextPage({super.key});

  @override
  State<StatefulWidget> createState() => _TextPageState();
}

class _TextPageState extends State<TextPage> {
  @override
  Widget build(BuildContext context) {
    return Column(
      children: [
        VipText("普通文字", marginTop: 10, onClick: () {
          print("普通文字");
        }),
        VipText("加粗文字",
            marginTop: 10,
            style: const TextStyle(fontWeight: FontWeight.bold), onClick: () {
          print("加粗文字");
        }),
        VipText("倾斜文字",
            marginTop: 10,
            style: const TextStyle(fontStyle: FontStyle.italic), onClick: () {
          print("倾斜文字");
        }),
        VipText("文字背景颜色", marginTop: 10, backgroundColor: Colors.red,
            onClick: () {
          print("文字背景颜色");
        }),
        VipText("文字圆角背景",
            marginTop: 10,
            radius: 10,
            solidColor: Colors.red,
            padding: 3, onClick: () {
          print("文字圆角背景");
        }),
        VipText("文字圆角框背景",
            marginTop: 10,
            radius: 10,
            strokeColor: Colors.red,
            padding: 3, onClick: () {
          print("文字圆角框背景");
        }),
        VipText("圆",
            marginTop: 10,
            isCircle: true,
            solidColor: Colors.cyan,
            padding: 8, onClick: () {
          print("圆");
        }),
        VipText("下划线文字",
            marginTop: 10,
            style: const TextStyle(decoration: TextDecoration.underline),
            onClick: () {
          print("下划线文字");
        }),
        VipText("下划波浪线文字",
            marginTop: 10,
            style: const TextStyle(
              decoration: TextDecoration.underline,
              decorationStyle: TextDecorationStyle.wavy,
            ), onClick: () {
          print("下划波浪线文字");
        }),
        VipText("删除线文字",
            marginTop: 10,
            style: const TextStyle(decoration: TextDecoration.lineThrough),
            onClick: () {
          print("删除线文字");
        }),
        ShaderMask(
          shaderCallback: (Rect bounds) {
            return const LinearGradient(
              colors: [Colors.red, Colors.blue],
            ).createShader(Offset.zero & bounds.size);
          },
          child: VipText(
            '文字设置渐变色',
            marginTop: 10,
            style: const TextStyle(
              fontSize: 16,
              color: Colors.white,
              fontWeight: FontWeight.bold,
            ),
            onClick: () {
              print("文字设置渐变色");
            },
          ),
        ),
        VipText("改变颜色",
            style: const TextStyle(color: Colors.red),
            marginTop: 10, onClick: () {
          print("改变颜色");
        }),
        VipText("左边带有Icon",
            marginTop: 10,
            //可以是网络图片或assets图片
            leftIcon: "https://www.vipandroid.cn/ming/image/gan.png",
            iconMarginRight: 10, onClick: () {
          print("左边带有Icon");
        }),
        VipText("右边带有Icon",
            marginTop: 10,
            //可以是网络图片或assets图片
            rightIcon: "https://www.vipandroid.cn/ming/image/gan.png",
            iconMarginLeft: 10, onClick: () {
          print("左边带有Icon");
        }),
        VipText("左右边都带有Icon",
            marginTop: 10,
            //可以是网络图片或assets图片
            leftIcon: "https://www.vipandroid.cn/ming/image/gan.png",
            rightIcon: "https://www.vipandroid.cn/ming/image/gan.png",
            iconMarginRight: 10,
            iconMarginLeft: 10, onClick: () {
          print("左右边都带有Icon");
        }),
        VipText("上边带有Icon",
            marginTop: 10,
            strokeColor: Colors.red,
            //可以是网络图片或assets图片
            topIcon: "https://www.vipandroid.cn/ming/image/gan.png",
            onClick: () {
          print("上边带有Icon");
        }),
        VipText("下边带有Icon",
            strokeColor: Colors.red,
            marginTop: 10,
            //可以是网络图片或assets图片
            bottomIcon: "https://www.vipandroid.cn/ming/image/gan.png",
            onClick: () {
          print("下边带有Icon");
        }),
        VipText(
          "超出的文字展示省略号,不妨我们就简单测试一下,看看是否能实现,再多打些文字看看吧,马上就够了,不着急哈,再输入一点",
          textOverflow: TextOverflow.ellipsis,
          marginLeft: 10,
          marginRight: 10,
          maxLines: 2,
          marginTop: 10,
          onClick: () {
            print("超出文字点击");
          },
        ),
        VipText("富文本设置", richList: [
          TextRichBean(text: "我已经阅读并同意"),
          TextRichBean(text: "《用户服务协议》", textColor: Colors.red),
          TextRichBean(text: "和"),
          TextRichBean(text: "《用户隐私政策》", textColor: Colors.red)
        ], onRichClick: (position, richBean) {
          //富文本点击事件
          print(richBean.text);
        }, marginTop: 10)
      ],
    );
  }
}
四、相关总结
关于子类需要拓展父类的哪些属性,这个需要结合实际的项目和需求而定,而关于自定义组件的命名,也需要根据公司而定,好了老铁们,一个简单的文本组件就介绍到这里,希望可以帮助到大家。


评论(0)