HTML之布局、表单、框架、颜色(笔记小结)
【摘要】 1 html布局 1.1 使用div块元素<div> 元素是用于分组 HTML 元素的块级元素; 1.1.1 举例<!DOCTYPE html><html><head> <meta charset="utf-8"> <title>布局学习</title></head><body> <div id="container" style="width: 1920;"> ...
1 html布局
1.1 使用div块元素
<div>元素是用于分组 HTML 元素的块级元素;
1.1.1 举例
<!DOCTYPE html>
<html>
<head>
<meta charset="utf-8">
<title>布局学习</title>
</head>
<body>
<div id="container" style="width: 1920;">
<div id="title" style="background-color: rgb(172, 132, 140);">
<h2 style="margin-bottom: 0">NoamaNelson的博客
<div>
<span style="text-align: center;font-size: small;">专注测试领域的测试技术研究,测试理论、测试方法、测试管理等测试知识分享
</span>
</div>
</h2>
</div>
<br>
<div id="menu" style="background-color:rgb(201, 201, 219);float: left;">
1000 1000 1000 100万 10<br>
原创 周排名 总排名 访问 等级<br>
<br>
5000 1000 6000 10万 8000<br>
积分 粉丝 获赞 评论 收藏<br>
</div>
<div id="content" style="text-align: center;background-color: khaki;height: 500;">
内容在这里内容在这里内容在这里<br>
内容在这里内容在这里内容在这里<br>
内容在这里内容在这里内容在这里<br>
内容在这里内容在这里内容在这里<br>
内容在这里内容在这里内容在这里<br>
</div>
<div id="text">
<h3 style="clear: both;">热门文章</h3>
<div style="background-color: khaki;float: left;">
<p>Visual Studio2019安装闪退(不弹出<br>下载界面)等问题解决方法 </p>
<p>Visual Studio2019安装闪退(不弹出<br>下载界面)等问题解决方法 </p>
<p>Visual Studio2019安装闪退(不弹出<br>下载界面)等问题解决方法 </p>
</div>
</div>
<div id="list">
<h3 style="clear: both;">文章分类</h3>
<div style="background-color: rgb(112, 102, 7);float: left;">
<p>Visual Studio2019安装闪退(不弹出<br>下载界面)等问题解决方法 </p>
<p>Visual Studio2019安装闪退(不弹出<br>下载界面)等问题解决方法 </p>
<p>Visual Studio2019安装闪退(不弹出<br>下载界面)等问题解决方法 </p>
</div>
</div>
</div>
</body>
</html>

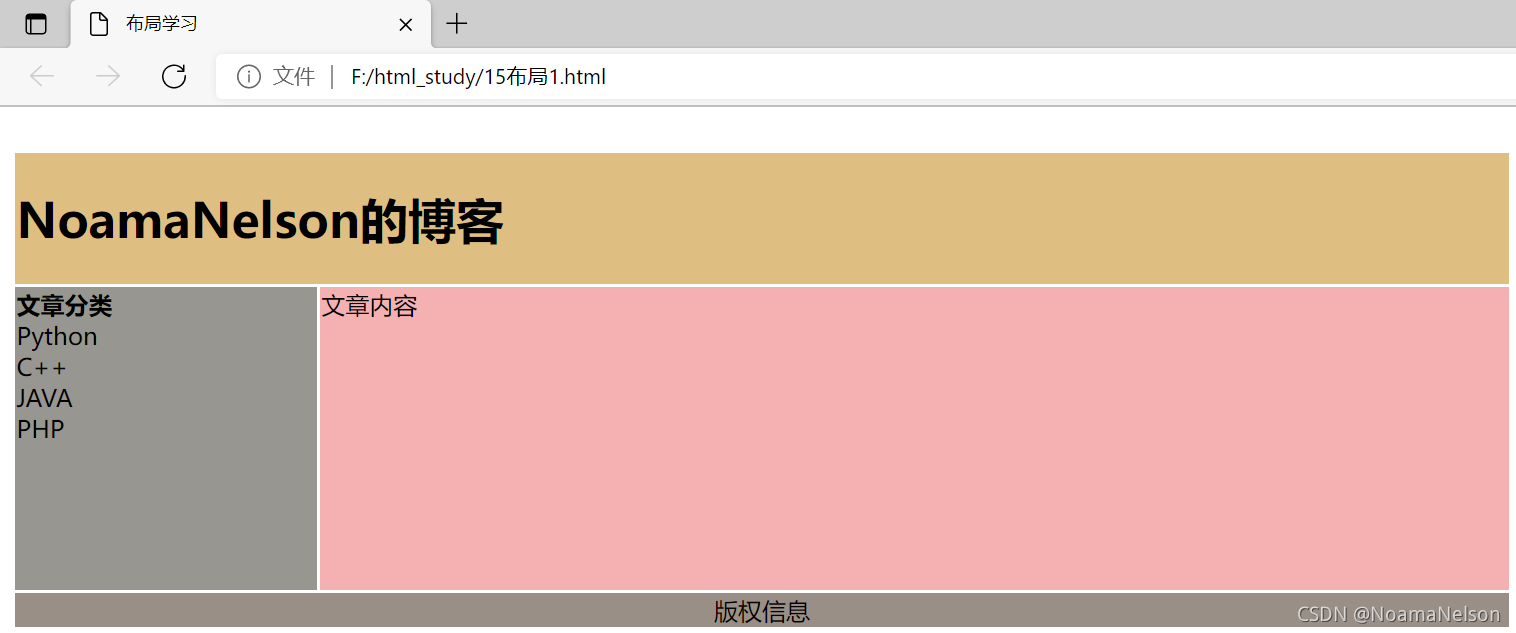
1.2 使用表格
- 可以使用
HTML <table>标签创建布局;
1.2.1 举例
<!DOCTYPE html>
<html>

<head>
    <meta charset="utf-8">
    <title>布局学习</title>
</head>

<body>

    <table width="1000" border="0">
        <tr>
            <td colspan="2" style="background-color:#dfbe82;">
                <h1>NoamaNelson的博客</h1>
            </td>
        </tr>

        <tr>
            <td style="background-color:#979690;width:100px;vertical-align:top;">
                <b>文章分类</b><br>
                Python<br>
                C++<br>
                JAVA<br>
                PHP<br>
            </td>
            <td style="background-color:#f5b1b1;height:200px;width:400px;vertical-align:top;">
                文章内容</td>
        </tr>
        <tr>
            <td colspan="2" style="background-color:#998f86;text-align:center;">
                版权信息</td>
        </tr>
    </table>

</body>

</html>

2 表单
2.1 表单说明
- 表单是一个包含表单元素的区域;
- 表单元素是允许用户在表单中输入内容;
- 表单使用表单标签
<form>来设置; - 格式:
<form>
内容部分
</form>
2.2 表单标签
| 标签 | 说明 |
|---|---|
<form> |
供用户输入的表单 |
<input> |
输入域 |
<textarea> |
文本域 (一个多行的输入控件) |
<label> |
<input> 元素的标签,一般为输入标题 |
<fieldset> |
一组相关的表单元素,并使用外框包含起来 |
<legend> |
<fieldset> 元素的标题 |
<select> |
下拉选项列表 |
<optgroup> |
选项组 |
<option> |
下拉列表中的选项 |
<button> |
一个点击按钮 |
<datalist> |
一个预先定义的输入控件选项列表 |
<keygen> |
表单的密钥对生成器字段 |
<output> |
一个计算结果 |
2.3 输入元素-文本域
- 通过
<input type="text">标签来设定; - 使用场景:比如用户在表单中输入字母、数字等字符;
- 默认宽度为20个字符;
- 举例:
<!DOCTYPE html>
<html>
<head>
<meta charset="utf-8">
<title>表单学习</title>
</head>
<body>
<h2>1、输入元素:文本域</h2>
<form>
please input height: <input type="text" height="height"><br>
please input weight: <input type="text" weight="weight"><br>
</form>
</body>
</html>

2.4 输入元素-密码字段
- 通过标签
<input type="password">来定义; - 输入的密码不显示,以星号或圆点代替;
- 举例:
<!DOCTYPE html>
<html>
<head>
<meta charset="utf-8">
<title>表单学习</title>
</head>
<body>
<h2>1、输入元素:文本域</h2>
<form>
please input height: <input type="text" height="height"><br>
please input weight: <input type="text" weight="weight"><br>
</form>
<h2>2、输入元素:密码字段</h2>
<form>
please input password: <input type="password" name="pwd"><br>
please input password again: <input type="password" name="pwd"><br>
</form>
</body>
</html>

2.5 输入元素-单选按钮
- 通过标签
<input type="radio">定义; - 举例:
<!DOCTYPE html>
<html>
<head>
<meta charset="utf-8">
<title>表单学习</title>
</head>
<body>
<h2>1、输入元素:文本域</h2>
<form>
please input height: <input type="text" height="height"><br>
please input weight: <input type="text" weight="weight"><br>
</form>
<h2>2、输入元素:密码字段</h2>
<form>
please input password: <input type="password" name="pwd"><br>
please input password again: <input type="password" name="pwd"><br>
</form>
<h2>3、输入元素:单选按钮</h2>
<form>
please select: <input type="radio" value="是">是<br>
please select: <input type="radio" value="否">否<br>
</form>
</body>
</html>

2.6 输入元素-复选框
- 通过标签
<input type="checkbox">定义; - 举例:
<!DOCTYPE html>
<html>
<head>
<meta charset="utf-8">
<title>表单学习</title>
</head>
<body>
<h2>1、输入元素:文本域</h2>
<form>
please input height: <input type="text" height="height"><br>
please input weight: <input type="text" weight="weight"><br>
</form>
<h2>2、输入元素:密码字段</h2>
<form>
please input password: <input type="password" name="pwd"><br>
please input password again: <input type="password" name="pwd"><br>
</form>
<h2>3、输入元素:单选按钮</h2>
<form>
please select: <input type="radio" value="是">是<br>
please select: <input type="radio" value="否">否<br>
</form>
<h2>4、输入元素:复选框</h2>
<form>
你都在哪个网站写博客,请选择:<br>
<input type="checkbox" name="boke" value="CSDN">CSDN<br>
<input type="checkbox" name="boke" value="博客园">博客园<br>
<input type="checkbox" name="boke" value="开源中国">开源中国<br>
<input type="checkbox" name="boke" value="简书">简书<br>
<input type="checkbox" name="boke" value="掘金">掘金<br>
<input type="checkbox" name="boke" value="思否">思否<br>
<input type="checkbox" name="boke" value="GitHub">GitHub<br>
<input type="checkbox" name="boke" value="个人网站">个人网站<br>
</form>
</body>
</html>

2.7 输入元素-提交按钮
- 通过标签
<input type="submit">定义; - 单击确认按钮时,表单的内容会被传送到另一个文件;
- 表单的动作属性定义了目的文件的文件名;
- 举例:
<!DOCTYPE html>
<html>
<head>
<meta charset="utf-8">
<title>表单学习</title>
</head>
<body>
<h2>1、输入元素:文本域</h2>
<form>
please input height: <input type="text" height="height"><br>
please input weight: <input type="text" weight="weight"><br>
</form>
<h2>2、输入元素:密码字段</h2>
<form>
please input password: <input type="password" name="pwd"><br>
please input password again: <input type="password" name="pwd"><br>
</form>
<h2>3、输入元素:单选按钮</h2>
<form>
please select: <input type="radio" value="是">是<br>
please select: <input type="radio" value="否">否<br>
</form>
<h2>4、输入元素:复选框</h2>
<form>
你都在哪个网站写博客,请选择:<br>
<input type="checkbox" name="boke" value="CSDN">CSDN<br>
<input type="checkbox" name="boke" value="博客园">博客园<br>
<input type="checkbox" name="boke" value="开源中国">开源中国<br>
<input type="checkbox" name="boke" value="简书">简书<br>
<input type="checkbox" name="boke" value="掘金">掘金<br>
<input type="checkbox" name="boke" value="思否">思否<br>
<input type="checkbox" name="boke" value="GitHub">GitHub<br>
<input type="checkbox" name="boke" value="个人网站">个人网站<br>
</form>
<h2>5、输入元素:提交按钮</h2>
<form name="input" action="xxx.py" method="GET">
用户名: <input type="text" name="name"><br>
密 码: <input type="password" name="pwd"><br>
<input style=background-color:yellow; type="submit" value="submit"><br>
</form>
</body>
</html>

3 框架
3.1 语法
- 使用标签
<iframe>定义; - 作用是:通过框架可以在一个窗口中可以显示多个页面;
- 语法:
<iframe src="url"></iframe>
3.2 设置iframe宽高
- 使用height 和 width 属性用来定义iframe标签的高度与宽度;
- 默认为像素单位,也可使用比例;
- 举例:
<!DOCTYPE html>
<html>
<head>
<meta charset="utf-8">
<title>框架学习</title>
</head>
<body>
<iframe name="csdn" src="https://blog.csdn.net/NoamaNelson" width="300" height="300"></iframe>
<iframe name="csdn" src="https://blog.csdn.net/NoamaNelson" width="300" height="300"></iframe>
<iframe name="csdn" src="https://blog.csdn.net/NoamaNelson" width="300" height="300"></iframe> <br>
<iframe name="csdn" src="https://blog.csdn.net/NoamaNelson" width="300" height="300"></iframe>
<iframe name="csdn" src="https://blog.csdn.net/NoamaNelson" width="300" height="300"></iframe>
<iframe name="csdn" src="https://blog.csdn.net/NoamaNelson" width="300" height="300"></iframe> <br>
</body>
</html>

3.3 iframe边框移除
- 使用frameborder 属性定义iframe边框;
- 属性值为0,则表示移除边框;
- 举例:
<!DOCTYPE html>
<html>
<head>
<meta charset="utf-8">
<title>框架学习</title>
</head>
<body>
<iframe name="csdn" src="https://blog.csdn.net/NoamaNelson" frameborder="0" width="300" height="300"></iframe>
<iframe name="csdn" src="https://blog.csdn.net/NoamaNelson" width="300" height="300"></iframe>
</body>
</html>

- 另外还有三个值的含义如下:
DENY:该网站页面不允许被嵌套;
SAMEORIGIN:该页面可以在相同域名页面中被嵌套;
ALLOW-FROM uri:该页面可以在指定来源页面中进行嵌套。
4 颜色
- HTML 颜色由红色、绿色、蓝色混合而成;
4.1 颜色名
- HTML和CSS颜色规范定义有141个颜色名称(其中17个标准颜色);
- 17标准颜色:黑色,蓝色,水,紫红色,灰色,绿色,石灰,栗色,海军,橄榄,橙,紫,红,白,银,蓝绿色,黄色;
- 比如颜色名:Bule、Black等等;
4.2 颜色值
- 颜色值由十六进制来表示红、绿、蓝(RGB);
- 每个颜色的最低值为 0(十六进制为 00),最高值为 255(十六进制为FF);
- 十六进制值的写法为 # 号后跟三个或六个十六进制字符。
4.3 颜色举例
<!DOCTYPE html>
<html>
    <head>
        <meta charset="utf-8">
        <title>颜色学习</title>
    </head>
    <body>
        <p style=background-color:yellow; >会当凌绝顶,</p>
        <p style=background-color:rgb(82,82,218); >一览众山小。</p>
        <p style=background-color:#FF0000>前两句是啥?。</p>
    </body>
</html>

【特别说明】:知识来源于网络、各种资料、书本、网站等,本文仅用于学习使用,不做他用,如果涉及版权问题,请联系博主删除,谢谢
【声明】本内容来自华为云开发者社区博主,不代表华为云及华为云开发者社区的观点和立场。转载时必须标注文章的来源(华为云社区)、文章链接、文章作者等基本信息,否则作者和本社区有权追究责任。如果您发现本社区中有涉嫌抄袭的内容,欢迎发送邮件进行举报,并提供相关证据,一经查实,本社区将立刻删除涉嫌侵权内容,举报邮箱:
cloudbbs@huaweicloud.com
- 点赞
- 收藏
- 关注作者


评论(0)