服务巡检
1. 背景
项目经过层层测试,最终上线了,此时我们很多时候需要保证线上是OK的。如果线上哪个服务出了问题,带来的后果是可想而知的。那么做线上巡检就成了我们很多测试,或者运维考虑的了,我们巡检不是为了去发现bug,更多的时候是保证服务是OK的,是可以访问的,比如我们Tomcat下的一个站点,很少有首页挂了,其他页面是OK的情况,因此我们巡检的目的是验证服务是否OK,有时也关注下响应时间。在讯飞开放平台上有很多第三方的webapi服务提供给用户使用,服务的可用性、授权和计量的准确性等都需要得到很好的保障,服务不可用,用户会第一时间反馈,但授权和计量出错,很难被及时发现,所以定时服务巡检就很有必要。接下来我们就以具体的实例来讲解下服务巡检的流程。
2. 设计思路
2.1 流程图

2.2 主要模块介绍
2.2.1 startUp.py
程序的入口,代码如下:
#coding: utf-8

"""
文件名:startUp.py
"""

import time
import os
from  get_count import get_count
from send_mail import mail_html,send_mail
import Femail

def use_service():
    par_dir = os.path.dirname(os.path.abspath(__file__)) #获取当前程序入口文件所在的文件夹路径
    lst = os.listdir(par_dir) #获取指定路径下的文件和文件夹列表
    for c in lst:
        c=os.path.join(par_dir, c)
        #筛选出列表内需要批量运行的.py文件
        if os.path.isfile(c) and c.endswith('.py')  and c.find("getCookie")==-1 and c.find("getcount") == -1 and c.find("startup")==-1 and c.find("Femail1") == -1 and c.find("Femail")==-1:
            time.sleep(1)
            os.system(c)

def get_result(dicbusiness2, dicbusiness3):
    dicresult={}
    #根据数据计算结果,判断服务调用情况
    for k,v in dicbusiness1.items():
        resultlist = []
        resultlist.append(dicbusiness1[k])
        resultlist.append(dicbusiness2[k])
        if dicbusiness2[k] - dicbusiness1[k]==1:
            if dicbusiness2[k]!=-1:
                dicbusiness3[k]="true"
            else:
                dicbusiness3[k] = "查量失败"
            print(dicbusiness3[k])
        elif dicbusiness2[k] == -1:
            dicbusiness3[k] = "查量失败"
        else:
            dicbusiness3[k] = "失败"
        resultlist.append(dicbusiness3[k])
        dicresult[k]=resultlist
    return dicresult


if __name__ == "__main__":
    APPID = "6034d943"
    dicbusiness = {"语音听写": "iat", "在线语音合成": "tts"}
    dicbusiness1={}  #用来存放服务使用前当日服务使用次数
    dicbusiness2 ={}   # 用来存放服务使用后当日服务使用次数
    dicbusiness3 = {}  # 用来存放服务是否调用成功或扣量成功的结果
    for k,v in dicbusiness.items():  #获取服务调用前当日服务使用次数
        dicbusiness1[k] = get_count(v, APPID)

    use_service()#开始调用服务
    time.sleep(30)
    for k,v in dicbusiness.items():  #获取服务调用后当日服务使用次数
        dicbusiness2[k] = get_count(v, APPID)

    dicresult=get_result(dicbusiness2, dicbusiness3)#对数据进行处理,判断服务有没有调用成功、扣量有没有成功
    mailcontent=mail_html(dicresult)#把结果格式化成可以在邮件正文内展示的表格样式
    send_mail(mailcontent)#发送邮件

    time.sleep(30) #确保服务不会因为程序延迟导致的结果异常
程序入口,主要的调用链路是:
1. 调用前获取当日服务使用次数  get_count()  #具体实现见2.2.2
2. 开始调用服务 use_service() #具体实现见2.2.1
3. 服务调用后当日服务使用次数 get_count()   #具体实现见2.2.2
4. 通过对调用前和调用后两次数据进行比较得到巡检结果get_result() #具体实现见2.2.1
5. 对结果进行处理,得到可以作为邮件正文的html mail_html() #具体实现见2.2.3
6. 把处理后的巡检结果,通过邮件的形式发送 send_mail() #具体实现见2.2.3
use_service()和get_result()两个方法,也在这个.py文件中实现
2.2.2 get_count.py
主要是用来获取数据,代码如下:
#coding: utf-8
"""
文件名:get_count.py
"""
import requests
import urllib3

def get_cookie():
    url1 = ""  #登录接口
    headers = {} #请求头
    data = {} #请求体
    r1 = requests.post(url1, data=data, headers=headers)
    cookie = "" + r1.json()["data"]['ssoSessionId'] + ";"
    return (cookie)

def get_count(businessId,appId):
    cookie=get_cookie()
    url = ""  # 获取数据的接口地址
    headers = {} #请求头
    data={} #请求体
    try:
        urllib3.disable_warnings()
        r = requests.get(url, headers=headers,data=data,verify=False)
        try:
            e=r.json()["data"]["usedCount"] #取出返回json串中data内的usedCount的值
        except Exception as e:
            return -1 #当接口返回异常时,把-1作为结果,返回到主程序中
    except Exception as e:
        return -1
    return e
获取get_count()方法中,使用到的获取数据的接口,需要通过cookie才能获取当前用户的服务量使用情况,因此,需要先通过get_cookie(),拿到登录接口返回值的cookie,作为获取数据接口的请求头参数(代码中去除了一些私密的数据)。
2.2.3 send_mail.py
对数据进行处理,处理完成后发送邮件,代码如下:
#coding: utf-8
"""
文件名:send_mail.py
"""

import smtplib
from email.mime.multipart import  MIMEMultipart
from email.header import Header
from email.mime.text import MIMEText

def mail_html(dicresult):
    header = '<html><head><meta http-equiv="Content-Type" content="text/html; charset=utf-8" /></head>'
    # 把数据做成表格样式,表头“服务名称、今日调用量(调用前)、今日调用量(调用后)、扣量是否成功、调用是否成功”
    th = '<body text="#000000" ><table border="1" cellspacing="0" cellpadding="3" bordercolor="#000000" width="180" align="left" ><tr bgcolor="#0000FF" align="left" ><th nowrap="nowrap">服务名称</th><th nowrap="nowrap">今日调用量(调用前)</th><th nowrap="nowrap">今日调用量(调用后)</th><th nowrap="nowrap">扣量是否成功</th><th nowrap="nowrap">调用是否成功</th></tr>'
    body = ''
    truenum=0
    for k,v in dicresult.items():
        td = ''
        tip1 = '<td nowrap="nowrap">' + k+ '</td>'
        tip2 = '<td>' + str(v[0]) + '</td>'
        tip3 = '<td>' + str(v[1]) + '</td>'
        tip4 = '<td nowrap="nowrap">' + v[2] + '</td>'
        td = td + tip1+tip2+tip3+tip4+tip4
        if v[2]=="true":
            tr = '<tr>' + td + '</tr>'#一组数据作为一行
            truenum=truenum+1
        else:
            tr = '<tr bgcolor="#FF3333">' + td + '</tr>'  #一组数据作为一行,当出现其他异常状态时,让该行变红
        body = body + tr
        tail = '</table></body></html>'
        mailcontent = header+th+body+tail #组成一个完整的html

    sum=len(dicresult)
    str1 = "执行:" + str(sum) + ";"
    str2 = "成功:" + str(truenum) + ";"
    str3 = "失败:" + str(sum-truenum) + ";"
    cs="<h3>" + str1 + str2 + str3 + "</h3>"
    mailcontent=cs+mailcontent #邮件正文内容
    return mailcontent

def send_mail(mailcontent):
    #创建连接和登录,smtp服务器地址,端口,发件人账号和密码,
    con = smtplib.SMTP_SSL('邮箱服务器地址')  #服务器地址
    con.login('邮箱账号','邮箱密码')#账号、密码


    #准备基础数据,主题、发件人、收件人
    msg = MIMEMultipart()
    #邮件主题
    msg['Subject'] = Header('开放平台服务调用巡检报告','utf-8').encode()
    #发件人
    msg['From'] = '' #发件人邮箱
    #收件人
    msg['To'] = '' #收件人邮箱

    html = MIMEText(mailcontent,'html','utf-8')
    msg.attach(html)
    #发送邮件
    #sendmail(发件人,收件人,内容)
    con.sendmail('发件人邮箱','收件人邮箱',msg.as_string())
    con.quit()
    print('发送成功!')
该.py文件中有两个方法mail_html()和send_mail(),mail_html()方法是为了对结果数据进行格式处理,send_mail()方法是把处理后的内容,通过邮件发送给项目组相关人员,具体实现,见上方代码。
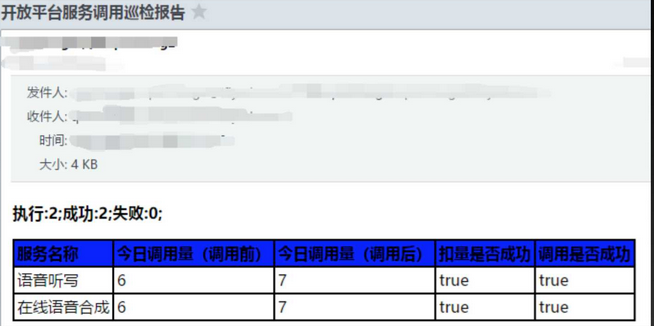
3. 结果展示
巡检结果正常时:

巡检结果异常时:

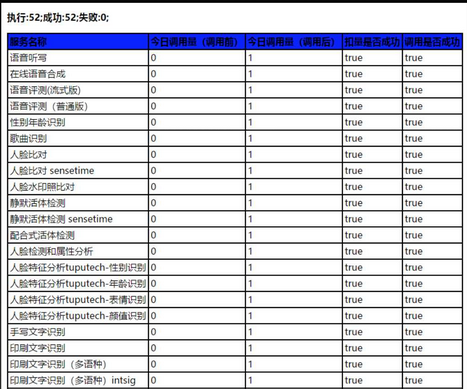
实际日常巡检的结果:

- 点赞
- 收藏
- 关注作者


评论(0)