Unity Metaverse(五)、Avatar数字人换装系统的实现方案
🎈 前言
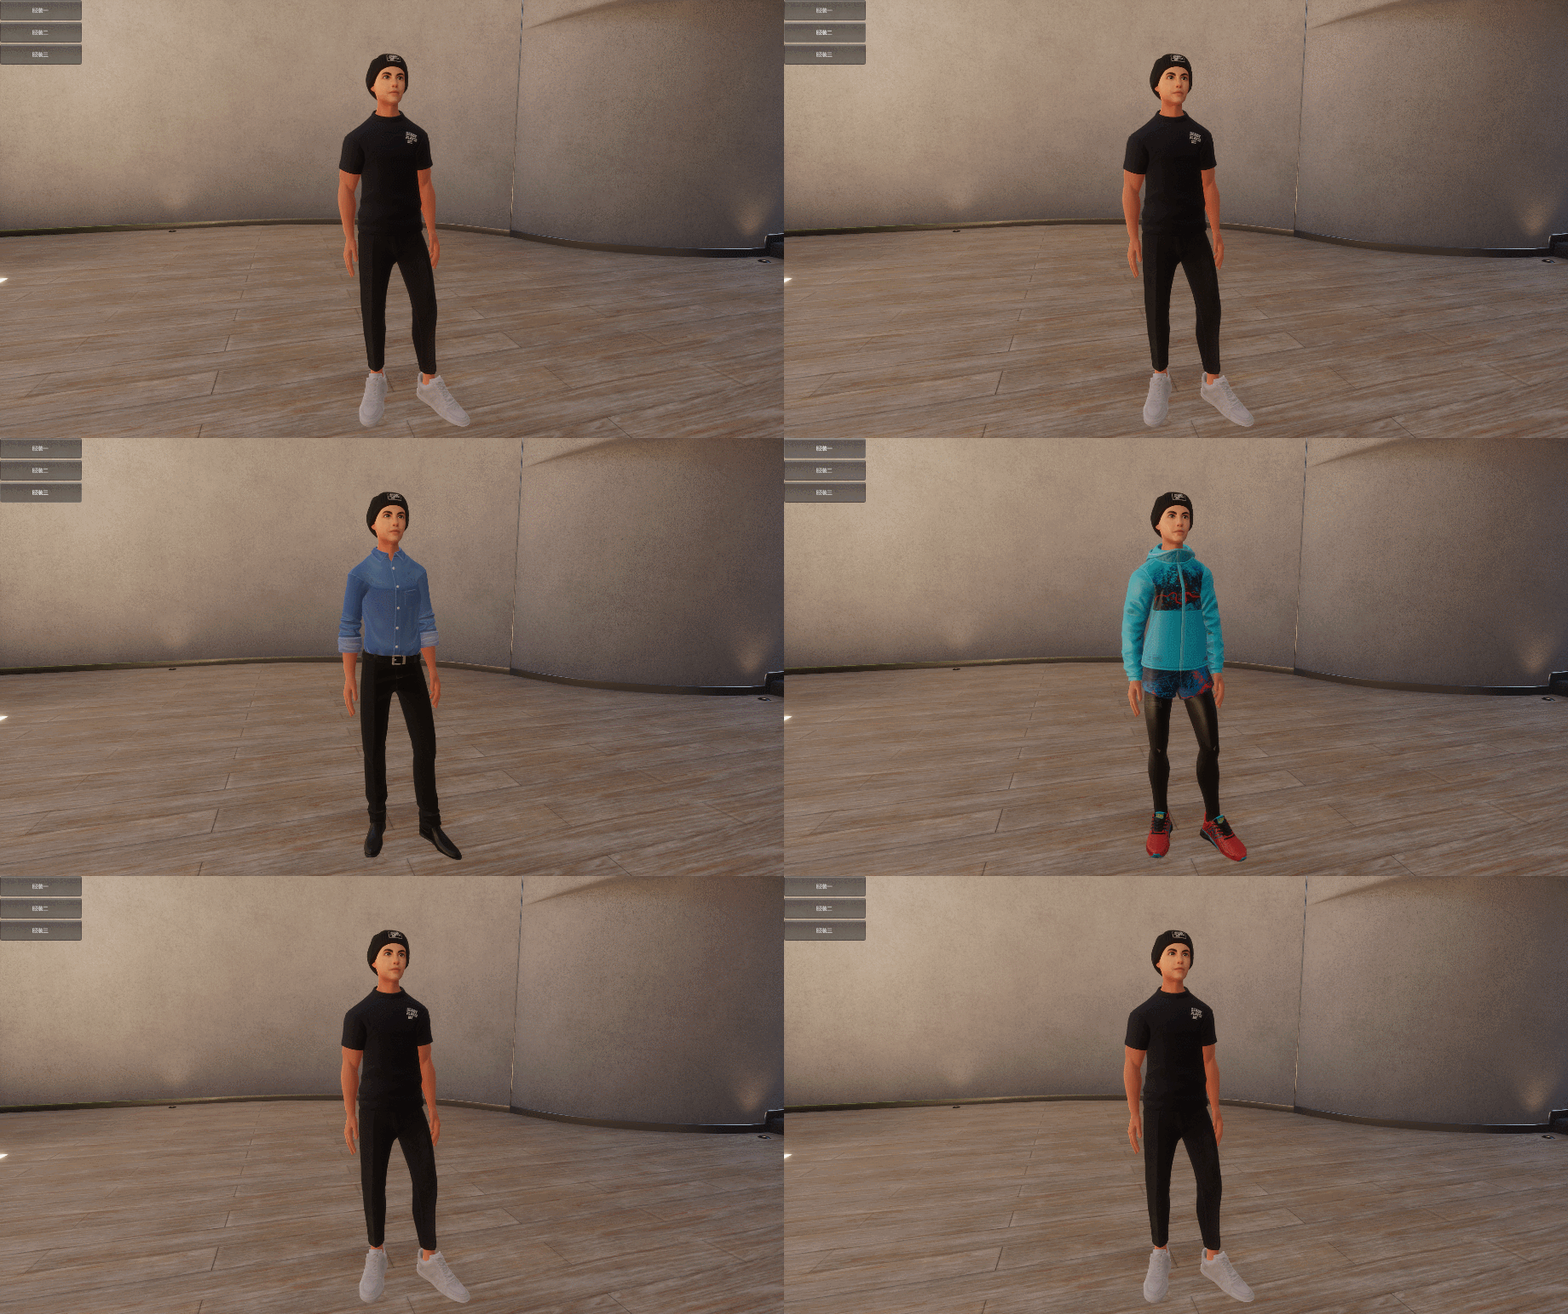
随着
元宇宙概念的火热,数字人换装捏脸的实现方案逐渐受到更多关注,本篇内容主要介绍如何在Unity中实现数字人的换装系统,涉及的所有美术资源均来源于RPM(Ready Player Me),地址:Ready Player Me主页。
实现该系统涉及到的无非是老生常谈的几项内容:
- Skinned Mesh Renderer - 蒙皮网格
- Material - 材质球
- Avatar Bone - 骨架
重要点,也是核心点,就是基于Avatar数字人的同一套骨架,也就是讲当数字人进行换装时,切换的是Skinned Mesh Renderer中的Mesh网格及Material材质球,骨架是不会去改变的。
🎈 如何将RPM中编辑的Avatar导入到Unity
本专栏的第一篇内容中有介绍RPM的使用以及将Avatar导入Unity的过程,下面简要说明。
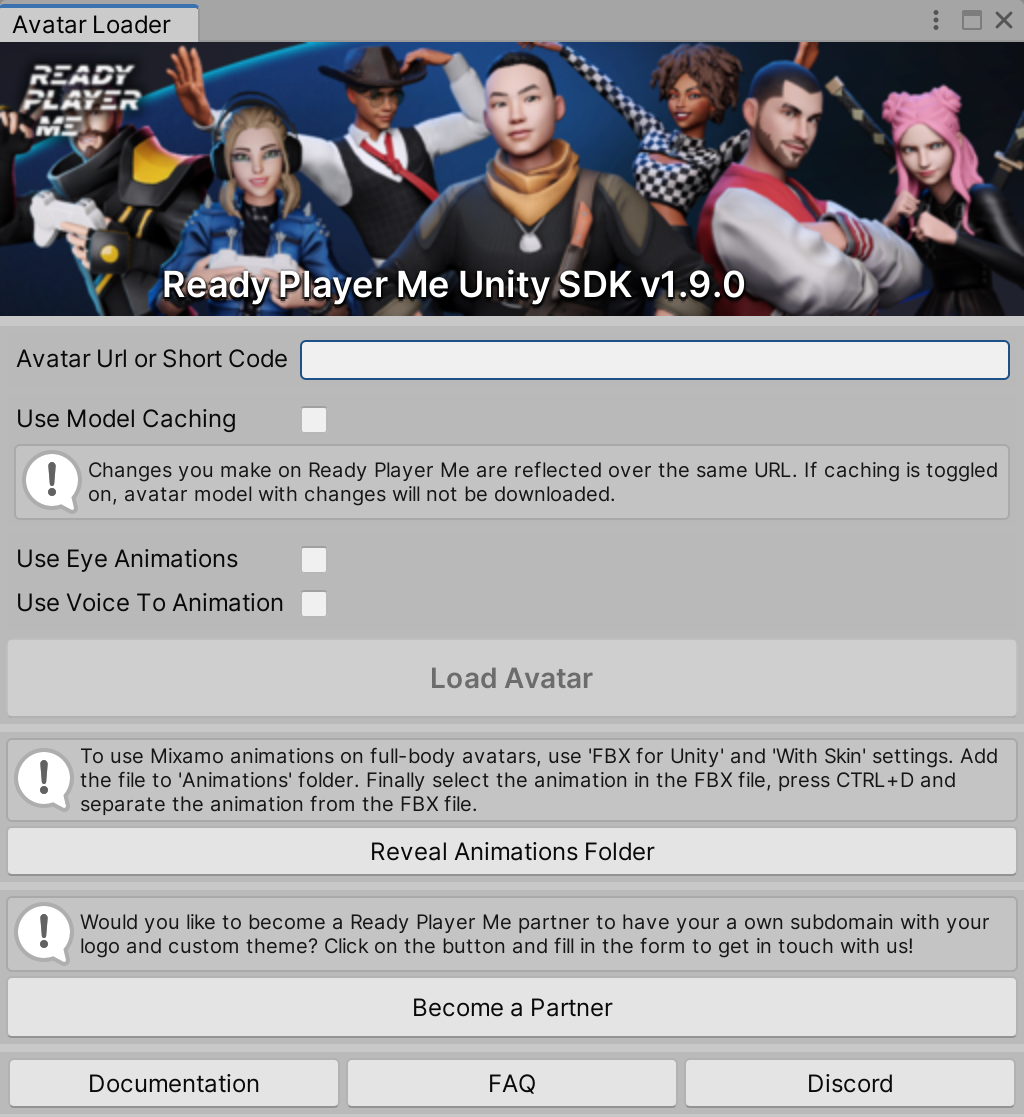
首先要下载其SDK,地址:Ready Player Me - Unity SDK,将下载的.unitypackage包导入到Unity中,可以看到菜单栏中有了Ready Player Me的选项,Avatar Loader可以将我们自定义的Avatar模型导入到Unity中:
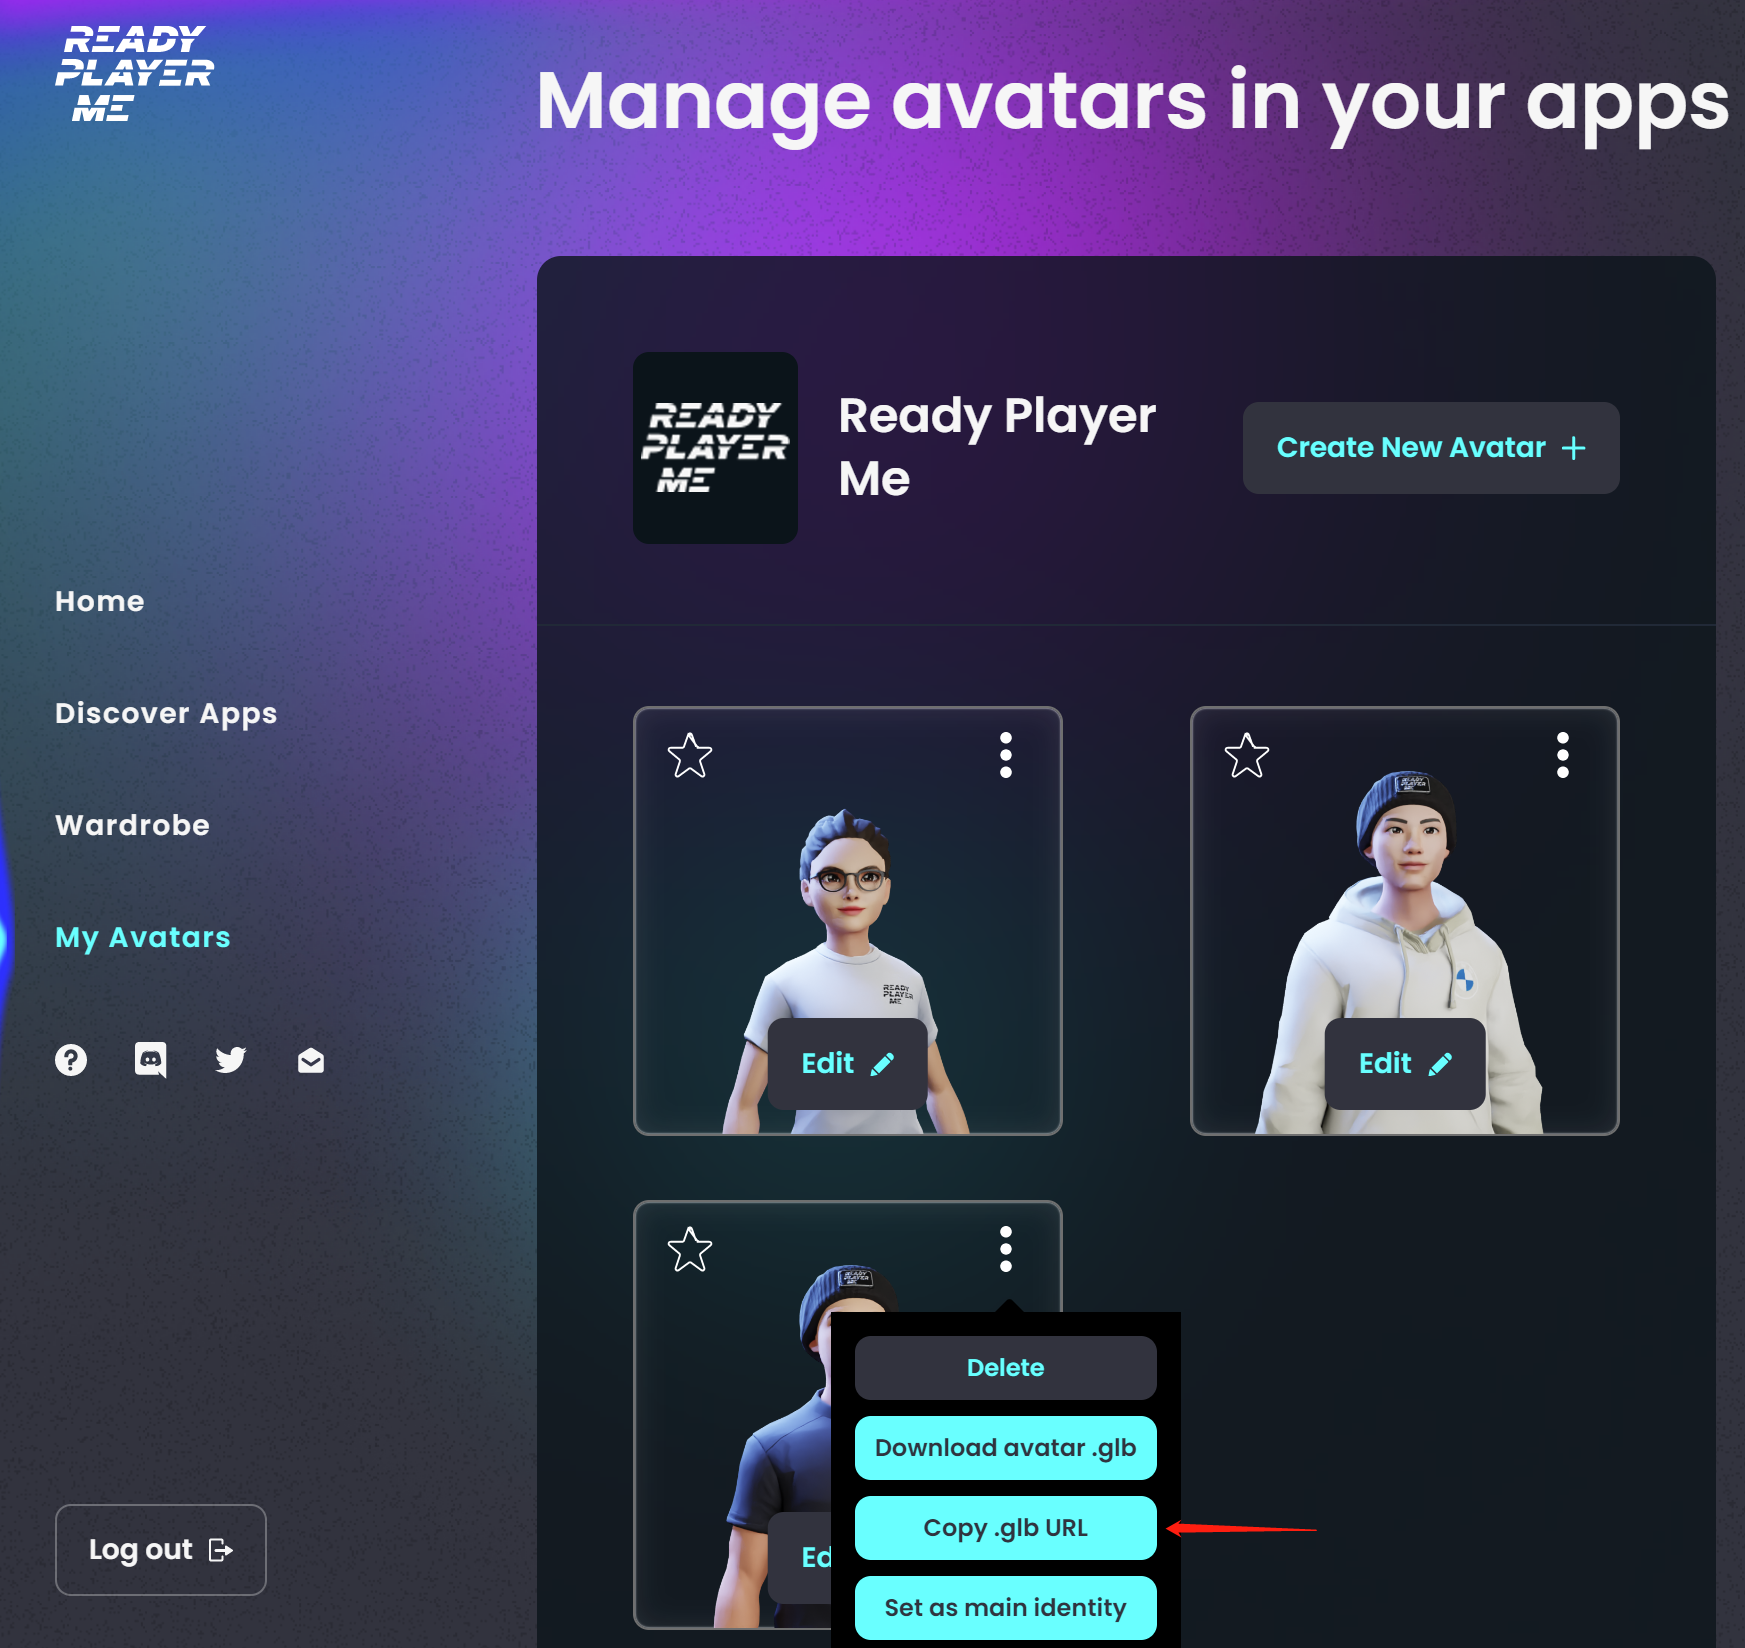
在RPM的Avatar Hub中,选择我们想要导入到Unity中的Avatar,通过Copy .glb URL复制链接。
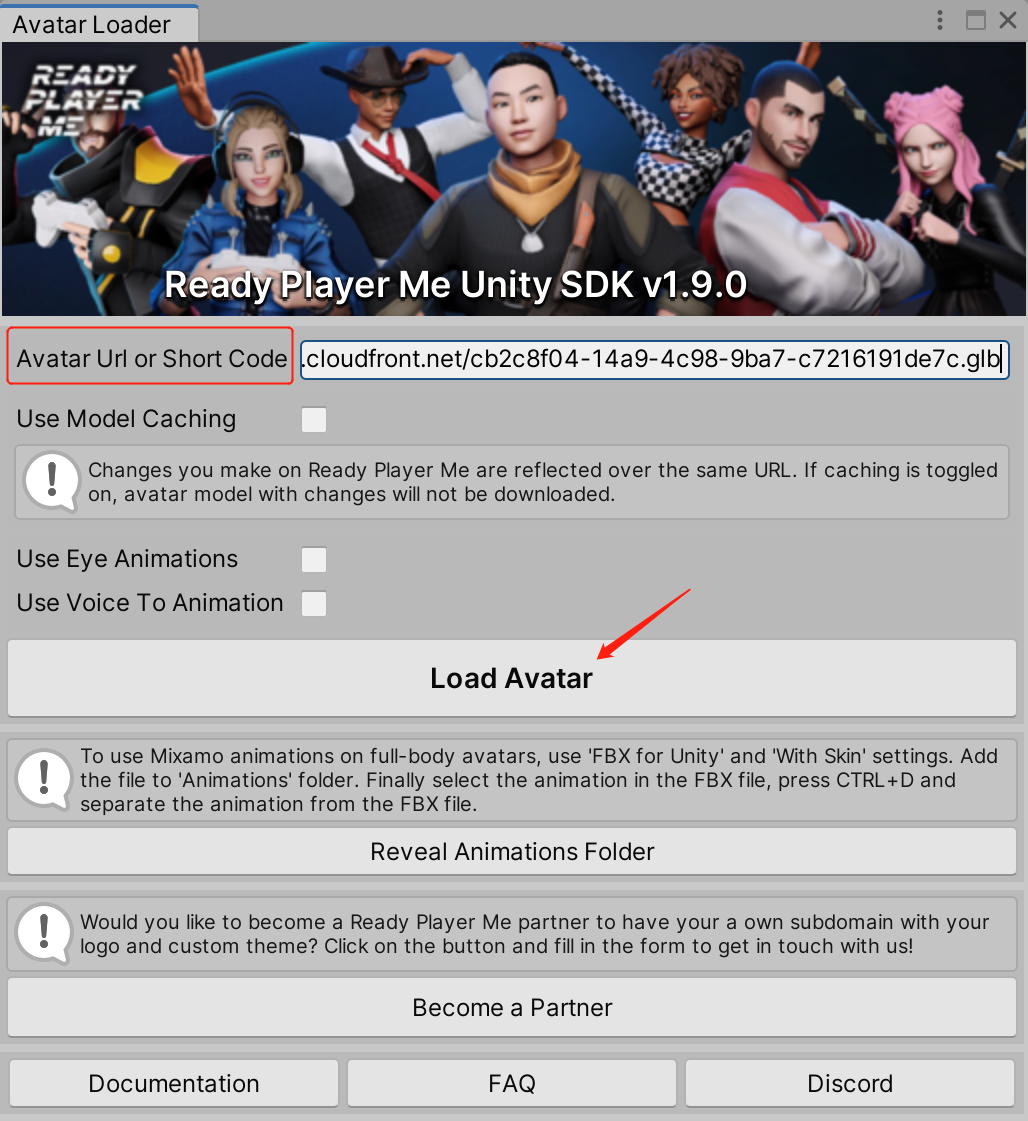
回到Unity中,将复制的链接粘贴到Avatar URL or Short Code中,点击Load Avatar
下载完成后,在Resources文件夹下可以看到下载的.glb模型文件:

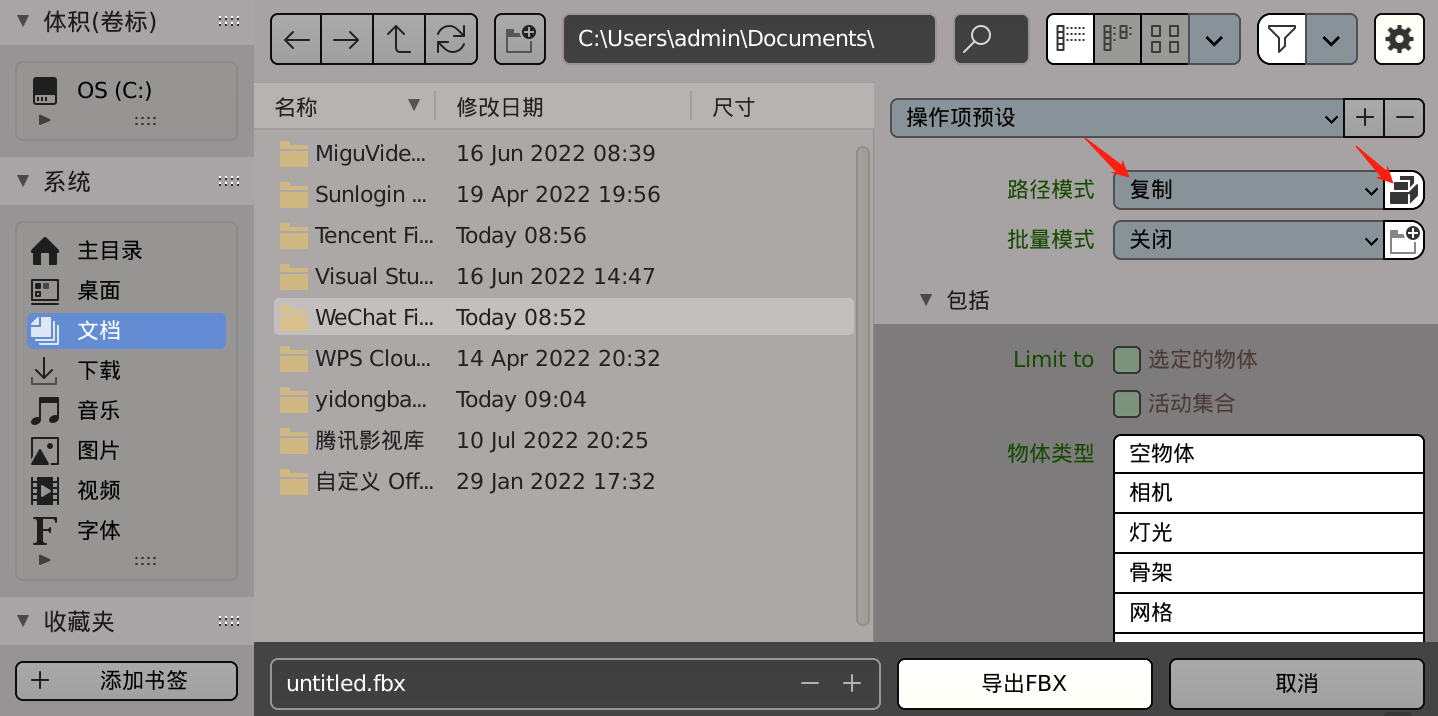
Unity中常用的模型文件格式为.fbx类型,可以通过Blender软件将.glb格式文件转换为.fbx格式文件,需要注意在导出选项里,将路径模式改为复制,并选中后面的内嵌纹理,否则导入到Unity中只是一个白模,并没有材质、贴图。
🎈 如何提取模型中的Mesh网格、Material材质、及Texture贴图
Mesh网格和Material材质的提取可以直接在Skinned Mesh Renderer组件中获取并通过实例化并调用AssetDatabase类中的CreateAsset来创建和保存资产:
// 摘要:
//     Creates a new asset at path.
//
// 参数:
//   asset:
//     Object to use in creating the asset.
//
//   path:
//     Filesystem path for the new asset.
[MethodImpl(MethodImplOptions.InternalCall)]
[NativeThrows]
[PreventExecutionInState(AssetDatabasePreventExecution.kGatheringDependenciesFromSourceFile, PreventExecutionSeverity.PreventExecution_ManagedException, "Assets may not be created during gathering of import dependencies")]
public static extern void CreateAsset([NotNull("ArgumentNullException")] UnityEngine.Object asset, string path);
- asset:第一个参数为要进行保存/创建的资产;
- path:第二个参数为该资产生成的文件夹路径。
而Texture贴图资源可以通过调用AssetDatabase类中的GetDependencies方法获取材质球的依赖项文件路径:
// 摘要:
//     Returns an array of all the assets that are dependencies of the asset at the
//     specified pathName. Note: GetDependencies() gets the Assets that are referenced
//     by other Assets. For example, a Scene could contain many GameObjects with a Material
//     attached to them. In this case, GetDependencies() will return the path to the
//     Material Assets, but not the GameObjects as those are not Assets on your disk.
//
// 参数:
//   pathName:
//     The path to the asset for which dependencies are required.
//
//   recursive:
//     Controls whether this method recursively checks and returns all dependencies
//     including indirect dependencies (when set to true), or whether it only returns
//     direct dependencies (when set to false).
//
// 返回结果:
//     The paths of all assets that the input depends on.
public static string[] GetDependencies(string pathName)
{
    return GetDependencies(pathName, recursive: true);
}
根据路径调用LoadAssetAtPath方法加载贴图资源:
// 摘要:
//     Returns the first asset object of type type at given path assetPath.
//
// 参数:
//   assetPath:
//     Path of the asset to load.
//
//   type:
//     Data type of the asset.
//
// 返回结果:
//     The asset matching the parameters.
[MethodImpl(MethodImplOptions.InternalCall)]
[PreventExecutionInState(AssetDatabasePreventExecution.kGatheringDependenciesFromSourceFile, PreventExecutionSeverity.PreventExecution_ManagedException, "Assets may not be loaded while dependencies are being gathered, as these assets may not have been imported yet.")]
[PreventExecutionInState(AssetDatabasePreventExecution.kDomainBackup, PreventExecutionSeverity.PreventExecution_ManagedException, "Assets may not be loaded while domain backup is running, as this will change the underlying state.")]
[NativeThrows]
[TypeInferenceRule(TypeInferenceRules.TypeReferencedBySecondArgument)]
public static extern UnityEngine.Object LoadAssetAtPath(string assetPath, Type type);

public static T LoadAssetAtPath<T>(string assetPath) where T : UnityEngine.Object;
本篇内容中提取Avatar数字人相关资产的工作流如下:
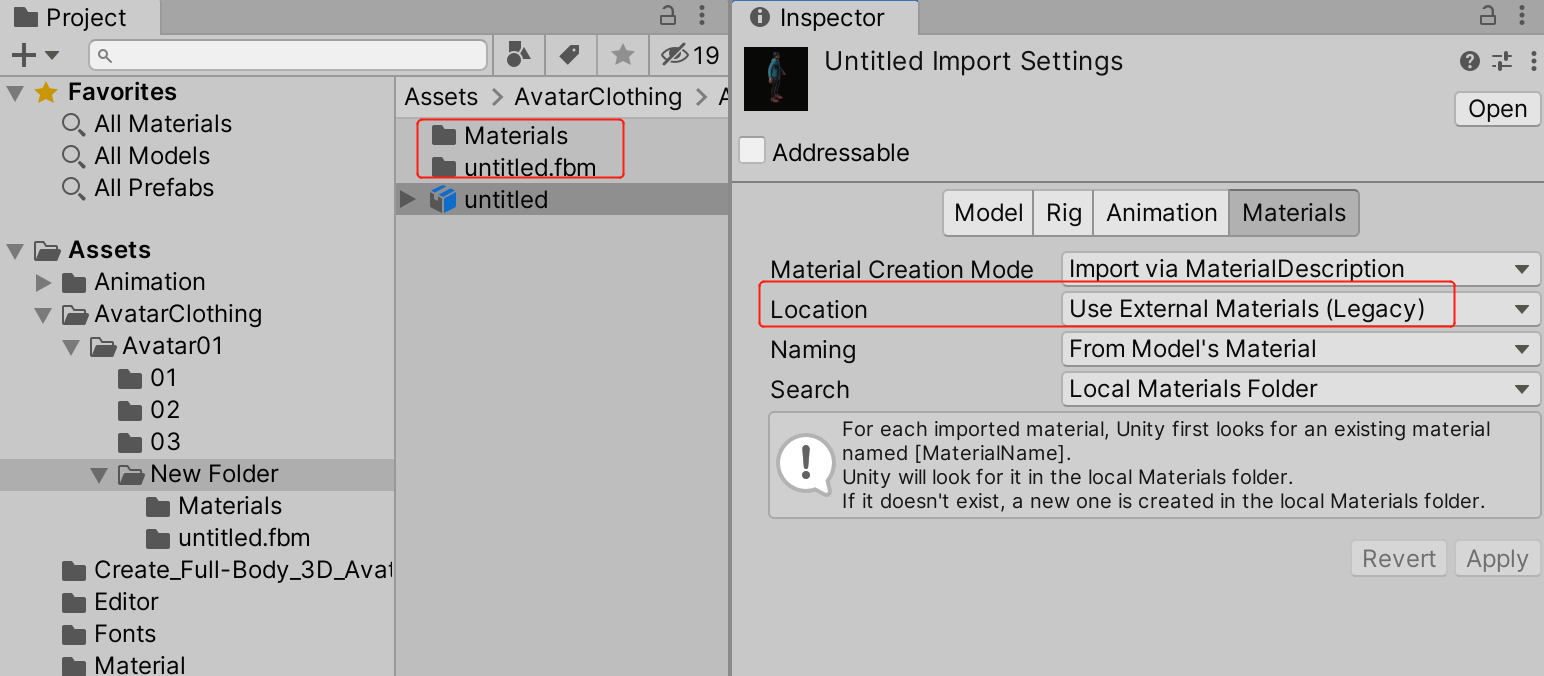
- fbx导入到Unity后,在
Import Settings导入设置中将Material Location类型改为Use External Materials(Legacy),应用后编辑器会在该fbx文件所在目录下生成相应的材质和贴图资源文件夹:
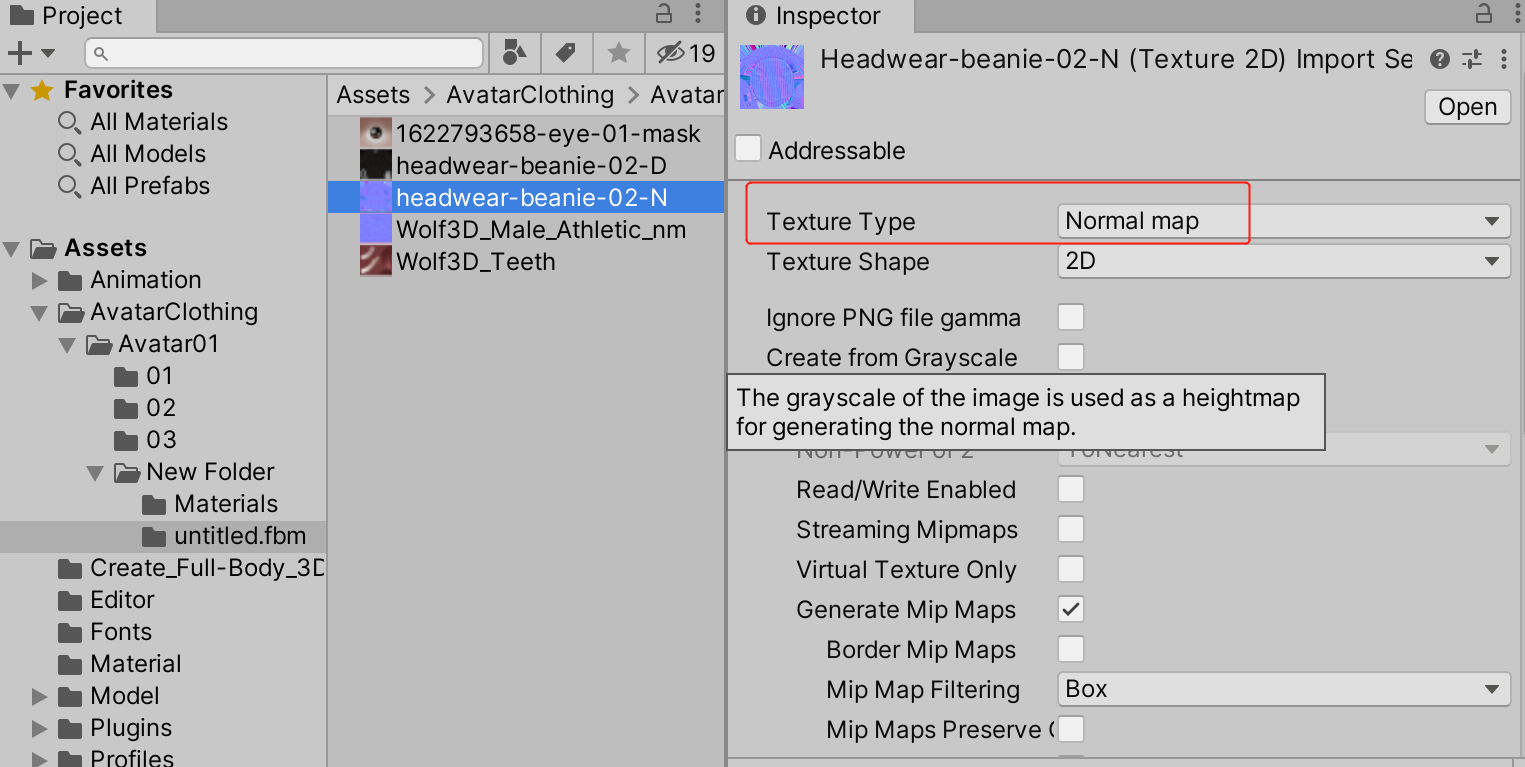
- 将所有
法线贴图的Texture Type改为Normal map,并检查法线贴图是否用在相应材质球上:

- 调用自定义的编辑器方法,提取资产:
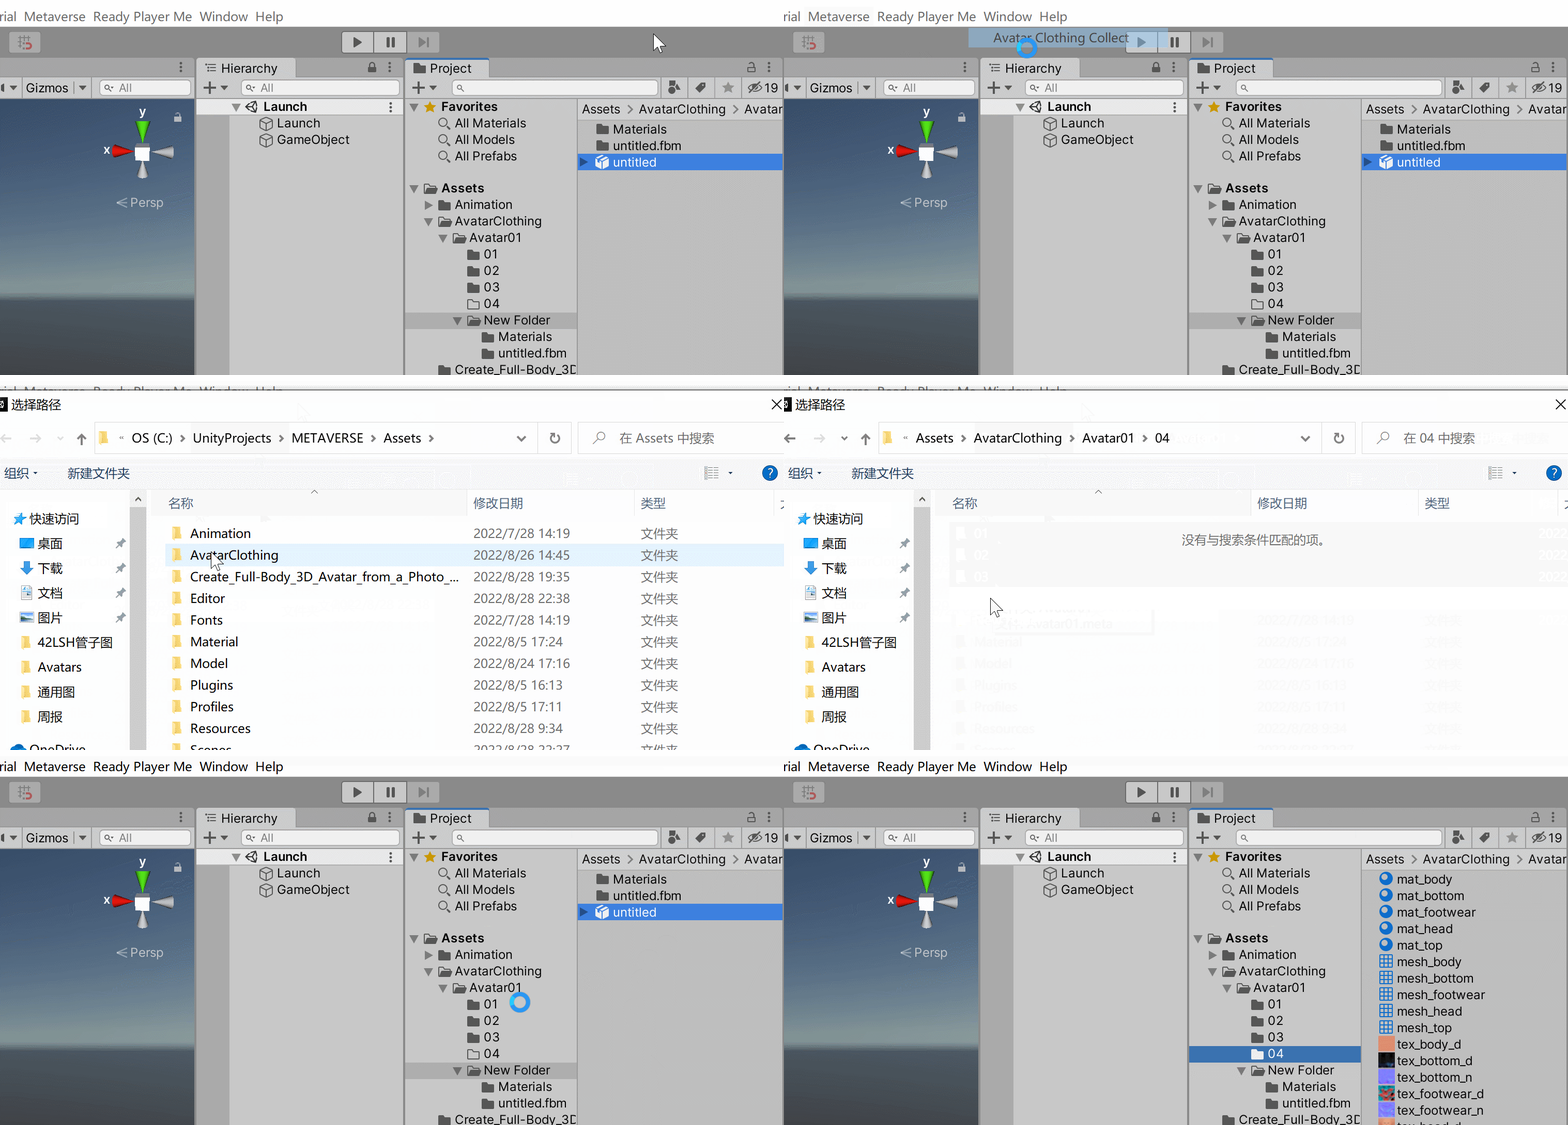
该方法可以提取Avatar的头部、身体、上衣、裤子及鞋子的相关资产,代码如下:
using UnityEngine;
using UnityEditor;

namespace Metaverse
{
    /// <summary>
    /// 用于提取ReadyPlayerMe的Avatar服装资源
    /// </summary>
    public class RPMAvatarClothingCollecter
    {
        [MenuItem("Metaverse/Ready Player Me/Avatar Clothing Collect")]
        public static void Execute()
        {
            //如果未选中任何物体
            if (Selection.activeGameObject == null) return;
            //弹出窗口 选择资源提取的路径
            string collectPath = EditorUtility.OpenFolderPanel("选择路径", Application.dataPath, null);
            //如果路径为空或无效 返回
            if (string.IsNullOrEmpty(collectPath)) return;
            //AssetDatabase路径
            collectPath = collectPath.Replace(Application.dataPath, "Assets");
            if (!AssetDatabase.IsValidFolder(collectPath)) return;

            //头部
            Transform head = Selection.activeGameObject.transform.Find("Wolf3D_Head");
            if (head != null) Collect(collectPath, head.GetComponent<SkinnedMeshRenderer>(), "head");

            //身体
            Transform body = Selection.activeGameObject.transform.Find("Wolf3D_Body");
            if (head != null) Collect(collectPath, body.GetComponent<SkinnedMeshRenderer>(), "body");

            //上衣
            Transform top = Selection.activeGameObject.transform.Find("Wolf3D_Outfit_Top");
            if (top != null) Collect(collectPath, top.GetComponent<SkinnedMeshRenderer>(), "top");

            //裤子
            Transform bottom = Selection.activeGameObject.transform.Find("Wolf3D_Outfit_Bottom");
            if (bottom != null) Collect(collectPath, bottom.GetComponent<SkinnedMeshRenderer>(), "bottom");

            //鞋子
            Transform footwear = Selection.activeGameObject.transform.Find("Wolf3D_Outfit_Footwear");
            if (footwear != null) Collect(collectPath, footwear.GetComponent<SkinnedMeshRenderer>(), "footwear");

            //刷新
            AssetDatabase.Refresh();
        }

        public static void Collect(string path, SkinnedMeshRenderer smr, string suffix)
        {
            //创建Mesh网格资产
            AssetDatabase.CreateAsset(Object.Instantiate(smr.sharedMesh), string.Format("{0}/mesh_{1}.asset", path, suffix));
            //创建Material材质球资产
            Material material = Object.Instantiate(smr.sharedMaterial);
            AssetDatabase.CreateAsset(material, string.Format("{0}/mat_{1}.asset", path, suffix));
            //获取材质球的依赖项路径
            string[] paths = AssetDatabase.GetDependencies(AssetDatabase.GetAssetPath(material));
            //遍历依赖项路径
            for (int i = 0;i < paths.Length; i++)
            {
                //AssetDatabase路径
                string p = paths[i].Replace(Application.dataPath, "Assets");
                //根据路径加载Texture贴图资源
                Texture tex = AssetDatabase.LoadAssetAtPath<Texture>(p);
                if (tex == null) continue;
                TextureImporter textureImporter = AssetImporter.GetAtPath(p) as TextureImporter;
                //主贴图
                if (textureImporter.textureType == TextureImporterType.Default)
                {
                    AssetDatabase.MoveAsset(p, string.Format("{0}/tex_{1}_d.jpg", path, suffix));
                }
                //法线贴图
                if (textureImporter.textureType == TextureImporterType.NormalMap)
                {
                    AssetDatabase.MoveAsset(p, string.Format("{0}/tex_{1}_n.jpg", path, suffix));
                }
            }
        }
    }
}
🎈 如何提取RPM网页中的图片资源
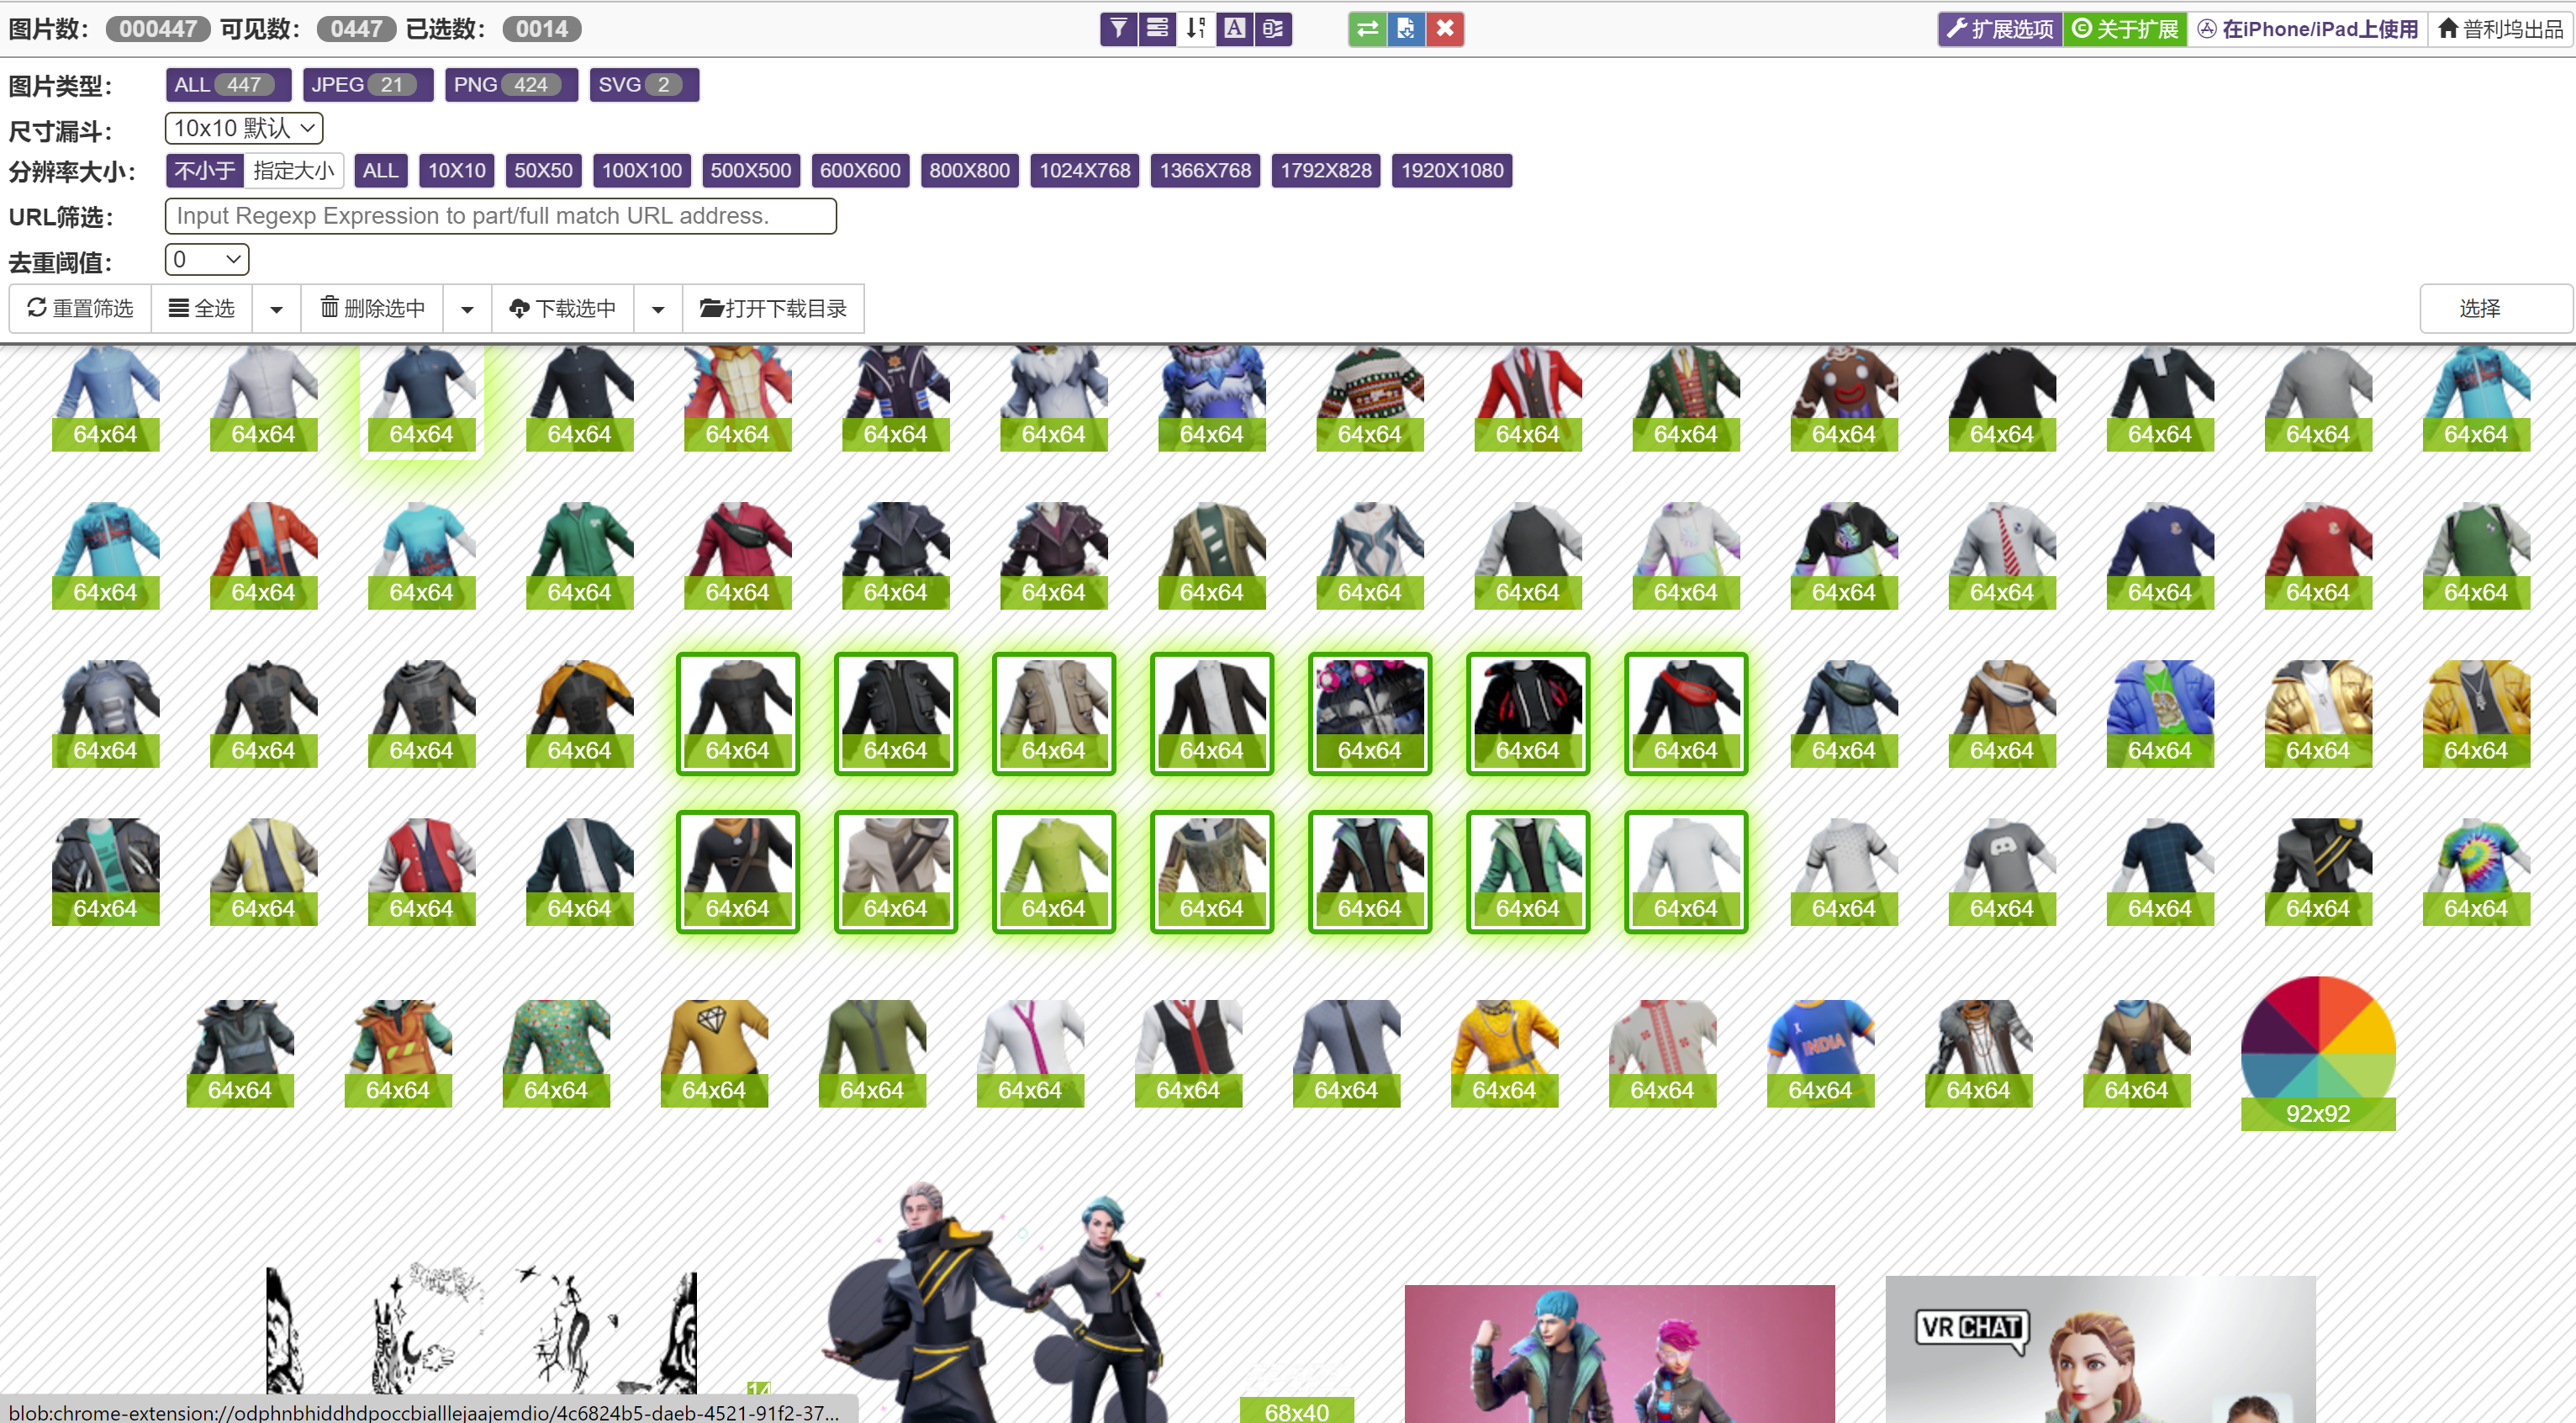
提取网页中的图片资源可以使用
ImageAssistant图片助手,一款Chrome浏览器中用于嗅探、分析网页图片、图片筛选、下载等功能的扩展程序,当然也可以在Edge浏览器中去使用,地址:Image Assistant
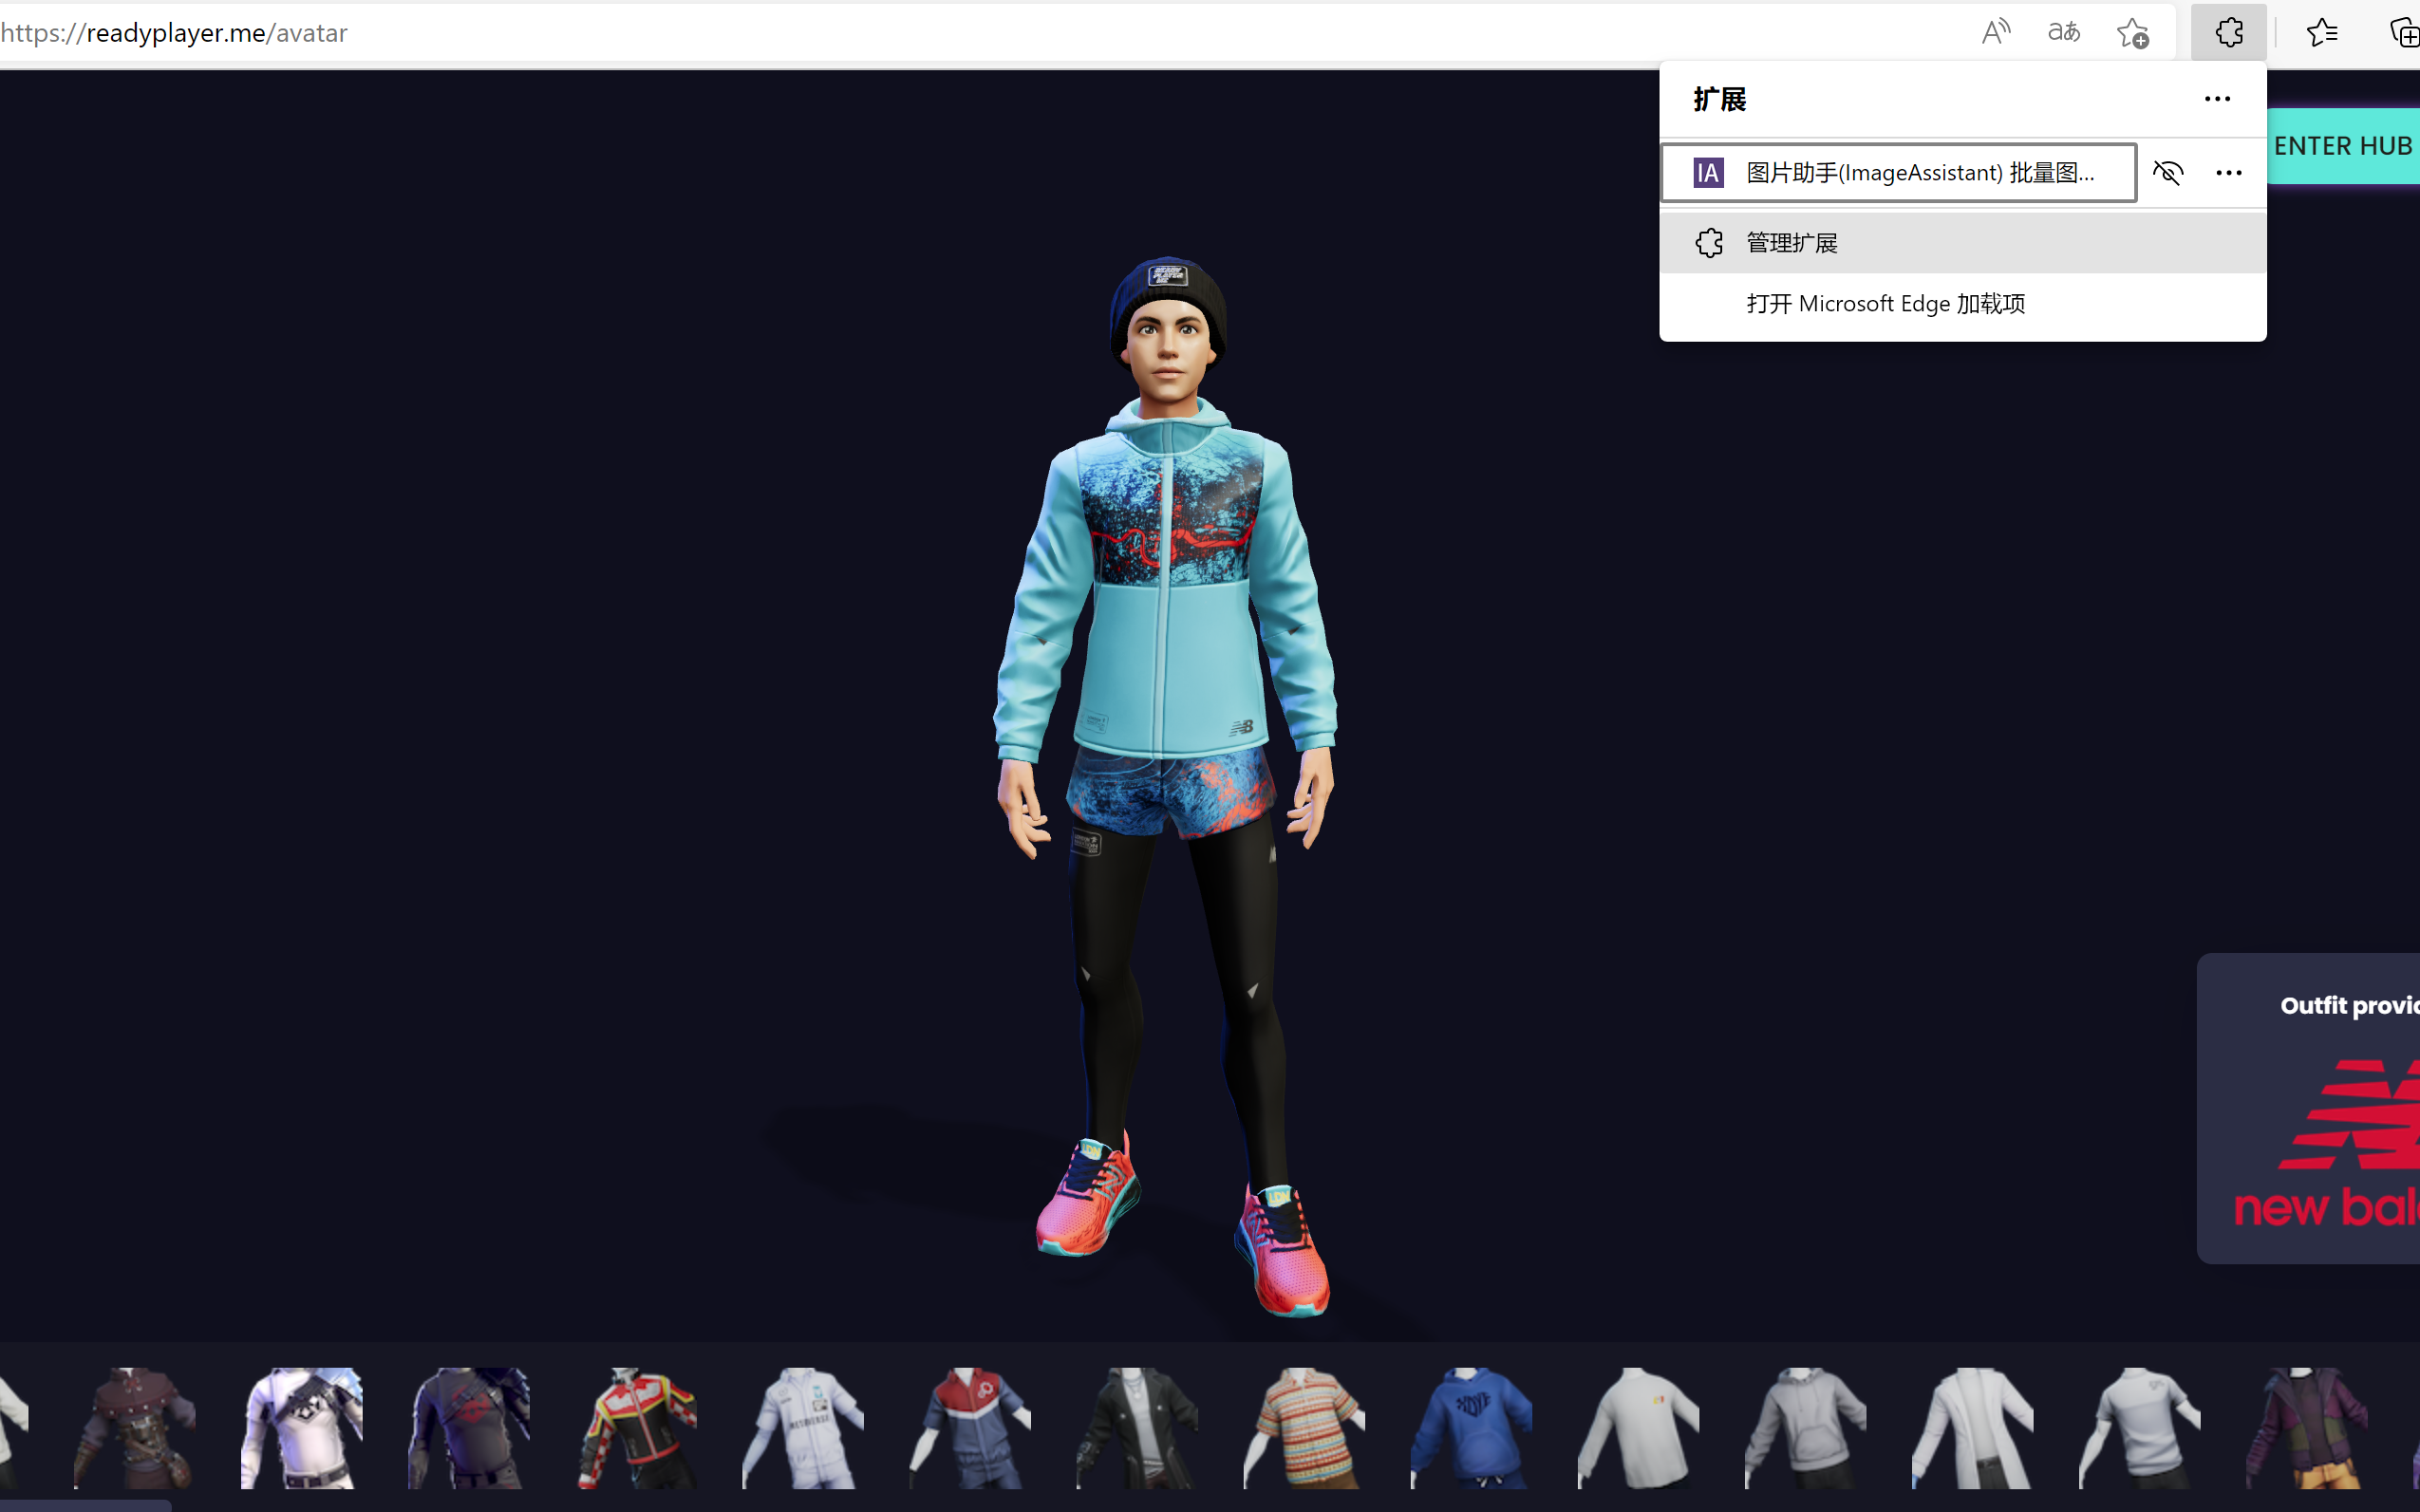
选中想要下载的图片资源并开始下载:
🎈 资源配置
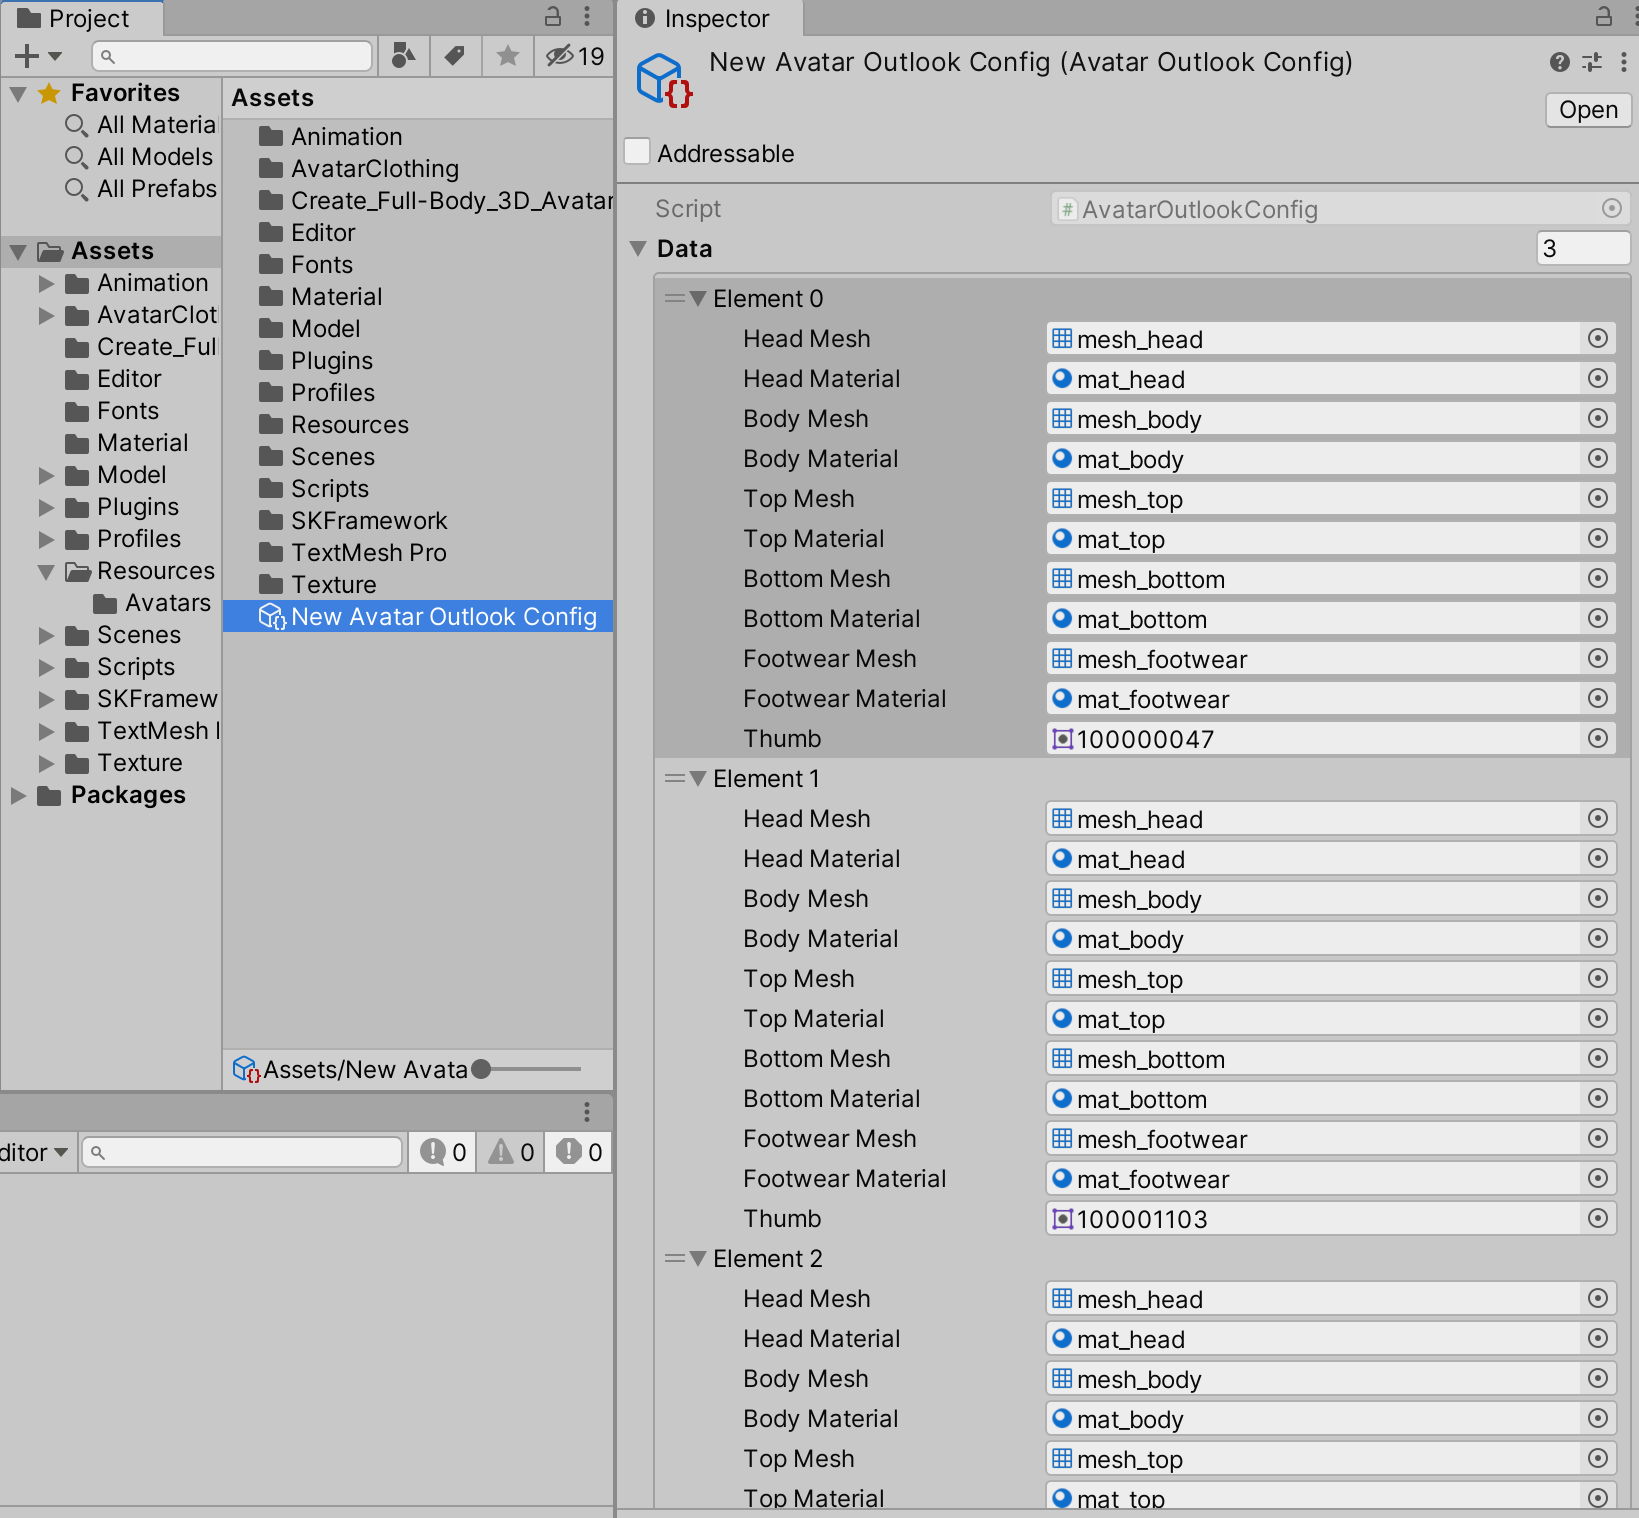
正常开发工作中,建议构建出不同服装资源的AB(AssetsBundle)包,通过加载AB包来实现各种服装的切换,本篇内容中通过Scriptable Object配置各种服装资源来实现Demo,首先编写外观数据类:
using System;
using UnityEngine;

namespace Metaverse
{
    /// <summary>
    /// Avatar外观数据
    /// </summary>
    [Serializable]
    public class AvatarOutlookData
    {
        /// <summary>
        /// 头部网格
        /// </summary>
        public Mesh headMesh;
        /// <summary>
        /// 头部材质
        /// </summary>
        public Material headMaterial;

        /// <summary>
        /// 身体网格
        /// </summary>
        public Mesh bodyMesh;
        /// <summary>
        /// 身体材质
        /// </summary>
        public Material bodyMaterial;

        /// <summary>
        /// 上衣网格
        /// </summary>
        public Mesh topMesh;
        /// <summary>
        /// 上衣材质
        /// </summary>
        public Material topMaterial;

        /// <summary>
        /// 裤子网格
        /// </summary>
        public Mesh bottomMesh;
        /// <summary>
        /// 裤子材质
        /// </summary>
        public Material bottomMaterial;

        /// <summary>
        /// 鞋子网格
        /// </summary>
        public Mesh footwearMesh;
        /// <summary>
        /// 鞋子材质
        /// </summary>
        public Material footwearMaterial;

        /// <summary>
        /// 缩略图
        /// </summary>
        public Sprite thumb;
    }
}
编写配置类如下,实现后创建一个新的配置表并配置数据:
using UnityEngine;

namespace Metaverse
{
    /// <summary>
    /// Avatar服装配置
    /// </summary>
    [CreateAssetMenu(menuName = "Metaverse/Avatar Clothing Config")]
    public class AvatarClothingConfig : ScriptableObject
    {
        public AvatarOutlookData[] data = new AvatarOutlookData[0];
    }
}
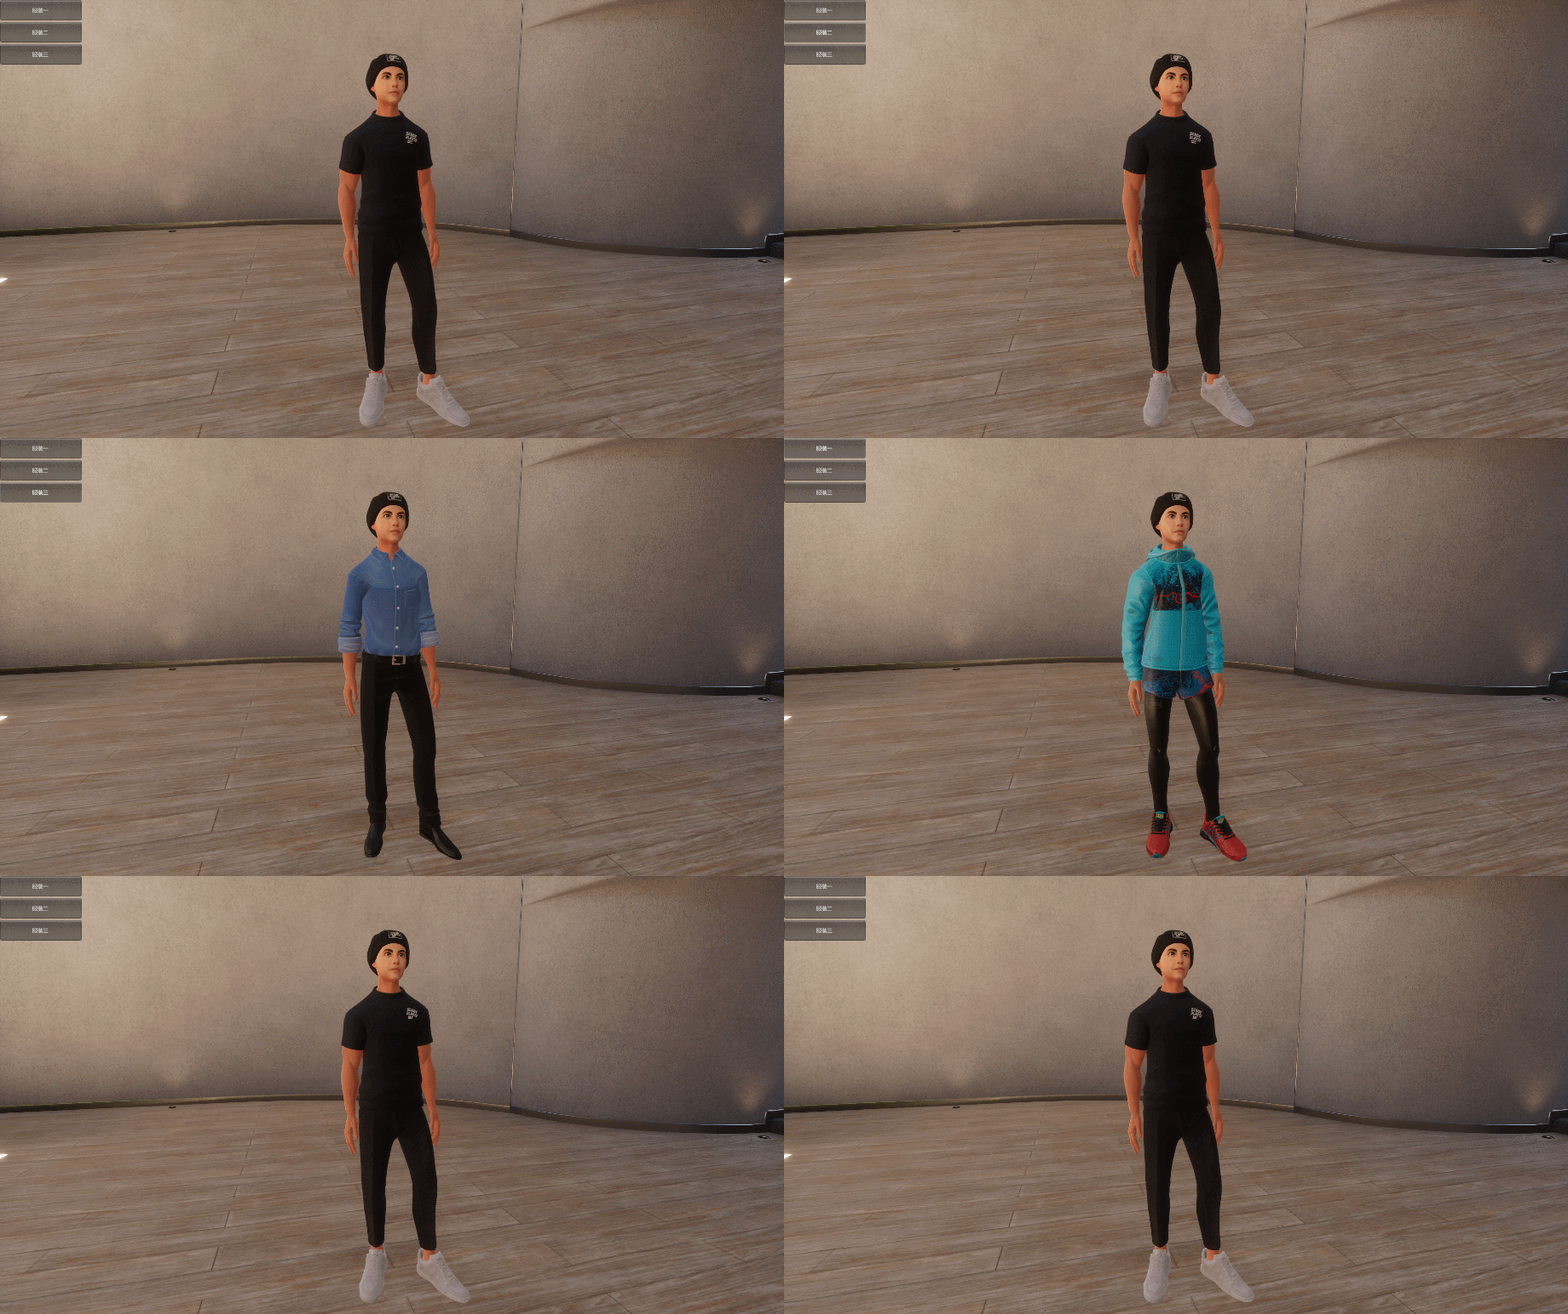
测试脚本如下:
using UnityEngine;

public class Example : MonoBehaviour
{
    [SerializeField] private SkinnedMeshRenderer head;
    [SerializeField] private SkinnedMeshRenderer body;
    [SerializeField] private SkinnedMeshRenderer top;
    [SerializeField] private SkinnedMeshRenderer bottom;
    [SerializeField] private SkinnedMeshRenderer footwear;

    [SerializeField] private Metaverse.AvatarOutlookConfig config;

    private void OnGUI()
    {
        if (GUILayout.Button("服装一", GUILayout.Width(200f), GUILayout.Height(50f))) Apply(0);
        if (GUILayout.Button("服装二", GUILayout.Width(200f), GUILayout.Height(50f))) Apply(1);
        if (GUILayout.Button("服装三", GUILayout.Width(200f), GUILayout.Height(50f))) Apply(2);
    }

    private void Apply(int index)
    {
        head.sharedMesh = config.data[index].headMesh;
        head.sharedMaterial = config.data[index].headMaterial;

        body.sharedMesh = config.data[index].bodyMesh;
        body.sharedMaterial = config.data[index].bodyMaterial;

        top.sharedMesh = config.data[index].topMesh;
        top.sharedMaterial = config.data[index].topMaterial;

        bottom.sharedMesh = config.data[index].bottomMesh;
        bottom.sharedMaterial = config.data[index].bottomMaterial;

        footwear.sharedMesh = config.data[index].footwearMesh;
        footwear.sharedMaterial = config.data[index].footwearMaterial;
    }
}
- 点赞
- 收藏
- 关注作者


评论(0)