PPv3-OCR自定义数据从训练到部署(四)

五、训练识别器
1、图片裁剪与数据集生成
在训练识别器之间,我们还有一步要做,就是将标注的数据裁剪出来。裁剪代码如下:
import json
import os
import numpy as np
import cv2

def get_rotate_crop_image(img, points):
    '''
    img_height, img_width = img.shape[0:2]
    left = int(np.min(points[:, 0]))
    right = int(np.max(points[:, 0]))
    top = int(np.min(points[:, 1]))
    bottom = int(np.max(points[:, 1]))
    img_crop = img[top:bottom, left:right, :].copy()
    points[:, 0] = points[:, 0] - left
    points[:, 1] = points[:, 1] - top
    '''
    assert len(points) == 4, "shape of points must be 4*2"
    # 求范数,得到宽度
    img_crop_width = int(
        max(
            np.linalg.norm(points[0] - points[1]),
            np.linalg.norm(points[2] - points[3])))
    #  # 求范数,得到高度
    img_crop_height = int(
        max(
            np.linalg.norm(points[0] - points[3]),
            np.linalg.norm(points[1] - points[2])))
    pts_std = np.float32([[0, 0], [img_crop_width, 0],
                          [img_crop_width, img_crop_height],
                          [0, img_crop_height]])
    #计算得到转换矩阵
    M = cv2.getPerspectiveTransform(points, pts_std)
    #实现透视变换
    dst_img = cv2.warpPerspective(
        img,
        M, (img_crop_width, img_crop_height),
        borderMode=cv2.BORDER_REPLICATE,
        flags=cv2.INTER_CUBIC)
    dst_img_height, dst_img_width = dst_img.shape[0:2]
    if dst_img_height * 1.0 / dst_img_width >= 1.5:
        dst_img = np.rot90(dst_img)
    return dst_img
def write_txt_img(src_path,label_txt):
    with open(src_path, 'r', encoding='utf-8') as f:
        for line in f.readlines():
            print(line)
            content = line.split('\t')
            print(content[0])
            imag_name = content[0].split('/')[1]
            image_path = './train_data/icdar2015/text_localization/' + content[0]
            img = cv2.imread(image_path)
            list_dict = json.loads(content[1])
            nsize = len(list_dict)
            print(nsize)
            num = 0
            for i in range(nsize):
                print(list_dict[i])
                lin = list_dict[i]
                info = lin['transcription']
                info=info.replace(" ","")
                points = lin['points']
                points = [list(x) for x in points]
                points = np.float32([list(map(float, item)) for item in points])
                imag_name=str(num)+"_"+imag_name
                save_path = './train_data/rec/train/' + imag_name
                dst_img = get_rotate_crop_image(img, points)
                cv2.imwrite(save_path, dst_img)
                label_txt.write('train/'+imag_name+'\t'+info+'\n')
                num=num+1
if not os.path.exists('train_data/rec/train/'):
    os.makedirs('train_data/rec/train/')
src_path = r"./train_data/icdar2015/text_localization/train_icdar2015_label.txt"
label_txt=r"./train_data/rec/rec_gt_train.txt"
src_test_path = r"./train_data/icdar2015/text_localization/test_icdar2015_label.txt"
label_test_txt=r"./train_data/rec/rec_gt_test.txt"
with open(label_txt, 'w') as w_label:
    write_txt_img(src_path,w_label)
with open(label_test_txt, 'w') as w_label:
    write_txt_img(src_test_path, w_label)
获取标注区域的图像主要用到了getPerspectiveTransform计算转换的矩阵和warpPerspective函数透视转换的组合。
获取到图像和标注的内容,生成文字识别通用数据集(SimpleDataSet)。
数据集的格式:
注意: txt文件中默认请将图片路径和图片标签用 \t 分割,如用其他方式分割将造成训练报错。
" 图像文件名                 图像标注信息 "

train/word_001.jpg   简单可依赖
train/word_002.jpg   用科技让复杂的世界更简单
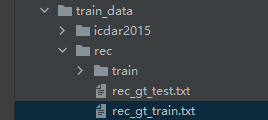
生成数据集的路径如下:
2、修改配置文件
修改配置文件,在configs/rec/中,用rec_icdar15_train.yml 举例:
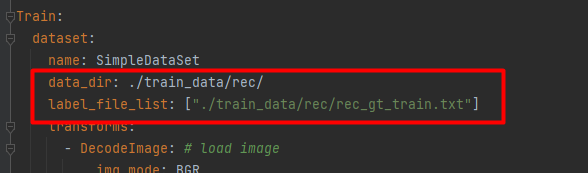
设置训练集的路径。
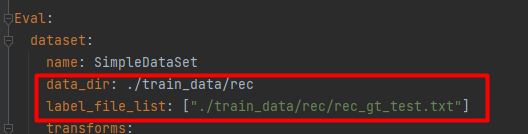
设置验证集的路径。

调整训练集和验证集的图片尺寸
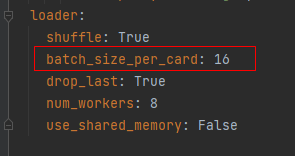
设置训练和验证的batchsize。
设置字典,根据任务不同设置的字典也不同。
内置字典如下:
PaddleOCR内置了一部分字典,可以按需使用。
ppocr/utils/ppocr_keys_v1.txt 是一个包含6623个字符的中文字典
ppocr/utils/ic15_dict.txt 是一个包含36个字符的英文字典
ppocr/utils/dict/french_dict.txt 是一个包含118个字符的法文字典
ppocr/utils/dict/japan_dict.txt 是一个包含4399个字符的日文字典
ppocr/utils/dict/korean_dict.txt 是一个包含3636个字符的韩文字典
ppocr/utils/dict/german_dict.txt 是一个包含131个字符的德文字典
ppocr/utils/en_dict.txt 是一个包含96个字符的英文字典
3、开启训练
完成上面的参数的设置,然后开始训练,命令如下:
python tools/train.py -c configs/rec/rec_icdar15_train.yml

更多的训练方式:
#单卡训练(训练周期长,不建议)
python3 tools/train.py -c configs/rec/PP-OCRv3/en_PP-OCRv3_rec.yml -o Global.pretrained_model=./pretrain_models/en_PP-OCRv3_rec_train/best_accuracy

#多卡训练,通过--gpus参数指定卡号
python3 -m paddle.distributed.launch --gpus '0,1,2,3'  tools/train.py -c configs/rec/PP-OCRv3/en_PP-OCRv3_rec.yml -o Global.pretrained_model=./pretrain_models/en_PP-OCRv3_rec_train/best_accuracy
3.1、 断点训练
如果训练程序中断,如果希望加载训练中断的模型从而恢复训练,可以通过指定Global.checkpoints指定要加载的模型路径:
python tools/train.py -c configs/rec/PP-OCRv3/en_PP-OCRv3_rec.yml -o Global.checkpoints=./your/trained/model
例如:
python tools/train.py -c configs/rec/ch_ppocr_v2.0/rec_chinese_common_train_v2.0.yml -o Global.checkpoints=./output/rec_chinese_common_v2.0/best_accuracy
best_accuracy指的是红框中的三个模型。
注意:Global.checkpoints的优先级高于Global.pretrained_model的优先级,即同时指定两个参数时,优先加载Global.checkpoints指定的模型,如果Global.checkpoints指定的模型路径有误,会加载Global.pretrained_model指定的模型。
3.2、 混合精度训练
如果您想进一步加快训练速度,可以使用自动混合精度训练, 以单机单卡为例,命令如下:
python3 tools/train.py -c configs/rec/PP-OCRv3/en_PP-OCRv3_rec.yml \
     -o Global.pretrained_model=./pretrain_models/en_PP-OCRv3_rec_train/best_accuracy \
     Global.use_amp=True Global.scale_loss=1024.0 Global.use_dynamic_loss_scaling=True
3.3、 分布式训练
多机多卡训练时,通过 --ips 参数设置使用的机器IP地址,通过 --gpus 参数设置使用的GPU ID:
python3 -m paddle.distributed.launch --ips="xx.xx.xx.xx,xx.xx.xx.xx" --gpus '0,1,2,3' tools/train.py -c configs/rec/PP-OCRv3/en_PP-OCRv3_rec.yml \
     -o Global.pretrained_model=./pretrain_models/en_PP-OCRv3_rec_train/best_accuracy
注意: 采用多机多卡训练时,需要替换上面命令中的ips值为您机器的地址,机器之间需要能够相互ping通。另外,训练时需要在多个机器上分别启动命令。查看机器ip地址的命令为ifconfig。
4 模型评估与预测
4.1、指标评估
训练中模型参数默认保存在Global.save_model_dir目录下。在评估指标时,需要设置Global.checkpoints指向保存的参数文件。评估数据集可以通过 configs/rec/PP-OCRv3/en_PP-OCRv3_rec.yml 修改Eval中的 label_file_path 设置。
# GPU 评估, Global.checkpoints 为待测权重
python -m paddle.distributed.launch --gpus '0' tools/eval.py -c configs/rec/PP-OCRv3/en_PP-OCRv3_rec.yml -o Global.checkpoints={path/to/weights}/best_accuracy
4.2、测试识别效果
使用 PaddleOCR 训练好的模型,可以通过以下脚本进行快速预测。
默认预测图片存储在 infer_img 里,通过 -o Global.checkpoints 加载训练好的参数文件:
根据配置文件中设置的 save_model_dir 和 save_epoch_step 字段,会有以下几种参数被保存下来:
output/rec/
├── best_accuracy.pdopt
├── best_accuracy.pdparams
├── best_accuracy.states
├── config.yml
├── iter_epoch_3.pdopt
├── iter_epoch_3.pdparams
├── iter_epoch_3.states
├── latest.pdopt
├── latest.pdparams
├── latest.states
└── train.log
其中 best_accuracy.* 是评估集上的最优模型;iter_epoch_3.* 是以 save_epoch_step 为间隔保存下来的模型;latest.* 是最后一个epoch的模型。
# 预测英文结果
python tools/infer_rec.py -c configs/rec/PP-OCRv3/en_PP-OCRv3_rec.yml -o Global.pretrained_model={path/to/weights}/best_accuracy  Global.infer_img=doc/imgs_words/en/word_1.png
预测使用的配置文件必须与训练一致,如您通过 python tools/train.py -c configs/rec/ch_ppocr_v2.0/rec_chinese_lite_train_v2.0.yml 完成了中文模型的训练, 您可以使用如下命令进行中文模型预测。
# 预测中文结果
python tools/infer_rec.py -c configs/rec/ch_ppocr_v2.0/rec_chinese_lite_train_v2.0.yml -o Global.pretrained_model={path/to/weights}/best_accuracy Global.infer_img=doc/imgs_words/ch/word_1.jpg
4. 模型导出与预测
inference 模型(paddle.jit.save保存的模型) 一般是模型训练,把模型结构和模型参数保存在文件中的固化模型,多用于预测部署场景。 训练过程中保存的模型是checkpoints模型,保存的只有模型的参数,多用于恢复训练等。 与checkpoints模型相比,inference 模型会额外保存模型的结构信息,在预测部署、加速推理上性能优越,灵活方便,适合于实际系统集成。
识别模型转inference模型与检测的方式相同,如下:
官方的例子:
# -c 后面设置训练算法的yml配置文件
# -o 配置可选参数
# Global.pretrained_model 参数设置待转换的训练模型地址,不用添加文件后缀 .pdmodel,.pdopt或.pdparams。
# Global.save_inference_dir参数设置转换的模型将保存的地址。

python tools/export_model.py -c configs/rec/PP-OCRv3/en_PP-OCRv3_rec.yml -o Global.pretrained_model=./pretrain_models/en_PP-OCRv3_rec_train/best_accuracy  Global.save_inference_dir=./inference/en_PP-OCRv3_rec/
**注意:**如果您是在自己的数据集上训练的模型,并且调整了中文字符的字典文件,请注意修改配置文件中的character_dict_path为自定义字典文件。
自己执行的命令:
python tools/export_model.py -c configs/rec/PP-OCRv3/en_PP-OCRv3_rec.yml -o Global.pretrained_model=./output/v3_en_mobile/best_accuracy Global.save_inference_dir=./inference/en_PP-OCRv3_rec/
转换成功后,在目录下有三个文件:
inference/en_PP-OCRv3_rec/
    ├── inference.pdiparams         # 识别inference模型的参数文件
    ├── inference.pdiparams.info    # 识别inference模型的参数信息,可忽略
    └── inference.pdmodel           # 识别inference模型的program文件
-
自定义模型推理
如果训练时修改了文本的字典,在使用inference模型预测时,需要通过
--rec_char_dict_path指定使用的字典路径python3 tools/infer/predict_rec.py --image_dir="./doc/imgs_words_en/word_336.png" --rec_model_dir="./your inference model" --rec_image_shape="3, 48, 320" --rec_char_dict_path="your text dict path"
六、hubserving部署
hubserving服务部署目录下包括文本检测、文本方向分类,文本识别、文本检测+文本方向分类+文本识别3阶段串联,表格识别和PP-Structure六种服务包,请根据需求选择相应的服务包进行安装和启动。目录结构如下:
deploy/hubserving/
  └─  ocr_cls     文本方向分类模块服务包
  └─  ocr_det     文本检测模块服务包
  └─  ocr_rec     文本识别模块服务包
  └─  ocr_system  文本检测+文本方向分类+文本识别串联服务包
  └─  structure_table  表格识别服务包
  └─  structure_system  PP-Structure服务包
每个服务包下包含3个文件。以2阶段串联服务包为例,目录如下:
deploy/hubserving/ocr_system/
  └─  __init__.py    空文件,必选
  └─  config.json    配置文件,可选,使用配置启动服务时作为参数传入
  └─  module.py      主模块,必选,包含服务的完整逻辑
  └─  params.py      参数文件,必选,包含模型路径、前后处理参数等参数
1、准备环境
# 安装paddlehub
# paddlehub 需要 python>3.6.2
pip install paddlehub==2.1.0 --upgrade -i https://mirror.baidu.com/pypi/simple
2、安装服务模块
PaddleOCR提供5种服务模块,根据需要安装所需模块。
- 在Linux环境下,安装示例如下:
# 安装检测服务模块:
hub install deploy/hubserving/ocr_det/

# 或,安装分类服务模块:
hub install deploy/hubserving/ocr_cls/

# 或,安装识别服务模块:
hub install deploy/hubserving/ocr_rec/

# 或,安装检测+识别串联服务模块:
hub install deploy/hubserving/ocr_system/

# 或,安装表格识别服务模块:
hub install deploy/hubserving/structure_table/

# 或,安装PP-Structure服务模块:
hub install deploy/hubserving/structure_system/
- 在Windows环境下(文件夹的分隔符为``),安装示例如下:
# 安装检测服务模块:
hub install deploy\hubserving\ocr_det\

# 或,安装分类服务模块:
hub install deploy\hubserving\ocr_cls\

# 或,安装识别服务模块:
hub install deploy\hubserving\ocr_rec\

# 或,安装检测+识别串联服务模块:
hub install deploy\hubserving\ocr_system\

# 或,安装表格识别服务模块:
hub install deploy\hubserving\structure_table\

# 或,安装PP-Structure服务模块:
hub install deploy\hubserving\structure_system\
我使用了检测+方向+识别,所以只需要安装
hub install deploy/hubserving/ocr_system/
注意:在PaddleOCR-release-2.5目录下执行
3、启动服务
3.1. 命令行命令启动(仅支持CPU,不推荐)
启动命令:
$ hub serving start --modules [Module1==Version1, Module2==Version2, ...] \
                    --port XXXX \
                    --use_multiprocess \
                    --workers \
参数:
| 参数 | 用途 |
|---|---|
| –modules/-m | PaddleHub Serving预安装模型,以多个Module==Version键值对的形式列出 当不指定Version时,默认选择最新版本 |
| –port/-p | 服务端口,默认为8866 |
| –use_multiprocess | 是否启用并发方式,默认为单进程方式,推荐多核CPU机器使用此方式 Windows操作系统只支持单进程方式 |
| –workers | 在并发方式下指定的并发任务数,默认为2*cpu_count-1,其中cpu_count为CPU核数 |
如启动串联服务: hub serving start -m ocr_system
这样就完成了一个服务化API的部署,使用默认端口号8866。
3.2、 配置文件启动(支持CPU、GPU)
启动命令:
hub serving start -c config.json
其中,config.json格式如下:
{
    "modules_info": {
        "ocr_system": {
            "init_args": {
                "version": "1.0.0",
                "use_gpu": true
            },
            "predict_args": {
            }
        }
    },
    "port": 8868,
    "use_multiprocess": false,
    "workers": 2
}
init_args中的可配参数与module.py中的_initialize函数接口一致。其中,当use_gpu为true时,表示使用GPU启动服务。predict_args中的可配参数与module.py中的predict函数接口一致。
注意:
- 使用配置文件启动服务时,其他参数会被忽略。
- 如果使用GPU预测(即,
use_gpu置为true),则需要在启动服务之前,设置CUDA_VISIBLE_DEVICES环境变量,如:export CUDA_VISIBLE_DEVICES=0,否则不用设置。 use_gpu不可与use_multiprocess同时为true。
如,使用GPU 3号卡启动串联服务:
export CUDA_VISIBLE_DEVICES=3
hub serving start -c deploy/hubserving/ocr_system/config.json
4、 发送预测请求
配置好服务端,可使用以下命令发送预测请求,获取预测结果:
python tools/test_hubserving.py server_url image_path
test_hubserving.py代码:
# Copyright (c) 2020 PaddlePaddle Authors. All Rights Reserved.
#
# Licensed under the Apache License, Version 2.0 (the "License");
# you may not use this file except in compliance with the License.
# You may obtain a copy of the License at
#
#     http://www.apache.org/licenses/LICENSE-2.0
#
# Unless required by applicable law or agreed to in writing, software
# distributed under the License is distributed on an "AS IS" BASIS,
# WITHOUT WARRANTIES OR CONDITIONS OF ANY KIND, either express or implied.
# See the License for the specific language governing permissions and
# limitations under the License.
import os
import sys
__dir__ = os.path.dirname(os.path.abspath(__file__))
sys.path.append(__dir__)
sys.path.append(os.path.abspath(os.path.join(__dir__, '..')))

from ppocr.utils.logging import get_logger
logger = get_logger()

import cv2
import numpy as np
import time
from PIL import Image
from ppocr.utils.utility import get_image_file_list
from tools.infer.utility import draw_ocr, draw_boxes, str2bool
from ppstructure.utility import draw_structure_result
from ppstructure.predict_system import to_excel

import requests
import json
import base64


def cv2_to_base64(image):
    return base64.b64encode(image).decode('utf8')


def draw_server_result(image_file, res):
    img = cv2.imread(image_file)
    image = Image.fromarray(cv2.cvtColor(img, cv2.COLOR_BGR2RGB))
    if len(res) == 0:
        return np.array(image)
    keys = res[0].keys()
    if 'text_region' not in keys:  # for ocr_rec, draw function is invalid
        logger.info("draw function is invalid for ocr_rec!")
        return None
    elif 'text' not in keys:  # for ocr_det
        logger.info("draw text boxes only!")
        boxes = []
        for dno in range(len(res)):
            boxes.append(res[dno]['text_region'])
        boxes = np.array(boxes)
        draw_img = draw_boxes(image, boxes)
        return draw_img
    else:  # for ocr_system
        logger.info("draw boxes and texts!")
        boxes = []
        texts = []
        scores = []
        for dno in range(len(res)):
            boxes.append(res[dno]['text_region'])
            texts.append(res[dno]['text'])
            scores.append(res[dno]['confidence'])
        boxes = np.array(boxes)
        scores = np.array(scores)
        draw_img = draw_ocr(
            image, boxes, texts, scores, draw_txt=True, drop_score=0.5)
        return draw_img


def save_structure_res(res, save_folder, image_file):
    img = cv2.imread(image_file)
    excel_save_folder = os.path.join(save_folder, os.path.basename(image_file))
    os.makedirs(excel_save_folder, exist_ok=True)
    # save res
    with open(
            os.path.join(excel_save_folder, 'res.txt'), 'w',
            encoding='utf8') as f:
        for region in res:
            if region['type'] == 'Table':
                excel_path = os.path.join(excel_save_folder,
                                          '{}.xlsx'.format(region['bbox']))
                to_excel(region['res'], excel_path)
            elif region['type'] == 'Figure':
                x1, y1, x2, y2 = region['bbox']
                print(region['bbox'])
                roi_img = img[y1:y2, x1:x2, :]
                img_path = os.path.join(excel_save_folder,
                                        '{}.jpg'.format(region['bbox']))
                cv2.imwrite(img_path, roi_img)
            else:
                for text_result in region['res']:
                    f.write('{}\n'.format(json.dumps(text_result)))


def main(args):
    image_file_list = get_image_file_list(args.image_dir)
    is_visualize = False
    headers = {"Content-type": "application/json"}
    cnt = 0
    total_time = 0
    for image_file in image_file_list:
        img = open(image_file, 'rb').read()
        if img is None:
            logger.info("error in loading image:{}".format(image_file))
            continue
        img_name = os.path.basename(image_file)
        # seed http request
        starttime = time.time()
        data = {'images': [cv2_to_base64(img)]}
        r = requests.post(
            url=args.server_url, headers=headers, data=json.dumps(data))
        elapse = time.time() - starttime
        total_time += elapse
        logger.info("Predict time of %s: %.3fs" % (image_file, elapse))
        res = r.json()["results"][0]
        logger.info(res)

        if args.visualize:
            draw_img = None
            if 'structure_table' in args.server_url:
                to_excel(res['html'], './{}.xlsx'.format(img_name))
            elif 'structure_system' in args.server_url:
                save_structure_res(res['regions'], args.output, image_file)
            else:
                draw_img = draw_server_result(image_file, res)
            if draw_img is not None:
                if not os.path.exists(args.output):
                    os.makedirs(args.output)
                cv2.imwrite(
                    os.path.join(args.output, os.path.basename(image_file)),
                    draw_img[:, :, ::-1])
                logger.info("The visualized image saved in {}".format(
                    os.path.join(args.output, os.path.basename(image_file))))
        cnt += 1
        if cnt % 100 == 0:
            logger.info("{} processed".format(cnt))
    logger.info("avg time cost: {}".format(float(total_time) / cnt))


def parse_args():
    import argparse
    parser = argparse.ArgumentParser(description="args for hub serving")
    parser.add_argument("--server_url", type=str, required=True)
    parser.add_argument("--image_dir", type=str, required=True)
    parser.add_argument("--visualize", type=str2bool, default=False)
    parser.add_argument("--output", type=str, default='./hubserving_result')
    args = parser.parse_args()
    return args


if __name__ == '__main__':
    args = parse_args()
    main(args)
需要给脚本传递2个参数:
- server_url:服务地址,格式为
http://[ip_address]:[port]/predict/[module_name]
例如,如果使用配置文件启动分类,检测、识别,检测+分类+识别3阶段,表格识别和PP-Structure服务,那么发送请求的url将分别是:
http://127.0.0.1:8865/predict/ocr_det
http://127.0.0.1:8866/predict/ocr_cls
http://127.0.0.1:8867/predict/ocr_rec
http://127.0.0.1:8868/predict/ocr_system
http://127.0.0.1:8869/predict/structure_table
http://127.0.0.1:8870/predict/structure_system - image_dir:测试图像路径,可以是单张图片路径,也可以是图像集合目录路径
- visualize:是否可视化结果,默认为False
- output:可视化结果保存路径,默认为
./hubserving_result
访问示例:
python tools/test_hubserving.py --server_url=http://127.0.0.1:8868/predict/ocr_system --image_dir=./doc/imgs/ --visualize=false
运行结果:

5、 返回结果格式说明
返回结果为列表(list),列表中的每一项为词典(dict),词典一共可能包含3种字段,信息如下:
| 字段名称 | 数据类型 | 意义 |
|---|---|---|
| angle | str | 文本角度 |
| text | str | 文本内容 |
| confidence | float | 文本识别置信度或文本角度分类置信度 |
| text_region | list | 文本位置坐标 |
| html | str | 表格的html字符串 |
| regions | list | 版面分析+表格识别+OCR的结果,每一项为一个list,包含表示区域坐标的bbox,区域类型的type和区域结果的res三个字段 |
不同模块返回的字段不同,如,文本识别服务模块返回结果不含text_region字段,具体信息如下:
| 字段名/模块名 | ocr_det | ocr_cls | ocr_rec | ocr_system | structure_table | structure_system |
|---|---|---|---|---|---|---|
| angle | ✔ | ✔ | ||||
| text | ✔ | ✔ | ✔ | |||
| confidence | ✔ | ✔ | ✔ | |||
| text_region | ✔ | ✔ | ✔ | |||
| html | ✔ | ✔ | ||||
| regions | ✔ | ✔ |
说明: 如果需要增加、删除、修改返回字段,可在相应模块的module.py文件中进行修改,完整流程参考下一节自定义修改服务模块。

- 点赞
- 收藏
- 关注作者
评论(0)