PPv3-OCR自定义数据从训练到部署(三)
五、训练检测器
1、制作数据集
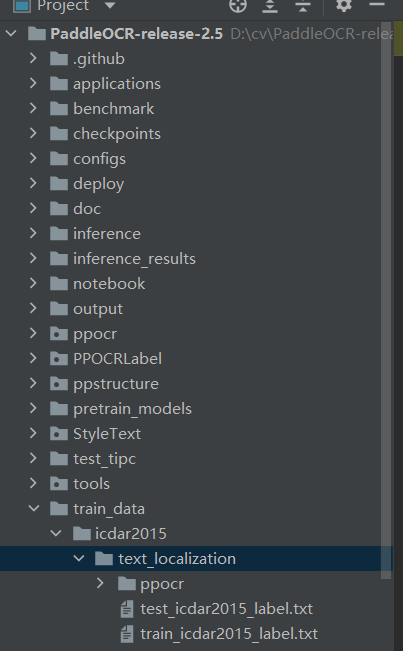
完成数据的标注就可以看是训练检测器了。找到Lable.txt,将其中一部分放到train_label.txt ,将一部分放到test_label.txt,将图片放到ppocr(这个文件夹的名字和标注时的图片文件夹的名字一致),如下:

PaddleOCR-release-2.5/train_data/icdar2015/text_localization/
  └─ ppocr/         图片存放的位置
  └─ train_label.txt    icdar数据集的训练标注
  └─ test_label.txt     icdar数据集的测试标注

自定义切分数据集代码。我在这里没有使用官方给的切分方式,是自定义的切分方式。
import os
import shutil
from sklearn.model_selection import train_test_split


label_txt='./ppocr/Label.txt' #标注数据的路径
if not os.path.exists('tmp'):
    os.makedirs('tmp')
with open(label_txt, 'r') as f:
   txt_List=f.readlines()
   trainval_files, val_files = train_test_split(txt_List, test_size=0.1, random_state=42)
   print(trainval_files)
   f = open("train_label.txt", "w")
   f.writelines(trainval_files)
   f.close()
   f = open("test_label.txt", "w")
   f.writelines(val_files)
   f.close()
   for txt in txt_List:
       image_name=txt.split('\t')[0]
       new_path="./tmp/"+image_name.split('/')[1]
       shutil.move(image_name, new_path)
       print(image_name)
如果路径不存在,请手动创建。执行完成后将tmp文件夹里面的图片放到PaddleOCR-release-2.5/train_data/icdar2015/text_localization/ppocr/文件夹下面。如果不存在则自己创建。
2、下载预训练模型
然后下载预训练模型,将其放到pretrain_models文件夹中,命令如下:
# 根据backbone的不同选择下载对应的预训练模型
# 下载MobileNetV3的预训练模型
wget -P ./pretrain_models/ https://paddleocr.bj.bcebos.com/pretrained/MobileNetV3_large_x0_5_pretrained.pdparams
# 或,下载ResNet18_vd的预训练模型
wget -P ./pretrain_models/ https://paddleocr.bj.bcebos.com/pretrained/ResNet18_vd_pretrained.pdparams
# 或,下载ResNet50_vd的预训练模型
wget -P ./pretrain_models/ https://paddleocr.bj.bcebos.com/pretrained/ResNet50_vd_ssld_pretrained.pdparams
不同的预训练模型对应不同的配置文件,详见第3节。
这次我选用如下图的配置:

3、修改配置文件
然后修改该config文件,路径: configs/det/ch_PP-OCRv3/ch_PP-OCRv3_det_cml.yml,打开文件对里面的参数进行修改该。

按照自己定义的路径,修改训练集的路径。

按照自己定义的路径,修改验证集的路径。

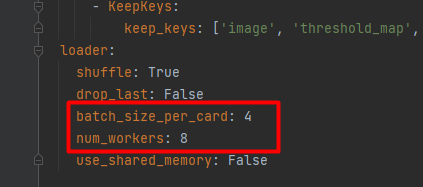
对BatchSize的修改。
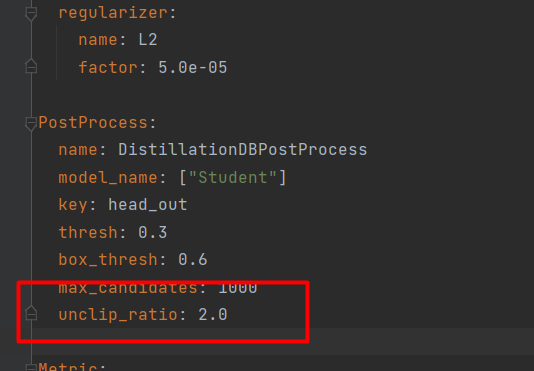
如果训练出来的检测框偏小,可以修改参数unclip_ratio,将其调大即可。

4、开启训练
完成上面的工作就可以启动训练了,在pycharm的Terminal中输入命令:
注意:在PaddleOCR的根目录执行命令。
# 单机单卡训练
python tools/train.py -c configs/det/ch_PP-OCRv3/ch_PP-OCRv3_det_cml.yml  -o Global.pretrained_model=./pretrain_models/

更多的训练方式如下:
# 单机单卡训练 mv3_db 模型
python3 tools/train.py -c configs/det/det_mv3_db.yml \
     -o Global.pretrained_model=./pretrain_models/MobileNetV3_large_x0_5_pretrained

# 单机多卡训练,通过 --gpus 参数设置使用的GPU ID
python3 -m paddle.distributed.launch --gpus '0,1,2,3' tools/train.py -c configs/det/det_mv3_db.yml \
     -o Global.pretrained_model=./pretrain_models/MobileNetV3_large_x0_5_pretrained

# 多机多卡训练,通过 --ips 参数设置使用的机器IP地址,通过 --gpus 参数设置使用的GPU ID
python3 -m paddle.distributed.launch --ips="xx.xx.xx.xx,xx.xx.xx.xx" --gpus '0,1,2,3' tools/train.py -c configs/det/det_mv3_db.yml \
     -o Global.pretrained_model=./pretrain_models/MobileNetV3_large_x0_5_pretrained
4.1、 断点训练
如果训练程序中断,如果希望加载训练中断的模型从而恢复训练,可以通过指定Global.checkpoints指定要加载的模型路径:
python3 tools/train.py -c configs/det/det_mv3_db.yml -o Global.checkpoints=./your/trained/model
注意:Global.checkpoints的优先级高于Global.pretrained_model的优先级,即同时指定两个参数时,优先加载Global.checkpoints指定的模型,如果Global.checkpoints指定的模型路径有误,会加载Global.pretrained_model指定的模型。
4.2 混合精度训练
如果您想进一步加快训练速度,可以使用自动混合精度训练, 以单机单卡为例,命令如下:
python3 tools/train.py -c configs/det/det_mv3_db.yml -o Global.pretrained_model=./pretrain_models/MobileNetV3_large_x0_5_pretrained Global.use_amp=True Global.scale_loss=1024.0 Global.use_dynamic_loss_scaling=True
4.3 分布式训练
多机多卡训练时,通过 --ips 参数设置使用的机器IP地址,通过 --gpus 参数设置使用的GPU ID:
python3 -m paddle.distributed.launch --ips="xx.xx.xx.xx,xx.xx.xx.xx" --gpus '0,1,2,3' tools/train.py -c configs/det/det_mv3_db.yml -o Global.pretrained_model=./pretrain_models/MobileNetV3_large_x0_5_pretrained
注意: 采用多机多卡训练时,需要替换上面命令中的ips值为您机器的地址,机器之间需要能够相互ping通。另外,训练时需要在多个机器上分别启动命令。查看机器ip地址的命令为ifconfig。
分布式训练,我没有试过,主要是没有钞能力。
5、 模型评估与预测
5.1 指标评估
PaddleOCR计算三个OCR检测相关的指标,分别是:Precision、Recall、Hmean(F-Score)。
训练中模型参数默认保存在Global.save_model_dir目录下。在评估指标时,需要设置Global.checkpoints指向保存的参数文件。
python tools/eval.py -c configs/det/det_mv3_db.yml -o Global.checkpoints="{path/to/weights}/best_accuracy"
5.2 测试检测效果
测试单张图像的检测效果:
python3 tools/infer_det.py -c configs/det/det_mv3_db.yml -o Global.infer_img="./doc/imgs_en/img_10.jpg" Global.pretrained_model="./output/det_db/best_accuracy"
测试DB模型时,调整后处理阈值:
python3 tools/infer_det.py -c configs/det/det_mv3_db.yml -o Global.infer_img="./doc/imgs_en/img_10.jpg" Global.pretrained_model="./output/det_db/best_accuracy" PostProcess.box_thresh=0.6 PostProcess.unclip_ratio=2.0
- 注:
box_thresh、unclip_ratio是DB后处理参数,其他检测模型不支持。
测试文件夹下所有图像的检测效果:
python3 tools/infer_det.py -c configs/det/det_mv3_db.yml -o Global.infer_img="./doc/imgs_en/" Global.pretrained_model="./output/det_db/best_accuracy"
6. 模型导出与预测
inference 模型(paddle.jit.save保存的模型) 一般是模型训练,把模型结构和模型参数保存在文件中的固化模型,多用于预测部署场景。 训练过程中保存的模型是checkpoints模型,保存的只有模型的参数,多用于恢复训练等。 与checkpoints模型相比,inference 模型会额外保存模型的结构信息,在预测部署、加速推理上性能优越,灵活方便,适合于实际系统集成。
检测模型转inference 模型方式:
官方的例子:
# 加载配置文件`det_mv3_db.yml`,从`output/det_db`目录下加载`best_accuracy`模型,inference模型保存在`./output/det_db_inference`目录下
python3 tools/export_model.py -c configs/det/det_mv3_db.yml -o Global.pretrained_model="./output/det_db/best_accuracy" Global.save_inference_dir="./output/det_db_inference/"
自己用的命令:
python tools/export_model.py -c output/db_mv3/config.yml -o Global.pretrained_model="./output/db_mv3/best_accuracy" Global.save_inference_dir="./output/det_db_inference/"
DB检测模型inference 模型预测:
python3 tools/infer/predict_det.py --det_algorithm="DB" --det_model_dir="./output/det_db_inference/" --image_dir="./doc/imgs/" --use_gpu=True
- 点赞
- 收藏
- 关注作者


评论(0)