PPv3-OCR自定义数据从训练到部署(一)

【摘要】 最近一段时间使用PaddleOCR做了一个OCR相关的项目,本文记录一下项目的实现过程。由于数据集是公司的真是数据,不方便公开,我从网上搜集了一些数据集,给大家做演示。PaddleOCR用的最新的PaddleOCR-release-2.5,模型用的v3模型。 一、配置Paddle环境创建虚拟环境conda create --name pp python=3.7创建完成后激活环境conda a...
最近一段时间使用PaddleOCR做了一个OCR相关的项目,本文记录一下项目的实现过程。由于数据集是公司的真是数据,不方便公开,我从网上搜集了一些数据集,给大家做演示。PaddleOCR用的最新的PaddleOCR-release-2.5,模型用的v3模型。
一、配置Paddle环境
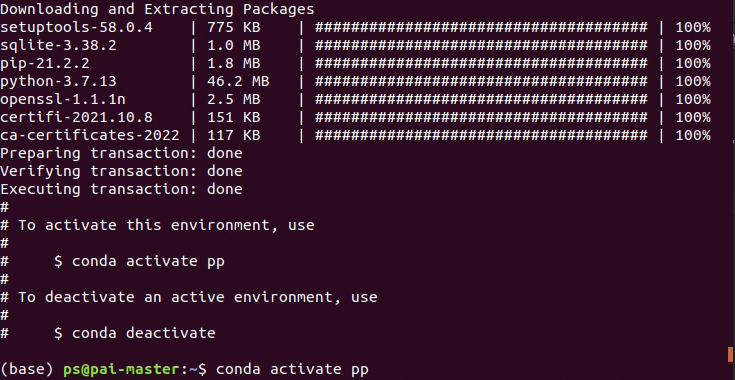
创建虚拟环境
conda create --name pp python=3.7
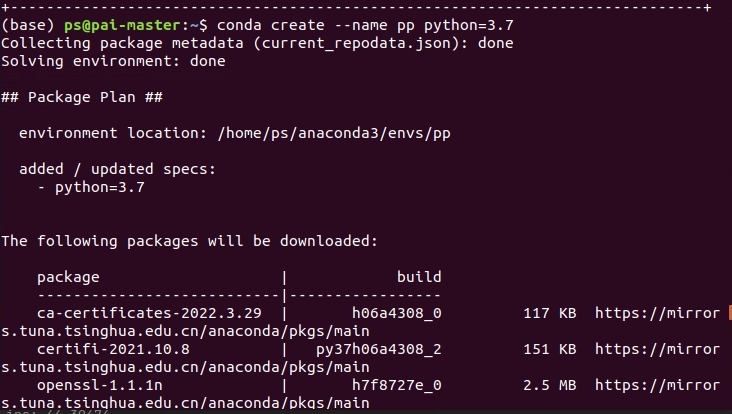
创建完成后激活环境
conda activate pp
登录飞桨的官网下载最新的paddle,官网地址:飞桨PaddlePaddle-源于产业实践的开源深度学习平台
选择合适的CUDA版本,然后会在下面生成对应的命令。
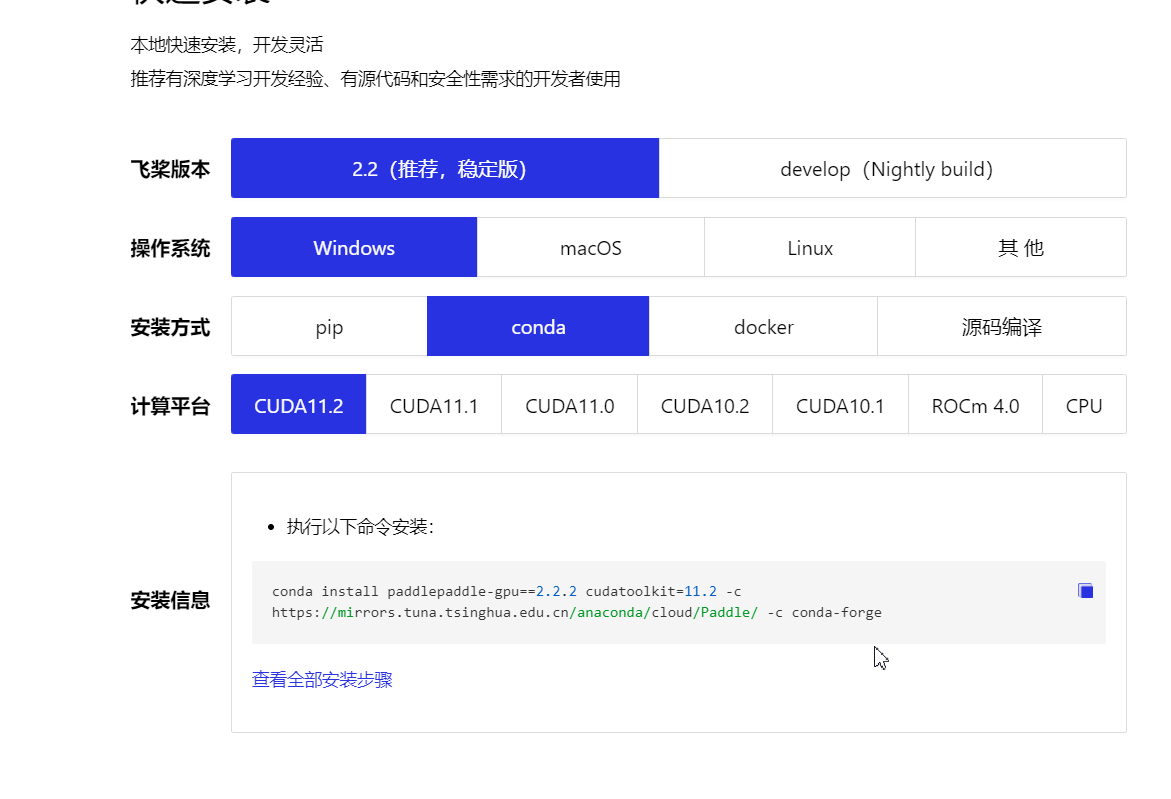
然后,复制命令即可
conda install paddlepaddle-gpu==2.2.2 cudatoolkit=11.2 -c https://mirrors.tuna.tsinghua.edu.cn/anaconda/cloud/Paddle/ -c conda-forge
二、配置PaddleOCR
下载地址:(https://gitee.com/paddlepaddle/PaddleOCR
将其下载到本地,然后解压配置环境。
1、安装python包
1、yaml
pip install pyyaml
2、imgaug
pip install imgaug
3、pyclipper
pip install pyclipper
4、lmdb
pip install lmdb
5、Levenshtein
pip install Levenshtein
6、tqdm
pip install tqdm
2、测试环境
| 模型简介 | 模型名称 | 推荐场景 | 检测模型 | 方向分类器 | 识别模型 |
|---|---|---|---|---|---|
| 中英文超轻量PP-OCRv3模型(16.2M) | ch_PP-OCRv3_xx | 移动端&服务器端 | 推理模型 / 训练模型 | 推理模型 / 训练模型 | 推理模型 / 训练模型 |
| 英文超轻量PP-OCRv3模型(13.4M) | en_PP-OCRv3_xx | 移动端&服务器端 | 推理模型 / 训练模型 | 推理模型 / 训练模型 | 推理模型 / 训练模型 |
| 中英文超轻量PP-OCRv2模型(13.0M) | ch_PP-OCRv2_xx | 移动端&服务器端 | 推理模型 / 训练模型 | 推理模型 / 预训练模型 | 推理模型 / 训练模型 |
| 中英文超轻量PP-OCR mobile模型(9.4M) | ch_ppocr_mobile_v2.0_xx | 移动端&服务器端 | 推理模型 / 预训练模型 | 推理模型 / 预训练模型 | 推理模型 / 预训练模型 |
| 中英文通用PP-OCR server模型(143.4M) | ch_ppocr_server_v2.0_xx | 服务器端 | 推理模型 / 预训练模型 | 推理模型 / 预训练模型 | 推理模型 / 预训练模型 |
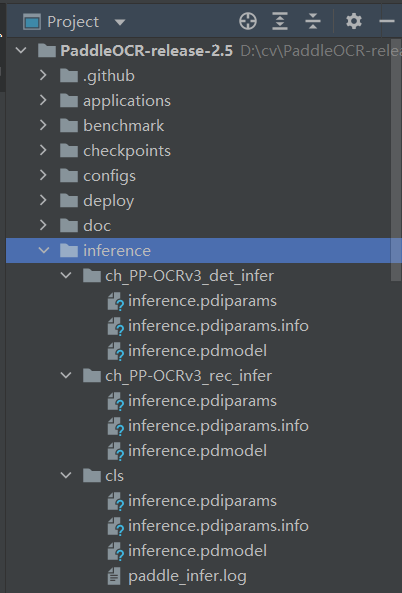
选择上面的一组模型放入到inference文件夹中,注意:是一组,包括:监测模型、方向分类器、识别模型。如下:
PaddleOCR-release-2.5
	└─inference
	   ├─ch_PP-OCRv3_det_infer #检测模型
	   │	 ├─inference.pdiparams
	   │	 ├─inference.pdiparams.info
	   │	 └─inference.pdmodel
	   ├─ch_PP-OCRv3_rec_infer #识别模型
       │	 ├─inference.pdiparams
	   │	 ├─inference.pdiparams.info
	   │	 └─inference.pdmodel
	   └─cls #方向分类器
			 ├─inference.pdiparams
			 ├─inference.pdiparams.info
			 └─inference.pdmodel
将待检测的图片放在./doc/imgs/文件夹下面,然后执行命令:
python tools/infer/predict_system.py --image_dir="./doc/imgs/0.jpg" --det_model_dir="./inference/ch_PP-OCRv3_det_infer/" --cls_model_dir="./inference/cls/" --rec_model_dir="./inference/ch_PP-OCRv3_rec_infer/" --use_angle_cls=true
然后在inference_results文件夹中查看结果,例如:
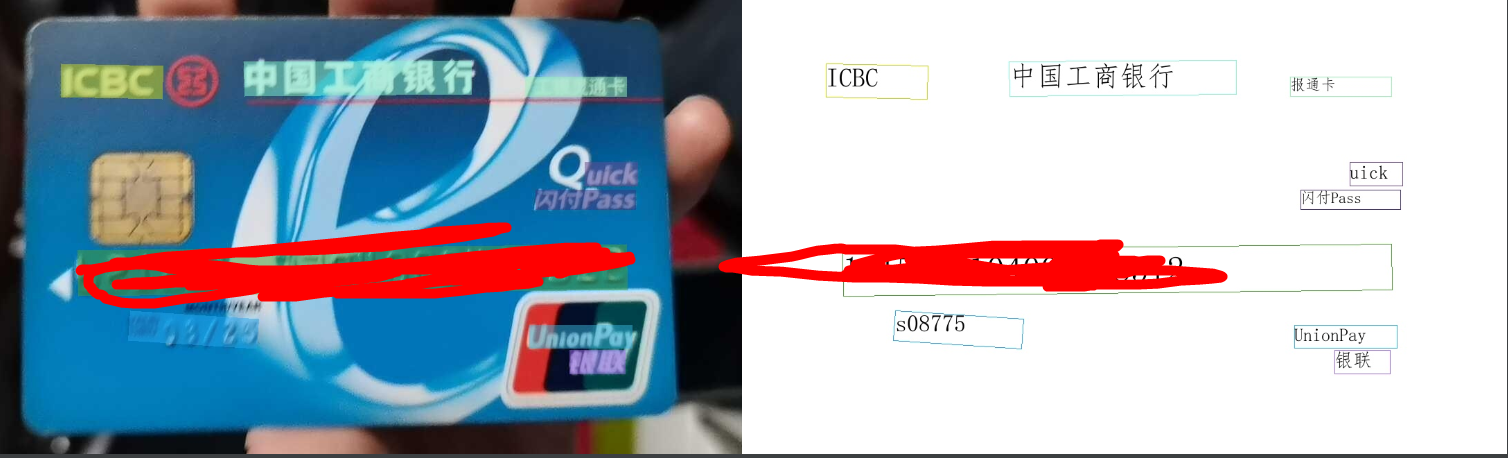
如果能看到结果就说明环境是ok的。
更多的命令,如下:
# 使用方向分类器
python3 tools/infer/predict_system.py --image_dir="./doc/imgs/00018069.jpg" --det_model_dir="./ch_PP-OCRv3_det_infer/" --cls_model_dir="./cls/" --rec_model_dir="./ch_PP-OCRv3_rec_infer/" --use_angle_cls=true --rec_image_shape=3,48,320
# 不使用方向分类器
python3 tools/infer/predict_system.py --image_dir="./doc/imgs/00018069.jpg" --det_model_dir="./ch_PP-OCRv3_det_infer/" --rec_model_dir="./ch_PP-OCRv3_rec_infer/" --use_angle_cls=false --rec_image_shape=3,48,320
# 使用多进程
python3 tools/infer/predict_system.py --image_dir="./doc/imgs/00018069.jpg" --det_model_dir="./ch_PP-OCRv3_det_infer/" --rec_model_dir="./ch_PP-OCRv3_rec_infer/" --use_angle_cls=false --use_mp=True --total_process_num=6 --rec_image_shape=3,48,320
也可以新建test.py脚本进行测试,系统会自动下载预训练模型,代码如下:
import cv2

from paddleocr import PaddleOCR, draw_ocr

# Paddleocr目前支持的多语言语种可以通过修改lang参数进行切换
# 例如`ch`, `en`, `fr`, `german`, `korean`, `japan`
ocr = PaddleOCR(use_angle_cls=True, lang="ch")  # need to run only once to download and load model into memory
img_path = './doc/imgs_en/img_10.jpg'
result = ocr.ocr(img_path, cls=True)
for line in result:
    print(line)
# 显示结果
from PIL import Image
image = Image.open(img_path).convert('RGB')
boxes = [line[0] for line in result]
txts = [line[1][0] for line in result]
scores = [line[1][1] for line in result]
im_show = draw_ocr(image, boxes, txts, scores, font_path='./fonts/simfang.ttf')
im_show = Image.fromarray(im_show)
im_show.save('result.jpg')
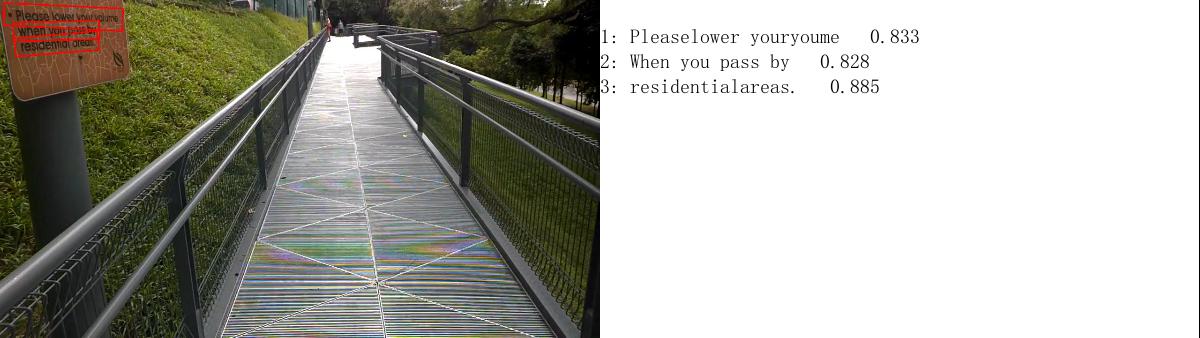
开始运行:

红框的位置显示了详细的配置信息。
查看结果:
ocr.ocr(img_path, cls=True)这个方法不仅支持传入图片的路径,还支持ndarray和list类型。比如传入ndarray
import cv2

from paddleocr import PaddleOCR, draw_ocr

# Paddleocr目前支持的多语言语种可以通过修改lang参数进行切换
# 例如`ch`, `en`, `fr`, `german`, `korean`, `japan`
ocr = PaddleOCR(use_angle_cls=True, lang="ch")  # need to run only once to download and load model into memory
img_path = './doc/imgs_en/img_10.jpg'
# 第一种使用读入图片转为ndarray
from PIL import Image
import numpy as np
img = Image.open(img_path)
img = np.array(img)
result = ocr.ocr(img, cls=True)
# 第二种使用cv2读入图片。
img=cv2.imread(img_path)
img = cv2.cvtColor(img, cv2.COLOR_BGR2RGB)
result = ocr.ocr(img, cls=True)
上面这两种方式都是可以的,大家自行尝试。

【声明】本内容来自华为云开发者社区博主,不代表华为云及华为云开发者社区的观点和立场。转载时必须标注文章的来源(华为云社区)、文章链接、文章作者等基本信息,否则作者和本社区有权追究责任。如果您发现本社区中有涉嫌抄袭的内容,欢迎发送邮件进行举报,并提供相关证据,一经查实,本社区将立刻删除涉嫌侵权内容,举报邮箱:
cloudbbs@huaweicloud.com
- 点赞
- 收藏
- 关注作者
评论(0)