SpringBoot-yaml语法规则和读取数据

【摘要】
✨博客主页:👉不会压弯的小飞侠 ✨欢迎关注:👉点赞🎀收藏⭐留言✒ ✨系列专栏:👉SpringBoot专栏(每日更新) ✨如果觉得博主的文章还不错的话,请三连支持一下博主。 ✨欢迎大佬指正,一起学...

✨博客主页:👉不会压弯的小飞侠
✨欢迎关注:👉点赞🎀收藏⭐留言✒
✨系列专栏:👉SpringBoot专栏(每日更新)
✨如果觉得博主的文章还不错的话,请三连支持一下博主。
✨欢迎大佬指正,一起学习!一起加油!

前言
YAML 是 “YAML Ain’t Markup Language”(YAML 不是一种标记语言)的递归缩写。在开发的这种语言时,YAML 的意思其实是:“Yet Another Markup Language”(仍是一种标记语言)。
👉yaml
- YAML是一种数据序列化格式。
- yaml扩展名
- .yaml
- .yml(主流)
👉yaml语法规则
- 大小写敏感
- 属性层次关系使用多行描述,每行结尾使用冒号结束
- 使用缩进表示层级关系,同层左侧对齐,只允许使用空格(不允许使用Tab键)
- 属性值前面添加空格(属性名与属性值之间使用冒号+空格作为分隔)
- #表示注释
⭐字面值表示方式:
boolean: true
float: 3.14
int: 15
#表示空
null: ~
string: xiaofeixia
date: 2022-7-9
#日期与时间用T连接
datetime: 2022-7-9T12:00:30+02:00
- 1
- 2
- 3
- 4
- 5
- 6
- 7
- 8
- 9
⭐数组表示方式:
likes:
  - music
  - draw
  - game

likes1: [music,draw,game]
- 1
- 2
- 3
- 4
- 5
- 6
- 7
- 8
⭐对象数组格式:
user2:
  - name: xiaofeixia
    age: 22
  - name: xiaomage
    age: 26

user3:
  -
    name: xiaofeixia
    age: 22
  -
    name: xiaomage
    age: 27
- 1
- 2
- 3
- 4
- 5
- 6
- 7
- 8
- 9
- 10
- 11
- 12
- 13
⭐对象数组缩略格式:
user4: [{name:xiaofeixia,age:21},{name:xiaofeixia,age:22}]
- 1
👉读取yaml数据
- 使用@Value读取单个数据,属性名引用方式:${一级属性名.二级属性名}
⭐编写yaml文件
server:
  port: 81
country: china
province: henan
city: zhengzhou
area: shangqiu

party: true
birthday: 2022-11-11

user8:
  name: xiaofeixia
  age: 22
user1:
  name: xiaofeixia
  age: 22

a:
  B:
    C:
      d:
        e: abc

likes:
  - music
  - draw
  - game

likes1: [music,draw,game]

user2:
  - name: xiaofeixia
    age: 22
  - name: xiaomage
    age: 26

user3:
  -
    name: xiaofeixia
    age: 22
  -
    name: xiaomage
    age: 27

user4: [{name:xiaofeixia,age:21},{name:xiaofeixia,age:22}]

- 1
- 2
- 3
- 4
- 5
- 6
- 7
- 8
- 9
- 10
- 11
- 12
- 13
- 14
- 15
- 16
- 17
- 18
- 19
- 20
- 21
- 22
- 23
- 24
- 25
- 26
- 27
- 28
- 29
- 30
- 31
- 32
- 33
- 34
- 35
- 36
- 37
- 38
- 39
- 40
- 41
- 42
- 43
- 44
- 45
⭐读取单一数据
package com.jkj.controller;
import com.jkj.MyDataSource;
import org.springframework.beans.factory.annotation.Autowired;
import org.springframework.beans.factory.annotation.Value;
import org.springframework.core.env.Environment;
import org.springframework.web.bind.annotation.GetMapping;
import org.springframework.web.bind.annotation.RequestMapping;
import org.springframework.web.bind.annotation.RestController;

@RestController
@RequestMapping("/yamlBooks")
public class BookController {
    //读取yaml数据中的单一数据
    @Value("${country}")
    public String country1;

    @GetMapping
    public String ById(){
        System.out.println("springboot is running...");
        System.out.println("country=="+country1);  //country==china
        return "springboot is running...";
    }
}
- 1
- 2
- 3
- 4
- 5
- 6
- 7
- 8
- 9
- 10
- 11
- 12
- 13
- 14
- 15
- 16
- 17
- 18
- 19
- 20
- 21
- 22
- 23
- 24
⭐读取二级数据
package com.jkj.controller;
import com.jkj.MyDataSource;
import org.springframework.beans.factory.annotation.Autowired;
import org.springframework.beans.factory.annotation.Value;
import org.springframework.core.env.Environment;
import org.springframework.web.bind.annotation.GetMapping;
import org.springframework.web.bind.annotation.RequestMapping;
import org.springframework.web.bind.annotation.RestController;

@RestController
@RequestMapping("/yamlBooks")
public class BookController {
    @Value("${user8.name}")
    public String username;
    @GetMapping
    public String ById(){
        System.out.println("springboot is running...");
        System.out.println("username=="+username);         //username==xiaofeixia
        return "springboot is running...";
    }
}
- 1
- 2
- 3
- 4
- 5
- 6
- 7
- 8
- 9
- 10
- 11
- 12
- 13
- 14
- 15
- 16
- 17
- 18
- 19
- 20
- 21
- 22
⭐读取数组数据
package com.jkj.controller;
import com.jkj.MyDataSource;
import org.springframework.beans.factory.annotation.Autowired;
import org.springframework.beans.factory.annotation.Value;
import org.springframework.core.env.Environment;
import org.springframework.web.bind.annotation.GetMapping;
import org.springframework.web.bind.annotation.RequestMapping;
import org.springframework.web.bind.annotation.RestController;

@RestController
@RequestMapping("/yamlBooks")
public class BookController {
 @Value("${likes[0]}")
    public String likes1;
     @GetMapping
    public String ById(){
        System.out.println("springboot is running...");
        System.out.println("likes1=="+likes1);  //likes1==music
        return "springboot is running...";
    }

}
- 1
- 2
- 3
- 4
- 5
- 6
- 7
- 8
- 9
- 10
- 11
- 12
- 13
- 14
- 15
- 16
- 17
- 18
- 19
- 20
- 21
- 22
⭐读取服务器端口号
package com.jkj.controller;
import com.jkj.MyDataSource;
import org.springframework.beans.factory.annotation.Autowired;
import org.springframework.beans.factory.annotation.Value;
import org.springframework.core.env.Environment;
import org.springframework.web.bind.annotation.GetMapping;
import org.springframework.web.bind.annotation.RequestMapping;
import org.springframework.web.bind.annotation.RestController;

@RestController
@RequestMapping("/yamlBooks")
public class BookController {
   @Value("${server.port}")
    public String port;
    @GetMapping
    public String ById(){
        System.out.println("springboot is running...");
        System.out.println("port=="+port);  //port==81
        return "springboot is running...";
    }
}
- 1
- 2
- 3
- 4
- 5
- 6
- 7
- 8
- 9
- 10
- 11
- 12
- 13
- 14
- 15
- 16
- 17
- 18
- 19
- 20
- 21
⭐读取对象属性
package com.jkj.controller;
import com.jkj.MyDataSource;
import org.springframework.beans.factory.annotation.Autowired;
import org.springframework.beans.factory.annotation.Value;
import org.springframework.core.env.Environment;
import org.springframework.web.bind.annotation.GetMapping;
import org.springframework.web.bind.annotation.RequestMapping;
import org.springframework.web.bind.annotation.RestController;

@RestController
@RequestMapping("/yamlBooks")
public class BookController {
    @Value("${user2[0].age}")
    public String age2;
    @GetMapping
    public String ById(){
        System.out.println("springboot is running...");
         System.out.println("age2=="+age2);  //age2==22
        return "springboot is running...";
    }
}
- 1
- 2
- 3
- 4
- 5
- 6
- 7
- 8
- 9
- 10
- 11
- 12
- 13
- 14
- 15
- 16
- 17
- 18
- 19
- 20
- 21
⭐封装全部数据到Environment对象
package com.jkj.controller;
import com.jkj.MyDataSource;
import org.springframework.beans.factory.annotation.Autowired;
import org.springframework.beans.factory.annotation.Value;
import org.springframework.core.env.Environment;
import org.springframework.web.bind.annotation.GetMapping;
import org.springframework.web.bind.annotation.RequestMapping;
import org.springframework.web.bind.annotation.RestController;

@RestController
@RequestMapping("/yamlBooks")
public class BookController {
    @Autowired
    private Environment env;
    @GetMapping
    public String ById(){
        System.out.println(env.getProperty("server.port"));
        System.out.println(env.getProperty("user8.name"));
        return "springboot is running...";
    }
}
- 1
- 2
- 3
- 4
- 5
- 6
- 7
- 8
- 9
- 10
- 11
- 12
- 13
- 14
- 15
- 16
- 17
- 18
- 19
- 20
- 21
- 22
⭐读取yaml引用类型属性数据
⭐⭐application.yml
server:
  port: 81
#创建类用于封装下面的数据
#由spring去加载数据到对象中,一定要告诉spring加载这组信息
#使用的时候直接从spring中获取信息
datasource:
  driver: com.mysql.jdbc.Driver
  url: jdbc:mysql://localhost/springboot
  username: root
  password: root
- 1
- 2
- 3
- 4
- 5
- 6
- 7
- 8
- 9
- 10
⭐⭐MyDataSource
自定义对象封装指定数据
1.定义数据模型封装yaml文件中对应的数据
package com.jkj;

import org.springframework.boot.context.properties.ConfigurationProperties;
import org.springframework.stereotype.Component;
//2.定义spring的管控Bean
@Component
//3.指定加载数据
@ConfigurationProperties(prefix = "datasource")
public class MyDataSource {
    private String driver;
    private String url;
    private String username;
    private String password;

    public String getDriver() {
        return driver;
    }

    public void setDriver(String driver) {
        this.driver = driver;
    }

    public String getUrl() {
        return url;
    }

    public void setUrl(String url) {
        this.url = url;
    }

    public String getUsername() {
        return username;
    }

    public void setUsername(String username) {
        this.username = username;
    }

    public String getPassword() {
        return password;
    }

    public void setPassword(String password) {
        this.password = password;
    }

    @Override
    public String toString() {
        return "MyDataSource{" +
                "driver='" + driver + '\'' +
                ", url='" + url + '\'' +
                ", username='" + username + '\'' +
                ", password='" + password + '\'' +
                '}';
    }
}
- 1
- 2
- 3
- 4
- 5
- 6
- 7
- 8
- 9
- 10
- 11
- 12
- 13
- 14
- 15
- 16
- 17
- 18
- 19
- 20
- 21
- 22
- 23
- 24
- 25
- 26
- 27
- 28
- 29
- 30
- 31
- 32
- 33
- 34
- 35
- 36
- 37
- 38
- 39
- 40
- 41
- 42
- 43
- 44
- 45
- 46
- 47
- 48
- 49
- 50
- 51
- 52
- 53
- 54
- 55
- 56
- 57
⭐⭐读取数据
package com.jkj.controller;
import com.jkj.MyDataSource;
import org.springframework.beans.factory.annotation.Autowired;
import org.springframework.beans.factory.annotation.Value;
import org.springframework.core.env.Environment;
import org.springframework.web.bind.annotation.GetMapping;
import org.springframework.web.bind.annotation.RequestMapping;
import org.springframework.web.bind.annotation.RestController;

@RestController
@RequestMapping("/yamlBooks")
public class BookController {
    @Autowired
    private MyDataSource myDataSource;
    @GetMapping
    public String ById(){
        System.out.println(myDataSource);
        //MyDataSource{driver='com.mysql.jdbc.Driver', url='jdbc:mysql://localhost/springboot', username='root', password='root'}
        return "springboot is running...";
    }
}
- 1
- 2
- 3
- 4
- 5
- 6
- 7
- 8
- 9
- 10
- 11
- 12
- 13
- 14
- 15
- 16
- 17
- 18
- 19
- 20
- 21
- 22
⭐变量的引用
⭐⭐application.yml
server:
  port: 81
baseDir: E:\window
tempDir: ${baseDir}\temp
- 1
- 2
- 3
- 4
⭐⭐读取数据
package com.jkj.controller;
import com.jkj.MyDataSource;
import org.springframework.beans.factory.annotation.Autowired;
import org.springframework.beans.factory.annotation.Value;
import org.springframework.core.env.Environment;
import org.springframework.web.bind.annotation.GetMapping;
import org.springframework.web.bind.annotation.RequestMapping;
import org.springframework.web.bind.annotation.RestController;

@RestController
@RequestMapping("/yamlBooks")
public class BookController {
     @Value("${tempDir}")
     public String temp;
    @GetMapping
    public String ById(){
         System.out.println("temp=="+temp);  //temp==E:\window\temp
        return "springboot is running...";
    }
}
- 1
- 2
- 3
- 4
- 5
- 6
- 7
- 8
- 9
- 10
- 11
- 12
- 13
- 14
- 15
- 16
- 17
- 18
- 19
- 20
⭐ context-path
只写:
server:
  port: 81
- 1
- 2
控制台输出:path为空

加上context-path后:
server:
  port: 81
  servlet:
    context-path: /test
- 1
- 2
- 3
- 4
控制台输出页面:
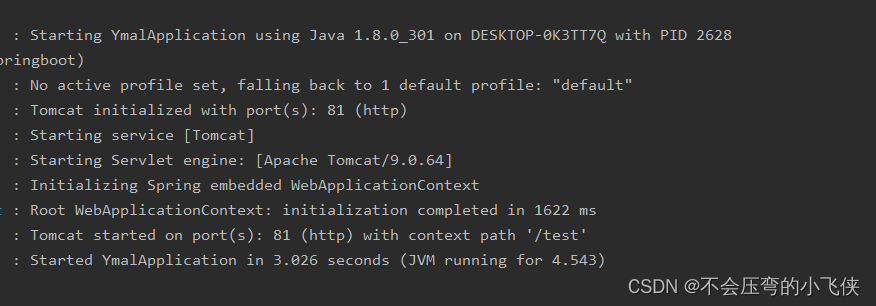
注意:在浏览器输入:http://localhost:81/test/yamlBooks 进行测试。
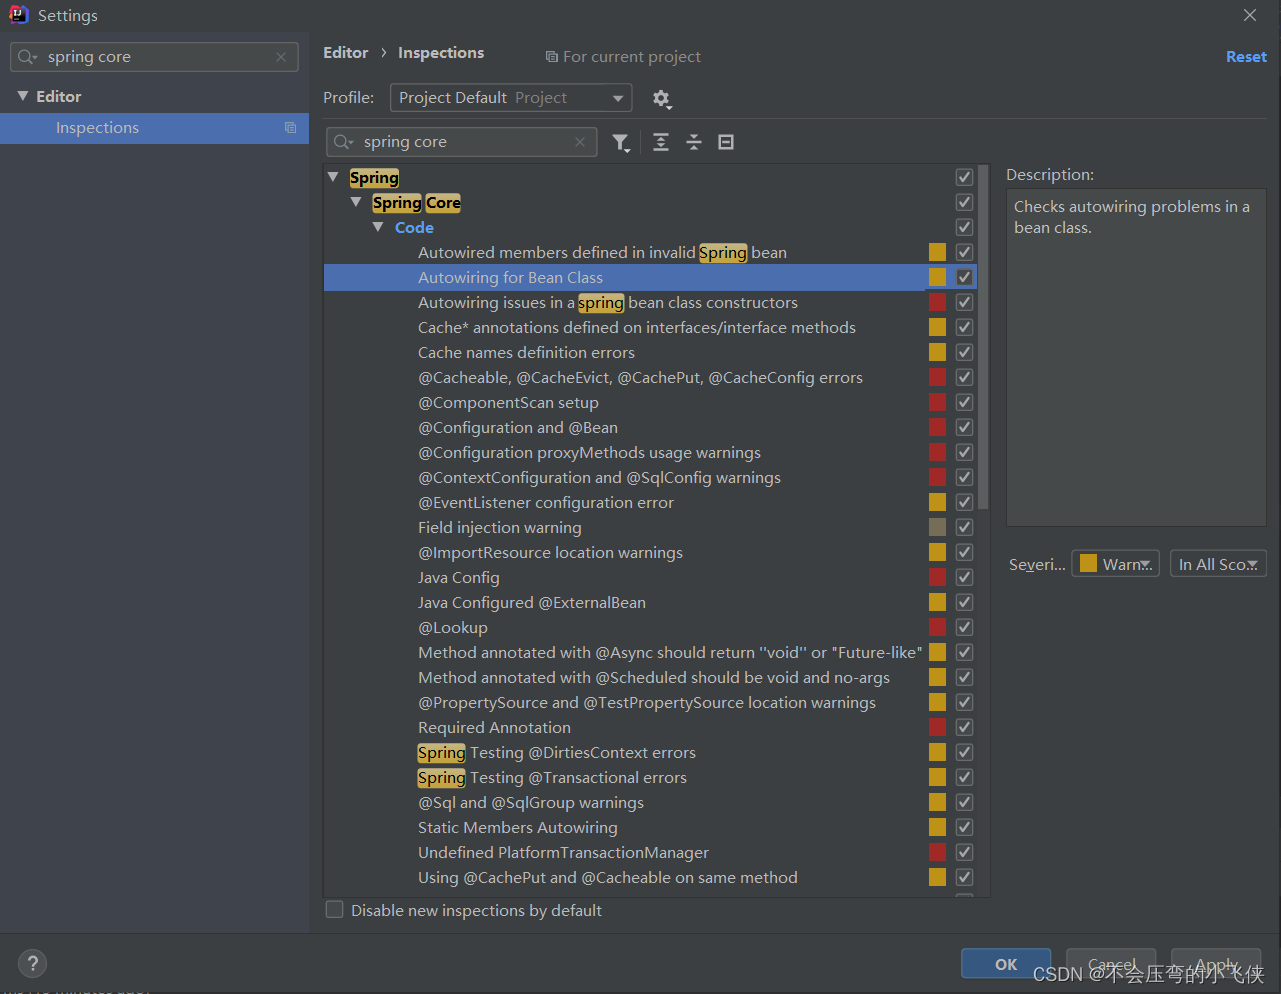
⭐@Autowired报错解决方案
- file
- setting
- 搜索Spring Core
- 如下图所示将Severity修改为Warning

文章来源: blog.csdn.net,作者:不会压弯的小飞侠,版权归原作者所有,如需转载,请联系作者。
原文链接:blog.csdn.net/qq_43514330/article/details/125690460

【版权声明】本文为华为云社区用户转载文章,如果您发现本社区中有涉嫌抄袭的内容,欢迎发送邮件进行举报,并提供相关证据,一经查实,本社区将立刻删除涉嫌侵权内容,举报邮箱:
cloudbbs@huaweicloud.com
- 点赞
- 收藏
- 关注作者
评论(0)