3D激光SLAM:ALOAM---后端laserMapping代码结构与数据处理分析

3D激光SLAM:ALOAM---后端laserMapping代码结构与数据处理分析
前言
ALOAM方法实现了低的漂移,并且计算的复杂度低,实时性很好.并且不需要高精度的lidar和惯导
这个方法的核心思想就是把SLAM问题进行了拆分,通过两个算法来进行.一个是执行高频率的前端里程计但是低精度的运动估计(定位),另一个算法在比定位低一个数量级的频率执行后端建图(建图和校正里程计).
这个两个算法都需要提特征点,就是经典的角点和面点,然后进行配准.在前端的那个算法中也就是里程计算法,特征点的提取会用到快速计算的方法.在建图的后端算法中,相互关联的特征点是通过特征值和特征向量来获得的.
前几篇博客分析了ALOAM的前端链接如下:
ALOAM:帧间里程计代码解读
ALOAM:Ceres 优化部分及代码解析
ALOAM:激光雷达的运动畸变补偿代码解析
ALOAM:异常点剔除机制代码解析
A-LOAM :前端lidar点特征提取部分代码解读
A-LOAM :前端lidar点预处理部分代码解读
剩下的就是ALOAM的后端了!本篇主要分析后端laserMapping的代码结构与数据处理
ALOAM 后端laserMapping
建图算法 运行 的频率要比里程计低
每一帧 执行 一次
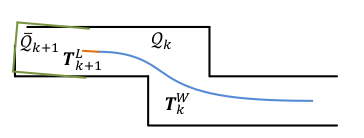
在k+1帧的最后,激光里程计得到了经过畸变校正的点云 ^Pk+1,并且同时得到了 一个位姿变换 Tk+1.
建图算法就是将 ^Pk+1 配准到世界坐标系中.
Qk 是 已存在地图中的点云 是前k帧的累积
Tw 是 地图中 最后一帧 k 的位姿 在tk+1时刻
用来自激光里程计的输出,建图算法 将 ^Pk+1 投影到世界坐标系中,形成 ^Qk+1
然后就是配准 ^Qk+1 和Qk, 这个过程会优化lidar的位姿 Twk+1
订阅四种消息
- 当前帧全部点云(经过一次降采样)
- 上一帧的边线点集合
- 上一帧的平面点集合
- 当前帧的位姿粗估计
发布六种消息
- 附近5帧组成的降采样子地图 for rviz
- 所有帧组成的点云地图
- 经过Map to Map精估计优化后当前帧位姿精估计
- 当前帧原始点云(从velodyne_cloud_3订阅来的点云未经其他处理)
- 里程计坐标系位姿转化到世界坐标系位姿(地图坐标系),mapping输出的1Hz位姿,odometry输出的10Hz位姿,整合成10hz作为最终结果
- 经过Map to Map 精估计优化后的当前帧平移
代码解析
ALOAM的后端的模块是laserMapping .代码就是在laserMapping.cpp里面
laserMapping.cpp也是一个ROS的node.所以可以从main函数看起
int main(int argc, char **argv)
{
	ros::init(argc, argv, "laserMapping");
	ros::NodeHandle nh;
- 1
- 2
- 3
- 4
ros的基本操作
	//配置线特征和面特征点云的分辨率,之后通过体素滤波进行下采样
	float lineRes = 0;//声明线特征分辨率
	float planeRes = 0;//声明面特征分辨率
	nh.param<float>("mapping_line_resolution", lineRes, 0.4);//从参数服务器读取线特征分辨率
	nh.param<float>("mapping_plane_resolution", planeRes, 0.8);//从参数服务器读取面特征分辨率
	printf("line resolution %f plane resolution %f \n", lineRes, planeRes);//打印设置的分辨率
	downSizeFilterCorner.setLeafSize(lineRes, lineRes,lineRes);//设置线特征的分辨率
	downSizeFilterSurf.setLeafSize(planeRes, planeRes, planeRes);//设置面特征的分辨率
- 1
- 2
- 3
- 4
- 5
- 6
- 7
- 8
配置线特征和面特征点云的分辨率,之后通过体素滤波进行下采样
然后订阅了4种消息
	ros::Subscriber subLaserCloudCornerLast = nh.subscribe<sensor_msgs::PointCloud2>("/laser_cloud_corner_last", 100, laserCloudCornerLastHandler);

	ros::Subscriber subLaserCloudSurfLast = nh.subscribe<sensor_msgs::PointCloud2>("/laser_cloud_surf_last", 100, laserCloudSurfLastHandler);

	ros::Subscriber subLaserOdometry = nh.subscribe<nav_msgs::Odometry>("/laser_odom_to_init", 100, laserOdometryHandler);

	ros::Subscriber subLaserCloudFullRes = nh.subscribe<sensor_msgs::PointCloud2>("/velodyne_cloud_3", 100, laserCloudFullResHandler);
- 1
- 2
- 3
- 4
- 5
- 6
- 7
- 上一帧的角点
- 上一帧的面点
- 前端里程计位姿
- 所有的点云
可以先看下各回调函数做了什么事情
void laserCloudCornerLastHandler(const sensor_msgs::PointCloud2ConstPtr &laserCloudCornerLast2)
{
	mBuf.lock();//线程锁 加锁
	cornerLastBuf.push(laserCloudCornerLast2);//存入Buf
	mBuf.unlock();//线程锁 解锁
}

void laserCloudSurfLastHandler(const sensor_msgs::PointCloud2ConstPtr &laserCloudSurfLast2)
{
	mBuf.lock();
	surfLastBuf.push(laserCloudSurfLast2);
	mBuf.unlock();
}

void laserCloudFullResHandler(const sensor_msgs::PointCloud2ConstPtr &laserCloudFullRes2)
{
	mBuf.lock();
	fullResBuf.push(laserCloudFullRes2);
	mBuf.unlock();
}
- 1
- 2
- 3
- 4
- 5
- 6
- 7
- 8
- 9
- 10
- 11
- 12
- 13
- 14
- 15
- 16
- 17
- 18
- 19
- 20
三个点云的回调函数处理很简单,就是存入到各自的数据Buf中
注意:回调函数要加线程锁,因为一个回调函数就是一个线程,主函数里还有一个线程,两个线程都会访问Buf信息,避免线程冲突,在存入数据前加锁,写入后解锁
然后来看里程计的回调函数做的事情
//前端激光雷达里程计回调函数
void laserOdometryHandler(const nav_msgs::Odometry::ConstPtr &laserOdometry)
{
- 1
- 2
- 3
	mBuf.lock();
	odometryBuf.push(laserOdometry);
	mBuf.unlock();
- 1
- 2
- 3
首先和点云一样写入Buf中
之后需要发布最新的位姿信息(这部分需要计算了).
前端里程计会定期向后端发送位姿,这个位姿是当前帧和里程计初始位姿直接的位姿(可以叫做T_odom_curr),在后端mapping模块中,需要以map坐标系为初始位姿,然后得到当前帧和map的位姿变换(可以叫做T_map_curr),如何进行这个两个位姿的转换呢?
后端mapping模块就是解决这个问题,它会估计出里程计初始位姿和map的初始位姿的位姿变换(可以叫做T_map_odom),然后
T_map_curr = T_map_odom×T_odom_curr
上面就是计算的原理
再补充一句,里程计坐标系和map坐标系在初始时刻是对齐的,然后里程计是累加转的时间坐标系下的,所以会随着时间的推移,越来越不准,通过后端的处理,map坐标系下的位姿会相对准一些
回到代码,就是的上面位姿变换的处理,收到一个odom的位姿,就发布一个map下的位姿
	Eigen::Quaterniond q_wodom_curr;
	Eigen::Vector3d t_wodom_curr;
	q_wodom_curr.x() = laserOdometry->pose.pose.orientation.x;
	q_wodom_curr.y() = laserOdometry->pose.pose.orientation.y;
	q_wodom_curr.z() = laserOdometry->pose.pose.orientation.z;
	q_wodom_curr.w() = laserOdometry->pose.pose.orientation.w;
	t_wodom_curr.x() = laserOdometry->pose.pose.position.x;
	t_wodom_curr.y() = laserOdometry->pose.pose.position.y;
	t_wodom_curr.z() = laserOdometry->pose.pose.position.z;
- 1
- 2
- 3
- 4
- 5
- 6
- 7
- 8
- 9
将ros的消息,转成eigen的格式
	Eigen::Quaterniond q_w_curr = q_wmap_wodom * q_wodom_curr;
	Eigen::Vector3d t_w_curr = q_wmap_wodom * t_wodom_curr + t_wmap_wodom;
- 1
- 2
这个就是上面的公式,将odom的位姿转成map的位姿
q_wmap_wodom和t_wmap_wodom 后端优化的odom到map的位姿变换
	nav_msgs::Odometry odomAftMapped;
	odomAftMapped.header.frame_id = "/camera_init";
	odomAftMapped.child_frame_id = "/aft_mapped";
	odomAftMapped.header.stamp = laserOdometry->header.stamp;
	odomAftMapped.pose.pose.orientation.x = q_w_curr.x();
	odomAftMapped.pose.pose.orientation.y = q_w_curr.y();
	odomAftMapped.pose.pose.orientation.z = q_w_curr.z();
	odomAftMapped.pose.pose.orientation.w = q_w_curr.w();
	odomAftMapped.pose.pose.position.x = t_w_curr.x();
	odomAftMapped.pose.pose.position.y = t_w_curr.y();
	odomAftMapped.pose.pose.position.z = t_w_curr.z();
	pubOdomAftMappedHighFrec.publish(odomAftMapped);
- 1
- 2
- 3
- 4
- 5
- 6
- 7
- 8
- 9
- 10
- 11
- 12
转成ROS的里程计信息 发布出去
继续回到main函数中之后是定义本节点发布的消息(6种)
	pubLaserCloudSurround = nh.advertise<sensor_msgs::PointCloud2>("/laser_cloud_surround", 100);
	pubLaserCloudMap = nh.advertise<sensor_msgs::PointCloud2>("/laser_cloud_map", 100);
	pubLaserCloudFullRes = nh.advertise<sensor_msgs::PointCloud2>("/velodyne_cloud_registered", 100);
	pubOdomAftMapped = nh.advertise<nav_msgs::Odometry>("/aft_mapped_to_init", 100);
	pubOdomAftMappedHighFrec = nh.advertise<nav_msgs::Odometry>("/aft_mapped_to_init_high_frec", 100);
	pubLaserAfterMappedPath = nh.advertise<nav_msgs::Path>("/aft_mapped_path", 100);
- 1
- 2
- 3
- 4
- 5
- 6
定义本节点发布的5种消息
	//地图的数组进行 重置 分配地址
	for (int i = 0; i < laserCloudNum; i++)
	{
		//后端地图的数组 用栅格的形式
		laserCloudCornerArray[i].reset(new pcl::PointCloud<PointType>());
		laserCloudSurfArray[i].reset(new pcl::PointCloud<PointType>());
	}
- 1
- 2
- 3
- 4
- 5
- 6
- 7
地图的数组进行 重置 分配地址
std::thread mapping_process{process};
- 1
主线程
process是一个 while(1)的循环
void process()
{
	while(1)
	{
- 1
- 2
- 3
- 4
主循环一直运行. 后端的优化部分也就是在这主循环里一直执行.
这个就是ALOAM后端的整体代码结构
文章来源: blog.csdn.net,作者:月照银海似蛟龙,版权归原作者所有,如需转载,请联系作者。
原文链接:blog.csdn.net/qq_32761549/article/details/125780117

- 点赞
- 收藏
- 关注作者
评论(0)