yolo-v3模型测试及测试结果转化
yolo-v3模型测试及测试结果转化
1.制作2019_test.txt文件
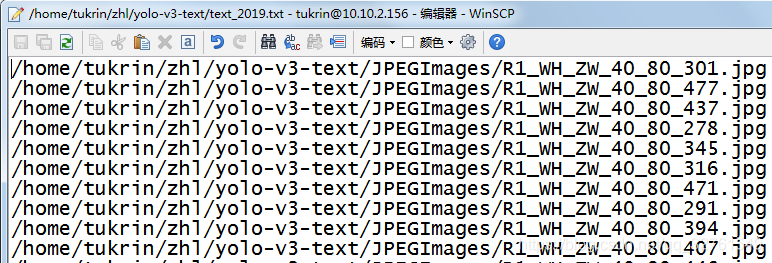
像制作训练集时生产2019_train.txt(文件内容为包含所有训练图片的路径和文件名)一样,制作2019_test.txt文件(文件内容为包含所有测试图片的路径和文件名)。

采用以下程序来生成测试集的 test.txt 文件,其中包含每个测试样本的路径和文件名,注意此处包含后缀
# coding=utf-8
import os
from os import listdir, getcwd
from os.path import join
if __name__ == '__main__':  # 只有在文件作为脚本文件直接执行时才执行下面代码
    source_folder='Your Path' #图片保存的路径
    dest='Your Path/test.txt' #写有图片的名字的路径
    file_list=os.listdir(source_folder)#获取各图片的名称
    test_file=open(dest,'a')    #追加写打开
    count = 0
    for file_obj in file_list:
        count += 1
        file_path=os.path.join(source_folder,file_obj) #路径拼接  指向 图片文件的路径
        # file_name,file_extend=os.path.splitext(file_path) #分离文件名与扩展名 file_name为去掉扩展名的图片名称
        test_file.write(file_path+'\n')  #写入去掉扩展名的文件名名称
    test_file.close() #关闭文件
- 1
- 2
- 3
- 4
- 5
- 6
- 7
- 8
- 9
- 10
- 11
- 12
- 13
- 14
- 15
- 16
然后在该.py文件的路径下,执行如下命令:
python create_test_txt.py
- 1
2. 修改./darknet/cfg/voc.data文件
修改./cfg/voc.data文件中的valid部分,将其设置为第1步中生成的test.txt路径。
classes= # 不用改
train  = # 不用改
valid  = /Your Path/test.txt
names = # 不用改
backup = # 不用改`在这里插入代码片`
- 1
- 2
- 3
- 4
- 5
3. 修改./darknet/cfg/yolov3-voc.cfg文件
将测试模式打开,将训练模式关闭,如下:
[net]
# Testing
batch=1
subdivisions=1
# Training
# batch=64
# subdivisions=16
- 1
- 2
- 3
- 4
- 5
- 6
- 7
4. 执行测试语句
在命令窗口的./darknet路径下,执行以下语句:
./darknet detector valid cfg/voc.data cfg/yolov3-voc.cfg backup/yolov3-voc_final.weights
- 1
执行完毕之后会在./darknet/result/ 路径下生成若干个txt文件(个数和类别数一致),名称为comp4_det_test_[class_name].txt,这便是预测结果文件。
5. 转换预测结果格式
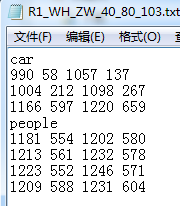
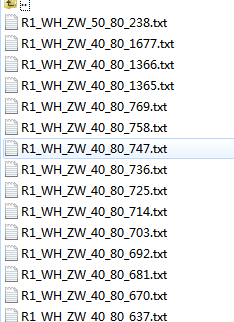
通常我们希望预测结果保存在一个个以图片名称为名字的txt文件中,例如,我所期望的文件格式如下:

那么我们可以使用如下程序进行格式转换:
注意:
1)需要将第4步生成的若干个txt文件重命名为:类名.txt
2)将这些类名.txt统一放到一个空文件夹下,即下面程序中的 ‘Your Path\raw_txt’
3)创建一个用来存放转换后txt文件的文件夹,即下面程序中的 ‘Your Path\converted_txt’
import os

def creat_mapping_dic(result_txt, threshold=0.0):  # 设置一个阈值,用来删掉置信度低的预测框信息

    mapping_dic = {}  # 创建一个字典,用来存放信息
    txt = open(result_txt, 'r').readlines()  # 按行读取TXT文件

    for info in txt:  # 提取每一行
        info = info.split()  # 将每一行(每个预测框)的信息切分开

        photo_name = info[0]  # 图片名称
        probably = float(info[1])  # 当前预测框的置信度
        if probably < threshold:
            continue
        else:
            xmin = int(float(info[2]))
            ymin = int(float(info[3]))
            xmax = int(float(info[4]))
            ymax = int(float(info[5]))

            position = [xmin, ymin, xmax, ymax]

            if photo_name not in mapping_dic:  # mapping_dic的每个元素的key值为图片名称,value为一个二维list,其中存放当前图片的若干个预测框的位置
                mapping_dic[photo_name] = []
            mapping_dic[photo_name].append(position)
    return mapping_dic


def creat_result_txt(raw_txt_path, target_path, threshold=0.0):  # raw_txt_path为yolo按类输出的TXT的路径 target_path 为转换后的TXT存放路径

    all_files = os.listdir(raw_txt_path)  # 获取所以的原始txt

    for each_file in all_files:  # 遍历所有的原始txt文件,each_file为一个文件名,例如‘car.txt’

        each_file_path = os.path.join(raw_txt_path, each_file)  # 获取当前txt的路径
        map_dic = creat_mapping_dic(each_file_path, threshold=threshold)  # 对当前txt生成map_dic

        for each_map in map_dic:  # 遍历当前存放信息的字典
            target_txt = each_map + '.txt'  # 生成目标txt文件名
            target_txt_path = os.path.join(target_path, target_txt)  # 生成目标txt路径

            if target_txt not in os.listdir(target_path):
                txt_write = open(target_txt_path, 'w')  # 如果目标路径下没有这个目标txt文件,则创建它,即模式设置为“覆盖”
            else:
                txt_write = open(target_txt_path, 'a')  # 如果目标路径下有这个目标txt文件,则将模式设置为“追加”

            class_name = each_file[:-4]  # 获取当前原始txt的类名
            txt_write.write(class_name)  # 对目标txt写入类名
            txt_write.write('\n')  # 换行

            for info in map_dic[each_map]:  # 遍历某张图片的所有预测框信息
                txt_write.write(str(info[0]) + ' ' + str(info[1]) +
                                ' ' + str(info[2]) + ' ' + str(info[3]) + ' ')  # 写入预测框信息
                txt_write.write('\n')  # 换行

creat_result_txt('Your Path\\raw_txt',
                 'Your Path\converted_txt',
                 threshold=0.1)
- 1
- 2
- 3
- 4
- 5
- 6
- 7
- 8
- 9
- 10
- 11
- 12
- 13
- 14
- 15
- 16
- 17
- 18
- 19
- 20
- 21
- 22
- 23
- 24
- 25
- 26
- 27
- 28
- 29
- 30
- 31
- 32
- 33
- 34
- 35
- 36
- 37
- 38
- 39
- 40
- 41
- 42
- 43
- 44
- 45
- 46
- 47
- 48
- 49
- 50
- 51
- 52
- 53
- 54
- 55
- 56
- 57
- 58
运行完毕后,在Your Path\converted_txt文件夹中会产生每个图片对应得检测结果

至此完成了 基于yolo-v3 针对自己数据集得检测与测试 结果转化 。
文章来源: blog.csdn.net,作者:月照银海似蛟龙,版权归原作者所有,如需转载,请联系作者。
原文链接:blog.csdn.net/qq_32761549/article/details/90054023
- 点赞
- 收藏
- 关注作者


评论(0)