openEuler安装GPU、CUDA、cudnn

openEuler安装GPU、CUDA、cudnn
准备工作
-
查看当前服务器显卡。
查看VGA接口显卡:lspci | grep VGA
查看Nvidia:lspci | grep NVIDIA
[root@Malluma ~]# lspci | grep VGA
05:00.0 VGA compatible controller: Huawei Technologies Co., Ltd. Hi1710 [iBMC Intelligent Management system chip w/VGA support] (rev 01)
[root@Malluma ~]# lspci | grep NVIDIA
01:00.0 3D controller: NVIDIA Corporation Device 20f1 (rev a1)
81:00.0 3D controller: NVIDIA Corporation Device 20f1 (rev a1)
这里结果中的“00:”前缀,表示该显卡是虚拟机上挂载的显卡。
-
查看是否存在历史安装。
nvidia-smi
如果没有找到命令,则说明驱动没有安装。
再执行nvcc -V,如果没有找到命令,则说明CUDA没有安装。如果已经安装CUDA,则会出现如下结果:
[root@Malluma ~]# nvcc -V nvcc: NVIDIA (R) Cuda compiler driver Copyright (c) 2005-2021 NVIDIA Corporation Built on Wed_Jul_14_19:41:28_PDT_2021 Cuda compilation tools, release 11.4, V11.4.100 Build cuda_11.4.r11.4/compiler.30188945_0 -
禁用nouveau。
-
查看系统自带的驱动:
lsmod | grep nouveau
如果有结果,则说明存在nouveau。没有则直接跳过这一步。
-
编辑如下文件:
vim /usr/lib/modprobe.d/dist-blacklist.conf
然后在最后添加如下内容:
blacklist nouveau
options nouveau modeset=0
Nouveau是由第三方为NVIDIA显卡开发的一个开源3D驱动,也没能得到NVIDIA的认可与支持。虽然Nouveau Gallium3D在游戏速度上还远远无法和NVIDIA官方私有驱动相提并论,不过确让Linux更容易的应对各种复杂的NVIDIA显卡环境,让用户安装完系统即可进入桌面并且有不错的显示效果,所以,很多Linux发行版默认集成了Nouveau驱动,在遇到NVIDIA显卡时默认安装。企业版的Linux更是如此,几乎所有支持图形界面的企业Linux发行版都将Nouveau收入其中。
那为什么要禁用它呢?
上面的介绍里面已经提到了,它就是一个显卡驱动,虽然初衷是好的,但是并没有得到NVIDIA的认可,所以对于显卡的调用来说,是不如现在官方提供的驱动来的效果好的。所以,一般情况下, 我们都会选择安装官方的驱动,但是两个驱动难免又互掐的场面,这就会导致系统莫名重启(这一点已经被年轻的我在生产环境测试过了,差点就我曾经有一份工作了,惨啊)。所以,为了我们的官方驱动,就只能忍痛割爱的把它禁用掉。
-
重启服务器。
重启后,发现已经成功禁用

-
-
安装基础rpm依赖包。
安装Nvidia驱动所需要的依赖包为kernel-devel、gcc、dkms。
验证CUDA,编译并运行验证Sample代码所需要的依赖包为gcc-c++。
-
确认并安装对应服务器内核版本的kernel-devel包。
首先确认当前服务器的内核版本。
[root@Malluma ~]# uname -r
4.19.90-2003.4.0.0036.oe1.aarch64
然后查看当前yum环境中提供的kernel-devel包的版本。
[root@Malluma ~]# yum list|grep kernel-devel
kernel-devel.aarch64                   4.19.90-2003.4.0.0036.oe1             @anaconda
yum提供的kernel-devel的版本是不是和当前服务器内核版本一致,如果一致则直接安装,不一致则更换一个和当前内核一致的版本。
-
(可选)添加一个合适的yum源。亦可以直接跳过这步。
因为默认的yum源没有dkms包。
华为镜像源配置对应的环境镜像: https://mirrors.huaweicloud.com/home
-
安装rpm依赖包。
yum install gcc dkms gcc-c++
-


安装Nvidia驱动
-
安装驱动。(选择最新版本即可)
首先下载对应的驱动,下载链接:
https://www.nvidia.cn/geforce/drivers/驱动路径下执行命令:./NVIDIA-Linux-aarch64-470.82.01.run --kernel-source-path=/usr/src/kernels/4.19.90-2003.4.0.0036.oe1.aarch64/
本机环境执行的是:./NVIDIA-Linux-x86_64-515.57.run --kernel-source-path=/usr/src/kernels/5.10.0-60.41.0.70.oe2203.x86_64/ -no-x-check因为远程安装会检测x server,要让它不检测
Would you like to run the nvidia-xconfig utility to automatically update
your X configuration file so that the NVIDIA X driver will be used when you
restart X? Any pre-existing X configuration file will be backed up.
选择NO说明:注意如下选项:
Would you like to register the kernel module sources with DKMS? This will allow DKMS to automatically build a new module, if you install a different kernel later.这个服务器安装选择YES,本地安装选择No;安装结束后,执行如下命令可以查看显卡信息:nvidia-smi。
-
查看显卡基本信息。
执行nvidia-smi命令后,能看到类似下面对表格。
+-----------------------------------------------------------------------------+
| NVIDIA-SMI 410.73       Driver Version: 410.73       CUDA Version: 10.0     |
|-------------------------------+----------------------+----------------------+
| GPU  Name        Persistence-M| Bus-Id        Disp.A | Volatile Uncorr. ECC |
| Fan  Temp  Perf  Pwr:Usage/Cap|         Memory-Usage | GPU-Util  Compute M. |
|===============================+======================+======================|
|   0  GeForce GTX 108...  Off  | 00000000:01:00.0  On |                  N/A |
| 35%   44C    P8    18W / 250W |   4694MiB / 11176MiB |      0%      Default |
+-------------------------------+----------------------+----------------------+
|   1  GeForce GTX 108...  Off  | 00000000:02:00.0 Off |                  N/A |
| 33%   38C    P8    17W / 250W |     12MiB / 11178MiB |      0%      Default |
+-------------------------------+----------------------+----------------------+
+-----------------------------------------------------------------------------+
| Processes:                                                       GPU Memory |
|  GPU       PID   Type   Process name                             Usage      |
|=============================================================================|
|    0      1846      G   /usr/bin/X                                    29MiB |
|    0      1903      G   /usr/bin/gnome-shell                          15MiB |
|    0     11521      C   ./darknet_gpu                               2319MiB |
|    0     32297      C   ./darknet                                   2319MiB |
+-----------------------------------------------------------------------------+
第一行表示当前显卡驱动的版本和显卡支持的CUDA的版本;这里支持CUDA的版本是只能够支持的最高版本,是可以向下兼容的。
参数 说明 GPU 本机的GPU编号。 NAME GPU名称。 Persistence-M 驱动常驻模式,如果设置为ON,则GPU功耗大但是启动新deGPU应用花费的时间更少。 Fan 风扇转速百分比。 Temp 显卡温度。 Perf 当前的性能状态,P0最高,P12最低。 Pwr 当前能耗。 Bus-Id GPU总线。 Disp.A GPU显示功能是否初始化。 Memory-Usage 显存的使用情况。 Volatile GPU-Util 浮动的GPU利用率。 ECC 错误码。 Compute M 计算模式。 Processes 每块GPU的进程情况。
 说明:
说明:
安装CUDA和cuDNN
-
确定需下载的版本。此处我准备的是CUDA 11.6,为了pytorch。
CUDA:GPU编程的语言函数。CUDA 版本 (对应)> Tensorflow 版本。
cuDNN:深度学习/矩阵运算的加速库。 CUDA 版本 (对应)> cuDNN 版本。
显卡驱动(CUDA驱动):向下兼容的,可以一直保持最新。
-
安装cuda。
下载链接https://developer.nvidia.com/cuda-toolkit-archive
sh cuda_11.4.1_470.57.02_linux_sbsa.run
sudo sh cuda_11.6.0_510.39.01_linux.run-
将文件翻到最后,进行一些选项配置。
Do you accept the above EULA? (accept/decline/quit):
accept/decline/quit: accept
如已安装高版本,不安装以下工具。取消选择驱动,不安装老版本驱动
Install the CUDA 9.0 Toolkit?
(y)es/(n)o/(q)uit: y
Enter Toolkit Location
 [ default is /usr/local/cuda-9.0 ]:
Do you want to install a symbolic link at /usr/local/cuda?
(y)es/(n)o/(q)uit: y
Install the CUDA 9.0 Samples?
(y)es/(n)o/(q)uit: y
Enter CUDA Samples Location
 [ default is /root ]:
Installing the CUDA Toolkit in /usr/local/cuda-11.4 ...
===========
= Summary =
===========
Driver:   Not Selected
Toolkit:  Installed in /usr/local/cuda-11.4
Samples:  Installed in /root, but missing recommended libraries
Please make sure that
 -   PATH includes /usr/local/cuda-11.4/bin
 -   LD_LIBRARY_PATH includes /usr/local/cuda-9.0/lib64, or, add /usr/local/cuda-11.4/lib64 to /etc/ld.so.conf and run ldconfig as root
To uninstall the CUDA Toolkit, run the uninstall script in /usr/local/cuda-11.4/bin
Please see CUDA_Installation_Guide_Linux.pdf in /usr/local/cuda-11.4/doc/pdf for detailed information on setting up CUDA.
***WARNING: Incomplete installation! This installation did not install the CUDA Driver. A driver of version at least 384.00 is required for CUDA 9.0 functionality to work.
To install the driver using this installer, run the following command, replacing <CudaInstaller> with the name of this run file:
    sudo <CudaInstaller>.run -silent -driver
Logfile is /tmp/cuda_install_24940.log


实际情况


(base) [root@localhost 下载]# sudo sh cuda_11.6.0_510.39.01_linux.run
===========
= Summary =
===========

Driver:   Not Selected
Toolkit:  Installed in /usr/local/cuda-11.6/

Please make sure that
 -   PATH includes /usr/local/cuda-11.6/bin
 -   LD_LIBRARY_PATH includes /usr/local/cuda-11.6/lib64, or, add /usr/local/cuda-11.6/lib64 to /etc/ld.so.conf and run ldconfig as root

To uninstall the CUDA Toolkit, run cuda-uninstaller in /usr/local/cuda-11.6/bin
***WARNING: Incomplete installation! This installation did not install the CUDA Driver. A driver of version at least 510.00 is required for CUDA 11.6 functionality to work.
To install the driver using this installer, run the following command, replacing <CudaInstaller> with the name of this run file:
    sudo <CudaInstaller>.run --silent --driver

Logfile is /var/log/cuda-installer.log
首次安装,选择yes,修改软连接
他说的不完整,不一定就是不完整了,我们有驱动,哪里还需要安装驱动呢。
-
配置环境变量,修改/etc/profile文件。
在文件中添加:
export PATH=${PATH}:/usr/local/cuda-11.4/bin export LD_LIBRARY_PATH=${LD_LIBRARY_PATH}:/usr/local/cuda-11.4/lib64 在本机上 export PATH=${PATH}:/usr/local/cuda-11.6/bin export LD_LIBRARY_PATH=${LD_LIBRARY_PATH}:/usr/local/cuda-11.6/lib64保存文件后执行source /etc/profile。
source之后会重新连接
-
验证CUDA版本。
nvcc -V
[root@localhost A100]# nvcc -V nvcc: NVIDIA (R) Cuda compiler driver Copyright (c) 2005-2021 NVIDIA Corporation Built on Wed_Jul_14_19:41:28_PDT_2021 Cuda compilation tools, release 11.4, V11.4.100 Build cuda_11.4.r11.4/compiler.30188945_0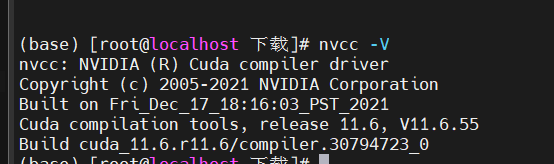如果前面安装了CUDA,这里可以执行如下操作:
[root@localhost A100]# cd /root/NVIDIA_CUDA-11.4_Samples/1_Utilities/deviceQuery
[root@localhost deviceQuery]# make

在本机上:
[root@localhost A100]# cd /root/NVIDIA_CUDA-11.6_Samples/1_Utilities/deviceQuery
[root@localhost deviceQuery]# make
编译完成后执行**./deviceQuery**。
[root@localhost deviceQuery]# ./deviceQuery
./deviceQuery Starting...
 CUDA Device Query (Runtime API) version (CUDART static linking)
Detected 2 CUDA Capable device(s)
Device 0: "NVIDIA A100-PCIE-40GB"
-
-
安装cuDNN。
下载链接:https://developer.nvidia.com/rdp/cudnn-archive
tar -xvf cudnn-11.4-linux-aarch64sbsa-v8.2.4.15.tgz
xz -d cudnn-linux-x86_64-8.4.0.27_cuda11.6-archive.tar.xz
tar -xvf cudnn-linux-x86_64-8.4.0.27_cuda11.6-archive.tar
cd cudnn-linux-x86_64-8.4.0.27_cuda11.6-archive
cp ./include/cudnn.h /usr/local/cuda-11.6/include
 cp ./lib/libcudnn\* /usr/local/cuda-11.6/lib64
将解压后的文件复制到cuda的安装后的目录中。
cp cuda/include/cudnn.h /usr/local/cuda-11.4/include
cp cuda/lib64/libcudnn* /usr/local/cuda-11.4/lib64
将复制后的文件全部添加“a+r”权限。
chmod a+r /usr/local/cuda-11.6/include/cudnn.h /usr/local/cuda-11.6/lib64/libcudnn*


安装完成。

- 点赞
- 收藏
- 关注作者
评论(0)