利用nginx+fancyindex美化目录索引

# 利用nginx+fancyindex美化目录索引
## 1.下载第三方插件
```sh
1)下载插件
[root@localhost ~]# wget -O fancyindex.zip https://github.com/aperezdc/ngx-fancyindex/archive/v0.4.3.zip
[root@localhost ~]# wget -O fancytheme.zip https://github.com/Naereen/Nginx-Fancyindex-Theme/archive/master.zip
2)解压
[root@localhost ~]# unzip fancyindex.zip
[root@localhost ~]# unzip fancytheme.zip
```
## 2.重新编译nginx
```sh
[root@localhost ~]# tar -zxvf nginx-1.16.0.tar.gz
[root@localhost ~]# cd nginx-1.16.0
[root@localhost ~]# ./configure --prefix=/data1/nginx --add-module=/root/ngx-fancyindex-0.4.3/ --user=root --group=root && make && make
```
## 3.准备目录索引路径
```sh
[root@localhost ~]# mkdir /data1/www/html/repo/{centos6.5,centos7.5,tomcat,fio,redis,elasticsearch,abase} -p
```
## 4.编写站点配置文件
conf.d目录需要手动创建,然后再主配置文件nginx.conf中配置一个include才能识别其他路径的配置文件
```sh
1.创建配置文件路径
[root@localhost ~]# mkdir /data1/nginx/conf/conf.d/
2.修改主配置文件
[root@localhost ~]# vim /data1/nginx/conf/nginx.conf
http {
......
include /data/nginx/conf/conf.d/*.conf
......
}
3.编写目录索引配置文件
[root@localhost ~]# cd /data1/nginx/conf/conf.d/
[root@localhost conf.d]# vim repo.conf
server {
listen 888;
server_name localhost;
location / {
fancyindex on;
fancyindex_localtime on;
fancyindex_exact_size off;
fancyindex_footer "/data/www/html/Nginx-Fancyindex-Theme-dark/footer.html";
fancyindex_header "/data/www/html/Nginx-Fancyindex-Theme-dark/header.html";
root /data1/www/html;
charset utf-8,gbk;
}
}
```
## 5.将fancyindex放到站点目录
```sh
[root@localhost ~]# mv /root/Nginx-Fancyindex-Theme-master/fancyindex.conf /data1/nginx/conf/
[root@localhost ~]# mv /root/Nginx-Fancyindex-Theme-master/Nginx-Fancyindex-Theme-dark/ /data1/www/html/
将站点标题改成自己的称谓
[root@localhost ~]# vim /data/www/html/Nginx-Fancyindex-Theme-dark/header.html
修改最后一行即可
<h1>jiangxl_20200714
```
## 6.启动nginx
```sh
[root@localhost ~]# nginx -t
[root@localhost ~]# nginx
```
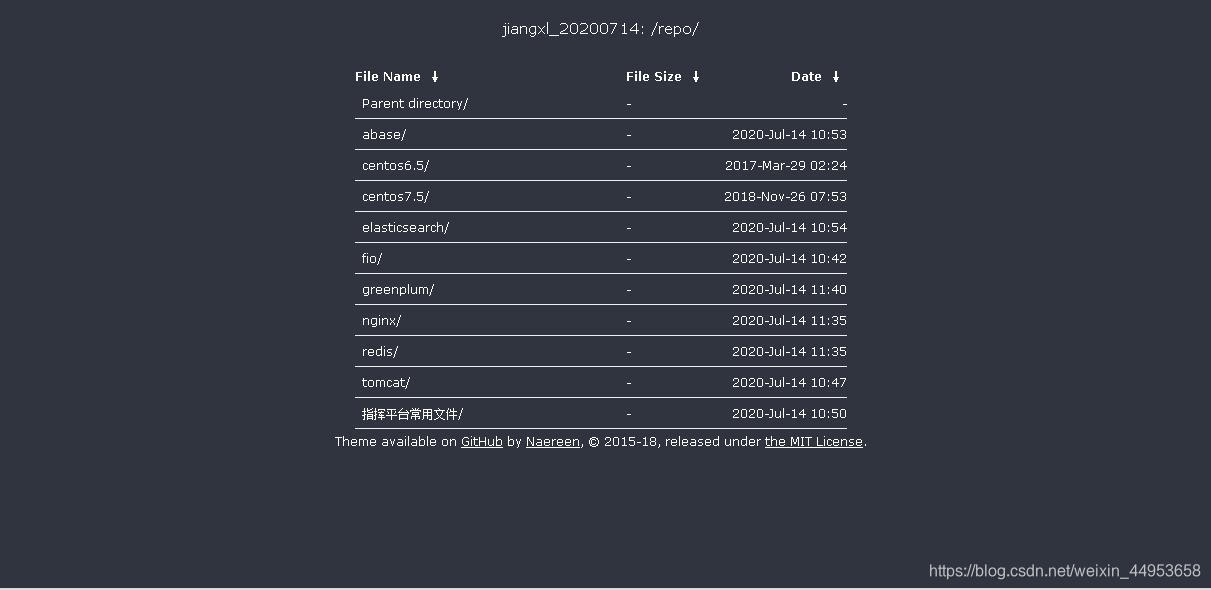
## 7.访问
访问http://192.1.44.123:888/repo

- 点赞
- 收藏
- 关注作者
评论(0)