如何制作一个可以自动更新的Github个人主页
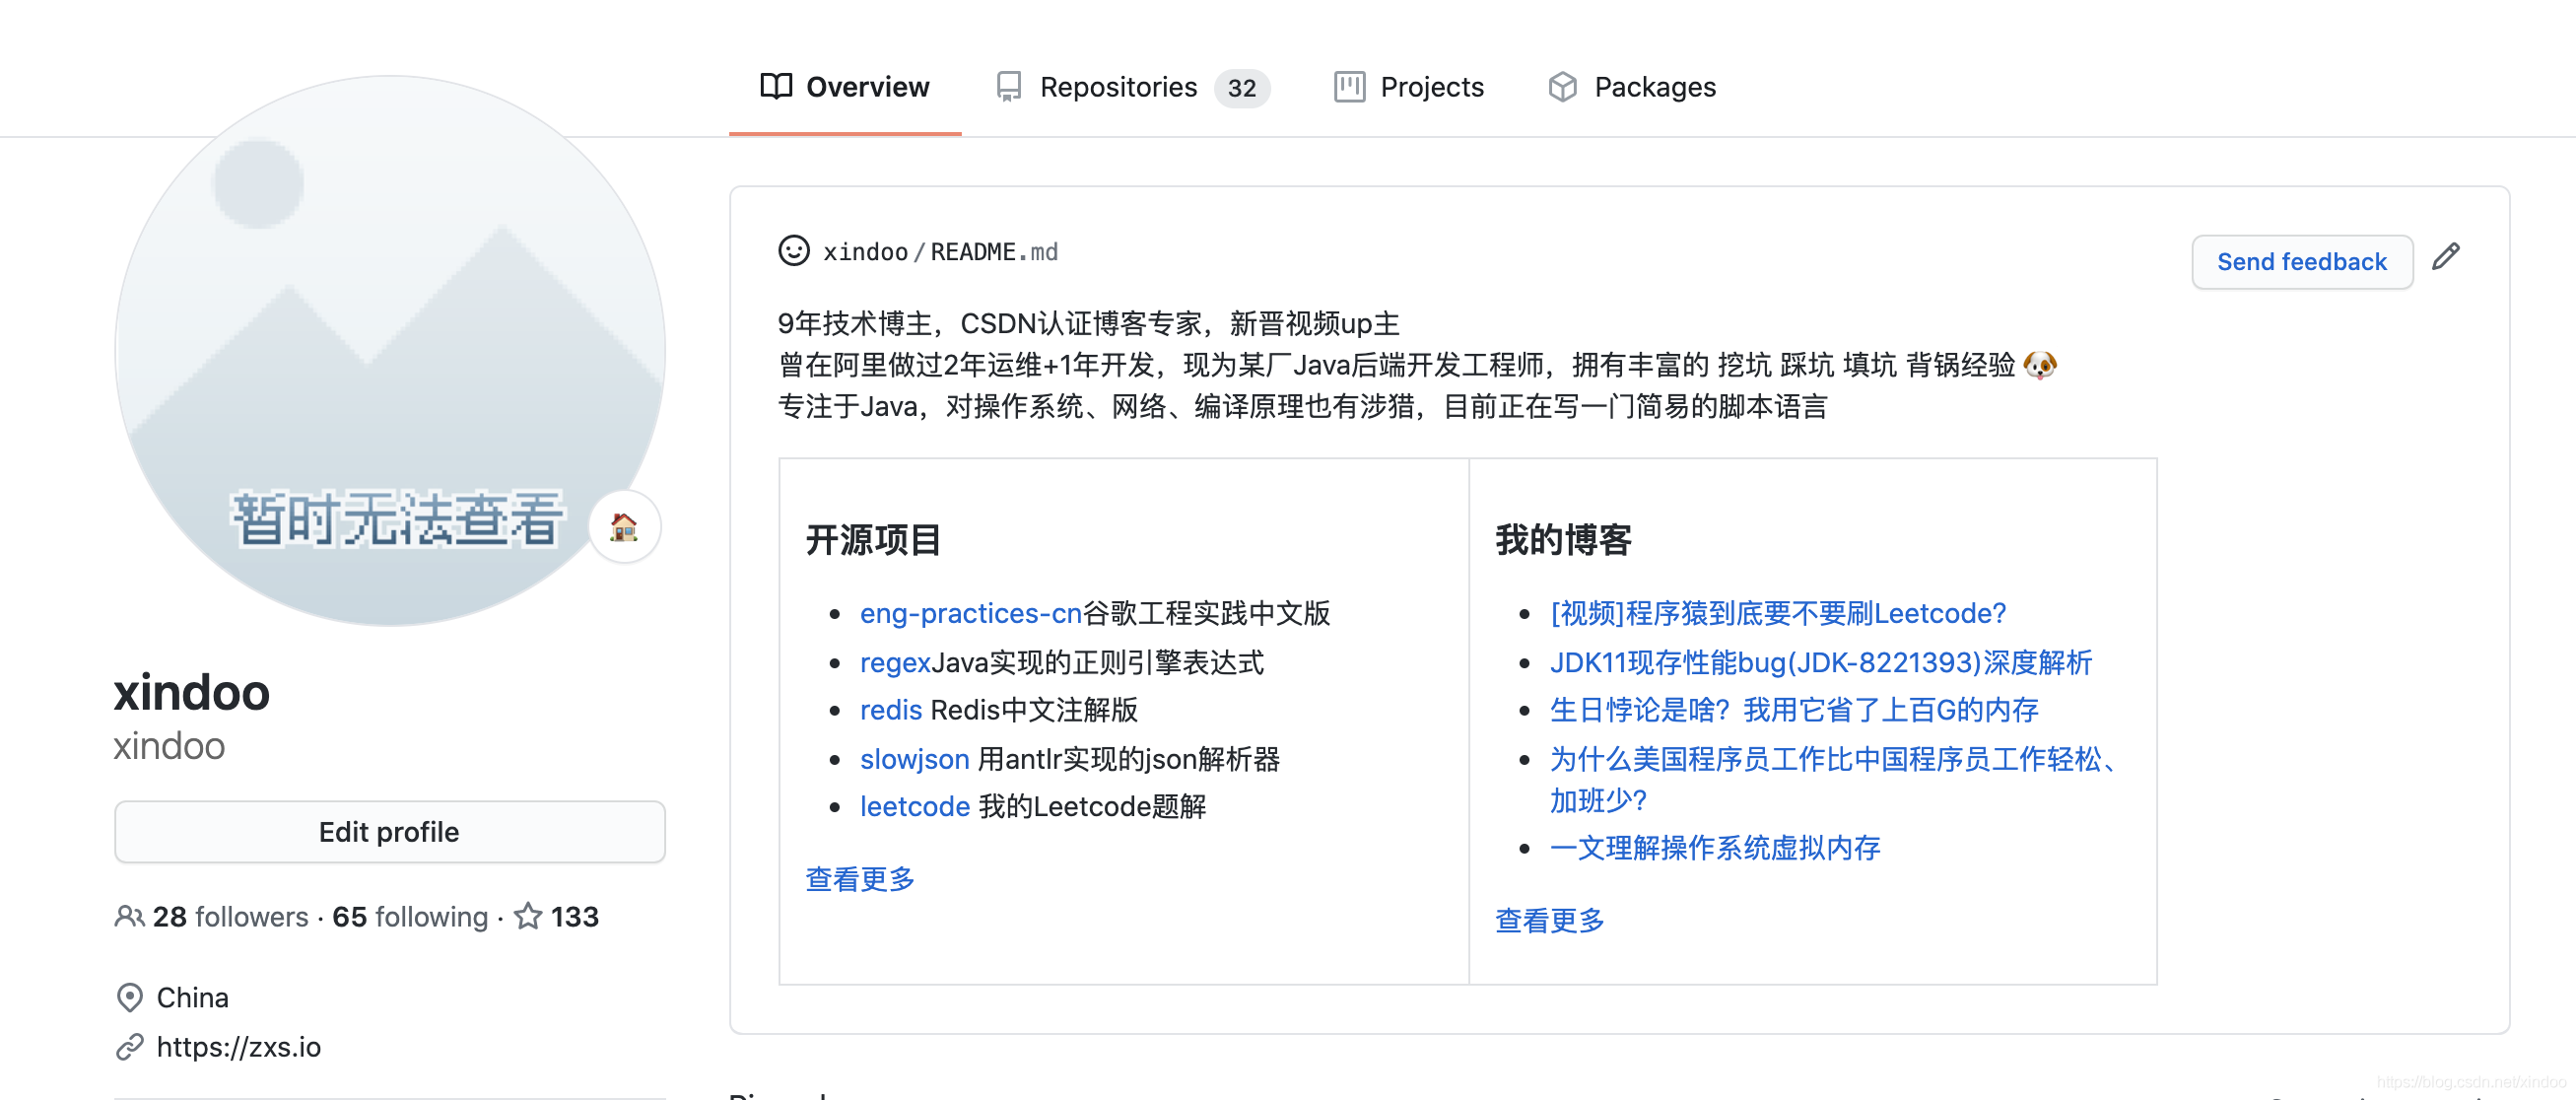
Github近期上线一个新的功能,就是你在自己账号下创建一个和自己用户名同名的仓库,并在仓库下创建一个README.md文件,这个文件就会被展示在你的Github个人主页。源于markdown的强大描述能力,你可以在你的Github首页展示各种各样的信息,甚至有人直接将自己个人简历挂上面,极大丰富了Github的可玩性。

比如我的Github账号是xindoo ,我直接建个xindoo代码库,然后写个README.md文件介绍自己,最终展示效果如上图,大家也可以直接到我Github主页查看。不过我个人设计的就比较简陋了,但依赖于Markdown的能力,你可以充分发挥自己主观能动性,在README嵌入更多好玩的东西,比如给你看下Github前端小姐姐的主页,对比之下我直男的身份算是藏不住了。

不过如何制作一个好看的个人主页不是今天的主要内容,我主要是想教大家如何制作一个动态更新的主页。比如我自己的主页有一栏是我最新博文列表,我每写一篇新博文都要手动更新一次README.md? 当然不,我的主页是会自动定期更新上去的,怎么做到的???
思路很简单,首页动态更新的本质其实就是更新README.md文件,先问一个问题 Readme.md一定要手写吗? 用程序生成不好吗!!只要有个定时任务能自动抓取我博客首页的内容,然后更新README.md并push到github上就行,自己手头有服务器的人可能立马想到写一个crontab定时任务就能搞定,没服务器也不急,你接着往后看。
稍微有点编码水平的人用程序生成一个README.md并不难,拿我的主页来说吧,稍微有点难度的就是如何抓取我最新的博客。 其实本质上就是个简易的爬虫,CSDN目前并没有反扒机制,所以实现难度并不大,代码如下,我用了urllib3抓取html源码,并用了etree的xpath解析出了博客标题和地址。
# -*- coding: utf-8 -*-
import urllib3
from lxml import etree
import html
import re

blogUrl = 'https://xindoo.blog.csdn.net/'

headers={'User-Agent': 'Mozilla/5.0 (Macintosh; Intel Mac OS X 10_15_6) AppleWebKit/537.36 (KHTML, like Gecko) Chrome/84.0.4147.89 Safari/537.36'}

def addIntro(f):
	txt = '''
9年技术博主,CSDN认证博客专家,新晋视频up主
曾在阿里做过2年运维+1年开发,现为某厂Java后端开发工程师,拥有丰富的 挖坑 踩坑 填坑 背锅经验 🐶
专注于Java,对操作系统、网络、编译原理也有涉猎,目前正在写一门简易的脚本语言
'''
	f.write(txt)

def addProjectInfo(f):
	txt ='''
### 开源项目
- [eng-practices-cn](https://github.com/xindoo/eng-practices-cn)谷歌工程实践中文版
- [regex](https://github.com/xindoo/regex)Java实现的正则引擎表达式
- [redis](https://github.com/xindoo/redis) Redis中文注解版
- [slowjson](https://github.com/xindoo/slowjson) 用antlr实现的json解析器
- [leetcode](https://github.com/xindoo/leetcode) 我的Leetcode题解

[查看更多](https://github.com/xindoo/)
	'''
	f.write(txt)


def addBlogInfo(f):
	http = urllib3.PoolManager(num_pools=5, headers = headers)
	resp = http.request('GET', blogUrl)
	resp_tree = etree.HTML(resp.data.decode("utf-8"))
	html_data = resp_tree.xpath(".//div[@class='article-item-box csdn-tracking-statistics']/h4")
	f.write("\n### 我的博客\n")
	cnt = 0
	for i in html_data:
		if cnt >= 5:
			break
		title = i.xpath('./a/text()')[1].strip()
		url = i.xpath('./a/@href')[0]
		item = '- [%s](%s)\n' % (title, url)
		f.write(item)
		cnt = cnt + 1
	f.write('\n[查看更多](https://xindoo.blog.csdn.net/)\n')

f = open('README.md', 'w+')
addIntro(f)
f.write('<table><tr>\n')
f.write('<td valign="top" width="50%">\n')

addProjectInfo(f)
f.write('\n</td>\n')
f.write('<td valign="top" width="50%">\n')
addBlogInfo(f)
f.write('\n</td>\n')
f.write('</tr></table>\n')
f.close
- 1
- 2
- 3
- 4
- 5
- 6
- 7
- 8
- 9
- 10
- 11
- 12
- 13
- 14
- 15
- 16
- 17
- 18
- 19
- 20
- 21
- 22
- 23
- 24
- 25
- 26
- 27
- 28
- 29
- 30
- 31
- 32
- 33
- 34
- 35
- 36
- 37
- 38
- 39
- 40
- 41
- 42
- 43
- 44
- 45
- 46
- 47
- 48
- 49
- 50
- 51
- 52
- 53
- 54
- 55
- 56
- 57
- 58
- 59
- 60
- 61
有了上面代码,你只需要在你服务器设置个crontab,执行这段python代码,然后git commit -a"update" git push 就可以拥有我和同款的Github首页了。
你没有自己的服务器也没关系,Github给你免费的服务器让你用,这就是Github之前推出的Actions功能,我理解它的本质就是Github给你提供了免费的容器,你可以在容器里执行某些workflow,当然也可以运行一些自定义的代码,更多Actions的内容可以参考下阮一峰老师的GitHub Actions 入门教程,当然你也可以直接看Actions的官方文档。
为了实现无服务器的自动更新,我们只需要让上面这段python运行在github Actions之上就可以了,你只需要在你代码仓库 ->Actions -> 新建Workflow,github会自动帮你在你仓库下面创建 .github/workflows/${FILENAME}.yml 文件,你只需要按格式要求修改书写文件即可,具体书写方式参考上述文档,这里不再展开。

最后给大家看下我的workflow文件,你也可以直接在我github仓库查看该文件xindoo/.github/workflows/build.yml
# This is a basic workflow to help you get started with Actions

name: build readme

# Controls when the action will run. Triggers the workflow on push or pull request
# events but only for the master branch
on:   # 触发时机
  push:
    branches: [ master ]  # master有更新
  schedule:
    - cron:  '0 */6 * * *'  # 每6小时运行一次
# A workflow run is made up of one or more jobs that can run sequentially or in parallel
jobs:
  # This workflow contains a single job called "build"
  build:
    # The type of runner that the job will run on
    runs-on: ubuntu-latest   # 使用最新版ubuntu镜像

    # Steps represent a sequence of tasks that will be executed as part of the job
    steps:
    # Checks-out your repository under $GITHUB_WORKSPACE, so your job can access it
    - uses: actions/checkout@v2

    - name: Setup Python  # 安装python环境
      uses: actions/setup-python@v2.1.1

    - name: Install Python dependencies  # 安装python爬虫依赖包
      run: python -m pip install urllib3 lxml

    - name: Run python   # 生成新的README.md文件
      run: python generateReadme.py

    - name: Record time
      run: echo `date` > date.log

    - name: Commit and push if changed   # 将README.md更新到仓库
      run: |
        git diff
        git config --global user.email "xindoo@zxs.io"
        git config --global user.name "zxs"
        git add -A
        git commit -m "Updated Readme" || exit
        git push
- 1
- 2
- 3
- 4
- 5
- 6
- 7
- 8
- 9
- 10
- 11
- 12
- 13
- 14
- 15
- 16
- 17
- 18
- 19
- 20
- 21
- 22
- 23
- 24
- 25
- 26
- 27
- 28
- 29
- 30
- 31
- 32
- 33
- 34
- 35
- 36
- 37
- 38
- 39
- 40
- 41
- 42
- 43
创作不易,如果觉得我的文章对你有帮助,欢迎点赞+关注,我会分享更多有趣又有深度的内容。
文章来源: xindoo.blog.csdn.net,作者:xindoo,版权归原作者所有,如需转载,请联系作者。
原文链接:xindoo.blog.csdn.net/article/details/107897691
- 点赞
- 收藏
- 关注作者


评论(0)