人脸检测高级:疲劳检测

今天我们实现疲劳检测。 如果眼睛已经闭上了一段时间,我们会认为他们开始打瞌睡并发出警报来唤醒他们并引起他们的注意。我们测试一段视频来展示效果。同时代码中保留开启摄像头的的代码,取消注释即可使用。

使用 OpenCV 构建犯困检测器
要开始我们的实现,打开一个新文件,将其命名为 detect_drowsiness.py ,并插入以下代码:
# import the necessary packages
from scipy.spatial import distance as dist
from imutils.video import VideoStream
from imutils import face_utils
from threading import Thread
import numpy as np
import playsound
import argparse
import imutils
import time
import dlib
import cv2
导入们所需的 Python 包。
我们还需要 imutils 包,我的一系列计算机视觉和图像处理功能,以便更轻松地使用 OpenCV。
如果您的系统上还没有安装 imutils,您可以通过以下方式安装/升级 imutils:
pip install --upgrade imutils
还将导入 Thread 类,以便我们可以在与主线程不同的线程中播放我们的警报,以确保我们的脚本不会在警报响起时暂停执行。
为了真正播放我们的 WAV/MP3 闹钟,我们需要 playsound 库,这是一个纯 Python 的跨平台实现,用于播放简单的声音。
playsound 库可以通过 pip 方便地安装:
pip install playsound
但是,如果您使用的是 macOS(就像我为这个项目所做的那样),您还需要安装 pyobjc,否则当您实际尝试播放声音时,您将收到与 AppKit 相关的错误:
pip install pyobjc
接下来,我们需要定义 sound_alarm 函数,该函数播放音频文件:
def sound_alarm(path):
	# play an alarm sound
	playsound.playsound(path)
定义 eye_aspect_ratio 函数,该函数用于计算垂直眼睛界标之间的距离与水平眼睛界标之间的距离之比:
def eye_aspect_ratio(eye):
	# compute the euclidean distances between the two sets of
	# vertical eye landmarks (x, y)-coordinates
	A = dist.euclidean(eye[1], eye[5])
	B = dist.euclidean(eye[2], eye[4])
	# compute the euclidean distance between the horizontal
	# eye landmark (x, y)-coordinates
	C = dist.euclidean(eye[0], eye[3])
	# compute the eye aspect ratio
	ear = (A + B) / (2.0 * C)
	# return the eye aspect ratio
	return ear
由于OpenCV不能直接绘制中文,我们还需定义绘制中文的方法:
def cv2ImgAddText(img, text, left, top, textColor=(0, 255, 0), textSize=20):
    if (isinstance(img, np.ndarray)):  # 判断是否OpenCV图片类型
        img = Image.fromarray(cv2.cvtColor(img, cv2.COLOR_BGR2RGB))
    # 创建一个可以在给定图像上绘图的对象
    draw = ImageDraw.Draw(img)
    # 字体的格式
    fontStyle = ImageFont.truetype(
        "font/simsun.ttc", textSize, encoding="utf-8")
    # 绘制文本
    draw.text((left, top), text, textColor, font=fontStyle,stroke_width=2)
    # 转换回OpenCV格式
    return cv2.cvtColor(np.asarray(img), cv2.COLOR_RGB2BGR)
接下来,定义命令行参数:
# construct the argument parse and parse the arguments
ap = argparse.ArgumentParser()
ap.add_argument("-p", "--shape-predictor", required=True,
	help="path to facial landmark predictor")
ap.add_argument("-v", "--video", type=str, default="",
                help="path to input video file")
ap.add_argument("-a", "--alarm", type=str, default="",
	help="path alarm .WAV file")
ap.add_argument("-w", "--webcam", type=int, default=0,
	help="index of webcam on system")
args = vars(ap.parse_args())
犯困检测器需要一个命令行参数,后跟两个可选参数,每个参数的详细信息如下:
–shape-predictor :这是 dlib 的预训练面部标志检测器的路径。 您可以使用本博文底部的“下载”部分将检测器和本教程的源代码一起下载。
–video:视频文件。本文用视频文件测试。
–alarm :您可以在此处选择指定要用作警报的输入音频文件的路径。
–webcam :此整数控制内置网络摄像头/USB 摄像头的索引。
定义了命令行参数,我们还需要定义几个重要的变量:
# define two constants, one for the eye aspect ratio to indicate
# blink and then a second constant for the number of consecutive
# frames the eye must be below the threshold for to set off the
# alarm
EYE_AR_THRESH = 0.3
EYE_AR_CONSEC_FRAMES = 48
# initialize the frame counter as well as a boolean used to
# indicate if the alarm is going off
COUNTER = 0
ALARM_ON = False
定义了 EYE_AR_THRESH。如果眼睛纵横比低于此阈值,我们将开始计算人闭上眼睛的帧数。
如果该人闭上眼睛的帧数超过 EYE_AR_CONSEC_FRAMES,我们将发出警报。
在实验中,我发现 0.3 的 EYE_AR_THRESH 在各种情况下都能很好地工作(尽管您可能需要为自己的应用程序自己调整它)。
我还将 EYE_AR_CONSEC_FRAMES 设置为 48 ,这意味着如果一个人连续闭眼 48 帧,我们将播放警报声。
您可以通过降低 EYE_AR_CONSEC_FRAMES 来使疲劳检测器更敏感——同样,您可以通过增加它来降低疲劳检测器的敏感度。
定义了 COUNTER,即眼睛纵横比低于 EYE_AR_THRESH 的连续帧的总数。
如果 COUNTER 超过 EYE_AR_CONSEC_FRAMES ,那么我们将更新布尔值 ALARM_ON。
dlib 库附带了一个基于定向梯度的人脸检测器的直方图以及一个人脸地标预测器——我们在以下代码块中实例化了这两个:
# initialize dlib's face detector (HOG-based) and then create
# the facial landmark predictor
print("[INFO] loading facial landmark predictor...")
detector = dlib.get_frontal_face_detector()
predictor = dlib.shape_predictor(args["shape_predictor"])
dlib 产生的面部标志是一个可索引的列表,见下图:
因此,要从一组面部标志中提取眼睛区域,我们只需要知道正确的数组切片索引:
# grab the indexes of the facial landmarks for the left and
# right eye, respectively
(lStart, lEnd) = face_utils.FACIAL_LANDMARKS_IDXS["left_eye"]
(rStart, rEnd) = face_utils.FACIAL_LANDMARKS_IDXS["right_eye"]
使用这些索引,我们将能够通过数组切片轻松提取眼睛区域。
我们现在准备启动我们的睡意检测器的核心:
# start the video stream thread
print("[INFO] starting video stream thread...")
vs = VideoStream(src=args["webcam"]).start()
time.sleep(1.0)
# loop over frames from the video stream
while True:
	# grab the frame from the threaded video file stream, resize
	# it, and convert it to grayscale
	# channels)
	frame = vs.read()
	frame = imutils.resize(frame, width=450)
	gray = cv2.cvtColor(frame, cv2.COLOR_BGR2GRAY)
	# detect faces in the grayscale frame
	rects = detector(gray, 0)
实例化 VideoStream。
暂停一秒钟,让相机传感器预热。
开始遍历视频流中的帧。
读取下一帧,然后我们通过将其大小调整为 450 像素的宽度并将其转换为灰度进行预处理。
应用 dlib 的人脸检测器来查找和定位图像中的人脸。
下一步是应用面部标志检测来定位面部的每个重要区域:
	# loop over the face detections
	for rect in rects:
		# determine the facial landmarks for the face region, then
		# convert the facial landmark (x, y)-coordinates to a NumPy
		# array
		shape = predictor(gray, rect)
		shape = face_utils.shape_to_np(shape)
		# extract the left and right eye coordinates, then use the
		# coordinates to compute the eye aspect ratio for both eyes
		leftEye = shape[lStart:lEnd]
		rightEye = shape[rStart:rEnd]
		leftEAR = eye_aspect_ratio(leftEye)
		rightEAR = eye_aspect_ratio(rightEye)
		# average the eye aspect ratio together for both eyes
		ear = (leftEAR + rightEAR) / 2.0
循环遍历检测到的每个人脸——在我们的实现中(特别与司机睡意有关),我们假设只有一张脸——司机——但我把这个 for 循环留在这里以防万一你想应用多张脸视频的技术。
对于每个检测到的人脸,我们应用 dlib 的面部标志检测器并将结果转换为 NumPy 数组。
使用 NumPy 数组切片,我们可以分别提取左眼和右眼的 (x, y) 坐标。
给定双眼的 (x, y) 坐标,我们然后计算它们的眼睛纵横比。
Soukupová 和 Čech 建议将两个眼睛的纵横比平均在一起以获得更好的估计。
然后,我们可以使用下面的 cv2.drawContours 函数可视化框架上的每个眼睛区域——这在我们尝试调试脚本并希望确保正确检测和定位眼睛时通常很有帮助:
		# compute the convex hull for the left and right eye, then
		# visualize each of the eyes
		leftEyeHull = cv2.convexHull(leftEye)
		rightEyeHull = cv2.convexHull(rightEye)
		cv2.drawContours(frame, [leftEyeHull], -1, (0, 255, 0), 1)
		cv2.drawContours(frame, [rightEyeHull], -1, (0, 255, 0), 1)
最后,我们现在准备检查视频流中的人是否出现犯困的症状:
		# check to see if the eye aspect ratio is below the blink
		# threshold, and if so, increment the blink frame counter
		if ear < EYE_AR_THRESH:
			COUNTER += 1
			# if the eyes were closed for a sufficient number of
			# then sound the alarm
			if COUNTER >= EYE_AR_CONSEC_FRAMES:
				# if the alarm is not on, turn it on
				if not ALARM_ON:
					ALARM_ON = True
					# check to see if an alarm file was supplied,
					# and if so, start a thread to have the alarm
					# sound played in the background
					if args["alarm"] != "":
						t = Thread(target=sound_alarm,
							args=(args["alarm"],))
						t.deamon = True
						t.start()
				# draw an alarm on the frame
                frame=cv2ImgAddText(frame,"醒醒,别睡!",10,30,(255, 0, 0),30)
		# otherwise, the eye aspect ratio is not below the blink
		# threshold, so reset the counter and alarm
		else:
			COUNTER = 0
			ALARM_ON = False
检查眼睛纵横比是否低于“眨眼/闭合”眼睛阈值 EYE_AR_THRESH 。
如果是,我们增加 COUNTER ,即该人闭上眼睛的连续帧总数。
如果 COUNTER 超过 EYE_AR_CONSEC_FRAMES,那么我们假设此人开始打瞌睡。
进行了另一次检查,以查看警报是否已打开——如果没有,我们将其打开。
处理播放警报声音,前提是在执行脚本时提供了 --alarm 路径。我们特别注意创建一个单独的线程来负责调用 sound_alarm 以确保我们的主程序在声音播放完毕之前不会被阻塞。
绘制文本 DROWSINESS ALERT!在我们的框架上——同样,这通常有助于调试,尤其是当您不使用 playsound 库时。
最后,第 136-138 行处理眼睛纵横比大于 EYE_AR_THRESH 的情况,表示眼睛是睁开的。如果眼睛是睁开的,我们重置计数器并确保警报关闭。
我们的睡意检测器中的最后一个代码块处理将输出帧显示到我们的屏幕上:
		# draw the computed eye aspect ratio on the frame to help
		# with debugging and setting the correct eye aspect ratio
		# thresholds and frame counters
		cv2.putText(frame, "EAR: {:.2f}".format(ear), (300, 30),
			cv2.FONT_HERSHEY_SIMPLEX, 0.7, (0, 0, 255), 2)

	# show the frame
	cv2.imshow("Frame", frame)
	key = cv2.waitKey(1) & 0xFF

	# if the `q` key was pressed, break from the loop
	if key == ord("q"):
		break
# do a bit of cleanup
cv2.destroyAllWindows()
vs.stop()
到这里编码完成!!!
测试疲劳检测器
运行指令:
python detect_drowsiness.py --shape-predictor shape_predictor_68_face_landmarks.dat --video 12.mp4 --alarm alarm.mp3
运行结果:
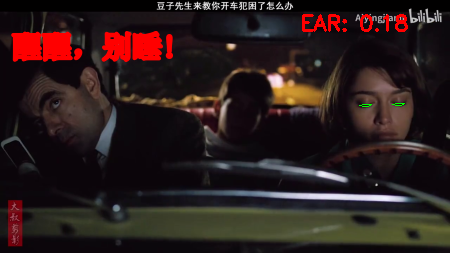
检测到打瞌睡就会发出提示,并将提醒打印在视频上面
完整代码如下:
https://download.csdn.net/download/hhhhhhhhhhwwwwwwwwww/67343016

- 点赞
- 收藏
- 关注作者
评论(0)