Android单元测试初探——Instrumentation

首先,我们来了解一下android的测试类的层次结构:

可以看出android中的测试方法主要有AndroidTextCase和InstrumentationTextCase。在这篇文章中,我将介绍Instrumentation这种测试方法,那么什么是Instrumentation?
Instrumentation和Activity有点类似,只不过Activity是需要一个界面的,而Instrumentation并不是这样的,我们可以将它理解为一种没有图形界面的,具有启动能力的,用于监控其他类(用Target Package声明)的工具类。
下面通过一个简单的例子来讲解Instrumentation的基本测试方法。
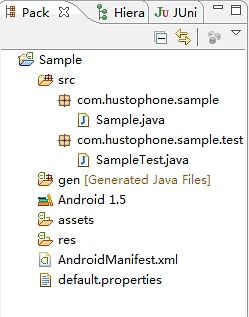
1.首先建立一个Android project,类名为Sample,代码如下:
-
public class Sample extends Activity {
-
private TextView myText = null;
-
private Button button = null;
-
-
@Override
-
public void onCreate(Bundle savedInstanceState) {
-
super.onCreate(savedInstanceState);
-
setContentView(R.layout.main);
-
myText = (TextView) findViewById(R.id.text1);
-
button = (Button) findViewById(R.id.button1);
-
button.setOnClickListener(new OnClickListener() {
-
@Override
-
public void onClick(View arg0) {
-
myText.setText("Hello Android");
-
}
-
});
-
}
-
-
public int add(int i, int j) {
-
return (i + j);
-
}
-
}
测试类的代码如下:
-
public class SampleTest extends InstrumentationTestCase {
-
private Sample sample = null;
-
private Button button = null;
-
private TextView text = null;
-
-
/*
-
* 初始设置
-
* @see junit.framework.TestCase#setUp()
-
*/
-
@Override
-
protected void setUp() {
-
try {
-
super.setUp();
-
} catch (Exception e) {
-
e.printStackTrace();
-
}
-
Intent intent = new Intent();
-
intent.setClassName("com.hustophone.sample", Sample.class.getName());
-
intent.setFlags(Intent.FLAG_ACTIVITY_NEW_TASK);
-
sample = (Sample) getInstrumentation().startActivitySync(intent);
-
text = (TextView) sample.findViewById(R.id.text1);
-
button = (Button) sample.findViewById(R.id.button1);
-
}
-
-
/*
-
* 垃圾清理与资源回收
-
* @see android.test.InstrumentationTestCase#tearDown()
-
*/
-
@Override
-
protected void tearDown() {
-
sample.finish();
-
try {
-
super.tearDown();
-
} catch (Exception e) {
-
e.printStackTrace();
-
}
-
}
-
-
/*
-
* 活动功能测试
-
*/
-
public void testActivity() throws Exception {
-
Log.v("testActivity", "test the Activity");
-
SystemClock.sleep(1500);
-
getInstrumentation().runOnMainSync(new PerformClick(button));
-
SystemClock.sleep(3000);
-
assertEquals("Hello Android", text.getText().toString());
-
}
-
-
/*
-
* 模拟按钮点击的接口
-
*/
-
private class PerformClick implements Runnable {
-
Button btn;
-
public PerformClick(Button button) {
-
btn = button;
-
}
-
-
public void run() {
-
btn.performClick();
-
}
-
}
-
-
/*
-
* 测试类中的方法
-
*/
-
public void testAdd() throws Exception{
-
String tag = "testAdd";
-
Log.v(tag, "test the method");
-
int test = sample.add(1, 1);
-
assertEquals(2, test);
-
}
-
}
-
<?xml version="1.0" encoding="utf-8"?>
-
<manifest xmlns:android="http://schemas.android.com/apk/res/android"
-
package="com.hustophone.sample" android:versionCode="1"
-
android:versionName="1.0">
-
<application android:icon="@drawable/icon" android:label="@string/app_name">
-
<!--用于引入测试库-->
-
<uses-library android:name="android.test.runner" />
-
<activity android:name=".Sample" android:label="@string/app_name">
-
<intent-filter>
-
<action android:name="android.intent.action.MAIN" />
-
<category android:name="android.intent.category.LAUNCHER" />
-
</intent-filter>
-
</activity>
-
</application>
-
-
<uses-sdk android:minSdkVersion="3" />
-
<!--表示被测试的目标包与instrumentation的名称。-->
-
<instrumentation android:targetPackage="com.hustophone.sample" android:name="android.test.InstrumentationTestRunner" />
-
</manifest>
同时可以通过LogCat工具查看信息

(2) 通过模拟器运行单元测试
点击模拟器界面的Dev Tools菜单

再点击Instrumentation选项,进入Instrumentation菜单


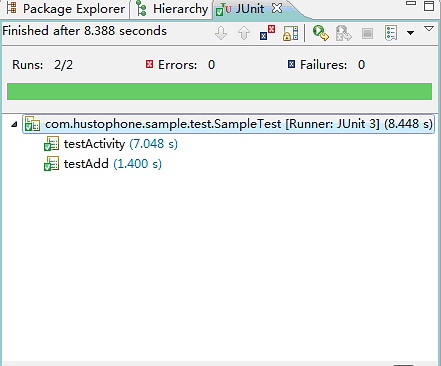
这里有一个InstrumentationTestRunner,它是测试的入口,点击这个选项,就可以自动运行我们的测试代码。以下为运行结果:
按钮点击前

按钮点击后

至此,一个简单的测试过程结束了。当然,android的测试内容还有很多,也有比较复杂的,我会在以后的学习过程中继续分享我的体会。好了,今天就到这里吧!
文章来源: panda1234lee.blog.csdn.net,作者:panda1234lee,版权归原作者所有,如需转载,请联系作者。
原文链接:panda1234lee.blog.csdn.net/article/details/8767820

- 点赞
- 收藏
- 关注作者
评论(0)