GDI+——常用的图像处理技术(三)
目录
实现锐化效果
实现原理:改变图像像素点颜色值变化较大的地方,颜色值变化小的地方,改变不大,图像的边缘,由于相邻两个像素的颜色值变化较大,所以在锐化后,颜色值变化较大。

代码:
public Image AcuteEffect(PictureBox Pict)
{
int Var_W = Pict.Width; //获取图片的宽度
int Var_H = Pict.Height; //获取图片的高度
Bitmap Var_bmp = new Bitmap(Var_W, Var_H); //根据图片的大小实例化Bitmap类
Bitmap Var_SaveBmp = (Bitmap)Pict.Image; //根据图片实例化Bitmap类
int[] Laplacian = { -1, -1, -1, -1, 9, -1, -1, -1, -1 }; //拉普拉斯模板
//遍历图象中的各象素
for (int i = 1; i < Var_W - 1; i++)
for (int j = 1; j < Var_H - 1; j++)
{
int tem_r = 0, tem_g = 0, tem_b = 0, tem_index = 0; //定义变量
for (int c = -1; c <= 1; c++)
for (int r = -1; r <= 1; r++)
{
Color tem_color = Var_SaveBmp.GetPixel(i + r, j + c); //获取指定象素的颜色值
tem_r += tem_color.R * Laplacian[tem_index]; //设置R色值
tem_g += tem_color.G * Laplacian[tem_index]; //设置G色值
tem_b += tem_color.B * Laplacian[tem_index]; //设置B色值
tem_index++;
}
tem_r = tem_r > 255 ? 255 : tem_r; //如果R色值大于255,将R色值设为255,否则不变
tem_r = tem_r < 0 ? 0 : tem_r; //如果R色值小于0,将R色值设为0,否则不变
tem_g = tem_g > 255 ? 255 : tem_g; //如果G色值大于255,将R色值设为255,否则不变
tem_g = tem_g < 0 ? 0 : tem_g; //如果G色值小于0,将R色值设为0,否则不变
tem_b = tem_b > 255 ? 255 : tem_b; //如果B色值大于255,将R色值设为255,否则不变
tem_b = tem_b < 0 ? 0 : tem_b; //如果B色值小于0,将R色值设为0,否则不变
Var_bmp.SetPixel(i - 1, j - 1, Color.FromArgb(tem_r, tem_g, tem_b)); //设置指定象素的颜色
}
return Var_bmp;
}
private void button1_Click(object sender, EventArgs e)
{
pictureBox1.Image = AcuteEffect(pictureBox1);
}
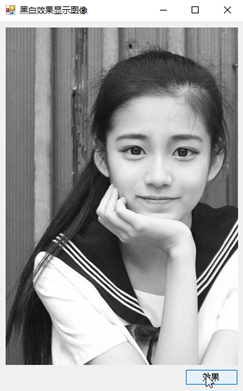
将彩色图像变为黑白色
原理:将一张彩色的图片,按照色图像的RGB颜色值,通过平均值法,将其改为比较柔和的黑白图像。

public Image BlackandWhiteEffect(PictureBox Pict)
{
int Var_H = Pict.Image.Height;//获取图象的高度
int Var_W = Pict.Image.Width;//获取图象的宽度
Bitmap Var_bmp = new Bitmap(Var_W, Var_H);//根据图象的大小实例化Bitmap类
Bitmap Var_SaveBmp = (Bitmap)Pict.Image;//根据图象实例化Bitmap类
//遍历图象的象素
for (int i = 0; i < Var_W; i++)
for (int j = 0; j < Var_H; j++)
{
Color tem_color = Var_SaveBmp.GetPixel(i, j);//获取当前象素的颜色值
int tem_r, tem_g, tem_b, tem_Value = 0;//定义变量
tem_r = tem_color.R;//获取R色值
tem_g = tem_color.G;//获取G色值
tem_b = tem_color.B;//获取B色值
tem_Value = ((tem_r + tem_g + tem_b) / 3);//用平均值法产生黑白图像
Var_bmp.SetPixel(i, j, Color.FromArgb(tem_Value, tem_Value, tem_Value));//改变当前象素的颜色值
}
return Var_bmp;
}
private void button1_Click(object sender, EventArgs e)
{
pictureBox1.Image = BlackandWhiteEffect(pictureBox1);
}
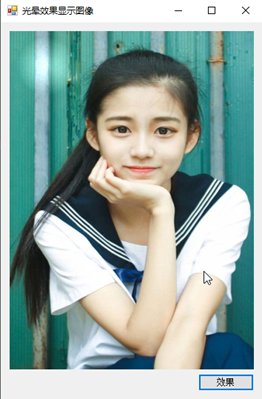
实现光照效果
实现原理:在图片指定的中心点设置个圆,并按设置好的亮度值将圆中各像素的颜色值变亮,以形成光晕效果

public Image pp(PictureBox Pict, int x, int y, int R, float better)//R强光照射面的半径,即”光晕”
{
Bitmap Var_Bmp = new Bitmap(Pict.Image, Pict.Width, Pict.Height);//根据图象实例化Bitmap类
int tem_W = Var_Bmp.Width;//获取图象的宽度
int tem_H = Var_Bmp.Height;//获取图象的高度
//定义一个Bitmap类的复本
Bitmap Var_SaveBmp = Var_Bmp.Clone(new RectangleF(0, 0, tem_W, tem_H), System.Drawing.Imaging.PixelFormat.DontCare);
Point Var_Center = new Point(x, y);//光晕的中心点
//遍历图象中的各象素
for (int i = tem_W - 1; i >= 1; i--)
{
for (int j = tem_H - 1; j >= 1; j--)
{
float Var_Length = (float)Math.Sqrt(Math.Pow((i - Var_Center.X), 2) + Math.Pow((j - Var_Center.Y), 2));//设置光晕的范围
//如果像素位于”光晕”之内_
if (Var_Length < R)
{
Color Var_Color = Var_SaveBmp.GetPixel(i, j);
int r, g, b;
float Var_Pixel = better * (1.0f - Var_Length / R);//设置光亮度的强弱
r = Var_Color.R + (int)Var_Pixel;//设置加强后的R值
r = Math.Max(0, Math.Min(r, 255));//如果R值不在颜色值的范围内,对R值进行设置
g = Var_Color.G + (int)Var_Pixel;//设置加强后的G值
g = Math.Max(0, Math.Min(g, 255));//如果G值不在颜色值的范围内,对G值进行设置
b = Var_Color.B + (int)Var_Pixel;//设置加强后的B值
b = Math.Max(0, Math.Min(b, 255));//如果B值不在颜色值的范围内,对B值进行设置
Var_SaveBmp.SetPixel(i, j, Color.FromArgb(255, r, g, b));//将增亮后的像素值回写到位图
}
}
}
return Var_SaveBmp;
}
private void button1_Click(object sender, EventArgs e)
{
pictureBox1.Image = pp(pictureBox1,49,47,40,100F);
}
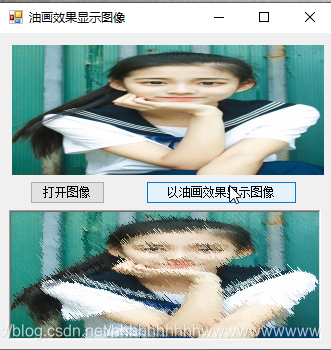
实现油画效果
实现原理:对彩色图像的某一范围内的像素进行随机处理,就可以产生油画的效果。

代码:
public partial class Frm_Main : Form
{
public Frm_Main()
{
InitializeComponent();
}
private Bitmap SourceBitmap;
private Bitmap MyBitmap;
private void button2_Click(object sender, EventArgs e)
{
//打开图像文件
OpenFileDialog openFileDialog = new OpenFileDialog();
openFileDialog.Filter = "图像文件(JPeg, Gif, Bmp, etc.)|*.jpg;*.jpeg;*.gif;*.bmp;*.tif; *.tiff; *.png| JPeg 图像文件(*.jpg;*.jpeg)|*.jpg;*.jpeg |GIF 图像文件(*.gif)|*.gif |BMP图像文件(*.bmp)|*.bmp|Tiff图像文件(*.tif;*.tiff)|*.tif;*.tiff|Png图像文件(*.png)| *.png |所有文件(*.*)|*.*";
if (openFileDialog.ShowDialog() == DialogResult.OK)
{
//得到原始大小的图像
SourceBitmap = new Bitmap(openFileDialog.FileName);
//得到缩放后的图像
MyBitmap = new Bitmap(SourceBitmap, this.pictureBox1.Width, this.pictureBox1.Height);
this.pictureBox1.Image = MyBitmap;
}
}
private void button1_Click(object sender, EventArgs e)
{
//以油画效果显示图像
Graphics g = this.panel1.CreateGraphics();
//取得图片尺寸
int width = MyBitmap.Width;
int height = MyBitmap.Height;
RectangleF rect = new RectangleF(0, 0, width, height);
Bitmap img = MyBitmap.Clone(rect, System.Drawing.Imaging.PixelFormat.DontCare);
//产生随机数序列
Random rnd = new Random();
//取不同的值决定油画效果的不同程度
int iModel = 2;
int i = width - iModel;
while (i > 1)
{
int j = height - iModel;
while (j > 1)
{
int iPos = rnd.Next(100000) % iModel;
//将该点的RGB值设置成附近iModel点之内的任一点
Color color = img.GetPixel(i + iPos, j + iPos);
img.SetPixel(i, j, color);
j = j - 1;
}
i = i - 1;
}
//重新绘制图像
g.Clear(Color.White);
g.DrawImage(img, new Rectangle(0, 0, width, height));
}
}
文章来源: wanghao.blog.csdn.net,作者:AI浩,版权归原作者所有,如需转载,请联系作者。
原文链接:wanghao.blog.csdn.net/article/details/106288571
- 点赞
- 收藏
- 关注作者


评论(0)