NLP进阶,Bert+BiLSTM情感分析实战

Bert+BiLSTM做情感分析
情感分析
情感分析一类的任务比如商品评价正负面分析,敏感内容分析,用户感兴趣内容分析、甚至安全领域的异常访问日志分析等等实际上都可以用文本分类的方式去做,情感分析的问题本质是个二分类或者多分类的问题。
什么是Bert?
BERT的全称为Bidirectional Encoder Representation from Transformers,是一个预训练的语言表征模型。它强调了不再像以往一样采用传统的单向语言模型或者把两个单向语言模型进行浅层拼接的方法进行预训练,而是采用新的masked language model(MLM),以致能生成深度的双向语言表征。
该模型有以下主要优点:
1)采用MLM对双向的Transformers进行预训练,以生成深层的双向语言表征。
2)预训练后,只需要添加一个额外的输出层进行fine-tune,就可以在各种各样的下游任务中取得state-of-the-art的表现。在这过程中并不需要对BERT进行任务特定的结构修改。
今天我们使用Bert+BiLSTM实现对菜品正负评价的情感分析预测!
数据集
数据集是我们搜集了一些菜品的正负评价,正面的评价标记为1,负面评价标记为0,将其保存为csv文件。

将数据集放在工程的根目录
下载预训练模型
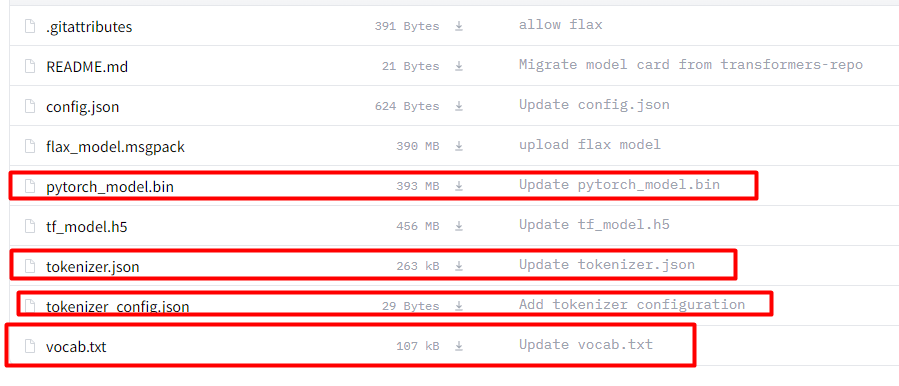
下载地址:https://huggingface.co/bert-base-chinese/tree/main。
我们的数据集是中文,所以,选择中文的预训练模型,这点要注意,如果选择其他的可能会出现不收敛的情况。将下图中画红框的文件加载下来。
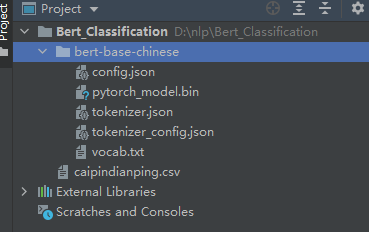
在工程的根目录,新建文件夹“bert_base_chinese”,将下载的模型放进去,如下图:
模型
思路:将bert做为嵌入层提取特征,然后传入BiLSTM,最后使用全连接层输出分类。创建bert_lstm模型,代码如下:
class bert_lstm(nn.Module):
    def __init__(self, bertpath, hidden_dim, output_size,n_layers,bidirectional=True, drop_prob=0.5):
        super(bert_lstm, self).__init__()

        self.output_size = output_size
        self.n_layers = n_layers
        self.hidden_dim = hidden_dim
        self.bidirectional = bidirectional

        #Bert ----------------重点,bert模型需要嵌入到自定义模型里面
        self.bert=BertModel.from_pretrained(bertpath)
        for param in self.bert.parameters():
            param.requires_grad = True

        # LSTM layers
        self.lstm = nn.LSTM(768, hidden_dim, n_layers, batch_first=True,bidirectional=bidirectional)

        # dropout layer
        self.dropout = nn.Dropout(drop_prob)

        # linear and sigmoid layers
        if bidirectional:
            self.fc = nn.Linear(hidden_dim*2, output_size)
        else:
            self.fc = nn.Linear(hidden_dim, output_size)

        #self.sig = nn.Sigmoid()

    def forward(self, x, hidden):
        batch_size = x.size(0)
        #生成bert字向量
        x=self.bert(x)[0]     #bert 字向量

        # lstm_out
        #x = x.float()
        lstm_out, (hidden_last,cn_last) = self.lstm(x, hidden)
        #print(lstm_out.shape)   #[32,100,768]
        #print(hidden_last.shape)   #[4, 32, 384]
        #print(cn_last.shape)    #[4, 32, 384]

        #修改 双向的需要单独处理
        if self.bidirectional:
            #正向最后一层,最后一个时刻
            hidden_last_L=hidden_last[-2]
            #print(hidden_last_L.shape)  #[32, 384]
            #反向最后一层,最后一个时刻
            hidden_last_R=hidden_last[-1]
            #print(hidden_last_R.shape)   #[32, 384]
            #进行拼接
            hidden_last_out=torch.cat([hidden_last_L,hidden_last_R],dim=-1)
            #print(hidden_last_out.shape,'hidden_last_out')   #[32, 768]
        else:
            hidden_last_out=hidden_last[-1]   #[32, 384]


        # dropout and fully-connected layer
        out = self.dropout(hidden_last_out)
        #print(out.shape)    #[32,768]
        out = self.fc(out)

        return out

    def init_hidden(self, batch_size):
        weight = next(self.parameters()).data

        number = 1
        if self.bidirectional:
            number = 2

        if (USE_CUDA):
            hidden = (weight.new(self.n_layers*number, batch_size, self.hidden_dim).zero_().float().cuda(),
                      weight.new(self.n_layers*number, batch_size, self.hidden_dim).zero_().float().cuda()
                     )
        else:
            hidden = (weight.new(self.n_layers*number, batch_size, self.hidden_dim).zero_().float(),
                      weight.new(self.n_layers*number, batch_size, self.hidden_dim).zero_().float()
                     )

        return hidden
- 1
- 2
- 3
- 4
- 5
- 6
- 7
- 8
- 9
- 10
- 11
- 12
- 13
- 14
- 15
- 16
- 17
- 18
- 19
- 20
- 21
- 22
- 23
- 24
- 25
- 26
- 27
- 28
- 29
- 30
- 31
- 32
- 33
- 34
- 35
- 36
- 37
- 38
- 39
- 40
- 41
- 42
- 43
- 44
- 45
- 46
- 47
- 48
- 49
- 50
- 51
- 52
- 53
- 54
- 55
- 56
- 57
- 58
- 59
- 60
- 61
- 62
- 63
- 64
- 65
- 66
- 67
- 68
- 69
- 70
- 71
- 72
- 73
- 74
- 75
- 76
- 77
- 78
- 79
- 80
bert_lstm需要的参数功6个,参数说明如下:
–bertpath:bert预训练模型的路径
–hidden_dim:隐藏层的数量。
–output_size:分类的个数。
–n_layers:lstm的层数
–bidirectional:是否是双向lstm
–drop_prob:dropout的参数
定义bert的参数,如下:
class ModelConfig:
    batch_size = 2
    output_size = 2
    hidden_dim = 384   #768/2
    n_layers = 2
    lr = 2e-5
    bidirectional = True  #这里为True,为双向LSTM
    # training params
    epochs = 10
    # batch_size=50
    print_every = 10
    clip=5 # gradient clipping
    use_cuda = USE_CUDA
    bert_path = 'bert-base-chinese' #预训练bert路径
    save_path = 'bert_bilstm.pth' #模型保存路径
- 1
- 2
- 3
- 4
- 5
- 6
- 7
- 8
- 9
- 10
- 11
- 12
- 13
- 14
- 15
batch_size:batchsize的大小,根据显存设置。
output_size:输出的类别个数,本例是2.
hidden_dim:隐藏层的数量。
n_layers:lstm的层数。
bidirectional:是否双向
print_every:输出的间隔。
use_cuda:是否使用cuda,默认使用,不用cuda太慢了。
bert_path:预训练模型存放的文件夹。
save_path:模型保存的路径。
配置环境
需要下载transformers和sentencepiece,执行命令:
conda install sentencepiece
conda install transformers
- 1
- 2
数据集切分
数据集按照7:3,切分为训练集和测试集,然后又将测试集按照1:1切分为验证集和测试集。
代码如下:
model_config = ModelConfig()
    data=pd.read_csv('caipindianping.csv',encoding='utf-8')
    result_comments = pretreatment(list(data['comment'].values))
    tokenizer = BertTokenizer.from_pretrained(model_config.bert_path)

    result_comments_id = tokenizer(result_comments,
                                    padding=True,
                                    truncation=True,
                                    max_length=200,
                                    return_tensors='pt')
    X = result_comments_id['input_ids']
    y = torch.from_numpy(data['sentiment'].values).float()

    X_train,X_test, y_train, y_test = train_test_split( X,
                                                        y,
                                                        test_size=0.3,
                                                        shuffle=True,
                                                        stratify=y,
                                                        random_state=0)
    X_valid,X_test,y_valid,y_test = train_test_split(X_test,
                                                     y_test,
                                                     test_size=0.5,
                                                     shuffle=True,
                                                     stratify=y_test,
                                                     random_state=0)
- 1
- 2
- 3
- 4
- 5
- 6
- 7
- 8
- 9
- 10
- 11
- 12
- 13
- 14
- 15
- 16
- 17
- 18
- 19
- 20
- 21
- 22
- 23
- 24
- 25
训练、验证和预测
训练详见train_model函数,验证详见test_model,单次预测详见predict函数。
代码和模型链接:
https://download.csdn.net/download/hhhhhhhhhhwwwwwwwwww/36305682
文章来源: wanghao.blog.csdn.net,作者:AI浩,版权归原作者所有,如需转载,请联系作者。
原文链接:wanghao.blog.csdn.net/article/details/121289547

- 点赞
- 收藏
- 关注作者
评论(0)