不需要web服务器,如何构建一个可以内部跨域的http服务(Vue+Flask)
【摘要】 人生两苦,想要却不得,拥有却失去。 ----- 烽火戏诸侯《雪中悍刀行》
写在前面
我的需求:
- 一个很老的项目,中游服务,
webservice接口,需要测试,没有页面,需要我写一个小工具来测试,我准备用一个web来实现。
我需要解决的问题:
- 这个小工具其实类似测试工具,
soup UI或者postman,需要实现以下功能:- 满足跨域请求,尽可能的轻量。
- 满足发送
xml和json作为报文请求 - 可以做
简单的自动化压力测试 - 可以
存储所有的的接口报文信息作为发送请求 - 可以
修改设置请求url,选择存在的url路径 - 可以展示少量的
请求报文和响应报文历史数据 - 做好的工具
不需要环境可以在机器上直接运行,类似windows上的*.exe
我是是这样解决的:
- 在技术上,涉及到的技术栈:
Vue+Flask,主要是轻量 - 数据没有持久化,因为也没有多少数据,只是简单的使用
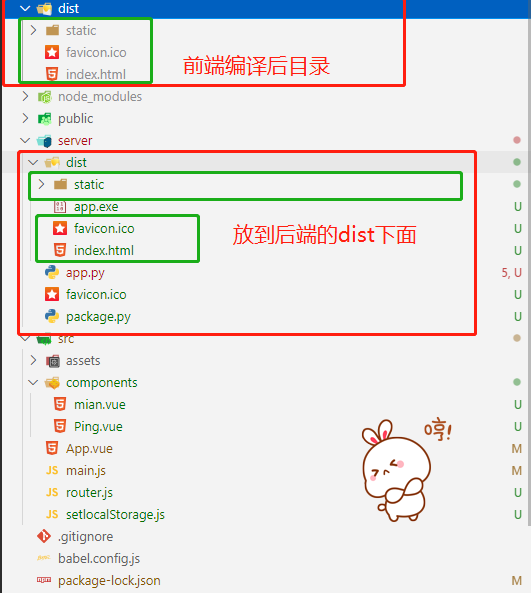
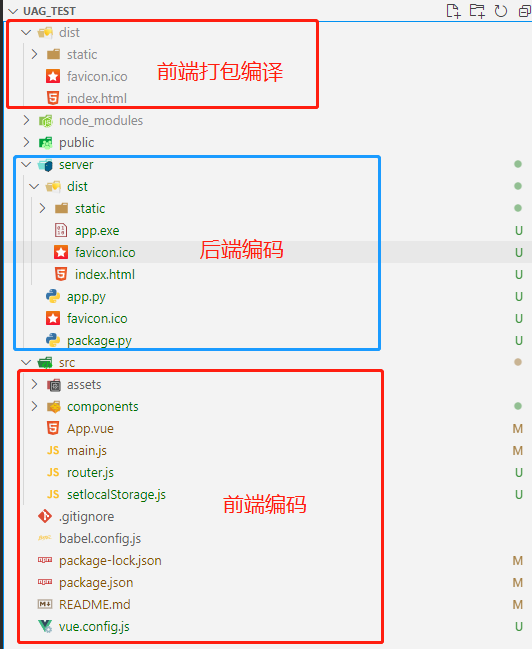
- 前后端分离的方式开发,打包方式:前端编译好直接放到后端的指定文件夹下,通过
python的PyInstaller打包为exe - 直接运行
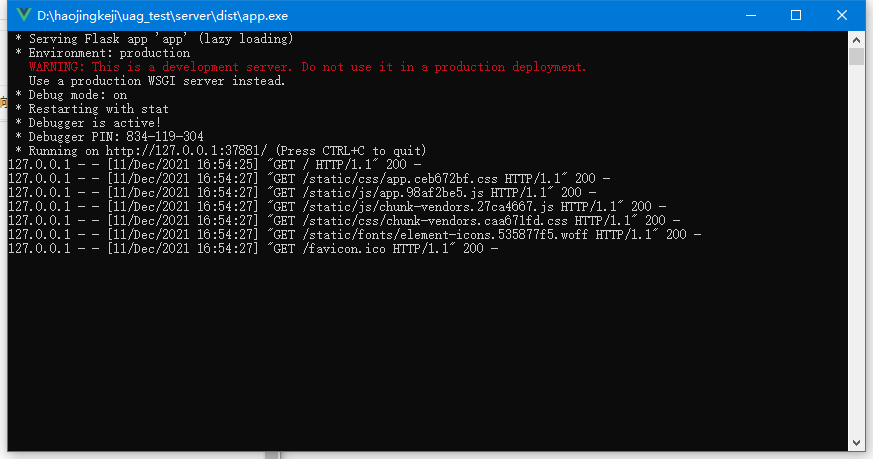
exe就会在window发布为一个服务。不需要部署。
需要注意的问题
- 前后端的整合
- 使用
PyInstaller的打包问题 - 需要知道一点
Vue和python.
人生两苦,想要却不得,拥有却失去。 ----- 烽火戏诸侯《雪中悍刀行》
开发环境准备
这里不多讲,这是我的版本:
前端
PS > npm -v
6.12.1
PS > node -v
v12.13.1
PS > vue  -V
3.7.0
后端
PS > python -V
Python 3.9.0
PS > pip -V
pip 20.2.3 from d:\python\python310\lib\site-packages\pip (python 3.9)
PS > PyInstaller -v
4.7
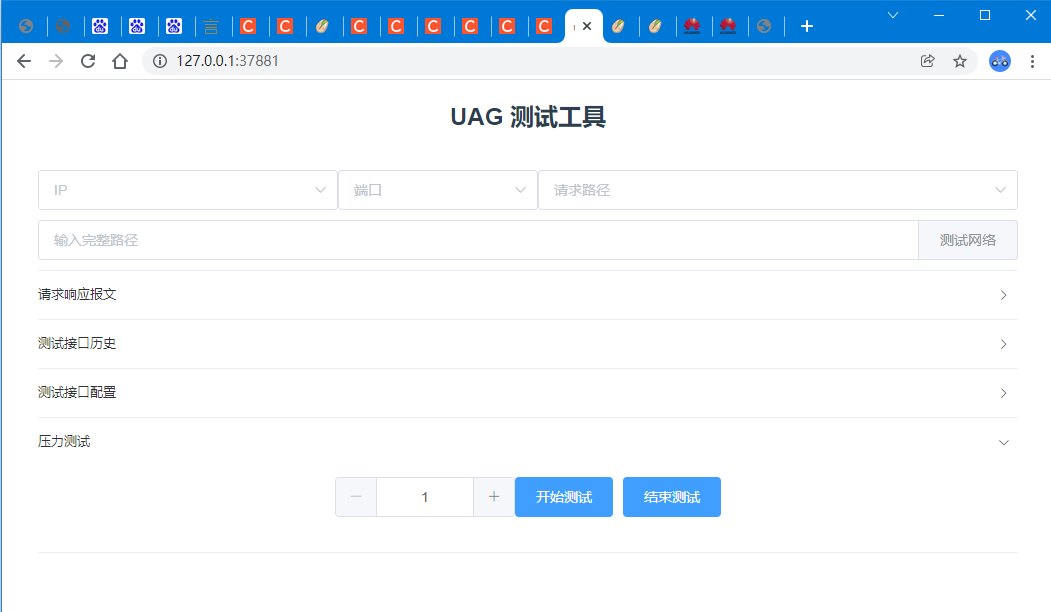
前端把需要测试的接口地址,报文通过axios 发送给后端Flask服务,Flask服务通过 requests 模块实现测试
测试工具功能:
| – |
|---|
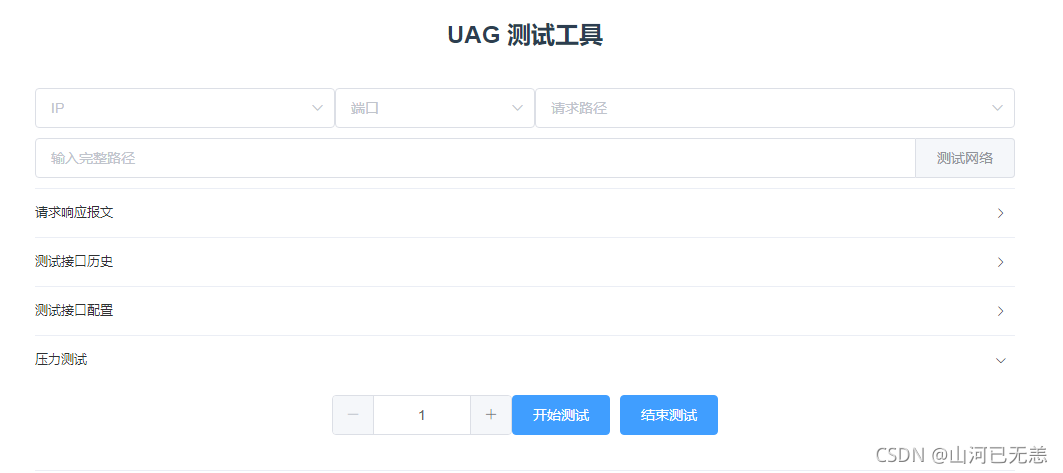 |
| xml,json 格式的报文发送,支持http,soap协议 的方式 |
|---|
 |
| 支持请求报文路径自定义及相关配置 |
|---|
 |
| 支持测试接口历史的查看(少量) |
|---|
 |
| 支持简单压力测试,自定义时间间隔,轮询调用接口方式 |
|---|
 |
| 获取报文 |
|---|
 |
二、编码
后端编码
后端很简单,需要注意的是,设置静态资源的加载路径,以及设置跨域
from flask import Flask, jsonify,request,render_template
from flask_cors import CORS  #跨域问题
import requests
import time


# configuration
DEBUG = True

# instantiate the app
app = Flask(__name__,static_folder = "./dist/static", template_folder = "./dist")
app.config.from_object(__name__)


# enable CORS
CORS(app, resources={r'/*': {'origins': '*'}})

headersXml = {
    "Content-Type": "Content-Type: text/xml;charset=UTF-8",
    "Connection": "keep-alive",
    }
headersJson = {
    "Content-Type": "application/json;charset=UTF-8",
    "Connection": "keep-alive",
    }
SendData = []


# sanity check route
@app.route('/test', methods=['POST','GET'])
def uag_test():
    response = ""
    if request.method == 'POST':
        post_data = request.get_json()
        data = post_data.get("content")
        url = post_data.get("url")
        id = post_data.get("id")
        nameCose = post_data.get("nameCose")
        type = post_data.get("type")
        date = time.strftime("%Y-%m-%d %H:%M:%S", time.localtime())
        print("============================================",time.strftime("%Y-%m-%d %H:%M:%S", time.localtime()),"================================================")
        print("请求的URL:",url)
        print("请求的报文:",data)
        print("请求的ID:",id)
        print("请求的日期:",date)
        print("请求的报文类型:",type)
        try:
            if type == 1 :
                responseDate=requests.post(url, headers=headersXml, data=data)
                response = responseDate.text
            if type == 2 :
                responseDate=requests.post(url, headers=headersJson, data=data)
                response = responseDate.text
        except:
            return jsonify("服务器异常!")


        print("============================================",time.strftime("%Y-%m-%d %H:%M:%S", time.localtime()),"================================================")

        #response = etree.fromstring(response.encode('utf-8'))
        #htmlelement = etree.XML(etree.tostring(response, pretty_print = True,encoding='utf-8'))
        #print(etree.tostring(htmlelement))
        SendData.insert(0,{
            "id":id,
            "url":url,
            "data":data,
            "response":response ,
            "date":date,
            "nameCose":nameCose
        })
        if len(SendData) > 5 :
            SendData.pop()
    return jsonify(response)


# sanity check route
@app.route("/init",methods=['GET','POST'])
def uag_init():
    print("获取全部数据")
    return jsonify(SendData)

@app.route('/', defaults={'path': ''})
@app.route('/<path:path>')
def catch_all(path):
    return render_template("index.html")


if __name__ == '__main__':
    app.run(host='127.0.0.1', port=8085,debug=DEBUG)
前端代码
vie.config.js 代码
let proxyObj = {};

proxyObj['/'] = {
    target: 'http://localhost:8086',
    changeOrigin: true,
    pathRewrite: {
        '^/': ''
    }
}
module.exports = {
    devServer: {
        host: '127.0.0.1',
        proxy: proxyObj,
    },
    lintOnSave:false,//关闭eslintre语法检查
    assetsDir: 'static/',


}
main.js
import Vue from 'vue'
import App from './App.vue'

import ElementUI from 'element-ui';
import 'element-ui/lib/theme-chalk/index.css';
import axios from 'axios'
import VueAxios from 'vue-axios'


Vue.config.productionTip = false

Vue.use(ElementUI);
Vue.use(VueAxios, axios)

new Vue({
  render: h => h(App),
}).$mount('#app')
router.js
import Vue from 'vue';
import Router from 'vue-router';
import Ping from './components/Ping.vue';
import App from './App.vue';

Vue.use(Router);

export default new Router({
  mode: 'history',
  base: process.env.BASE_URL,
  routes: [
    {
      path: '/ping',
      name: 'Ping',
      component: Ping,
    },
    {
      path: '/',
      name: 'App',
      component: App,
    }
  ],
});
vue的相关页面代码在最后
三、前后端整合
| 前后端目录对应 |
|---|
 |
PyInstaller打包,运行测试
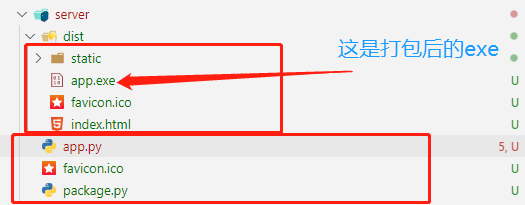
这里打包是通过PyInstaller来完成的,如果为windows系统打包,则为一个单独的app.exe文件,windows上运行直接双击。linux的话,是一个可以在机器上直接运行的二进制文件,linux上运行通过./app来运行。
当然,PyInstaller可以直接通过命令行的方式来运行,也可以通过py文件的方式,下面是一个打包的脚本。
from PyInstaller.__main__ import run
#### 打包文件直接执行
if __name__ == '__main__':
    opts = ['app.py',  # 主程序文件
            '-F',  # 打包单文件
            '--icon=favicon.ico',  # 可执行程序图标
            '--add-data=dist;dist',  # 打包包含的html页面
            '--add-data=dist\\static;dist\\static',  # 打包包含的静态资
            ]

    run(opts)
直接运行就可以打包了。
python package.py
这里要说明一下文件对应的目录位置
| 对应的打包文件 |
|---|
 |
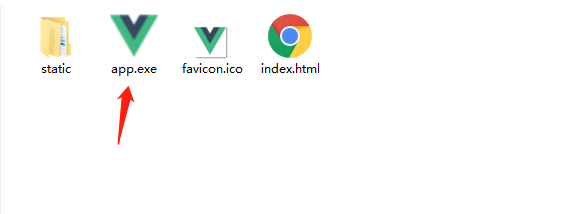 |
| 直接发布一个服务服务 |
 |
 |
| 整个文件目录 |
 |
app.vue 代码
<template>
<div id="app">
<el-container>
<el-header><h1>接口测试小工具</h1></el-header>
<el-main class="main-class">
<div class="main-up-class">
<div class="search-class">
<!-- 搜索框 -->
<div class="search-class-up">
<div>
<el-select
v-model="ipValue"
placeholder="IP"
style="width: 300px"
>
<el-option
v-for="item in optionsIp"
:key="item"
:label="item"
:value="item"
>
</el-option>
</el-select>
</div>
<div>
<el-select
v-model="hostValue"
placeholder="端口"
style="width: 200px"
>
<el-option
v-for="item in optionsHost "
:key="item"
:label="item"
:value="item"
>
</el-option>
</el-select>
</div>
<div>
<el-select
v-model="pathValue"
placeholder="请求路径"
style="width: 480px"
>
<el-option
v-for="item in optionsPath"
:key="item"
:label="item"
:value="item"
>
</el-option>
</el-select>
</div>
</div>
<div class="search-class-next">
<el-input placeholder="输入完整路径" clearable v-model="urlValue">
<el-button slot="append" @click = "testNet">测试网络</el-button>
</el-input>
</div>
</div>
<div class="active-class">
<el-collapse v-model="activeNames" @change="handleChange">
<el-collapse-item title="请求响应报文" name="1">
<div class="context-class">
<el-card
v-loading="loading"
shadow="never"
class="context-card-class"
>
<div slot="header" class="clearfix">
<span>请求报文</span>
<el-button
style="float: right; padding: 3px 0px 2px"
type="text"
@click="getPost"
>
请求
</el-button>
<el-button
style="float: right; padding: 3px "
type="text"
@click="cleartextareaRequest"
>
清空
</el-button>
<el-button
style="float: right; padding: 3px 0"
type="text"
@click="RequestTxt"
>
获取报文
</el-button>
<el-radio-group v-model="radio" style="float: right; padding: 3px 0">
<el-radio :label="1">text/xml</el-radio>
<el-radio :label="2">application/json</el-radio>
</el-radio-group>
</div>
<el-input
type="textarea"
:autosize="{ minRows: 17, maxRows: 17 }"
placeholder="请输入请求"
v-model="textareaRequest"
show-word-limit
autofocus="true"
>
</el-input>
</el-card>
<el-card shadow="never" class="context-card-class">
<div slot="header" class="clearfix">
<span>响应报文</span>
<el-button
style="float: right; padding: 3px 0"
type="text"
@click="clearTextareaResponse"
>清空</el-button
>
</div>
<el-input
type="textarea"
:autosize="{ minRows: 17, maxRows: 17 }"
placeholder=""
v-model="textareaResponse"
show-word-limit
autofocus="true"
>
</el-input>
</el-card>
</div>
</el-collapse-item>
<el-collapse-item title="测试接口历史" name="2">
<div class="list-class">
<template>
<el-table :data="sendDate" border style="width: 100%" >
<el-table-column fixed prop="nameCose" label="接口编码" width="200">
</el-table-column>
<el-table-column prop="url" label="url路径">
</el-table-column>
<el-table-column prop="date" label="日期" width="150">
</el-table-column>
<el-table-column fixed="right" label="操作" width="150">
<template slot-scope="scope">
<el-button
@click="handleClickRequest(scope.row)"
type="text"
size="small"
>请求报文</el-button
>
<el-button
@click="handleClickResponse(scope.row)"
type="text"
size="small"
>响应报文</el-button
>
</template>
</el-table-column>
</el-table>
</template>
</div>
</el-collapse-item>
<el-collapse-item title="测试接口配置" name="3">
<div class="input-with-select-add">
<el-input placeholder="IP添加" v-model="tepmIp" @keyup.enter.native="addIp" >
</el-input>
<el-input placeholder="端口添加" v-model="tempHost" @keyup.enter.native="addHost">
</el-input>
<el-input placeholder="路径添加" v-model="tepmValurl" @keyup.enter.native="addValurl">
</el-input>
</div>
</el-collapse-item>
<el-collapse-item title="压力测试" name="4">
<div class="input-with-select-add">
<el-input-number label="调用间隔时间(s)" v-model="num" @change="handleChange" :min="1" :max="10"></el-input-number>
<el-button @click="testing()" type="primary">{{testmsg}} {{testmsg !="开始测试"?"秒":""}}</el-button>
<el-button @click="testingon()" type="primary">结束测试</el-button>
</div>
</el-collapse-item>
</el-collapse>
</div>
</div>
</el-main>
</el-container>
<el-dialog title="报文" :visible.sync="dialogTableVisible">
<code>{{ msg }}</code>
</el-dialog>
<el-dialog title="请求报文列表" :visible.sync="dialogTableVisible_req">
<el-tag v-for="item in interData"
:key="item.key" style="margin: 5px;width: 250px;"
effect="plain" @click="clickInterData(item)">
{{ item.key }}
</el-tag>
</el-dialog>
</div>
</template>
<script>
import axios from "axios";
import { v4 as uuidv4 } from "uuid";
export default {
name: "App",
data() {
return {
radio:1,
testmsg:"开始测试",
olddate:'',
setInterval_:'',
num:1,
tepmIp:'',
tempHost:'',
tepmValurl:'',
dialogTableVisible_req:false,
dialogTableVisible: false,
msg: "",
nameCose:'',
hostValue: "",
ipValue: "",
pathValue: "",
activeNames: ["4"],
select: "",
urlValue: "",
sessionStorage:"",
optionsHost: ["30066"],
textareaRequest: "",
textareaResponse: "",
optionsIp: ["10.218.7.201"],
sendDate: [],
interData:new Array(),
optionsPath: [
"/app/baseurl/CrmService?wsdl",
"/app/baseurl/UaService?wsdl",
"/app/baseurl/AccountSynchro?wsdl",
"/app/baseurl/AccountStatusIf?wsdl",
"/app/baseurl/BindingSynchro?wsdl",
"/app/baseurl/BusinessAccountQuery?wsdl"
],
loading: false,
};
},
created() {
//这是存放报文
this.sessionStorage = window.sessionStorage;
this.sessionStorage.setItem("CAP04003新增产品", '<soapenv:Envelope xmlns:soapenv="http://schemas.xmlsoap.org/soap/envelope/" xmlns:ua="http://www.mbossuac.com.cn/ua">\n。。。。。。</soapenv:Envelope>');
},
mounted() {
let len = this.sessionStorage.length;
console.log("接口条数"+len)
var gridData_ = new Array();
for(let i = 0; i < len; i++) {
let getKey = this.sessionStorage.key(i);
var getVal = this.sessionStorage.getItem(getKey);
gridData_[i] = {
'key': getKey,
'val': getVal,
}
}
this.interData = gridData_;
console.log(gridData_);
},
methods: {
handleChangetest(){
},
testingon(){
clearInterval(this.setInterval_);
this.testmsg ="开始测试";
},
testing(){
this.activeNames=["4"];
this.testmsg = 0;
this.setInterval_ = setInterval(_ => {this.getPost();this.testmsg=this.testmsg+this.num},this.num * 1000);
},
addValurl(){
if(this.tepmValurl){
this.optionsPath.push(this.tepmValurl);
this.tepmValurl ='';
this.$notify({
title: "添加成功",
});
}else{
this.$notify({
title: "数据为空",
type: "warning",
});
}
},
addHost(){
if(this.tempHost){
this.optionsHost.push(this.tempHost);
this.$notify({
title: "添加成功",
});
this.tempHost='';
}else{
this.$notify({
title: "数据为空",
type: "warning",
});
}
},
addIp(){
console.log("fsdf")
if(this.tepmIp){
this.optionsIp.push(this.tepmIp);
this.tepmIp='';
this.$notify({
title: "添加成功",
});
}else{
this.$notify({
title: "数据为空",
type: "warning",
});
}
},
testNet(){
window.open(this.urlValue);
},
clickInterData(val){
console.log(val);
this.textareaRequest = val.val;
this.nameCose = val.key;
this.dialogTableVisible_req=false;
},
RequestTxt(){
this.dialogTableVisible_req=true;
},
handleClickRequest(row) {
this.msg = row.data;
this.dialogTableVisible = true;
console.log(row);
},
handleClickResponse(row) {
this.msg = row.response;
this.dialogTableVisible = true;
console.log(row);
},
clearTextareaResponse() {
console.log("清空数据");
this.textareaResponse = "";
},
cleartextareaRequest() {
console.log("清空数据");
this.textareaRequest = "";
},
getinit() {
axios({
url: "/init",
method: "get",
})
.then((res) => {
this.sendDate = res.data;
console.log(this.sendDate);
})
.catch((error) => {
// eslint-disable-next-line
console.error(error);
});
},
getPost() {
if (!this.urlValue) {
this.$notify({
title: "测试路径为空",
type: "warning",
});
return;
}
let path = this.urlValue;
console.log("开始调用接口:"+path)
this.loading = true;
axios({
url: "/test",
method: "post",
data: {
content: this.textareaRequest,
url: path,
id: uuidv4().toString(),
nameCose:this.nameCose,
type:this.radio,
},
}).then((res) => {
console.log(uuidv4());
console.log(res)
this.textareaResponse = res.data;
this.loading = false;
this.getinit();
this.$notify({
title: this.nameCose +" "+this.getCurrentTime(),
type: "success",
});
})
.catch((error) => {
// eslint-disable-next-line
this.loading = false;
console.error(error);
this.$notify({
title: "请求异常",
type: "error",
});
return;
});
},
getCurrentTime() {
//获取当前时间并打印
let yy = new Date().getFullYear();
let mm = new Date().getMonth()+1;
let dd = new Date().getDate();
let hh = new Date().getHours();
let mf = new Date().getMinutes()<10 ? '0'+new Date().getMinutes() : new Date().getMinutes();
let ss = new Date().getSeconds()<10 ? '0'+new Date().getSeconds() : new Date().getSeconds();
return yy+'年'+mm+'月'+dd+'日'+hh+':'+mf+':'+ss;
},
handleChange(val) {
console.log(val);
},
},
watch: {
hostValue: {
// eslint-disable-next-line
handler(newName, oldName) {
let m = this;
m.urlValue ="http://"+ m.ipValue + ":" + m.hostValue + m.pathValue;
// eslint-disable-next-line
immediate: true;
},
},
ipValue: {
// eslint-disable-next-line
handler(newName, oldName) {
let m = this;
m.urlValue ="http://"+ m.ipValue + ":" + m.hostValue + m.pathValue;
// eslint-disable-next-line
immediate: true;
},
},
pathValue: {
// eslint-disable-next-line
handler(newName, oldName) {
let m = this;
m.urlValue ="http://"+ m.ipValue + ":" + m.hostValue + m.pathValue;
// eslint-disable-next-line
immediate: true;
},
},
},
};
</script>
<style>
#app {
font-family: Avenir, Helvetica, Arial, sans-serif;
-webkit-font-smoothing: antialiased;
-moz-osx-font-smoothing: grayscale;
text-align: center;
color: #2c3e50;
margin-top: 60px;
}
html,
body,
#app,
.el-container {
/*设置内部填充为0,几个布局元素之间没有间距*/
padding: 0px;
/*外部间距也是如此设置*/
margin: 0px;
/*统一设置高度为100%*/
height: 100%;
}
.el-select .el-input {
width: 100%;
}
.input-with-select .el-input-group__prepend {
background-color: #fff;
}
.main-up-class {
width: 1000px;
}
.http-w {
width: 20px;
}
.search-class {
width: 1000px;
height: 90px;
}
.search-class-up {
margin: 10px;
display: flex;
justify-content: space-between;
}
.search-class-next {
margin: 10px;
}
.active-class {
margin: 10px;
}
.context-class {
display: flex;
justify-content: space-between;
height: 405px;
}
.context-card-class {
height: 100%;
width: 100%;
margin: 5px;
}
.el-card__header {
padding: 5px 6px !important;
}
.el-card__body {
padding: 1px !important;
}
.el-textarea__inner {
resize: none !important;
}
.main-class {
display: flex !important;
justify-content: center !important;
border-radius: 5px;
}
pre,
code {
font-size: 0.85em;
font-family: Consolas, Inconsolata, Courier, monospace;
}
code {
margin: 0 0.15em;
padding: 0 0.3em;
white-space: pre-wrap;
border: 1px solid #eaeaea;
background-color: #f8f8f8;
border-radius: 3px;
display: inline; /* added to fix Yahoo block display of inline code */
}
pre {
font-size: 1em;
line-height: 1em;
}
pre code {
white-space: pre;
overflow: auto; /* fixes issue #70: Firefox/Thunderbird: Code blocks with horizontal scroll would have bad background colour */
border-radius: 3px;
border: 1px solid #ccc;
padding: 0.5em 0.7em;
display: block !important; /* added to counteract the Yahoo-specific `code` rule; without this, code blocks in Blogger are broken */
}
/* In edit mode, Wordpress uses a `* { font: ...;} rule+style that makes highlighted
code look non-monospace. This rule will override it. */
.markdown-here-wrapper[data-md-url*="wordpress."] code span {
font: inherit;
}
/* Wordpress adds a grey background to `pre` elements that doesn't go well with
our syntax highlighting. */
.markdown-here-wrapper[data-md-url*="wordpress."] pre {
background-color: transparent;
}
.input-with-select-add{
display: flex !important;
justify-content: center !important;
margin: 10px;
}
</style>
【声明】本内容来自华为云开发者社区博主,不代表华为云及华为云开发者社区的观点和立场。转载时必须标注文章的来源(华为云社区)、文章链接、文章作者等基本信息,否则作者和本社区有权追究责任。如果您发现本社区中有涉嫌抄袭的内容,欢迎发送邮件进行举报,并提供相关证据,一经查实,本社区将立刻删除涉嫌侵权内容,举报邮箱:
cloudbbs@huaweicloud.com
- 点赞
- 收藏
- 关注作者


评论(0)