Spring Boot 2.X 配置命令行参数

【摘要】
Spring Boot 提供了2个接口:CommandLineRunner 和 ApplicationRunner
用于在应用启动时做特殊的处理。这些代码会在 Bean 被装载之后,SpringBoot...
Spring Boot 提供了2个接口:CommandLineRunner 和 ApplicationRunner
用于在应用启动时做特殊的处理。这些代码会在 Bean 被装载之后,SpringBootApplication 的 run() 方法执行之前被运行。
通常用于应用启动前的特殊代码执行、特殊数据加载、垃圾数据清理、微服务的服务发现注册、系统启动成功后的通知等。相当于 Spring 的 ApplicationListener、Servlet 的 ServletContextListener。
两种常用的创建方式
1. 使用组件类(@Component)创建
@Order(0)
@Component
public class MyApplicationRunner1 implements ApplicationRunner {
	@Override
	public void run(ApplicationArguments args) throws Exception {
		System.out.println("MyApplicationRunner1");

		List<String> nonOptionArgs = args.getNonOptionArgs();
		Set<String> optionNames = args.getOptionNames();
		String[] sourceArgs = args.getSourceArgs();

		System.out.println("nonOptionArgs = " + nonOptionArgs.size() + " | " + Arrays.toString(nonOptionArgs.toArray(new String[0])));
		System.out.println("optionNames = " + optionNames.size() + " | " + Arrays.toString(optionNames.toArray(new String[0])));
		System.out.println("sourceArgs = " + sourceArgs.length + " | " + Arrays.toString(sourceArgs));
	}
}
- 1
- 2
- 3
- 4
- 5
- 6
- 7
- 8
- 9
- 10
- 11
- 12
- 13
- 14
- 15
- 16
@Order(-1)
@Component
public class MyApplicationRunner2 implements ApplicationRunner {
	@Override
	public void run(ApplicationArguments args) throws Exception {
		System.out.println("MyApplicationRunner2");
	}
}
- 1
- 2
- 3
- 4
- 5
- 6
- 7
- 8
- 9
@Order(2)
@Component
public class MyCommandLineRunner1 implements CommandLineRunner  {
	@Override
	public void run(String... args) throws Exception {
		System.out.println("MyCommandLineRunner1 = " + args.length + " | " + Arrays.toString(args));
	}
}
- 1
- 2
- 3
- 4
- 5
- 6
- 7
- 8
@Order(-2)
@Component
public class MyCommandLineRunner2 implements CommandLineRunner {
	@Override
	public void run(String... args) throws Exception {
		System.out.println("MyCommandLineRunner2");
	}
}
- 1
- 2
- 3
- 4
- 5
- 6
- 7
- 8
2. 使用配置类(@Comfiguration)的 @Bean 装载
@Configuration
public class RunnerConfig {

	@Bean
	public CommandLineRunner commandLineRunner() {
		return new CommandLineRunner() {

			@Override
			public void run(String... args) throws Exception {
				System.out.println("CommandLineRunner3");
			}
		};
	}

	@Bean
	public ApplicationRunner applicationRunner() {
		return new ApplicationRunner() {

			@Override
			public void run(ApplicationArguments args) throws Exception {
				System.out.println("ApplicationRunner3");
			}
		};
	}

}
- 1
- 2
- 3
- 4
- 5
- 6
- 7
- 8
- 9
- 10
- 11
- 12
- 13
- 14
- 15
- 16
- 17
- 18
- 19
- 20
- 21
- 22
- 23
- 24
- 25
- 26
执行顺序
在没有设置 Order 的情况下,执行顺序如下:
- 先执行 ApplicationRunner,再执行 CommandLineRunner ,最后执行 SpringBootApplicatoin 的 run() 方法。
- 先执行 @Component 组件类,再装载 @Configuration 配置类的 @Bean
MyApplicationRunner1
MyApplicationRunner2
ApplicationRunner3
MyCommandLineRunner1
MyCommandLineRunner2
CommandLineRunner3
- 1
- 2
- 3
- 4
- 5
- 6
通过源码可以得出,默认的 Order 是 Integer.MAX_VALUE,值越小越先执行。
如果存在 Order,则依次按 Order 定义的顺序,越小越先执行。
@Retention(RetentionPolicy.RUNTIME)
@Target({ElementType.TYPE, ElementType.METHOD, ElementType.FIELD})
@Documented
public @interface Order {

	/**
	 * The order value.
	 * <p>Default is {@link Ordered#LOWEST_PRECEDENCE}.
	 * @see Ordered#getOrder()
	 */
	int value() default Ordered.LOWEST_PRECEDENCE;

}

public class Ordered {
/**
	 * Useful constant for the highest precedence value.
	 * @see java.lang.Integer#MIN_VALUE
	 */
	int HIGHEST_PRECEDENCE = Integer.MIN_VALUE;

	/**
	 * Useful constant for the lowest precedence value.
	 * @see java.lang.Integer#MAX_VALUE
	 */
	int LOWEST_PRECEDENCE = Integer.MAX_VALUE;
}
- 1
- 2
- 3
- 4
- 5
- 6
- 7
- 8
- 9
- 10
- 11
- 12
- 13
- 14
- 15
- 16
- 17
- 18
- 19
- 20
- 21
- 22
- 23
- 24
- 25
- 26
- 27
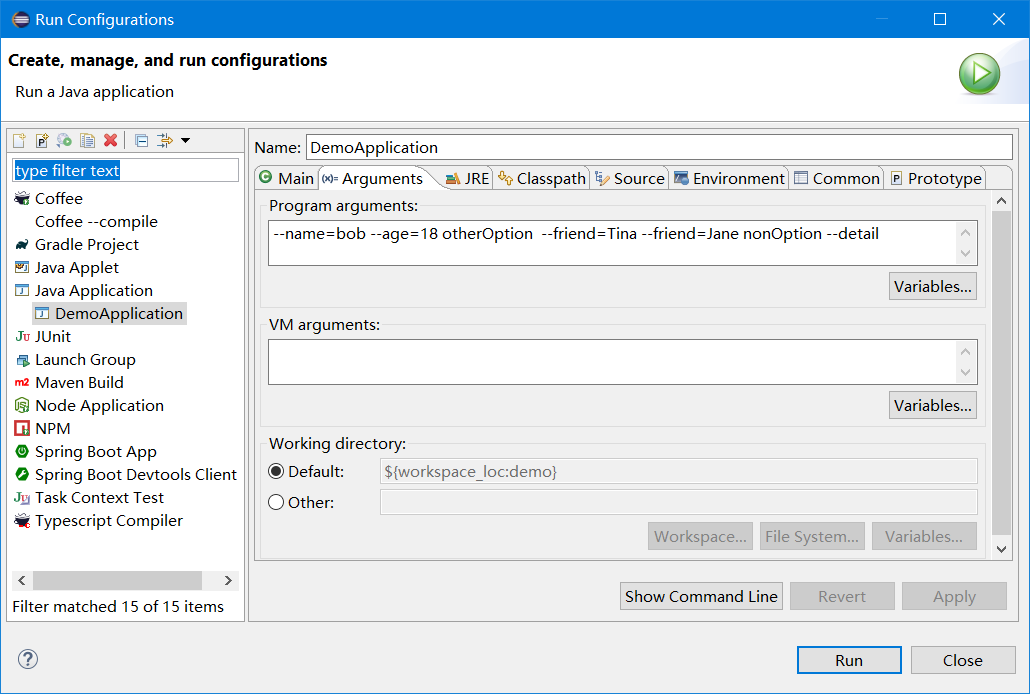
参数配置
在 eclipse 中通过,Run -> Run Configurations 的 Arguments 选项卡来设置参数
在实际项目中,CommandLineRunner 和 ApplicationRunner 二选一即可。
-
相同点,都是通过 “空格” 来分隔参数
-
不同点
- CommandLineRunner 拿到的是以空格分隔的 "字符串"数组
- ApplicationRunner 拿到的是以空格分隔的 "键值对"数组 和 "字符串"数组
-
可以说 ApplicationRunner 是 CommandLineRunner 的增强版。
Program Arguments
--name=bob --age=18 otherOption --friend=Tina --friend=Jane nonOption --detail
- 1
CommandLineRunner
很好理解,直接把 args 当成一个自动拆包的数组即可。
MyCommandLineRunner1 = 7 | [--name=bob, --age=18, otherOption, --friend=Tina, --friend=Jane, nonOption, --detail]
- 1
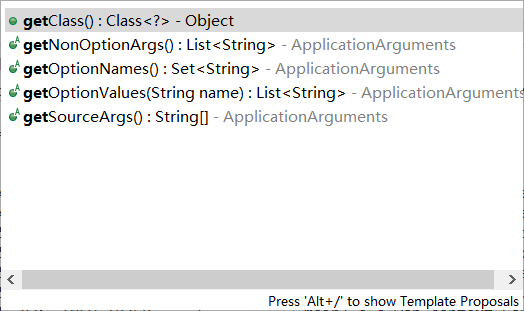
ApplicationRunner
- getNonOptionArgs() : List<String>
获取没有 双"减号" 打头的参数 - getOptionNames() : Set<String>
获取 双"减号" 打头的参数名 - getOptionValues(String name) : List<String>
根据 双"减号"打头的参数名,获取参数的值。由于可能存在同样的参数名,因此将值组装成列表。 - getSourceArgs() : String[]
获取用空格分隔的所有参数数组
nonOptionArgs = 2 | [otherOption, nonOption]
optionNames = 4 | [name, friend, detail, age]
sourceArgs = 7 | [--name=bob, --age=18, otherOption, --friend=Tina, --friend=Jane, nonOption, --detail]
optionValues = 2 | [Tina, Jane]
- 1
- 2
- 3
- 4
使用自动绑定的对象(@Autowire)和自动装配的属性(@Bean)
CommandLineRunner 和 ApplicationRunner 在被执行时,Spring内部已经启动完成,可以注入Spring的Bean。
文章来源: blog.csdn.net,作者:福州-司马懿,版权归原作者所有,如需转载,请联系作者。
原文链接:blog.csdn.net/chy555chy/article/details/100023374

【版权声明】本文为华为云社区用户转载文章,如果您发现本社区中有涉嫌抄袭的内容,欢迎发送邮件进行举报,并提供相关证据,一经查实,本社区将立刻删除涉嫌侵权内容,举报邮箱:
cloudbbs@huaweicloud.com
- 点赞
- 收藏
- 关注作者
评论(0)