Spring Boot 2.X 加载 so 库
新建临时目录
首先通过 System.getProperty 获取系统环境变量
System.getProperty("java.io.tmpdir")
- 在 windows 上,
C:\Users\用户名\AppData\Local\Temp\ - 在 Linux 上,
/tmp/
需要在该目录下,新建一个项目文件夹,用来存放当前项目的文件。
下面以 bsdiff 服务器,加载 so 为例(与 File.separator 是与系统相关的环境分隔符 )
public static final String TMP_DIR = System.getProperty("java.io.tmpdir") + "BsDiff" + File.separator;
放置资源文件
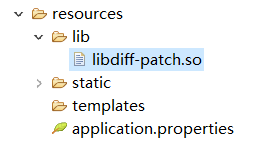
首先在 src\main\resources 目录下,新建一个 lib 目录,然后在该目录下,贴入 so 库。

读取资源文件
- Class.getResourceAsStream(String path)
- path不以“/”开头时,默认是从当前类所在的包下面获取资源
- path以“/”开头时,则是从项目的classPath根下获取资源
-
ClassLoader.getResourceAsStream(String path)
默认是从classpath根下获取,path不能以“/”开头,path是指类加载器的加载范围,在资源加载的过程中,使用逐级向上的委托的形式加载的,“/”表示Boot ClassLoader中的加载范围,因为这个类加载器是C++实现的,所以加载范围为null。 -
ServletContext.getResourceAsStream(String path)
默认从WebAPP根目录下取资源,Tomcat下path是否以“/”开头无所谓,当然这和具体的容器实现有关。
创建一个 LibLoader 类。
/**
 * 将resources目录下的文件,写入到File中
 */
private static boolean saveResource(String resourcePath, File dstFile) {
	InputStream in = null;
	FileOutputStream fos = null;
	try {
		in = LibLoader.class.getResourceAsStream(resourcePath);
		System.out.println("in = " + in);
		if(in != null) {
			fos = new FileOutputStream(dstFile);
			int BUFF_SIZE = 1024, len;
			byte[] buffer = new byte[BUFF_SIZE];
			while((len = in.read(buffer)) != -1) {
				fos.write(buffer, 0, len);
			}
			return true;
		}
	} catch(Exception e) {
		e.printStackTrace();
	} finally {
		if(fos != null) {
			try {
				fos.flush();
				fos.close();
			} catch (IOException e) {
				e.printStackTrace();
			}
		}
		if(in != null) {
			try {
				in.close();
			} catch (IOException e) {
				e.printStackTrace();
			}
		}
	}
	return false;
}
- 1
- 2
- 3
- 4
- 5
- 6
- 7
- 8
- 9
- 10
- 11
- 12
- 13
- 14
- 15
- 16
- 17
- 18
- 19
- 20
- 21
- 22
- 23
- 24
- 25
- 26
- 27
- 28
- 29
- 30
- 31
- 32
- 33
- 34
- 35
- 36
- 37
- 38
- 39
调用函数
注意:由于资源文件在 resources 目录下,所以 getResourceAsStream 的参数要以 “/” 打头。
下面这段代码,先判断缓存目录下是否有该so文件,如果有,则使用 System.load 加载该库;否则
public static void loadLib(String libName) {
	String folderName = System.getProperty("java.io.tmpdir") + "BSDiff" + File.separator + "lib" + File.separator;
	File folder = new File(folderName);
	folder.mkdirs();
	File libFile = new File(folder, libName);
	String path = libFile.getAbsolutePath();
	//如果文件不存在,或者文件长度为0,则从资源路径中复制文件到临时文件夹
	if(libFile.exists() && libFile.length() > 0) {
		System.load(path);
	} else {
		String resourcePath = "/lib/" + libName;
		System.out.println(resourcePath);
		boolean result = saveResource(resourcePath, libFile);
		if(result) {
			System.load(path);
		} else {
			System.out.println("save resource to tmp dir fail!");
		}
	}
}
- 1
- 2
- 3
- 4
- 5
- 6
- 7
- 8
- 9
- 10
- 11
- 12
- 13
- 14
- 15
- 16
- 17
- 18
- 19
- 20
加载 so 库
最后声明含有本地方法的类,然后实例化并调用即可。
注意:如果只是声明,却没有被实例化,static 方法块内的代码是不会被执行的。
public class DiffPatchUtil {

    static {
        //System.loadLibrary("diff-patch");
    	LibLoader.loadLib("diff-patch.so");
    }

    /**
     * 比较路径为oldPath的文件和newPath的文件之间差异,并生成patch包,存储于patchPath
     *
     * @param oldPath   示例:/sdcard/old.apk
     * @param newPath   示例:/sdcard/new.apk
     * @param patchPath 示例:/sdcard/diff.patch
     */
    public static native int diff(String oldPath, String newPath, String patchPath);

    /**
     * 使用路径为oldPath的文件与路径为pathPath的补丁包,合成新的文件,并存储于newPath
     *
     * @param oldPath   示例:/sdcard/old.apk
     * @param newPath   示例:/sdcard/new.apk
     * @param patchPath 示例:/sdcard/patch.patch
     */
    public static native int patch(String oldPath, String newPath, String patchPath);
}
- 1
- 2
- 3
- 4
- 5
- 6
- 7
- 8
- 9
- 10
- 11
- 12
- 13
- 14
- 15
- 16
- 17
- 18
- 19
- 20
- 21
- 22
- 23
- 24
- 25
文章来源: blog.csdn.net,作者:福州-司马懿,版权归原作者所有,如需转载,请联系作者。
原文链接:blog.csdn.net/chy555chy/article/details/98478703
- 点赞
- 收藏
- 关注作者


评论(0)