最简单的 UE 4 C++ 教程 —— 打印调试信息【五】
【摘要】
【原教程是基于 UE 4.18,我是基于 UE 4.25】
英文原地址
接上一节,我们新创建一个名为 ConsoleLog 的新 Actor 子类(我们不需要在头文件中执行任何操作)。
ConsoleLog.h
#pragma once #include "CoreMinimal.h"#includ...
【原教程是基于 UE 4.18,我是基于 UE 4.25】
接上一节,我们新创建一个名为 ConsoleLog 的新 Actor 子类(我们不需要在头文件中执行任何操作)。
ConsoleLog.h
-
#pragma once
-
-
#include "CoreMinimal.h"
-
#include "GameFramework/Actor.h"
-
#include "ConsoleLog.generated.h"
-
-
UCLASS()
-
class UNREALCPP_API AConsoleLog : public AActor
-
{
-
GENERATED_BODY()
-
-
public:
-
// Sets default values for this actor's properties
-
AConsoleLog();
-
-
protected:
-
// Called when the game starts or when spawned
-
virtual void BeginPlay() override;
-
-
public:
-
// Called every frame
-
virtual void Tick(float DeltaTime) override;
-
-
};
接着我们将在 .cpp 文件中打印日志消息。对于这个例子,我们将在 BeginPlay 方法中打印该消息。所以,当游戏开始时,消息将打印出来。
下面是打印消息的三种方法。
- 打印到控制台
- 打印到屏幕
- 打印的数据格式为向量
分别如下所示
UE_LOG(LogTemp, Warning, TEXT("I just started running"));
GEngine->AddOnScreenDebugMessage(-1, 5.f, FColor::Red, TEXT("Screen Message"));
GEngine->AddOnScreenDebugMessage(-1, 5.f, FColor::Orange, FString::Printf(TEXT("My Location is: %s"), *GetActorLocation().ToString()));
下面是完整的.cpp文件(使用宏定义可以简化打印调试信息的步骤)
-
// define a print message function to print to screen
-
#define print(text) if (GEngine) GEngine->AddOnScreenDebugMessage(-1, 1.5, FColor::Green,text)
-
#define printFString(text, fstring) if (GEngine) GEngine->AddOnScreenDebugMessage(-1, 5.f, FColor::Magenta, FString::Printf(TEXT(text), fstring))
-
#include "ConsoleLog.h"
-
-
// Sets default values
-
AConsoleLog::AConsoleLog()
-
{
-
// Set this actor to call Tick() every frame. You can turn this off to improve performance if you don't need it.
-
PrimaryActorTick.bCanEverTick = true;
-
-
}
-
-
// Called when the game starts or when spawned
-
void AConsoleLog::BeginPlay()
-
{
-
Super::BeginPlay();
-
-
// Standard way to log to console.
-
UE_LOG(LogTemp, Warning, TEXT("I just started running"));
-
-
// Log to Screen
-
GEngine->AddOnScreenDebugMessage(-1, 5.f, FColor::Red, TEXT("Screen Message"));
-
-
FVector MyVector = FVector(200,100,900);
-
-
// log vector
-
GEngine->AddOnScreenDebugMessage(-1, 5.f, FColor::Orange, FString::Printf(TEXT("My Location is: %s"), *GetActorLocation().ToString()));
-
-
// Use the shortcut defined above
-
print("Hello Unreal");
-
printFString("My Variable Vector is: %s", *MyVector.ToString());
-
-
}
-
-
// Called every frame
-
void AConsoleLog::Tick(float DeltaTime)
-
{
-
Super::Tick(DeltaTime);
-
-
}
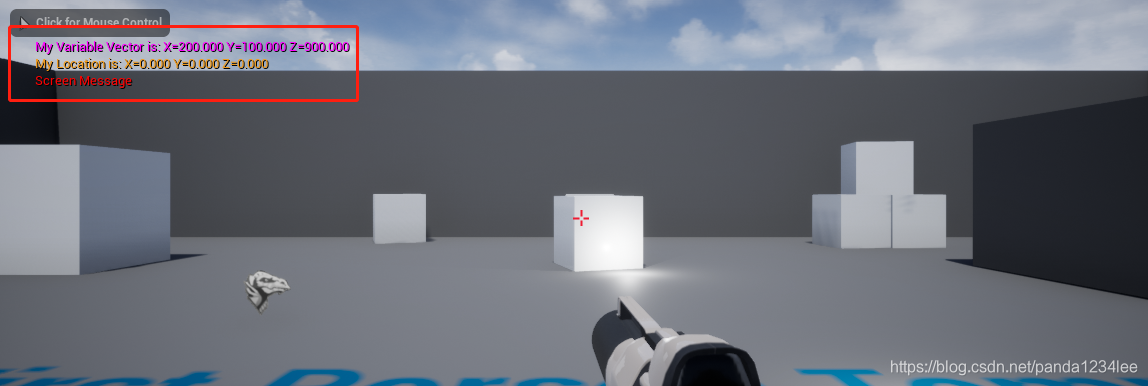
执行的结果如下所示

 先打印的在下,后打印的在上
文章来源: panda1234lee.blog.csdn.net,作者:panda1234lee,版权归原作者所有,如需转载,请联系作者。
原文链接:panda1234lee.blog.csdn.net/article/details/119099558
【版权声明】本文为华为云社区用户转载文章,如果您发现本社区中有涉嫌抄袭的内容,欢迎发送邮件进行举报,并提供相关证据,一经查实,本社区将立刻删除涉嫌侵权内容,举报邮箱:
cloudbbs@huaweicloud.com
- 点赞
- 收藏
- 关注作者


评论(0)