关于Linux中数据备份的一些总结

【摘要】 等长大就明白了。”小时候总是被人这么说。但那是不折不扣的谎言。我对任何事都只能越来越不明白。……这的确令人不安。但在另一方面,正是因为这样,自己才没有失去对生的好奇这也是事实。 ——中岛敦《山月记》
写在前面
- 一般需求增量上线的时候,会备份写数据,保证升级失败也可以回退回去,今天和小伙伴聊聊数据备份的事。
- 日常备份可以通过定时任务进行备份,也可以走动执行备份
- 这里和小伙分享一些备份的脚本Demo,写的很粗。
- 博文内容包括:
日志备份,数据库备份(mysql)。 - 备份方式分为:
物理备份、逻辑备份、远程差异备份。
等长大就明白了。”小时候总是被人这么说。但那是不折不扣的谎言。我对任何事都只能越来越不明白。……这的确令人不安。但在另一方面,正是因为这样,自己才没有失去对生的好奇这也是事实。 ——中岛敦《山月记》
一、日志文件备份
日志备份这里很简单,这里我们写一个shell脚本,通过脚本的方式进行,当然,如果需要,这个脚本可以配置到定时任务里。
┌──[root@liruilongs.github.io]-[~]
└─$ pwd
/root
┌──[root@liruilongs.github.io]-[~]
└─$ mkdir bak_shell
┌──[root@liruilongs.github.io]-[~]
└─$ cd bak_shell/
┌──[root@liruilongs.github.io]-[~/bak_shell]
└─$ vim bak_log.sh
┌──[root@liruilongs.github.io]-[~/bak_shell]
└─$ sh bak_log.sh
┌──[root@liruilongs.github.io]-[~/bak_shell]
└─$ cat bak_log.sh
#!/bin/bash
###此脚本运用日期定义备份的文件名,方便与每天进行备份不重复
date=`date +"%Y%m%d%H%M%S"`
if [ ! -f /tmp/log-$date.tar.gz ];then
tar -zcPf /tmp/log-$date.tar.gz /var/log
fi
┌──[root@liruilongs.github.io]-[/tmp]
└─$ cd /tmp/;ll -h | grep log-*
-rw-r--r-- 1 root root 4.4M 11月 15 10:51 log-20211115110510.tar.gz
┌──[root@liruilongs.github.io]-[/tmp]
└─$
二、数据库备份
关系数据库备份,这里我们用物理机直接操作,用容器也是一样的。
1、逻辑备份(SQL备份)
###安装mariadb数据库,重启服务
┌──[root@liruilongs.github.io]-[/tmp]
└─$ yum -y install mariadb mariadb-server
┌──[root@liruilongs.github.io]-[/tmp]
└─$ systemctl restart mariadb
####查看数据库服务的进程信息
┌──[root@liruilongs.github.io]-[/tmp]
└─$ ss -ntulpa | grep mysql
tcp    LISTEN     0      50        *:3306                  *:*                   users:(("mysqld",pid=52010,fd=14))
┌──[root@liruilongs.github.io]-[/tmp]
└─$ # 登录测试下
┌──[root@liruilongs.github.io]-[/var/lib/mysql]
└─$ mysql -uroot
Welcome to the MariaDB monitor.  Commands end with ; or \g.
Your MariaDB connection id is 2
Server version: 5.5.68-MariaDB MariaDB Server

Copyright (c) 2000, 2018, Oracle, MariaDB Corporation Ab and others.

Type 'help;' or '\h' for help. Type '\c' to clear the current input statement.

MariaDB [(none)]> show databases
    -> ;
+--------------------+
| Database           |
+--------------------+
| information_schema |
| mysql              |
| performance_schema |
| test               |
+--------------------+
4 rows in set (0.00 sec)

MariaDB [(none)]> use test
Database changed
MariaDB [test]> show tables
    -> ;
Empty set (0.00 sec)

MariaDB [test]>
mysqldump可以对mysql数据库中的库进行备份,一般的数据库都会提供相应的备份工具,比如MongoDB的mongodump
##mysqldump可以对数据库中的库进行备份
##格式: mysqldump -u"用户名" --password="" 数据库名 > 备份名.sql
┌──[root@liruilongs.github.io]-[/]
└─$ mysqldump mysql > mysql.sql
┌──[root@liruilongs.github.io]-[/]
└─$ ll | grep mysql*
-rw-r--r--    1 root root  514667 11月 15 15:52 mysql.sql
脚本编写
┌──[root@liruilongs.github.io]-[/]
└─$ mkdir mysql;cd mysql
┌──[root@liruilongs.github.io]-[/mysql]
└─$ vim mysqldump.sh
┌──[root@liruilongs.github.io]-[/mysql]
└─$ sh mysqldump.sh
┌──[root@liruilongs.github.io]-[/tmp]
└─$ cd /tmp/;ls -h |  grep *.sql
mysql-20211115160404.sql
┌──[root@liruilongs.github.io]-[/tmp]
└─$ cat /mysql/mysqldump.sh
#!/bin/bash
###date 指定备份数据名;iuser 指定登录数据库的用户
###ipass 指定登录密码,默认为空;db 指定要备份的数据库
date=$(date +"%Y%m%d%H%M%S")
iuser=root
ipass=
db=mysql
###文件在/tmp 下不存在时才会进行备份
if [ ! -f /tmp/$db-$date.sql ];then
mysqldump -u$iuser --password="$ipass" $db > /tmp/$db-$date.sql
fi
┌──[root@liruilongs.github.io]-[/tmp]
└─$
2、物理备份(buttaidong)
物理备份即直接备份相关文件,mysql默认的表数据相关文件在/var/lib/mysql中
┌──[root@liruilongs.github.io]-[/tmp]
└─$ cd /mysql
┌──[root@liruilongs.github.io]-[/mysql]
└─$ ls
mysqldump.sh
┌──[root@liruilongs.github.io]-[/mysql]
└─$ vim bak_mysql.sh
┌──[root@liruilongs.github.io]-[/mysql]
└─$ sh bak_mysql.sh
tar: 从成员名中删除开头的“/”
tar: 从成员名中删除开头的“/”
tar: 从成员名中删除开头的“/”
。。。。。
┌──[root@liruilongs.github.io]-[/tmp]
└─$ cd mysql/
┌──[root@liruilongs.github.io]-[/tmp/mysql]
└─$ ls
columns_priv.frm-20211115160950.tar.gz      proc.frm-20211115160950.tar.gz
columns_priv.MYD-20211115160950.tar.gz      proc.MYD-20211115160950.tar.gz
。。。。。。
┌──[root@liruilongs.github.io]-[/mysql]
└─$ cat bak_mysql.sh
#!/bin/bash
###对数据库中的mysql库下每一个表都进行打包备份;备份文件存放在/tmp/mysql目录下
date=$(date +"%Y%m%d%H%M%S")
db_dir="/var/lib/mysql"
db=mysql

[ ! -d /tmp/$db ] && mkdir /tmp/$db
for i in $(ls $db_dir/$db)
do
tar -zcf /tmp/$db/$i-$date.tar.gz $db_dir/$db/$i
done
┌──[root@liruilongs.github.io]-[/mysql]
└─$
这个的tar报错加了个 P参数就不报了,但是没必要,可以正常打包
3、差异备份 inotify+rsync
所谓差异备份,即通过inotify 来监听文件变化,通rsync来增量同步数据。
这里我们本机模拟一下,一般是备份到远程机器上的,备份前一定做ssh免密 ssh-copy-id root@192.168.26.55
部署安装rsync同步软件、inotifywait 监听软件
┌──[root@liruilongs.github.io]-[/var/www/html]
└─$ yum -y install rsync
┌──[root@liruilongs.github.io]-[/mysql]
└─$ yum search inotify-tools
已加载插件:fastestmirror
Loading mirror speeds from cached hostfile
============================================== N/S matched: inotify-tools ===============================================
inotify-tools.x86_64 : Command line utilities for inotify
inotify-tools-devel.x86_64 : Headers and libraries for building apps that use libinotifytools

  名称和简介匹配 only,使用“search all”试试。
┌──[root@liruilongs.github.io]-[/mysql]
└─$ yum -y install inotify-tools
┌──[root@liruilongs.github.io]-[/mysql]
└─$  rpm -qal  inotify-tools
/usr/bin/inotifywait
/usr/bin/inotifywatch
/usr/lib64/libinotifytools.so.0
/usr/lib64/libinotifytools.so.0.4.1
/usr/share/doc/inotify-tools-3.14
/usr/share/doc/inotify-tools-3.14/AUTHORS
/usr/share/doc/inotify-tools-3.14/COPYING
/usr/share/doc/inotify-tools-3.14/ChangeLog
/usr/share/doc/inotify-tools-3.14/NEWS
/usr/share/doc/inotify-tools-3.14/README
/usr/share/man/man1/inotifywait.1.gz
/usr/share/man/man1/inotifywatch.1.gz
差异备份【inotify+rsync】
进行模拟差异备份
┌──[root@liruilongs.github.io]-[~]
└─$ mkdir rsync;cd rsync
┌──[root@liruilongs.github.io]-[~/rsync]
└─$ vim isync.sh
┌──[root@liruilongs.github.io]-[~/rsync]
└─$ mkdir /root/liruilong
┌──[root@liruilongs.github.io]-[~/rsync]
└─$ sh isync.sh &
[1] 17575
┌──[root@liruilongs.github.io]-[~/rsync]
└─$ cd /root/liruilong/
┌──[root@liruilongs.github.io]-[~/liruilong]
└─$ ls
┌──[root@liruilongs.github.io]-[~/liruilong]
└─$ cd /var/www/html/
┌──[root@liruilongs.github.io]-[/var/www/html]
└─$ echo "123456" > liruilong.txt
┌──[root@liruilongs.github.io]-[/var/www/html]
└─$ cat liruilong.txt
123456
┌──[root@liruilongs.github.io]-[/var/www/html]
└─$ cd /root/liruilong/
┌──[root@liruilongs.github.io]-[~/liruilong]
└─$ ls
liruilong.txt
┌──[root@liruilongs.github.io]-[~/liruilong]
└─$ cat liruilong.txt
123456
┌──[root@liruilongs.github.io]-[~/liruilong]
└─$ jobs
[1]+  运行中               sh isync.sh &(工作目录:~/rsync)
┌──[root@liruilongs.github.io]-[~/liruilong]
└─$
备份脚本
┌──[root@liruilongs.github.io]-[~/rsync]
└─$ ls
isync.sh
┌──[root@liruilongs.github.io]-[~/rsync]
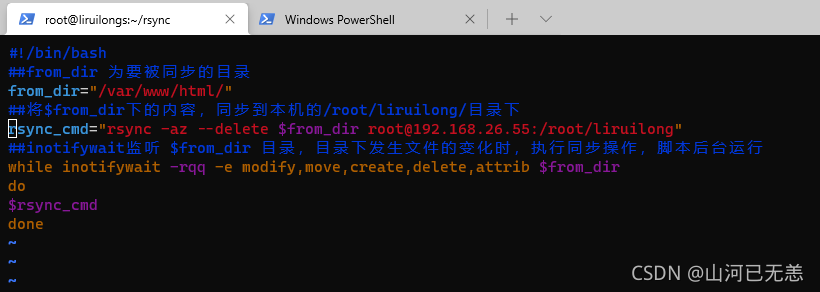
└─$ cat isync.sh
#!/bin/bash
##from_dir 为要被同步的目录
from_dir="/var/www/html/"
##将$from_dir下的内容,同步到本机的/root/liruilong/目录下
rsync_cmd="rsync -az --delete $from_dir root@192.168.26.55:/root/liruilong"
##inotifywait监听 $from_dir 目录,目录下发生文件的变化时,执行同步操作,脚本后台运行
while inotifywait -rqq -e modify,move,create,delete,attrib $from_dir
do
$rsync_cmd
done
┌──[root@liruilongs.github.io]-[~/rsync]
└─$

【声明】本内容来自华为云开发者社区博主,不代表华为云及华为云开发者社区的观点和立场。转载时必须标注文章的来源(华为云社区)、文章链接、文章作者等基本信息,否则作者和本社区有权追究责任。如果您发现本社区中有涉嫌抄袭的内容,欢迎发送邮件进行举报,并提供相关证据,一经查实,本社区将立刻删除涉嫌侵权内容,举报邮箱:
cloudbbs@huaweicloud.com
- 点赞
- 收藏
- 关注作者
评论(0)