使用nginx实现动静分离的负载均衡集群

架构图
本次要实现的架构图:

工作中我们希望这样:
静态文件处理:可以使用nginx 或apache
动文件处理: apache ,tomcat
图片文件处理: squid
我们可以使用nginx实现动静分离的负载均衡集群:
nginx负载均衡详解
Nginx 的 upstream 负载的5种方式,目前最常用 前3 种方式:
1)、轮询(默认)
每个请求按时间顺序逐一分配到不同的后端服务器,如果后端服务器 down 掉,能自动剔除。
2)、weight
指定轮询几率,weight 和访问比率成正比,用于后端服务器性能不均的情况。
3)、ip_hash
每个请求按访问 ip 的 hash 结果分配,这样每个访客固定访问一个后端服务器,可以解决 session 的问题。
4)、fair(第三方)
按后端服务器的响应时间来分配请求,响应时间短的优先分配。
5)、url_hash(第三方) url哈西
按访问url的hash结果来分配请求,使同样的url定向到同一个后端服务器,后端服务器为缓存时比较有效
我们先来实现nginx实现负载均衡和动静分离:
1. 编译安装nginx
1) 安装依赖工具
[root@itlaoxin163 ~]# yum -y install gcc gcc-c++ autoconf automake
[root@itlaoxin163 ~]# yum -y install zlib zlib-devel openssl openssl-devel pcre pcre-devel
- 1
- 2
- 3
itlaoxin是网名互联网老辛的简写
[root@itlaoxin163 ~]# ll nginx-1.8.0.tar.gz
-rw-r--r--. 1 root root 832104 12月 22 2016 nginx-1.8.0.tar.gz
[root@itlaoxin163 ~]#
- 1
- 2
- 3
2)解压:
[root@itlaoxin163 ~]# tar xf nginx-1.8.0.tar.gz -C /usr/local/src/
[root@itlaoxin163 ~]# cd !$
cd /usr/local/src/
[root@itlaoxin163 src]# pwd
/usr/local/src
[root@itlaoxin163 src]# cd nginx-1.8.0/
[root@itlaoxin163 nginx-1.8.0]# pwd
/usr/local/src/nginx-1.8.0
- 1
- 2
- 3
- 4
- 5
- 6
- 7
- 8
3)开始编译:
./configure --prefix=/usr/local/nginx --with-http_dav_module --with-http_stub_status_module --with-http_addition_module --with-http_sub_module --with-http_flv_module --with-http_mp4_module
- 1
对参数的解释:
参数:
–with-http_dav_module 启用ngx_http_dav_module支持(增加PUT,DELETE,MKCOL:创建集合,COPY和MOVE方法)默认情况下为关闭,需编译开启
–with-http_stub_status_module 启用ngx_http_stub_status_module支持(获取nginx自上次启动以来的工作状态)
–with-http_addition_module 启用ngx_http_addition_module支持(作为一个输出过滤器,支持不完全缓冲,分部分响应请求)
–with-http_sub_module 启用ngx_http_sub_module支持(允许用一些其他文本替换nginx响应中的一些文本)
–with-http_flv_module 启用ngx_http_flv_module支持(提供寻求内存使用基于时间的偏移量文件)
–with-http_mp4_module 启用对mp4文件支持(提供寻求内存使用基于时间的偏移量文件)
4)安装
[root@itlaoxin163 nginx-1.8.0]# make && make install
- 1
- 2
5) 生成运行nginx的用户
[root@itlaoxin163 nginx-1.8.0]# useradd -u 8000 -s /sbin/nologin  nginx
[root@itlaoxin163 nginx-1.8.0]# id !$
id nginx
uid=8000(nginx) gid=8000(nginx) 组=8000(nginx)
[root@itlaoxin163 nginx-1.8.0]#
- 1
- 2
- 3
- 4
- 5
- 6
6)启动nginx
如果你不知道nginx配置文件和启动脚本在哪,可以搜一下
[root@itlaoxin163 ~]# find / -name nginx.conf
/usr/local/nginx/conf/nginx.conf
[root@itlaoxin163 ~]# /usr/local/nginx/sbin/nginx

[root@itlaoxin163 ~]# netstat -antup |grep 80
tcp 0 0 0.0.0.0:80 0.0.0.0:* LISTEN 9327/nginx: master
[root@itlaoxin163 ~]#
- 1
- 2
- 3
- 4
- 5
- 6
- 7
- 8
7) 查看nginx执行效果
[root@itlaoxin163 ~]# systemctl stop firewalld.service
[root@itlaoxin163 ~]# curl -I 127.0.0.1
HTTP/1.1 200 OK
Server: nginx/1.8.0
Date: Fri, 02 Apr 2021 00:55:30 GMT
Content-Type: text/html
Content-Length: 612
Last-Modified: Fri, 02 Apr 2021 00:46:51 GMT
Connection: keep-alive
ETag: "6066697b-264"
Accept-Ranges: bytes
- 1
- 2
- 3
- 4
- 5
- 6
- 7
- 8
- 9
- 10
- 11
2. 配置nginx成为分发器
1)先备份
[root@itlaoxin163 ~]# cd /usr/local/nginx/c
client_body_temp/ conf/ [root@itlaoxin163 ~]# cd /usr/local/nginx/c
client_body_temp/ conf/ [root@itlaoxin163 ~]# cd /usr/local/nginx/conf/
[root@itlaoxin163 conf]# cp nginx.conf nginx.conf.bak
[root@itlaoxin163 conf]#
- 1
- 2
- 3
- 4
- 5
- 6
- 7
- 8
2) 把nginx设置成分发器,实现动静分离

为了方便大家复制:
location / { root html; index index.html index.htm; if ($request_uri ~* \.html$){ proxy_pass http://htmlservers; } if ($request_uri ~* \.php$){ proxy_pass http://phpservers; } proxy_pass http://picservers;
- 1
- 2
- 3
- 4
- 5
- 6
- 7
- 8
- 9
- 10
- 11
- 12
- 13
- 14
3) 定义负载均衡设备的IP
在nginx配置文件最后一行}前添加一下内容:
 upstream  htmlservers { server 192.168.1.162:80; server 192.168.1.164:80;
 }
 upstream  phpservers{ server 192.168.1.162:80; server 192.168.1.164:80;
 }
 upstream  picservers { server 192.168.1.162:80; server 192.168.1.164:80;
 }
- 1
- 2
- 3
- 4
- 5
- 6
- 7
- 8
- 9
- 10
- 11
- 12
- 13
4) 测试配置文件是否ok
[root@itlaoxin163 conf]# /usr/local/nginx/sbin/nginx -t
nginx: the configuration file /usr/local/nginx/conf/nginx.conf syntax is ok
nginx: configuration file /usr/local/nginx/conf/nginx.conf test is successful
[root@itlaoxin163 conf]#
- 1
- 2
- 3
- 4
5) 重启nginx
[root@itlaoxin163 conf]# /usr/local/nginx/sbin/nginx -s reload
在ITlaoxin62服务器和63服务器上进行配置
ITlaoxin62:
配置web服务器:
[root@ITlaoxin162 html]# yum install httpd  php -y
生成静态测试文件:
[root@ITlaoxin162 html]#echo 192.168.1.162 > /var/www/html/index.html
- 1
- 2
- 3
- 4
- 5
[root@itlaoxin162 ~]# vim /var/www/html/test.php
写入内容:
echo "我是162服务器";
<?php
phpinfo();
?>
- 1
- 2
- 3
- 4
启动apache

```bash
[root@itlaoxin162 html]# service httpd restart
Redirecting to /bin/systemctl restart httpd.service
- 1
- 2
- 3
- 4
- 5
- 6
- 7
ITlaoxin164
[root@itlaoxin164 ~]# yum install httpd php -y
[root@itlaoxin164 ~]# echo 192.168.1.164 > /var/www/html/index.html
- 1
- 2
[root@itlaoxin164 ~]# cd /var/www/html/
[root@itlaoxin164 html]# vim laoxin.php
[root@itlaoxin164 html]#
- 1
- 2
- 3
- 4
echo "我是164服务器";
<?php
phpinfo();
?>
- 1
- 2
- 3
- 4
启动
[root@itlaoxin164 html]# service httpd restart
Redirecting to /bin/systemctl restart httpd.service
[root@itlaoxin164 html]#
- 1
- 2
- 3
- 4
到目前为止,nginx负载均衡就结束了,接下来就是测试的时间
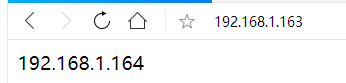
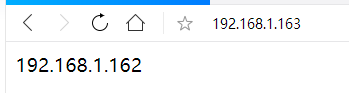
测试转发动态页面:


文章来源: zmedu.blog.csdn.net,作者:互联网老辛,版权归原作者所有,如需转载,请联系作者。
原文链接:zmedu.blog.csdn.net/article/details/115389820

- 点赞
- 收藏
- 关注作者
评论(0)