Spring Boot 学习01-----搭建一个简单的spring-boot-demo
今天开始要系统性的学习Spring Boot。这个熟悉又陌生的框架,已经陪伴了我2年多。百尺竿头更进一步,这里使用Idea来搭建一个SpringBoot项目。
系统环境
| 工具 | 版本号 |
|---|---|
| spring-boot | 2.4.5 |
| jdk | 1.8 |
实施步骤
- 选中 File---->New—>Module,进入创建项目的页面。

- 进入Module页面之后,选中Spring Initializer 会引导我们创建一个SpringBoot项目,默认选择最新的SpringBoot,当然也可以选中Custom,选择一个我们自己的私域连接,不过要确保这链接是有效的。

- 对项目进行配置,指定项目的 groupId和artifactId,这两个非常关键,直接决定了项目名,下面还有可以选在JDK的版本,以及指定包路径。

- 我们一般都是用SpringBoot来创建一个Web项目,所以需要选中Spring Web

点击确认之后,项目就创建成功了,项目的结构如下图所示:

选中启动类SpringBootDemoNewApplication,右键运行项目可以直接可以启动成功,默认的启动端口是 8080, 默认项目名是 /

不过这样的启动是空洞无味了,让我们给他上点色吧,比如添加一个controller
controller
依赖添加好之后,就是编写一个简单的controller了。
package com.jay.spring.boot.controller;

import org.springframework.boot.SpringApplication;
import org.springframework.boot.autoconfigure.EnableAutoConfiguration;
import org.springframework.stereotype.Controller;
import org.springframework.web.bind.annotation.RequestMapping;
import org.springframework.web.bind.annotation.ResponseBody;


@Controller
public class SampleController { @RequestMapping("/") @ResponseBody String home() { return "Hello World!"; }
}
- 1
- 2
- 3
- 4
- 5
- 6
- 7
- 8
- 9
- 10
- 11
- 12
- 13
- 14
- 15
- 16
- 17
说明
默认的访问地址是:http://localhost:8080/
当然我们也可以在classpath下的application.properties中进行修改启动端口号,比如下面将端口号改成了 9191。
#application.properties
server.port=9191
server.address=127.0.0.1
server.servlet.context-path=/spring-boot-demo-new
- 1
- 2
- 3
- 4
上面, server.servlet.context-path=/spring-boot-demo-new就是设置项目路径的,现在需要 http://localhost:9191/spring-boot-demo-new/ 才能访问。
至此,一个最简单的spring-boot的demo就完成了。
启动项目
前面是通过Idea直接运行启动类的,当然,也有其他的启动方式,比如:通过mvn spring-boot:run来启动项目。这是因为
我们使用了spring-boot-starter-parent POM。
启动之后就可以访问了,地址为:http://localhost:9191/spring-boot-demo-new/
打包
通过命令mvn package 用来打包。
注意,Spring Boot的这种打包方式需要使用Spring Boot 提供的spring-boot-maven-plugin
<build> <plugins> <plugin> <groupId>org.springframework.boot</groupId> <artifactId>spring-boot-maven-plugin</artifactId> </plugin> </plugins>
</build>
- 1
- 2
- 3
- 4
- 5
- 6
- 7
- 8
- 9
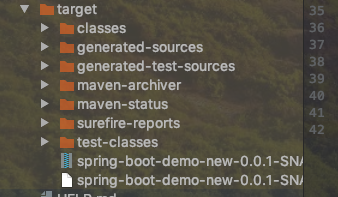
打包之后,我们可以在target下看到编译后的class文件,以及生成的jar,默认的名称是spring-boot-demo-new-0.0.1-SNAPSHOT.jar

正常执行
正常执行的jar 执行java -jar target/spring-boot-demo-new.jar
启动后的结果是,启动端口已经改成 9191,项目名已经改成了 /spring-boot-demo-new

附录
相关源码 : https://github.com/XWxiaowei/spring-boot-demo
总结
本文简单的介绍了如何搭建一个SpringBoot项目,实际上,用Idea来搭建的话还是非常简单的。
引用
http://www.cnblogs.com/larryzeal/p/5765945.html
文章来源: feige.blog.csdn.net,作者:码农飞哥,版权归原作者所有,如需转载,请联系作者。
原文链接:feige.blog.csdn.net/article/details/79784705
- 点赞
- 收藏
- 关注作者


评论(0)