为了完成小姐姐安排的打分系统,又熬了一个小时的夜补充视图与模板
橡皮擦,一个逗趣的互联网高级网虫。新的系列,让我们一起进入 Django 世界。
已经完成的文章
- 滚雪球学 Python 第三轮,Python Web 之 Django 的世界
- 小手哆嗦一下,就能用 Python Django 实现一个微型博客系统
- Django 做个小后台,细节在完善一点点,滚雪球学 Python 第三阶段
- Django QuerySet 就学那么一点点,一点点就够了
- 看完这篇博客,Python Django 你就学会一半了
- 让我们一起开发【菜谱系统】吧,滚雪球学 Python 第三轮项目计划
- 出现吧,Python Web 菜谱系统的首页,不会前端技术,也能做
- 简简单单实现 Python Web 的登录注册页面,还包含一半逻辑。
- Python Web 菜谱项目再次前进一步,从应用层了解内置用户认证系统
- 菜谱系统小成阶段,Python Web 领域终于攻占一个小山头
- 销售 小姐姐 给买家打分系统,用 Python Django 又整了一个花活
- 帮小姐姐打分系统的模型创建,滚雪球学 Python 第三轮第 12 篇
十三、视图与模板
第十二篇博客已经初步构建好了后台管理页面,接下来继续对 Django 的视图与模板进行学习。
13.1 打分系统的视图
Django 中每一个页面都是通过视图进行展示的,而视图背后对应的都是 Python 中的函数或者类中的方法,在 Django 中通过 URLconfs 进行视图匹配。这里涉及一个新的概念,叫做 URL 模式字符串,对应的浏览器地址栏里面的 /aaa/bbb/ccc 这类内容。
在 scoring/views.py 文件中添加如下代码,分别是 3 个视图,其中部分数据为测试用数据。
# 打分系统首页
def index(request): return HttpResponse("小姐姐打分系统")

# 客户详情&打分页面
def detail(request, _id): return HttpResponse(f"客户ID为{_id}")

# 客户分数查阅
def show_score(request, _id): totle = 0 return HttpResponse(f"客户 {_id} 的总分是 {totle}")
- 1
- 2
- 3
- 4
- 5
- 6
- 7
- 8
- 9
- 10
- 11
- 12
views.py 文件中的内容添加完毕,即可修改 scoring/urls.py 中的 URL 模式字符串了,具体如下:
urlpatterns = [ path("", views.index, name="index"), path("<int:_id>/", views.detail, name="detail"), path("<int:_id>/score", views.show_score, name="show_score"),
]
- 1
- 2
- 3
- 4
- 5
此时还需要关注的一个文件是 settings.py,在该文件中存在一个配置项如下:
ROOT_URLCONF = 'cutegirl.urls'
- 1
上述配置项决定了当用户访问的 URL 携带 scoring 时,Django 会自动跳转到 scoring.urls 中进行匹配。
现在可以通过访问下述地址获取不同的展示结果了。
http://127.0.0.1:8000/scoring/2/
http://127.0.0.1:8000/scoring/2/score
- 1
- 2
代码中 <int:_id> 在后续博客中会补充相应的说明,基本含义是前面是数据类型,后面是视图的参数名。
13.2 重拾模板
在 scoring 目录下新建一个目录叫做 templates ,然后在 templates 中再创建一个文件夹 ttt,这个文件名可以任意,甚至可以创建多套模板都没有问题。
在编写代码前,先通过命令行向 sqlite 中输入一些数据。
> python manage.py shell
>>> from scoring.models import Customer
>>> cus = Customer(1,"橡皮擦",15012345678)
>>> cus.save()
>>> cus = Customer(2,"1_bit",15066667777)
>>> cus.save()
- 1
- 2
- 3
- 4
- 5
- 6
数据准备完毕,可以通过下述代码输出数据进行基础测试,查看视图与模型之间的关联关系是否打通。
修改 views.py 文件,填入下述内容代码。
from django.http import HttpResponse
from .models import Customer

# 打分系统首页
def index(request): customers = Customer.objects.all() ret = ",".join([c.name for c in customers]) return HttpResponse(ret)
- 1
- 2
- 3
- 4
- 5
- 6
- 7
- 8
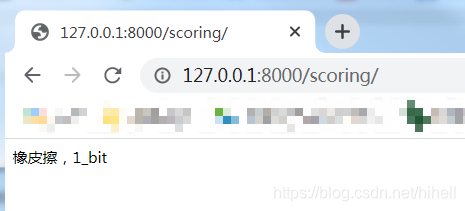
此时访问 http://127.0.0.1:8000/scoring/,得到如下内容。

接下来配合视图在对 views.py 中的内容进行修改。
from django.http import HttpResponse
from .models import Customer
from django.template import loader

# 打分系统首页
def index(request): customers = Customer.objects.all() template = loader.get_template("ttt/index.html") context = { "customers": customers } return HttpResponse(template.render(context, request))
- 1
- 2
- 3
- 4
- 5
- 6
- 7
- 8
- 9
- 10
- 11
- 12
- 13
上述代码中,优先导入了模型类与 template 中的 loader 模块,然后修改 index 函数,通过 Customer.objects.all() 获取之前录入的客户数据。
template = loader.get_template("ttt/index.html") 用于加载模板,最后将数据通过 context 传递到 index.html 页面中。
此时修改一下 index.html 页面逻辑,内容如下:
{% if customers %}
<ul>
  {% for c in customers %}
  <li><a href="/scoring/{{ c._id }}">{{ c.name }}</a></li>
  {% endfor %}
</ul>
{% else %}
<p>无客户</p>
{% endif %}
- 1
- 2
- 3
- 4
- 5
- 6
- 7
- 8
- 9
刷新页面,出现如下 BUG,原因是 c._id 导致,因 _ 开头的变量在模板中被当做私有变量。
TemplateSyntaxError at /scoring/ Variables and attributes may not begin with
underscores: 'c._id'
- 1
- 2
解决办法涉及新的模板标签知识点。
在 scoring 目录中新建立一个 templatetags 文件夹,其中创建两个文件 __init__.py 与 getid.py,目录结构如下:

__init__.py 保持为空即可,getid.py 中增加如下代码。这里相当于在 Django 模板中手动创建了一个过滤器。顺便再回顾一下 Django 模板语法。
- 变量:两个大括号括起来的
{{变量名}}; - 标签:代码段
{% 代码块 %}; - 过滤器:竖线(
|); - 注释:
{# 这里是注释 #}。
from django import template
register = template.Library()

@register.filter(name='getid')
def getid(d): return d._id
- 1
- 2
- 3
- 4
- 5
- 6
完成准备工作之后,修改 index.html 文件。
{% load getid %} {% if customers %}
<ul>
  {% for c in customers %}
  <li><a href="/scoring/{{ c|getid }}">{{ c.name }}</a></li>
  {% endfor %}
</ul>
{% else %}
<p>无客户</p>
{% endif %}
- 1
- 2
- 3
- 4
- 5
- 6
- 7
- 8
- 9
再次运行代码,得到的页面源码如下:
<ul>
  <li><a href="/scoring/1">橡皮擦</a></li>
  <li><a href="/scoring/2">1_bit</a></li>
</ul>
- 1
- 2
- 3
- 4
views.py 代码中的函数会返回一个 HttpResponse 对象到浏览器,该处理逻辑经常使用,所以 Django 提供了一个内置好的简写函数,render 。
from django.shortcuts import render
# 打分系统首页
def index(request): customers = Customer.objects.all() context = { "customers": customers } return render(request, "ttt/index.html", context)
- 1
- 2
- 3
- 4
- 5
- 6
- 7
- 8
刚才已经提及了 Django 模板系统中的常见语法,对于模板系统还有如下内容需要补充。
修改模板中的超链接生成方式,在前文中使用字符串拼接的方式 <a href="/scoring/{{ c|getid }}">{{ c.name }}</a> 生成了一个超链接,该内容可以进行优化,在 scoring/urls.py 中,我们给每个 URL 模式都进行了命名。
urlpatterns = [ path("", views.index, name="index"), path("<int:id>/", views.detail, name="detail"), path("<int:id>/score", views.show_score, name="show_score"),
]
- 1
- 2
- 3
- 4
- 5
通过上述命名,可以修改模板中超链接的生成方式为:
{% for c in customers %}
<li><a href="{% url 'detail' c|getid%}">{{ c.name }}</a></li>
{% endfor %}
- 1
- 2
- 3
在 Django 中任何功能都是以应用形式存在的,即会出现多个应用在一个项目内的场景,此时 URL 模式可能会出现相同内容。解决办法非常简单,通过在 urls.py 文件中增加 app_name 变量设置 URLconf 的命名空间。
from django.urls import path
from . import views

app_name = "scoring"
urlpatterns = [ path("", views.index, name="index"), path("<int:id>/", views.detail, name="detail"), path("<int:id>/score", views.show_score, name="show_score"),
]
- 1
- 2
- 3
- 4
- 5
- 6
- 7
- 8
- 9
命名名称空间之后,就可以在 index.html 文件中增加名称空间相关数据。
{% for c in customers %}
<li><a href="{% url 'scoring:detail' c|getid%}">{{ c.name }}</a></li>
{% endfor %}
- 1
- 2
- 3
13.3 本篇博客小节
本篇我们再次对打分系统中的视图与模板进行了补充与学习,一起打卡吧。
相关阅读
今天是持续写作的第 131 / 200 天。
如果你想跟博主建立亲密关系,可以关注同名公众号 梦想橡皮擦,近距离接触一个逗趣的互联网高级网虫。
博主 ID:梦想橡皮擦,希望大家点赞、评论、收藏。
文章来源: blog.csdn.net,作者:梦想橡皮擦,版权归原作者所有,如需转载,请联系作者。
原文链接:blog.csdn.net/hihell/article/details/115531609
- 点赞
- 收藏
- 关注作者


评论(0)