Vue基础入门小demo——记事本
【摘要】 记事本(不是操作系统的那个记事本,是一个简单的网页版本记事本)是一个较全面的Vue指令集合案例,在你学习完大部分基本的v-指令后(如v-model),你可以写这个记事本案例,来熟悉和巩固v-指令的使用方法,记事本这个案例是一个功能比较齐全的小demo,是一个不错的练手案例。
📋前言
记事本(不是操作系统的那个记事本,是一个简单的网页版本记事本)是一个较全面的Vue指令集合案例,在你学习完大部分基本的v-指令后(如v-model),你可以写这个记事本案例,来熟悉和巩固v-指令的使用方法,记事本这个案例是一个功能比较齐全的小demo,是一个不错的练手案例。
涉及指令:
- v-on
- v-for
- v-model
🎯demo介绍
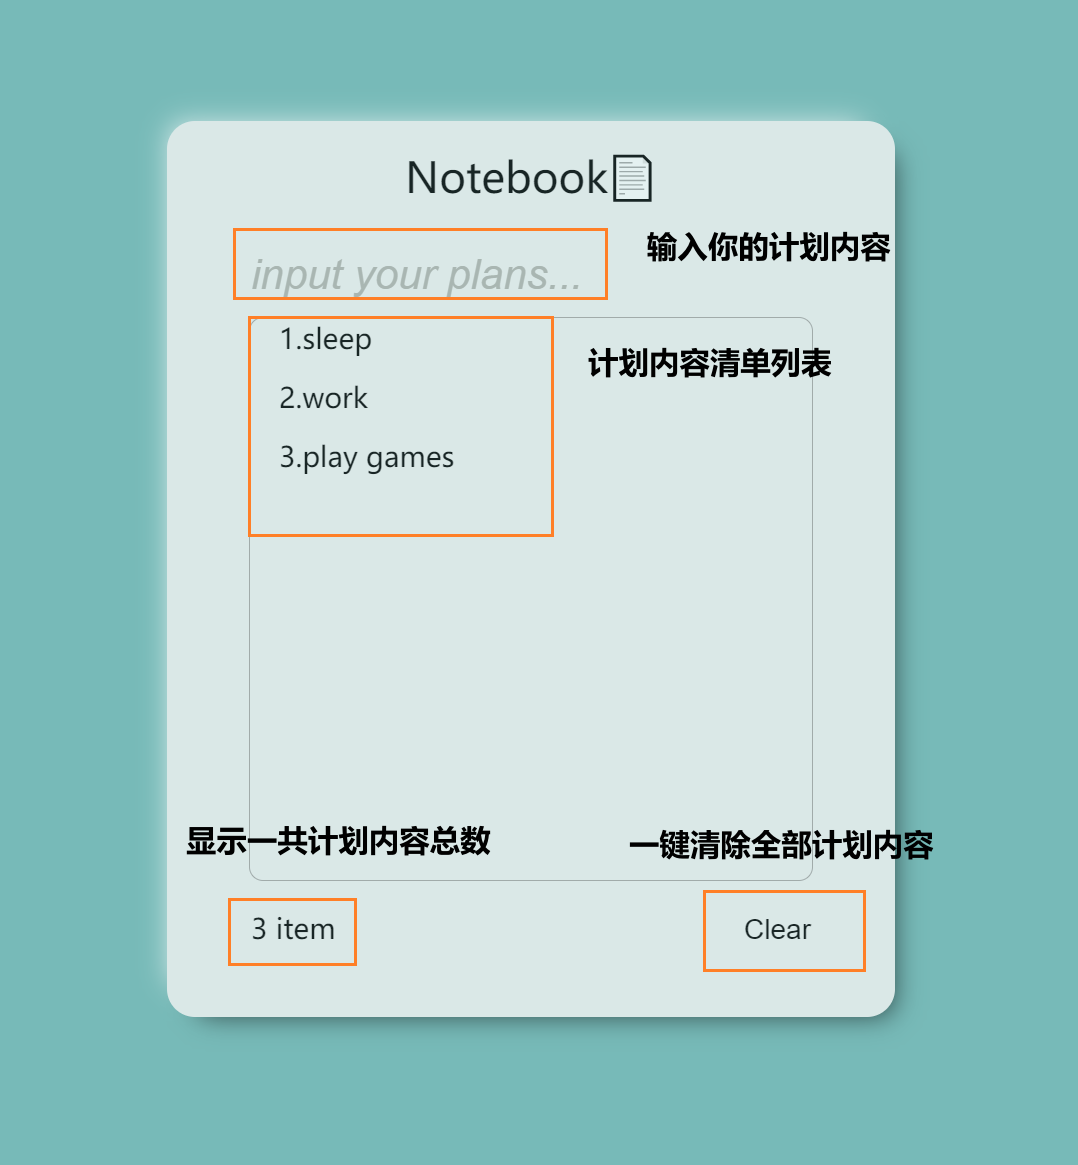
📄布局包括:
- 上面是一个输入内容的输入框
- 中间是显示内容的列表
- 底部是显示内容总数的文字和清空按钮
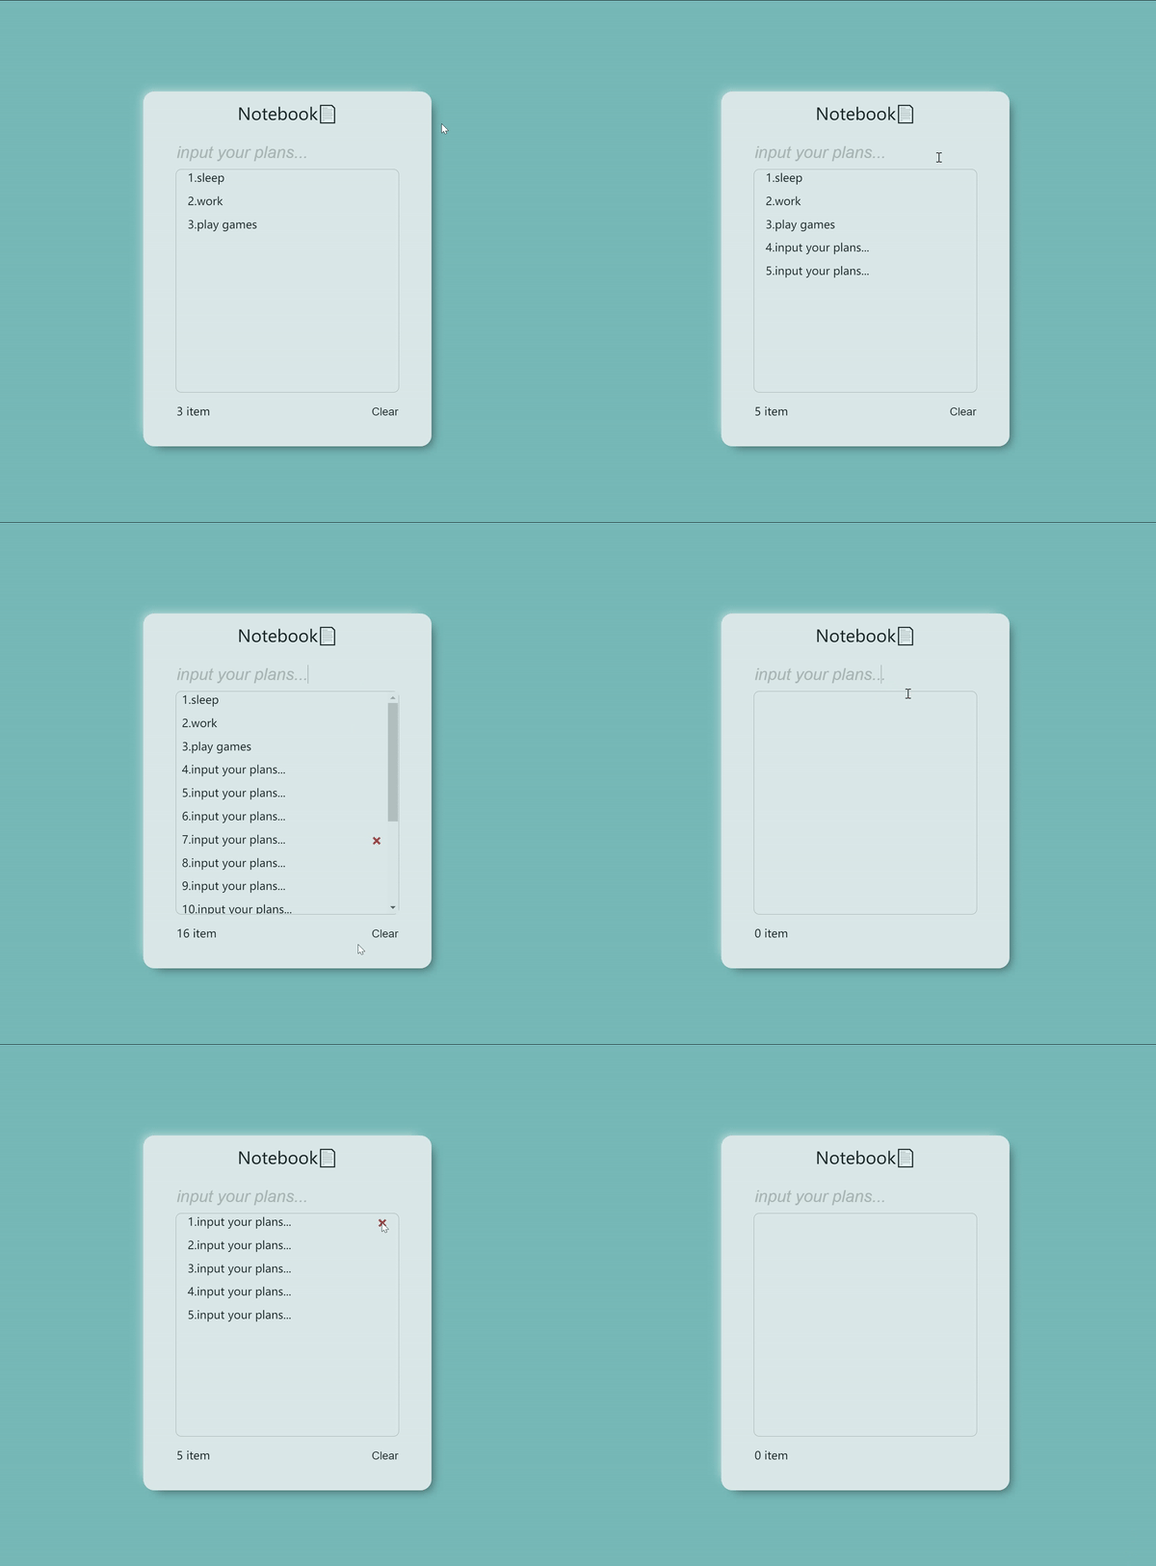
📄功能包括:
- 新增计划内容
- 删除单个计划内容
- 统计计划内容的总数
- 清空全部计划内容
- 隐藏按钮
- 鼠标移入计划内容出现删除的选项,点击 × 进行删除
🎯完整代码
<!DOCTYPE html>
<html lang="en">

<head>
    <meta charset="UTF-8">
    <meta http-equiv="X-UA-Compatible" content="IE=edge">
    <meta name="viewport" content="width=device-width, initial-scale=1.0">
    <title>Document</title>
</head>
<script src="https://unpkg.com/vue@3/dist/vue.global.js"></script>
<style>
    * {
        margin: 0;
        padding: 0;
    }


    body{
        background-color: #77bab8;
    }
    #todoapp {
        /* border: 1px solid #aba7a7; */
        width: 26rem;
        height: 32rem;
        margin: 10% auto;
        /* margin-top: rem; */
        position: relative;
        border-radius: 1rem;
        background-color: #f3f3f3;
        opacity: 0.8;
        box-shadow: -8px -8px 16px -10px rgba(255, 255, 255, 1),
        8px 8px 16px -10px rgba(0, 0, 0, .9);
        /* box-shadow: 1rem 0.5rem 3rem 0.01px rgb(0, 0, 0); */
    }

    header {
        text-align: center;
    }

    header h1 {
        line-height: 4rem;
        /* margin-bottom: 2rem; */
        /* border: 1px solid #000; */
        font-weight: normal;
    }

    header .new-todo {
        color: rgb(181, 181, 176);
        font-style: italic;
        width: 20rem;
        height: 3rem;
        font-size: 24px;
        outline: none;
        border: none;
        background-color: #f3f3f3;
    }

    .todo-list {
        margin: 0 auto;
        border: 1px solid #aba7a7;
        width: 20rem;
        height: 20rem;
        overflow-y: auto;
        overflow-x: none;
        border-radius: 0.5rem;
    }

    .todo {
        margin: 0 auto;
        list-style: none;
        width: 18rem;
        height: 1.6rem;
        /* line-height: 48px; */
        /* border: 1px solid; */
        position: relative;
        overflow: hidden;
        /* word-wrap: break-word; */
        white-space: nowrap;
        text-overflow: ellipsis;
        margin-bottom: 0.5rem;
    }

    .todo-list .todo .destory {
        display: none;
        position: absolute;
        background: none;
        border: none;
        font-weight: bold;
        /* top: 5rem; */
        /* margin-left: 12.8rem; */
        right: 0rem;
        top: 0rem;
        color: brown;
        font-size: 24px;
    }

    .todo:hover .destory {
        /* color: red; */
        display: inline-block;
    }

    footer {
        text-align: center;
        margin-top: 1rem;
    }

    footer span {
        /* text-align: center; */
        position: absolute;
        left: 3rem;
    }

    footer button {
        background: none;
        border: none;
        position: absolute;
        right: 3rem;
        margin-top: 0.2rem;
        font-size: 16px;
        /* text-align: center; */
    }

    footer button:hover {
        transition: 0.3s;
        color: brown;
        text-decoration: underline;
    }
</style>

<body>
    <section id="todoapp">
        <!-- 输入框 -->
        <header class="header">
            <h1>Notebook📄</h1>
            <input v-model="inputValue" @keyup.enter="add" autofocus="autofocus" autocomplete="off" placeholder="请输入任务"
                class="new-todo" />
        </header>
        <!-- 列表区域 -->
        <section class="main">
            <ul class="todo-list">
                <li class="todo" v-for="(item,index) in list">
                    <div class="view">
                        <span class="index">{{index+1}}.</span>
                        <label for="">{{item}}</label>
                    </div>
                    <button class="destory" @click="remove(index)">×</button>
                </li>
            </ul>
        </section>
        <!-- 统计和清空 -->
        <footer class="footer">
            <span>{{list.length}} item</span>
            <button @click="clear" v-if="list.length!=0">Clear</button>
        </footer>
    </section>
</body>
<script>
    const {
        createApp
    } = Vue

    createApp({
        data() {
            return {
                list: [
                    "sleep",
                    "work",
                    "play games"
                ],
                inputValue: "input your plans..."
            }
        },
        methods: {
            add: function () {
                this.list.push(this.inputValue);
            },
            remove: function (index) {
                this.list.splice(index, 1);
            },
            clear: function () {
                this.list = []
            }
        },
    }).mount('#todoapp')
</script>

</html>
🎯最终效果
🎯案例分析
- 首先页面布局和样式,不是该案例的重点,样式可以自由发挥,问题不大。
- 显示内容列表:首先定义一个数据列表,通过v-for渲染出来默认定义好的数据。
- 新增内容:通过v-model实现input输入框和内容清单的双向数据绑定,然后在input标签通过v-on绑定一个add函数,通过push()方法操作数组的索引值来实现新增数据。这里要注意的是绑定的不是click方法,而是通过键盘回车来实现上传,用到的是keyup.enter。
- 删除方法:跟新增内容绑定方式差不多,通过v-on绑定一个remove函数,通过splice()方法操作数据的索引值来实现删除数据,这里绑定的click方法。
- 统计总数:获取数据列表的长度即可。
- 清空全部内容:通过v-on绑定一个claer函数,然后让数据列表为空,即可达到清空效果。
- 隐藏清空按钮:通过v-if来进行判断数据列表内是否还有内容,即判断数组的长度是否为0。
🎯点赞收藏,防止迷路🔥
【声明】本内容来自华为云开发者社区博主,不代表华为云及华为云开发者社区的观点和立场。转载时必须标注文章的来源(华为云社区)、文章链接、文章作者等基本信息,否则作者和本社区有权追究责任。如果您发现本社区中有涉嫌抄袭的内容,欢迎发送邮件进行举报,并提供相关证据,一经查实,本社区将立刻删除涉嫌侵权内容,举报邮箱:
cloudbbs@huaweicloud.com
- 点赞
- 收藏
- 关注作者


评论(0)