SpringCloud学习笔记(九、配置客户端)

目的
配置客户端,使其能够得到使得其可以从配置服务器上获取版本信息。
改造视图微服务-feign
直接将前面的一个视图微服务进行改造。
pom.xml
添加spring-cloud-starter-config 用于访问配置服务器
<?xml version="1.0" encoding="UTF-8"?>

<project xmlns="http://maven.apache.org/POM/4.0.0" xmlns:xsi="http://www.w3.org/2001/XMLSchema-instance" xsi:schemaLocation="http://maven.apache.org/POM/4.0.0 http://maven.apache.org/xsd/maven-4.0.0.xsd"> <parent> <artifactId>springcloud</artifactId> <groupId>edu.hpu.springcloud</groupId> <version>1.0-SNAPSHOT</version> </parent> <modelVersion>4.0.0</modelVersion> <artifactId>product-view-service-feign</artifactId> <dependencies> <dependency> <groupId>org.springframework.cloud</groupId> <artifactId>spring-cloud-starter-netflix-eureka-client</artifactId> </dependency> <dependency> <groupId>org.springframework.cloud</groupId> <artifactId>spring-cloud-starter-openfeign</artifactId>  <!--对feign方式的支持--> </dependency> <dependency> <groupId>org.springframework.boot</groupId> <artifactId>spring-boot-starter-web</artifactId> </dependency> <dependency> <groupId>org.springframework.boot</groupId> <artifactId>spring-boot-starter-thymeleaf</artifactId> </dependency> <dependency> <groupId>org.springframework.cloud</groupId> <artifactId>spring-cloud-starter-zipkin</artifactId> </dependency> <dependency> <groupId>org.springframework.cloud</groupId> <artifactId>spring-cloud-starter-config</artifactId> </dependency> </dependencies>


</project>
- 1
- 2
- 3
- 4
- 5
- 6
- 7
- 8
- 9
- 10
- 11
- 12
- 13
- 14
- 15
- 16
- 17
- 18
- 19
- 20
- 21
- 22
- 23
- 24
- 25
- 26
- 27
- 28
- 29
- 30
- 31
- 32
- 33
- 34
- 35
- 36
- 37
- 38
- 39
- 40
- 41
- 42
- 43
- 44
- 45
- 46
- 47
- 48
bootstrap.yml
与 Spring Cloud Config (配置)相关的属性必须配置在 bootstrap.yml 中,config 部分内容才能被正确加载。因为 config 的相关配置会先application.yml,而 bootstrap.yml 的加载也是先于 application.yml。
spring:
  cloud: config: label: master profile: dev discovery: enabled:  true serviceId:  config-server
  client: serviceUrl: defaultZone:  http://localhost:8761/eureka/
- 1
- 2
- 3
- 4
- 5
- 6
- 7
- 8
- 9
- 10
- 11
application.yml
变化不大,把注册中心交给了bootstrap.yml,
spring:
  application: name:  product-view-service-feign
  thymeleaf: cache: false prefix: classpath:/templates/ suffix: .html encoding: UTF-8 content-type: text/html mode: HTML5
  zipkin: base-url: http://localhost:9411
- 1
- 2
- 3
- 4
- 5
- 6
- 7
- 8
- 9
- 10
- 11
- 12
ProductController
用@Value获取配置中version的值,并放入Model,
package edu.hpu.springcloud.controller;

import edu.hpu.springcloud.pojo.Product;
import edu.hpu.springcloud.service.ProductService;
import org.springframework.beans.factory.annotation.Autowired;
import org.springframework.beans.factory.annotation.Value;
import org.springframework.stereotype.Controller;
import org.springframework.ui.Model;
import org.springframework.web.bind.annotation.RequestMapping;

import java.util.List;

@Controller
public class ProductController { @Autowired ProductService productService; @Value("${version}") String version; @RequestMapping("/products") public Object products(Model m){ List<Product> ps=productService.listProducts(); m.addAttribute("version", version); m.addAttribute("ps",ps); return "products"; }
}
- 1
- 2
- 3
- 4
- 5
- 6
- 7
- 8
- 9
- 10
- 11
- 12
- 13
- 14
- 15
- 16
- 17
- 18
- 19
- 20
- 21
- 22
- 23
- 24
- 25
- 26
- 27
product.html
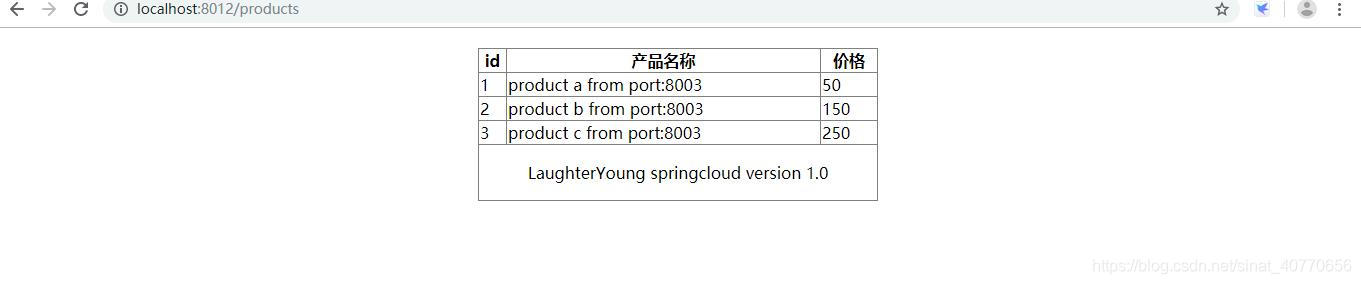
product.html添加对version的显示,
<!DOCTYPE HTML>
<html xmlns:th="http://www.thymeleaf.org">
<head> <title>products</title> <meta http-equiv="Content-Type" content="text/html; charset=UTF-8" /> <style> table { border-collapse:collapse; width:400px; margin:20px auto; } td,th{ border:1px solid gray; } </style>
</head>
<body>

<div class="workingArea"> <table> <thead> <tr> <th>id</th> <th>产品名称</th> <th>价格</th> </tr> </thead> <tbody> <tr th:each="p: ${ps}"> <td th:text="${p.id}"></td> <td th:text="${p.name}"></td> <td th:text="${p.price}"></td> </tr> </tbody> <tr> <td align="center" colspan="3"> <p th:text="${version}" >LaughterYoung springcloud version unknown</p> </td> </tr> </table>
</div>

</body>

</html>
- 1
- 2
- 3
- 4
- 5
- 6
- 7
- 8
- 9
- 10
- 11
- 12
- 13
- 14
- 15
- 16
- 17
- 18
- 19
- 20
- 21
- 22
- 23
- 24
- 25
- 26
- 27
- 28
- 29
- 30
- 31
- 32
- 33
- 34
- 35
- 36
- 37
- 38
- 39
- 40
- 41
- 42
- 43
- 44
- 45
- 46
- 47
跑一下,访问
依次运行注册中心、配置服务、数据服务、视图服务,访问:http://localhost:8012/products
错误
1、version注入失败
org.springframework.beans.factory.BeanCreationException: Error creating bean with name 'productController': Injection of autowired dependencies failed; nested exception is java.lang.IllegalArgumentException: Could not resolve placeholder 'version' in value "${version}"
- 1
1.1、先去看看bootstrap.yml中配置serviceId和注册的服务器名字是否一致,这个没有问题。
1.2、检查pom.xml包中是否添加了config jar包,没有问题。
1.3、修改gitee中项目配置文件名字,原名product-view-service-dev.properties 改为product-view-service-feign.properties

OK,解决了,懵逼来,懵逼去。
【1】、http://how2j.cn/k/springcloud/springcloud-config-client/2048.html
【2】、https://windmt.com/2018/04/19/spring-cloud-7-config-sample/
文章来源: blog.csdn.net,作者:三分恶,版权归原作者所有,如需转载,请联系作者。
原文链接:blog.csdn.net/sinat_40770656/article/details/96185220
- 点赞
- 收藏
- 关注作者
评论(0)