【ModelArts Course5】Deploying a Trained Model as an Edge Service

Deploying a Trained Model as an Edge Service
Introduction
After an AI model is developed, you can use it to create an AI application and quickly deploy the application as a real-time service on ModelArts. The API provided by ModelArts real-time service is a standard RESTful API, which can be integrated into production environments conveniently.

You can also download the trained model and inference SDK and deploy it locally as an HTTP service. 【ModelArts Course4】Using Built-in Algorithm for Food Detection describes how to train a model and deploy the trained model as a real-time service, and this document describes how to deploy the trained model as an edge service.
Edge service
The edge service consists of three parts: the model inference SDK on the edge server, the service script on the edge server, and the testing script on the local PC.
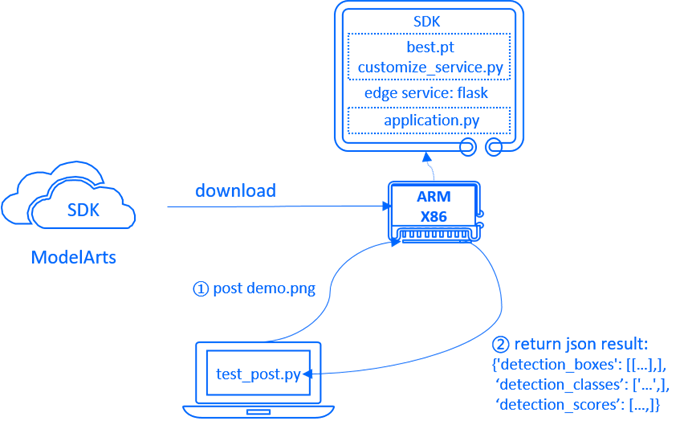
The model inference SDK, including trained models and inference code, can be downloaded directly from ModelArts, the service script is built using Flask to set up an HTTP service on the edge server, and the testing script on the local PC loads test images and posts them to the edge server to obtain inference results.
Download SDK
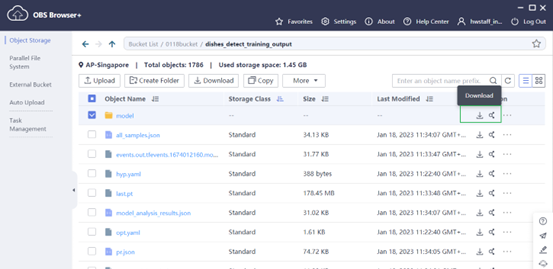
When the training job is completed, click Output Path to go to the OBS directory of the training job output:
You will see a directory organized as this, the model directory is the inference SDK. We can download the SDK from OBS, click Download to download entire folder:
After you download it, you will see a directory organized as below:
├─model
│  ├─models
│      ├─…
│      └─yolo.cpython-36m-x86_64-linux-gnu.so
│  ├─utils_y
│      ├─…
│      └─torch_utils.cpython-36m-x86_64-linux-gnu.so
│  ├─…
│  └─customize_service.py
The customize_service.py is model inference script, and *.so are the files customize_service.py depends on. Then, upload the folder to your edge server.
Environment Preparation
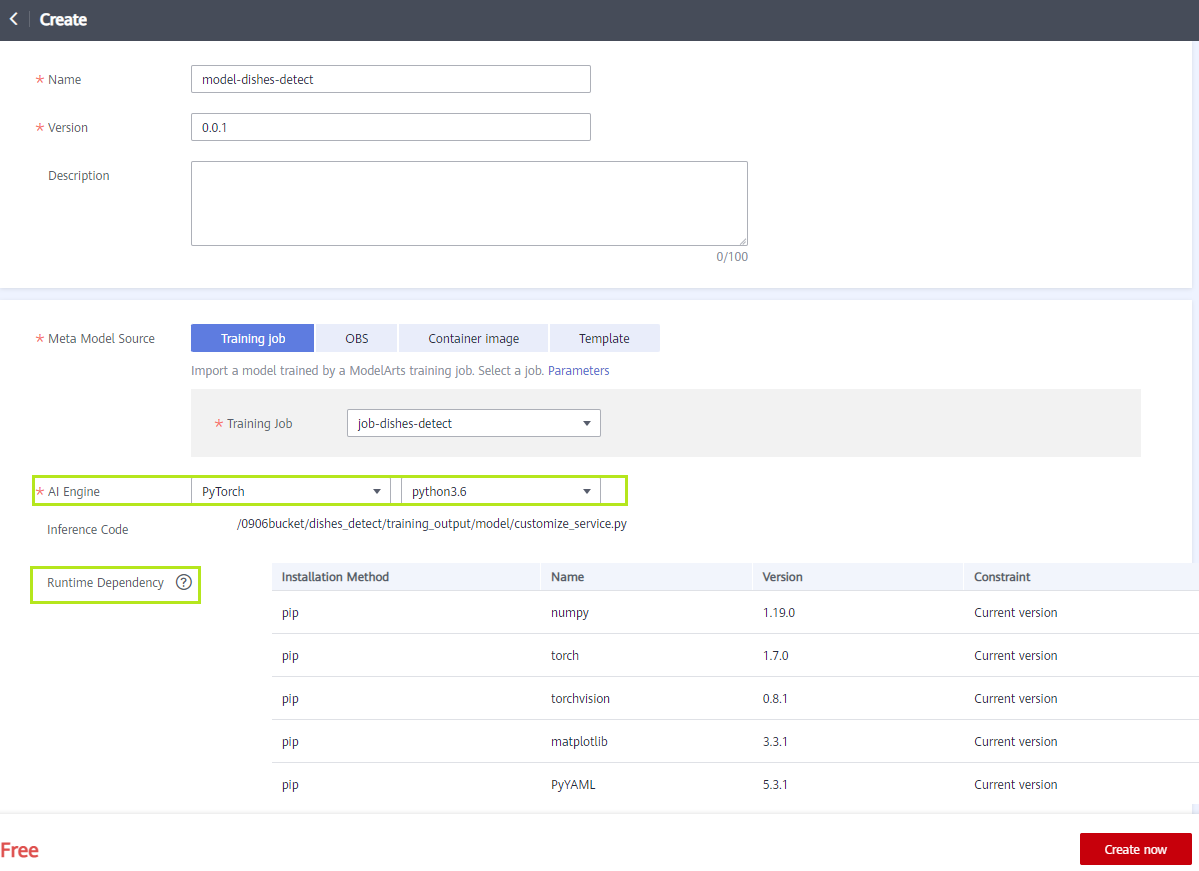
When deploying AI application, some dependences are needed. On the cloud, ModelArts will prepare the runtime environment, including some runtime dependencies and an AI engine with Pytorch and python3.6.
On the edge server, the runtime environment also needs to be prepared. Environments can be created and managed by conda:
conda create -n py36 python=3.6.10
conda activate py36
pip install torch==1.7.0 numpy==1.19.0 torchvision==0.8.1 matplotlib==3.3.1 PyYAML==5.3.1
In addition, the dependencies of AI application also need to be prepared:
pip install pandas==1.1.5 requests==2.27.1 pillow==8.4.0 opencv-python==4.7.0.68 tqdm==4.64.1 seaborn==0.11.2 flask==2.0.3
Deploy Service Code
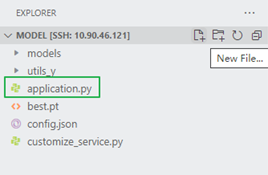
Create a python script in the model directory named application.py:
The application script uses flask to build HTTP services:
from flask import Flask, jsonify, request
from customize_service import YOLOv5

app = Flask(__name__)

yolov5 = YOLOv5(model_name="dishes_det", model_path="best.pt")

@app.route('/dishes_det', methods=['POST'])
def predict():
    file = request.files['file']
    input_dict = {"data": {"file": file}}
    input_data = yolov5._preprocess(input_dict)
    pred = yolov5._inference(input_data)
    out = yolov5._postprocess(pred)
    return jsonify(out)

if __name__ == '__main__':
    app.run(host='0.0.0.0', port=5005)
Deploy Local Test Code
The application can be accessed using HTTPS on other devices. The inference result is returned in JSON format:
| Field | Type | Description |
|---|---|---|
| detection_classes | string array | List of detected objects, for example, [“dishes”,“cat”] |
| detection_boxes | float array | Coordinates of the bounding box, in the format of |
| detection_scores | float array | Confidence scores of detected objects, which are used to measure the detection accuracy |
On the local device, inference results can be obtained through simple script:
import requests
import json
import cv2

if __name__ == "__main__":
    ip = "xx.xx.xx.xx"  # IP address of the edge server
    port = 5005  # Port set by the service
    route = "dishes_det"  # Route set by the service
    url = f'http://{ip}:{port}/{route}'
    files = {'file': open('./demo.png', 'rb')}
    response = requests.post(url, files=files)
    img = cv2.imread("./demo.png")
    bbox_data = json.loads(response.content)
    print(bbox_data)
    detection_boxes = bbox_data.get('detection_boxes')
    for box in detection_boxes:
        cv2.rectangle(img, (int(box[1]), int(box[0])), (int(box[3]), int(box[2])), (255, 0, 0), 1)
    cv2.imwrite("./res.jpg", img)
The script output is as follows:
{'detection_boxes': [[99.0, 133.0, 445.0, 492.0], [504.0, 291.0, 741.0, 548.0], [520.0, 90.0, 726.0, 291.0]], 'detection_classes': ['dish', 'dish', 'dish'], 'detection_scores': [0.8971166610717773, 0.8653378486633301, 0.8631448745727539]}
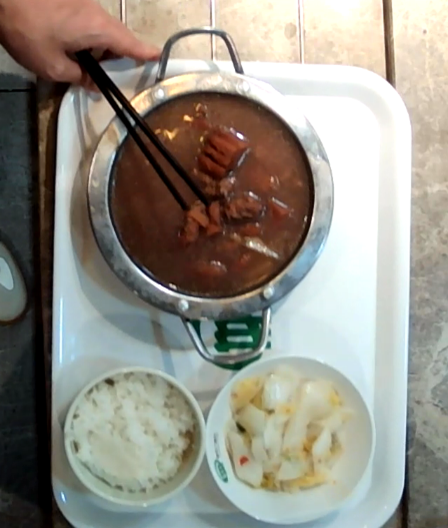
You can also visualize the inference results:


- 点赞
- 收藏
- 关注作者
评论(0)