Android 自定义UI 实战 01 文字变色

Android 自定义 UI 实战
第一章: 自定义View 文字变色
@TOC
前言
使用纯代码 加 注释的方式,可以更快的理解源码
如果你喜欢,请点个赞,后期会不断的深入讲解
使用自定义UI 完成 歌词文字颜色加载效果
1、自定义文本属性
在项目attrs.xml 文件中 res -> values -> attrs.xml,自定义文本属性,没有这个文件,就新建一个。
<?xml version="1.0" encoding="utf-8"?>
<resources>
    <declare-styleable name="ColorTrackTextView">
        <attr name="originColor" format="color" />
        <attr name="changeColor" format="color" />
    </declare-styleable>
</resources>
2、创建组件
新建一个 ColorTrackTextView 文件,继承自 AppCompatTextView 这里也可以直接继承View,我只需要自定义TextView ,就直接继承 AppCompatTextView
public class ColorTrackTextView extends AppCompatTextView {

//    绘制不变色字体的画笔
    private Paint mOriginPaint;
//    绘制变色字体的画笔
    private Paint mChangePaint;

    public ColorTrackTextView(@NonNull Context context) {
        this(context, null);
    }

    public ColorTrackTextView(@NonNull Context context, @Nullable AttributeSet attrs) {
        this(context, attrs, 0);
    }

    public ColorTrackTextView(@NonNull Context context, @Nullable AttributeSet attrs, int defStyleAttr) {
        super(context, attrs, defStyleAttr);

    }
}
3、在 xml 中使用组件
<com.traveleasy.leaningui.ColorTrackTextView
       android:id="@+id/color_track_tv"
       android:text="Hello Word"
       android:textSize="20sp"
       app:changeColor="@color/teal_200"
       android:layout_width="match_parent"
       android:layout_height="wrap_content"
       tools:ignore="MissingConstraints" />
上面的三步中,已经完成了自定义TextView 的属性设置,以及在 xml 中使用,接下来开始做测量绘制的效果
3、测量
这里我直接继承的是 AppCompatTextView, 所以就直接跳过了测量部分。当然,如果继承的是View,也只需要测量自己就可以了
4、绘制
接下来通过 onDraw:绘制,在此之前,我们需要先创建一个画笔
  /**
     * 根据颜色,设置画笔
     *
     * @return
     */
    private Paint getPaintByColor(int color) {
        Paint paint = new Paint();
//        设置颜色
        paint.setColor(color);
//       设置抗锯齿
        paint.setAntiAlias(true);
//       防抖动
        paint.setDither(true);
//       设置字体的大小 就是TextView 文本字体大小
        paint.setTextSize(getTextSize());

        return paint;
    }
画笔中的颜色,我传入即可
这里我初始了两个画笔颜色,一个默认颜色,和一个需要变成的颜色
//    绘制不变色字体的画笔
    private Paint mOriginPaint;
//    绘制变色字体的画笔
    private Paint mChangePaint;
需要先初始化一个 TypedArray,在使用 TypedArray 时候,别忘了回收哦
    private void initPaint(Context context, AttributeSet attrs) {
        TypedArray typedArray = context.obtainStyledAttributes(attrs, R.styleable.ColorTrackTextView);

        int changeColor = typedArray.getColor(R.styleable.ColorTrackTextView_changeColor, getTextColors().getDefaultColor());
        int originColor = typedArray.getColor(R.styleable.ColorTrackTextView_originColor, getTextColors().getDefaultColor());

//        typedArray 回收
        typedArray.recycle();

//        不变颜色的画笔
        mOriginPaint = getPaintByColor(originColor);
//        变色的画笔
        mChangePaint = getPaintByColor(changeColor);
    }
接下来就是绘制部分了,绕了一大圈,在这里,先看一张图,如下:
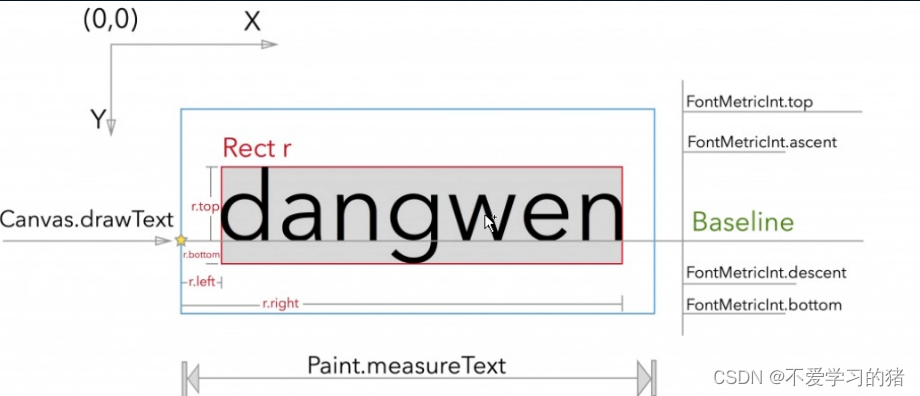
如图所示,这里我们需要先获取文本内容的基线 BaseLine,具体的就不解释了,不懂的地方请留言,直接看绘制代码吧。
 /**
     * 绘制部分
     * @param canvas
     */
    @Override
    protected void onDraw(Canvas canvas) {

//        获取绘制文本内容
        String text = getText().toString();
//        判空
        if (TextUtils.isEmpty(text)) return;

//        获取文字区域
        Rect bounds = new Rect();
        mOriginPaint.getTextBounds(text, 0, text.length(), bounds);
//        获取 x 坐标 (这里除 2 是为了让文本居中)
       int dx = getWidth() / 2 - bounds.width() / 2;
//       获取基线 baseLine
        Paint.FontMetricsInt fontMetricsInt = mChangePaint.getFontMetricsInt();
        int dy = (fontMetricsInt.bottom - fontMetricsInt.top) / 2 - fontMetricsInt.bottom;
        int baseLine = getHeight() / 2 + dy;
//        绘制文字
        canvas.drawText(text, dx, baseLine, mOriginPaint);
    }
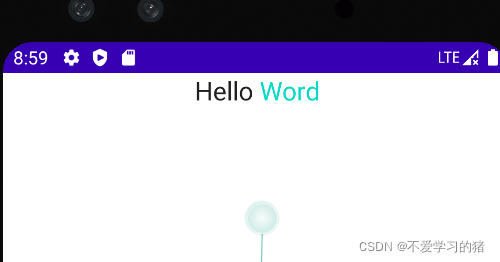
5、初步绘制效果
至此就完成了一个UI的基本绘制,看下效果图。

什么?这就完了?说好的变色呢?请继续往下看
6、绘制变色部分
声明一个变色进度的变量,这里默认值设置一半
  // 当前变色的进度
    private float mCurrentProgress = 0.5f;
接下来我们修改一下代码
 /**
     * 绘制部分
     * @param canvas
     */
    @Override
    protected void onDraw(Canvas canvas) {

      int currentPoint = (int) (mCurrentProgress * getWidth());

        onDrawText(canvas, mOriginPaint, 0, currentPoint);
        onDrawText(canvas, mChangePaint, currentPoint, getWidth());
    }

    /**
     *
     * @param canvas
     * @param paint
     * @param start    起始位置
     * @param end      结束位置
     */
    private void onDrawText(Canvas canvas, Paint paint, int start, int end){

        canvas.save();
        Rect rect = new Rect(start, 0, end, getHeight());
//        这里就要用到裁切 只显示裁切后的内容
        canvas.clipRect(rect);


//        获取绘制文本内容
        String text = getText().toString();
//        判空
        if (TextUtils.isEmpty(text)) return;

//        获取文字区域
        Rect bounds = new Rect();
        mOriginPaint.getTextBounds(text, 0, text.length(), bounds);
//        获取 x 坐标 (这里除 2 是为了让文本居中)
        int dx = getWidth() / 2 - bounds.width() / 2;
//       获取基线 baseLine
        Paint.FontMetricsInt fontMetricsInt = mChangePaint.getFontMetricsInt();
        int dy = (fontMetricsInt.bottom - fontMetricsInt.top) / 2 - fontMetricsInt.bottom;
        int baseLine = getHeight() / 2 + dy;
//        绘制文字
        canvas.drawText(text, dx, baseLine, paint);

        canvas.restore();
    }
这样我们就初步实现了文字变色的功能
7、自动变色功能实现
在XML 中新增两个按钮,控制变色的方向
<Button
       android:layout_width="wrap_content"
       android:layout_height="wrap_content"
       android:onClick="leftToRight"
       android:text="左到右"
       tools:ignore="MissingConstraints,UsingOnClickInXml" />

   <Button
       android:layout_width="wrap_content"
       android:layout_height="wrap_content"
       android:onClick="rightToLeft"
       android:text="右到左"
       tools:ignore="MissingConstraints,UsingOnClickInXml" />
定义一个变量,实现不同方向
    //    实现不同的朝向
    private Direction mDirection;

    //    定义一个枚举,保存两个方向
    public enum Direction {
        LEFT_TO_RIGHT, RIGHT_TO_LEFT
    }
修改onDraw 中的代码,实现不同方向的变色绘制
 /**
     * 绘制部分
     *
     * @param canvas
     */
    @Override
    protected void onDraw(Canvas canvas) {

        int currentPoint = (int) (mCurrentProgress * getWidth());

//        从左边开始回事
        if (mDirection == Direction.LEFT_TO_RIGHT) {
//            绘制变色的部分,--  开始 currentPoint = 0, 结束 currentPoint = getWidth
            onDrawText(canvas, mChangePaint, 0, currentPoint);
//            绘制不变色的部分
            onDrawText(canvas, mOriginPaint, currentPoint, getWidth());
        } else {
//            绘制变色的部分 --   开始 currentPoint = getWidth, 结束 currentPoint = 0
            onDrawText(canvas, mChangePaint, getWidth() - currentPoint, getWidth());
//            绘制不变色的部分
            onDrawText(canvas, mOriginPaint, 0, getWidth() - currentPoint);
        }

    }
在activity 中实现点击控制事件
    public void leftToRight(View view) {
        setAnimation(ColorTrackTextView.Direction.LEFT_TO_RIGHT);
    }

    public void rightToLeft(View view) {
        setAnimation(ColorTrackTextView.Direction.RIGHT_TO_LEFT);
    }
setAnimation() 加载进度写的动画控制
 public void setAnimation(ColorTrackTextView.Direction direction){
        mColorTrackTextView.setDirection(direction);
        ValueAnimator valueAnimator = ObjectAnimator.ofFloat(0, 1);
        valueAnimator.setDuration(2000);
        valueAnimator.addUpdateListener(new ValueAnimator.AnimatorUpdateListener() {
            @Override
            public void onAnimationUpdate(ValueAnimator animator) {
                float currentProgress = (float) animator.getAnimatedValue();
                mColorTrackTextView.setCurrentProgress(currentProgress);
            }
        });
        valueAnimator.start();
    }
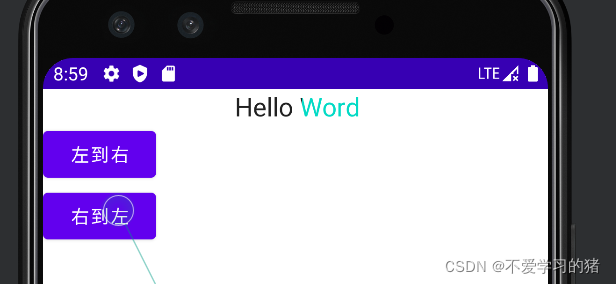
至此便完成了自定义 UI 文本 变化的功能实现,看下效果图
完整代码如下:
package com.traveleasy.leaningui;

import androidx.appcompat.app.AppCompatActivity;

import android.animation.ObjectAnimator;
import android.animation.ValueAnimator;
import android.os.Bundle;
import android.view.View;
import android.view.Window;

public class MainActivity extends AppCompatActivity {

    private ColorTrackTextView mColorTrackTextView;

    @Override
    protected void onCreate(Bundle savedInstanceState) {
        super.onCreate(savedInstanceState);
        supportRequestWindowFeature(Window.FEATURE_NO_TITLE);
        setContentView(R.layout.activity_main);

        mColorTrackTextView = findViewById(R.id.color_track_tv);

    }

    public void leftToRight(View view) {
        setAnimation(ColorTrackTextView.Direction.LEFT_TO_RIGHT);
    }

    public void rightToLeft(View view) {
        setAnimation(ColorTrackTextView.Direction.RIGHT_TO_LEFT);
    }

    public void setAnimation(ColorTrackTextView.Direction direction){
        mColorTrackTextView.setDirection(direction);
        ValueAnimator valueAnimator = ObjectAnimator.ofFloat(0, 1);
        valueAnimator.setDuration(2000);
        valueAnimator.addUpdateListener(new ValueAnimator.AnimatorUpdateListener() {
            @Override
            public void onAnimationUpdate(ValueAnimator animator) {
                float currentProgress = (float) animator.getAnimatedValue();
                mColorTrackTextView.setCurrentProgress(currentProgress);
            }
        });
        valueAnimator.start();
    }
}
package com.traveleasy.leaningui;

import android.content.Context;
import android.content.res.TypedArray;
import android.graphics.Canvas;
import android.graphics.Paint;
import android.graphics.Path;
import android.graphics.Rect;
import android.text.TextUtils;
import android.util.AttributeSet;

import androidx.annotation.NonNull;
import androidx.annotation.Nullable;
import androidx.appcompat.widget.AppCompatTextView;

public class ColorTrackTextView extends AppCompatTextView {

    //    绘制不变色字体的画笔
    private Paint mOriginPaint;
    //    绘制变色字体的画笔
    private Paint mChangePaint;

    //    当前变色的进度
    private float mCurrentProgress = 0.5f;

    //    实现不同的朝向
    private Direction mDirection;

    //    定义一个枚举,保存两个方向
    public enum Direction {
        LEFT_TO_RIGHT, RIGHT_TO_LEFT
    }

    public ColorTrackTextView(@NonNull Context context) {
        this(context, null);
    }

    public ColorTrackTextView(@NonNull Context context, @Nullable AttributeSet attrs) {
        this(context, attrs, 0);
    }

    public ColorTrackTextView(@NonNull Context context, @Nullable AttributeSet attrs, int defStyleAttr) {
        super(context, attrs, defStyleAttr);

        initPaint(context, attrs);
    }

    private void initPaint(Context context, AttributeSet attrs) {
        TypedArray typedArray = context.obtainStyledAttributes(attrs, R.styleable.ColorTrackTextView);

        int changeColor = typedArray.getColor(R.styleable.ColorTrackTextView_changeColor, getTextColors().getDefaultColor());
        int originColor = typedArray.getColor(R.styleable.ColorTrackTextView_originColor, getTextColors().getDefaultColor());

//        typedArray 回收
        typedArray.recycle();

//        不变颜色的画笔
        mOriginPaint = getPaintByColor(originColor);
//        变色的画笔
        mChangePaint = getPaintByColor(changeColor);
    }

    /**
     * 根据颜色,设置画笔
     *
     * @return
     */
    private Paint getPaintByColor(int color) {
        Paint paint = new Paint();
//        设置颜色
        paint.setColor(color);
//       设置抗锯齿
        paint.setAntiAlias(true);
//       防抖动
        paint.setDither(true);
//       设置字体的大小 就是TextView 文本字体大小
        paint.setTextSize(getTextSize());

        return paint;
    }

    /**
     * 绘制部分
     *
     * @param canvas
     */
    @Override
    protected void onDraw(Canvas canvas) {

        int currentPoint = (int) (mCurrentProgress * getWidth());

//        从左边开始回事
        if (mDirection == Direction.LEFT_TO_RIGHT) {
//            绘制变色的部分,--  开始 currentPoint = 0, 结束 currentPoint = getWidth
            onDrawText(canvas, mChangePaint, 0, currentPoint);
//            绘制不变色的部分
            onDrawText(canvas, mOriginPaint, currentPoint, getWidth());
        } else {
//            绘制变色的部分 --   开始 currentPoint = getWidth, 结束 currentPoint = 0
            onDrawText(canvas, mChangePaint, getWidth() - currentPoint, getWidth());
//            绘制不变色的部分
            onDrawText(canvas, mOriginPaint, 0, getWidth() - currentPoint);
        }


    }

    /**
     * @param canvas
     * @param paint
     * @param start  起始位置
     * @param end    结束位置
     */
    private void onDrawText(Canvas canvas, Paint paint, int start, int end) {

        canvas.save();
        Rect rect = new Rect(start, 0, end, getHeight());
//        这里就要用到裁切 只显示裁切后的内容
        canvas.clipRect(rect);

//        获取绘制文本内容
        String text = getText().toString();
//        判空
        if (TextUtils.isEmpty(text)) return;

//        获取文字区域
        Rect bounds = new Rect();
        mOriginPaint.getTextBounds(text, 0, text.length(), bounds);
//        获取 x 坐标 (这里除 2 是为了让文本居中)
        int dx = getWidth() / 2 - bounds.width() / 2;
//       获取基线 baseLine
        Paint.FontMetricsInt fontMetricsInt = mChangePaint.getFontMetricsInt();
        int dy = (fontMetricsInt.bottom - fontMetricsInt.top) / 2 - fontMetricsInt.bottom;
        int baseLine = getHeight() / 2 + dy;
//        绘制文字
        canvas.drawText(text, dx, baseLine, paint);

        canvas.restore();
    }

    public void setCurrentProgress(float currentProgress) {
        this.mCurrentProgress = currentProgress;
        invalidate();
    }

    public void setDirection(Direction direction) {
        this.mDirection = direction;
    }
}
总结
一.文字变色 – 自定义View
1.自定义属性,以及xml中使用
2.测量 — 只需要测量自己
3.onDraw:绘制自己
4.交互FontMetricInt.top 负数 FontMetricInt.bottom 正数
裁剪,只显示 裁剪后 canvas.drawXxx 的内容 cavas.clipRect();
- 点赞
- 收藏
- 关注作者
评论(0)