nginx开启https
1、nginx配置
1.1 下载nginx
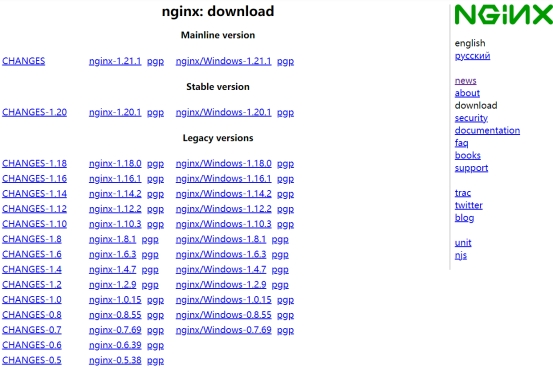
官网下载Nginx软件http://nginx.org,下载网址:http://nginx.org/en/download.html

Nginx 官方提供了三个类型的版本:
l Mainline Version:主线版,是最新版,但未经过过多的生产测试。
l Stable Version:稳定版,生产环境使用版本。
l Legacy Version:老版本。
我们需要下载的是 Stable Version。其中又分为两种版本:Linux 版与 Windows 版。开发时这两个版本我们都下载。Linux 版用于生产环境,而 Windows 版用于开发测试,选择需要的版本进行下载。
1.2 nginx 源码安装
1、安装 Nginx依赖
nginx是C语言开发,建议在linux上运行,这里使用的是CentOS7作为安装环境。
1.gcc
安装nginx需要先将官网下载的源码进行编译,编译依赖gcc环境,如果没有gcc环境,需要安装gcc。
yum install -y gcc make automake
2.PCRE
PCRE(Perl Compatible Regular Expressions)是一个Perl库,包括 Perl 兼容的正则表达式库。nginx的
http模块使用Pcre来解析正则表达式,所以需要在linux上安装Pcre库。
yum install -y pcre pcre-devel
注:pcre-devel是使用pcre开发的一个二次开发库。nginx也需要此库。
3.zlib
zlib库提供了很多种压缩和解压缩的方式,nginx使用zlib对http包的内容进行gzip,所以需要在linux上
安装zlib库。
yum install -y zlib zlib-devel
4.Openssl
OpenSSL 是一个强大的安全套接字层密码库,囊括主要的密码算法、常用的密钥和证书封装管理功能及
SSL协议,并提供丰富的应用程序供测试或其它目的使用。
nginx不仅支持http协议,还支持https(即在ssl协议上传输http),所以需要在linux安装openssl库。
yum install -y openssl openssl-devel
5.统一安装依赖环境命令:
yum -y install gcc make automake pcre-devel zlib zlib-devel openssl openssl-devel
2、安装nginx
2.1 创建存放源文件的文件夹
首先在目录/opt下创建apps目录,用于存放源文件以及解压后的文件
2.2 上传Nginx到步骤1创建的目录下
2.3 解压 Nginx
[root@localhost apps]# pwd
/opt/apps
[root@localhost apps]# ls
nginx-1.20.1.tar.gz
[root@localhost apps]# tar -zxvf nginx-1.20.1.tar.gz
[root@localhost apps]# cd nginx-1.20.1
2.4 生成 makefile
在 Nginx 解压目录下运行 make 命令,用于完成编译。但此时会给出提示:没有指定目标,并且没有发现编译文件 makefile。
编译命令 make 需要根据编译文件 makefile 进行编译,所以在编译之前需要先生成编译文件makefile。使用 configure 命令可以生成该文件。
下面是简单配置的命令执行。命令中每一行的最后添加了反斜杠\表示当前命令并未结束,回车不会执行该命令。执行成功后,会给出配置报告。
[root@localhost nginx-1.20.1]# mkdir -p /var/temp/nginx/client
[root@localhost nginx-1.20.1]# pwd
/opt/apps/nginx-1.20.1
[root@localhost nginx-1.20.1]# ./configure \
--prefix=/usr/local/nginx \
--pid-path=/usr/local/nginx/logs/nginx.pid \
--error-log-path=/usr/local/nginx/logs/error.log \
--http-log-path=/usr/local/nginx/logs/access.log \
--with-http_ssl_module \
--with-http_gzip_static_module \
--http-client-body-temp-path=/var/temp/nginx/client \
--http-proxy-temp-path=/var/temp/nginx/proxy \
--http-fastcgi-temp-path=/var/temp/nginx/fastcgi \
--http-uwsgi-temp-path=/var/temp/nginx/uwsgi
配置成功后,再次查看 Nginx 解压目录,发现其中多出了一个文件 Makefile。后面的编译就是依靠该文件进行的。
2.5 编译安装
这是两个命令,make 为编译命令,make install 为安装命令,可以分别执行。这里使用&&将两个命令连接执行,会在前面命令执行成功的前提下才会执行第二个命令。
make && make install
1.3 nginx启动与关闭
1.关闭防火墙命令:
#关闭防火墙,系统重启后还会启动
[root@localhost ~]# systemctl stop firewalld.service
[root@localhost ~]# systemctl status firewalld.service
● firewalld.service - firewalld - dynamic firewall daemon
Loaded: loaded (/usr/lib/systemd/system/firewalld.service; disabled; vendor
preset: enabled)
Active: inactive (dead)
Docs: man:firewalld(1)
#禁用防火墙,系统重启后
[root@localhost ~]# systemctl disable firewalld.service
[root@node0 ~]# systemctl list-unit-files |grep firewalld
firewalld.service disabled
2.启动Nginx:运行sbin目录下的nginx命令即可。
[root@localhost ~]# cd /usr/local/nginx/sbin/
[root@localhost sbin]# ls
nginx
[root@localhost sbin]# ./nginx
[root@localhost sbin]# ps aux|grep nginx
root 46423 0.0 0.0 40884 800 ? Ss 16:13 0:00 nginx: master process ./nginx
nobody 46424 0.0 0.5 73964 4244 ? S 16:13 0:00 nginx: worker process
root 46426 0.0 0.1 12344 1152 pts/4 S+ 16:13 0:00 grep --color=auto nginx
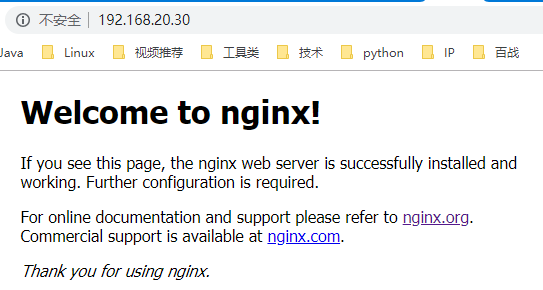
3.测试

4.关闭nginx
1.立即停止服务:这种方法比较强硬,无论进程是否在工作,都直接停止进程。
[root@localhost sbin]# ./nginx -s stop
2.从容停止服务:这种方法较stop相比就比较温和一些了,需要进程完成当前工作后再停止。
[root@localhost sbin]# ./nginx -s quit
3.killall 方法杀死进程:直接杀死进程,在上面无效的情况下使用,态度强硬,简单粗暴
[root@localhost sbin]# killall nginx
1.4 设置开机自启动
1. 进到系统服务添加路径:
[root@localhost sbin]# cd /usr/lib/systemd/system/
2.建立服务文件nginx.service
注意nginx 的安装路径保持一样: /usr/local/nginx/,将 [Unit] … 到 WantedBy=multi-user.target 的内容全部复制到 创建的 nginx.service 中
[root@node0 system]# vim nginx.service
[Unit]
Description=nginx - high performance web server
After=network.target remote-fs.target nss-lookup.target
[Service]
Type=forking
ExecStart=/usr/local/nginx/sbin/nginx -c /usr/local/nginx/conf/nginx.conf
ExecReload=/usr/local/nginx/sbin/nginx -s reload
ExecStop=/usr/local/nginx/sbin/nginx -s stop
[Install]
WantedBy=multi-user.target
3.添加执行权限
以755的权限保存在目录: /usr/lib/systemd/system
[root@localhost system]# chmod +x nginx.service
4.设置开机自启动
可在任意目录下执行
[root@localhost system]# systemctl enable nginx.service
[root@localhost system]# systemctl list-unit-files |grep nginx
nginx.service   								enabled
5.启动 nginx 命令
启动nginx服务: systemctl start nginx.service
停止开机自启动: systemctl disable nginx.service
查看服务当前状态: systemctl status nginx.service
重新启动服务: systemctl restart nginx.service
查看所有已启动的服务: systemctl list-units --type=service
2、https 服务
1. 生成证书

申请者需要将自己的信息及其公钥放入证书请求中。但在实际操作过程中,所需要提供的是私钥而非公钥,因为它会自动从私钥中提取公钥。另外,还需要将提供的数据进行数字签名(使用单向加密),保证该证书请求文件的完整性和一致性,防止他人盗取后进行篡改,例如黑客将为www.baidu.com所申请的证书请求文件中的公司名改成对方的公司名称,如果能够篡改成功,则签署该证书请求时,所颁发的证书信息中将变成他人信息。
注意:这里使用的是自签的证书,作为测试使用,并不是有效的证书,有效的证书需要去其他地方(某某云)申请。
1.1 创建一个cert文件夹
用来存放证书和服务器私钥
cd /opt/apps
mkdir cert
1.2 进入cert目录下
# 创建服务器私钥,命令会提醒输入一个密码
[root@localhost cert]# openssl genrsa -des3 -out server.key 4096
Generating RSA private key, 4096 bit long modulus (2 primes)
.............++++
............................................................++++
e is 65537 (0x010001)
Enter pass phrase for server.key:						 # 输入密码
Verifying - Enter pass phrase for server.key:			# 输入密码
[root@localhost cert]# ll
total 4
-rw-------. 1 root root 3311 Sep 2 11:15 server.key
1.3 创建签名请求的证书(CSR)
openssl req -new -key server.key -out server.csr
1.4 加载SSL
使用上述私钥时除去必须的口令(注意,所谓除去,其实就是将必须的私钥密码写入到了私钥文件里面了,更新了原来的私钥文件)
cp server.key server.key.org
openssl rsa -in server.key.org -out server.key
1.5 通过openssl的x509指令生成证书文件
openssl x509 -req -days 3650 -in server.csr -signkey server.key -out server.crt
2、服务配置
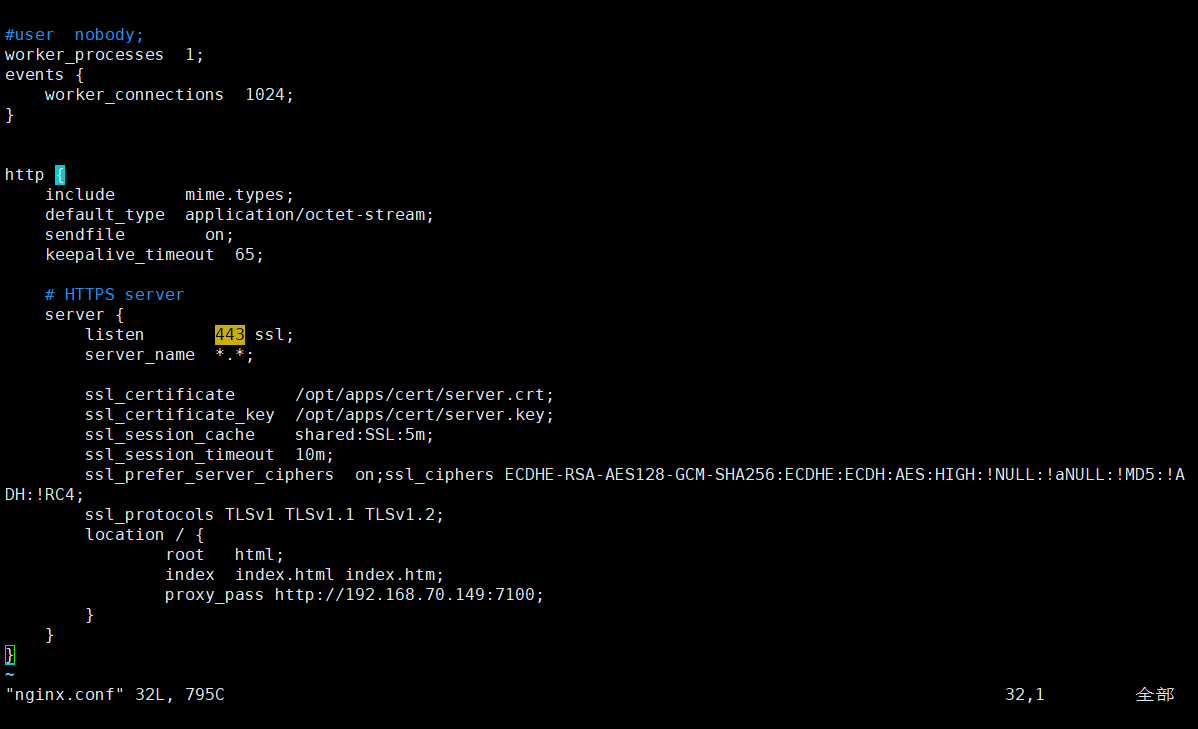
如下是在测试的时候使用配置的 nginx.conf 文件,其中 location 中的 proxy_pass http://192.168.70.149:7100 这个 url 是SRD 服务访问地址,端口 7100

配置说明
#user  nobody;
worker_processes  1;
events {
    worker_connections  1024;
}

http {
    include       mime.types;
    default_type  application/octet-stream;
    sendfile        on;
    keepalive_timeout  65;

    # HTTPS server
    server {
    	# 开启 https 服务
        listen       443 ssl;
        # 配置的地址,也就是 域名或ip地址
        server_name  *.*;
		# 生成的证书,如果是在其他地方申请了证书,则将证书下载下来放到cert目录下,然后在这里添加证书文件的名称
        ssl_certificate      /opt/apps/cert/server.crt;
        # 生成的密钥,将申请的有效证书放到cert目录下,该证书包含了crt和key
        ssl_certificate_key  /opt/apps/cert/server.key;
        ssl_session_cache    shared:SSL:5m;
        ssl_session_timeout  10m;
        # 使用的加密方式
        ssl_prefer_server_ciphers  on;ssl_ciphers ECDHE-RSA-AES128-GCM-SHA256:ECDHE:ECDH:AES:HIGH:!NULL:!aNULL:!MD5:!ADH:!RC4;
        ssl_protocols TLSv1 TLSv1.1 TLSv1.2;
        location / {
    		root   html;
    		index  index.html index.htm;
    		# 填写需要使用 https 服务访问的url
			proxy_pass http://192.168.70.149:7100;
    	}
    }
}
3、测试效果
这里使用的证书是本地测试生成的无效证书,所以显示不安全。


- 点赞
- 收藏
- 关注作者


评论(0)