HTTP3 正式发布,很快哦
QUIC
互联网工程任务组(IETF)近期发布了 HTTP/3 的 RFC,这是超文本传输协议 HTTP 的第三版。
根据 IETF 的原文中所述:
QUIC 传输协议具有 HTTP 传输所需的几个特性,例如多路复用、每个流的流控制和低延迟连接。 该文档还确定了 QUIC 包含的 HTTP/2 功能,并描述了如何将 HTTP/2 扩展移植到 HTTP/3。
简要简介一下 QUIC:
QUIC 是英文“Quick UDP Internet Connections”的简写,由 Google 创建并于 2013 年发布。Google 开发 QUIC 是为了解决传输控制协议 (TCP) 需要多次来回建立连接并开始传输数据的问题。 因此,它会产生很长的往返时间,这可能会转化为糟糕的用户体验。 QUIC 改为使用用户数据报协议 (UDP) 来传输流量。 UDP 减少了客户端和服务器之间的往返次数,因此加快了速度。 这在移动网络上很重要,因为移动网络仍然是一个非常有争议的资源,任何可以加速它们的东西都是受欢迎的。
谷歌非常喜欢 QUIC,以至于在 2020 年,这家巨头将其嵌入到自己的 Chrome 浏览器中,并在自己的服务中启用。微软也非常喜欢 QUIC,它创建了自己的版本并将其开源。
尽管 QUIC 的普及率有所提高,但世界上的大部分数据流量仍然通过依赖于 TCP 的 HTTP/2 传输。 因此,早在 2016 年,当网络专家开始考虑 HTTP/3 时,将其映射到 QUIC 作为一种加速网络的方式是有意义的。 但他们也确保 HTTP/3 和 HTTP/2 可以共存。
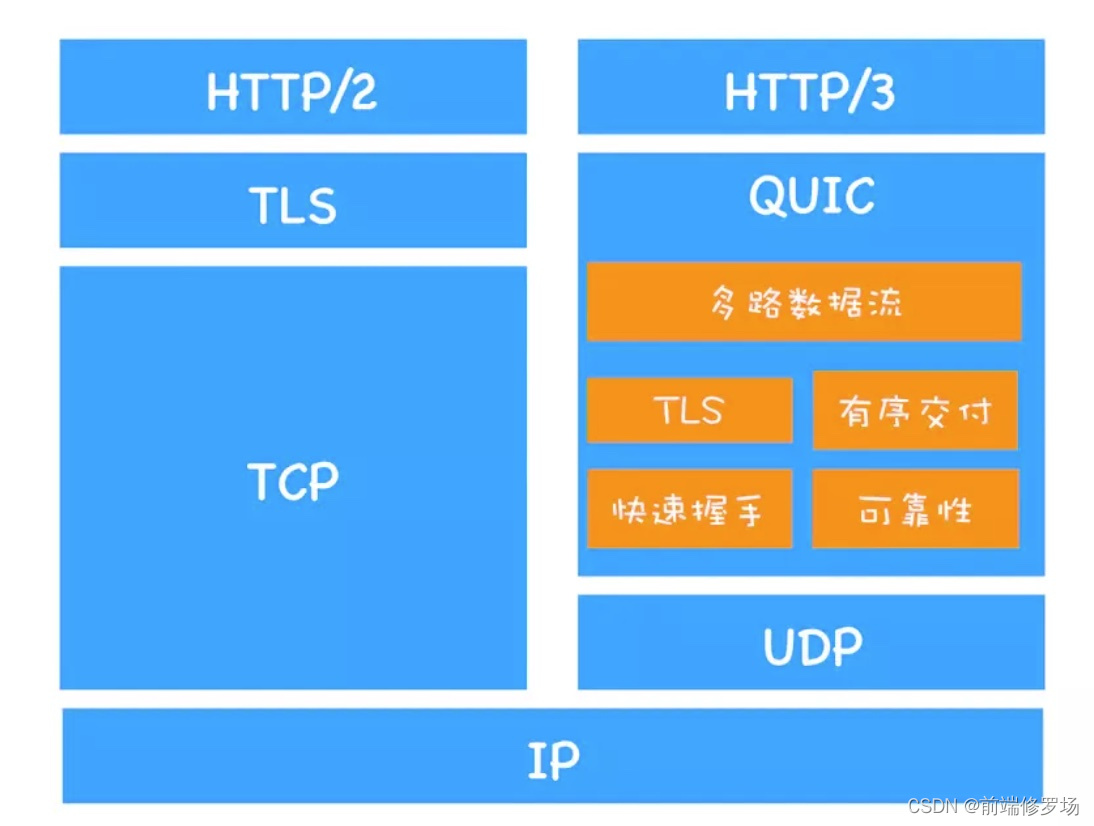
HTTP3 和 HTTP2 之间的区别
下图中,我总结了 HTTP3 和 HTTP2 之间的区别:

在 Nginx 中配置 HTTP3
准备
目前要让 NGINX 支持 HTTP/3,需要从源代码构建来支持。
首先,命令行中运行如下命令:
wget -O /etc/apt/trusted.gpg.d/nginx_signing.asc https://nginx.org/keys/nginx_signing.key
echo deb-src https://nginx.org/packages/mainline/debian bullseye nginx >> /etc/apt/sources.list
echo -e 'Package: *\nPin: origin nginx.org\nPin: release o=nginx\nPin-Priority: 900' > /etc/apt/preferences.d/99nginx
apt-get update
apt-get upgrade
apt-get build-dep nginx
apt-get install cmake git golang libunwind-dev mercurial rsync
获取 NGINX 及其 QUIC 分支的源代码
接着,获取 NGINX 及其 QUIC 分支的源代码。 运行这些命令:
apt-get source nginx
mv nginx-1.21.4 nginx
hg clone -b quic https://hg.nginx.org/nginx-quic
rsync -r nginx-quic/ nginx
cd nginx
请注意,NGINX 的版本可能不同。
然后我们需要获取 BoringSSL 源代码并将其构建为一个模块。 但是,NGINX 的 OCSP 实现与 BoringSSL 不兼容,那就可能需要 OCSP 补丁。你可以使用以下命令,通过补丁并解决问题:
wget https://raw.githubusercontent.com/kn007/patch/master/Enable_BoringSSL_OCSP.patch
patch -p1 < Enable_BoringSSL_OCSP.patch
接着,运行这些命令来处理 BoringSSL。
mkdir debian/modules
cd debian/modules
git clone https://github.com/google/boringssl
mkdir boringssl/build
cd boringssl/build
cmake ..
make -j$(nproc)
cd ../..
你可能还想添加 Brotli 压缩支持。 只需运行此命令:
git clone --recursive https://github.com/google/ngx_brotli
编辑构建规则
编辑 nginx/debian 中的规则文件:
cd ..
nano rules
找到 config.env.nginx 并设置 CFLAGS="-Wno-ignored-qualifiers"。
然后在 --sbin-path=/usr/sbin/nginx 之后添加 --add-module="$(CURDIR)/debian/modules/ngx_brotli" ,并添加 --with-http_v3_module --with-stream_quic_module --with -cc-opt="-I../modules/boringssl/include $(CFLAGS)" --with-ld-opt="-L../modules/boringssl/build/ssl -L../modules/boringssl /build/crypto $(LDFLAGS)"在 --with-stream_ssl_preread_module 之后。
确保删除原始的 --with-cc-opt 和 --with-ld-opt 并替换为上述内容。
构建为 deb 包
上述工作做的都差不多的话,你可以将代码构建为 Debian 软件包。 运行这些命令:
cd ..
dpkg-buildpackage -b
然后安装它(请注意,包的名称可能不同):
dpkg -i nginx_1.21.4-1~bullseye_amd64.deb
当需要使用 Debian Bullseye 使另一台 PC 具有支持 HTTP/3 的 NGINX 时,只需复制该软件包并使用 dpkg 安装它,无需再次构建。 因此可以保留那个包,因为你将来可能需要它。
❤️ 现在关注【前端修罗场】,后台回复【666】,即可获取一份【免费的优质学习资料】,一起学习,一起进步~
编辑 Nginx 配置文件
这是官方给出的配置信息:
https://quic.nginx.org/readme.html
Experimental QUIC support for nginx
-----------------------------------

1. Introduction
2. Installing
3. Configuration
4. Clients
5. Troubleshooting
6. Contributing
7. Links

1. Introduction

    This is an experimental QUIC [1] / HTTP/3 [2] support for nginx.

    The code is developed in a separate "quic" branch available
    at https://hg.nginx.org/nginx-quic.  Currently it is based
    on nginx mainline 1.21.x.  We merge new nginx releases into
    this branch regularly.

    The project code base is under the same BSD license as nginx.

    The code is currently at a beta level of quality and should not
    be used in production.

    We are working on improving HTTP/3 support with the goal of
    integrating it to the main NGINX codebase.  Expect frequent
    updates of this code and don't rely on it for whatever purpose.

    We'll be grateful for any feedback and code submissions however
    we don't bear any responsibilities for any issues with this code.

    You can always contact us via nginx-devel mailing list [3].

    What works now:

    We support IETF QUIC version 1.  Internet drafts are no longer supported.

    nginx should be able to respond to HTTP/3 requests over QUIC and
    it should be possible to upload and download big files without errors.

    + The handshake completes successfully
    + One endpoint can update keys and its peer responds correctly
    + 0-RTT data is being received and acted on
    + Connection is established using TLS Resume Ticket
    + A handshake that includes a Retry packet completes successfully
    + Stream data is being exchanged and ACK'ed
    + An H3 transaction succeeded
    + One or both endpoints insert entries into dynamic table and
      subsequently reference them from header blocks
    + Version Negotiation packet is sent to client with unknown version
    + Lost packets are detected and retransmitted properly
    + Clients may migrate to new address

2. Installing

    You will need a BoringSSL [4] library that provides QUIC support

    $ hg clone -b quic https://hg.nginx.org/nginx-quic
    $ cd nginx-quic
    $ ./auto/configure --with-debug --with-http_v3_module         \
                       --with-cc-opt="-I../boringssl/include"     \
                       --with-ld-opt="-L../boringssl/build/ssl    \
                                      -L../boringssl/build/crypto"
    $ make

    Alternatively, nginx can be configured with QuicTLS [5]

    $ ./auto/configure --with-debug --with-http_v3_module         \
                       --with-cc-opt="-I../quictls/build/include" \
                       --with-ld-opt="-L../quictls/build/lib"

    When configuring nginx, you can enable QUIC and HTTP/3 using the
    following new configuration options:

        --with-http_v3_module     - enable QUIC and HTTP/3
        --with-stream_quic_module - enable QUIC in Stream

3. Configuration

    The HTTP "listen" directive got a new option "http3" which enables
    HTTP/3 over QUIC on the specified port.

    The Stream "listen" directive got a new option "quic" which enables
    QUIC as client transport protocol instead of TCP or plain UDP.

    Along with "http3" or "quic", you also have to specify "reuseport"
    option [6] to make it work properly with multiple workers.

    To enable address validation:

        quic_retry on;

    To enable 0-RTT:

        ssl_early_data on;

    Make sure that TLS 1.3 is configured which is required for QUIC:

        ssl_protocols TLSv1.3;

    To enable GSO (Generic Segmentation Offloading):

        quic_gso on;

    To limit maximum UDP payload size on receive path:

        quic_mtu <size>;

    To set host key for various tokens:

        quic_host_key <filename>;


    By default, GSO Linux-specific optimization [8] is disabled.
    Enable if your network interface is configured to support GSO.

    A number of directives were added that configure HTTP/3:

        http3_stream_buffer_size
        http3_max_concurrent_pushes
        http3_max_concurrent_streams
        http3_push
        http3_push_preload
        http3_hq (requires NGX_HTTP_V3_HQ macro)

    In http, an additional variable is available: $http3.
    The value of $http3 is "h3" for HTTP/3 connections,
    "hq" for hq connections, or an empty string otherwise.

    In stream, an additional variable is available: $quic.
    The value of $quic is "quic" if QUIC connection is used,
    or an empty string otherwise.

Example configuration:

    http {
        log_format quic '$remote_addr - $remote_user [$time_local] '
                        '"$request" $status $body_bytes_sent '
                        '"$http_referer" "$http_user_agent" "$http3"';

        access_log logs/access.log quic;

        server {
            # for better compatibility it's recommended
            # to use the same port for quic and https
            listen 8443 http3 reuseport;
            listen 8443 ssl;

            ssl_certificate     certs/example.com.crt;
            ssl_certificate_key certs/example.com.key;
            ssl_protocols       TLSv1.3;

            location / {
                # required for browsers to direct them into quic port
                add_header Alt-Svc 'h3=":8443"; ma=86400';
            }
        }
    }

4. Clients

    * Browsers

        Known to work: Firefox 90+ and Chrome 92+ (QUIC version 1)

        Beware of strange issues: sometimes browser may decide to ignore QUIC
        Cache clearing/restart might help.  Always check access.log and
        error.log to make sure you are using HTTP/3 and not TCP https.

    * Console clients

        Known to work: ngtcp2, firefox's neqo and chromium's console clients:

        $ examples/client 127.0.0.1 8443 https://example.com:8443/index.html

        $ ./neqo-client https://127.0.0.1:8443/

        $ chromium-build/out/my_build/quic_client http://example.com:8443


   If you've got it right, in the access log you should see something like:

   127.0.0.1 - - [24/Apr/2020:11:27:29 +0300] "GET / HTTP/3" 200 805 "-"
                                         "nghttp3/ngtcp2 client" "quic"


5. Troubleshooting

    Here are some tips that may help you to identify problems:

    + Ensure you are building with proper SSL library that supports QUIC

    + Ensure you are using the proper SSL library in runtime
      (`nginx -V` will show you what you are using)

    + Ensure your client is actually sending requests over QUIC
      (see "Clients" section about browsers and cache)

      We recommend to start with simple console client like ngtcp2
      to ensure you've got server configured properly before trying
      with real browsers that may be very picky with certificates,
      for example.

    + Build nginx with debug support [7] and check your debug log.
      It should contain all details about connection and why it
      failed. All related messages contain "quic " prefix and can
      be easily filtered out.

    + If you want to investigate deeper, you may want to enable
      additional debugging in src/event/quic/ngx_event_quic_connection.h:

        #define NGX_QUIC_DEBUG_PACKETS
        #define NGX_QUIC_DEBUG_FRAMES
        #define NGX_QUIC_DEBUG_ALLOC
        #define NGX_QUIC_DEBUG_CRYPTO

6. Contributing

    If you are willing to contribute, please refer to
    http://nginx.org/en/docs/contributing_changes.html

7. Links

    [1] https://datatracker.ietf.org/doc/html/rfc9000
    [2] https://datatracker.ietf.org/doc/html/rfc9114
    [3] https://mailman.nginx.org/mailman3/lists/nginx-devel.nginx.org/
    [4] https://boringssl.googlesource.com/boringssl/
    [5] https://github.com/quictls/openssl
    [6] https://nginx.org/en/docs/http/ngx_http_core_module.html#listen
    [7] https://nginx.org/en/docs/debugging_log.html
    [8] http://vger.kernel.org/lpc_net2018_talks/willemdebruijn-lpc2018-udpgso-paper-DRAFT-1.pdf
    ```

要启用 Brotli,只需添加 brotli on; 在 NGINX 配置的 http 上下文中。

对于 OCSP 补丁,使用 ssl_stapling_file。 可以通过运行以下命令来创建它:


openssl ocsp -no_nonce -issuer /path/to/intermediate -cert /path/to/cert -url "$(openssl x509 -in /path/to/cert -noout -ocsp_uri)" -respout /path/to/ocsp
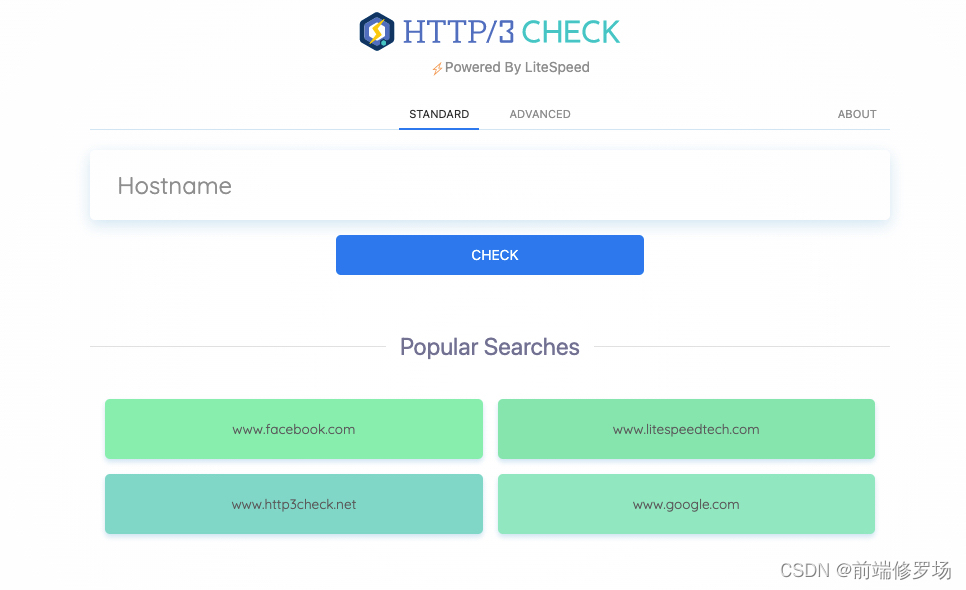
最后,你可以测试一下是否配置成功。
测试 HTTP3
这个网站可以用来测试你的域名是否支持 HTTP 3:

- 点赞
- 收藏
- 关注作者


评论(0)