【ModelArts Course2】Using ExeML for Food Classification

ModelArts - Using ExeML for Food Classification
ModelArts ExeML is a customized code-free model development tool that helps you start codeless AI application development with high flexibility. ExeML automates model design, parameter tuning and training, and model compression and deployment based on the labeled data. With ExeML, you only need to upload data and perform simple operations as prompted on the ExeML GUI to train and deploy models. Up to 100 ExeML projects can be created.
You can use ExeML to quickly build models for sound classification, text classification, image classification, predictive analytics, and object detection.
● Image classification: identifies a class of objects in images.
● Object detection: identifies the position and class of each object in an image.
● Predictive analytics: classifies or predicts structured data.
● Sound classification: classifies and identifies different sounds.
● Text classification: identifies the category of a piece of text.
The following figure shows the ExeML Process.

1 Data Preparation
1.1 Dataset Introduction
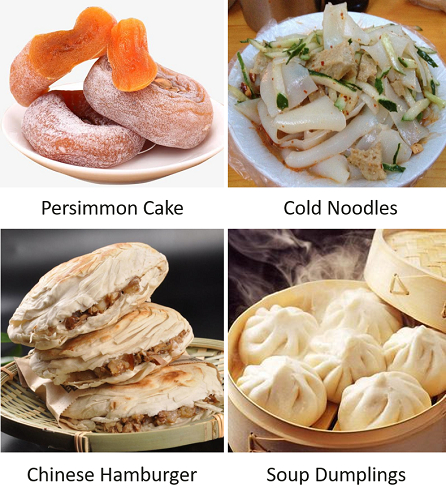
In this experiment will use a food dataset containing four categories, with 10 images per category. The following figure shows the cuisines and their categories contained in the dataset:
1.2 Download Dataset
You can download and unzip the dataset: ExeML_Food_Recognition.
The folder contains two subfolders. Foods_recognition is the training data, and foods_recognition_assi is the added data.
1.3 Creating an OBS Bucket
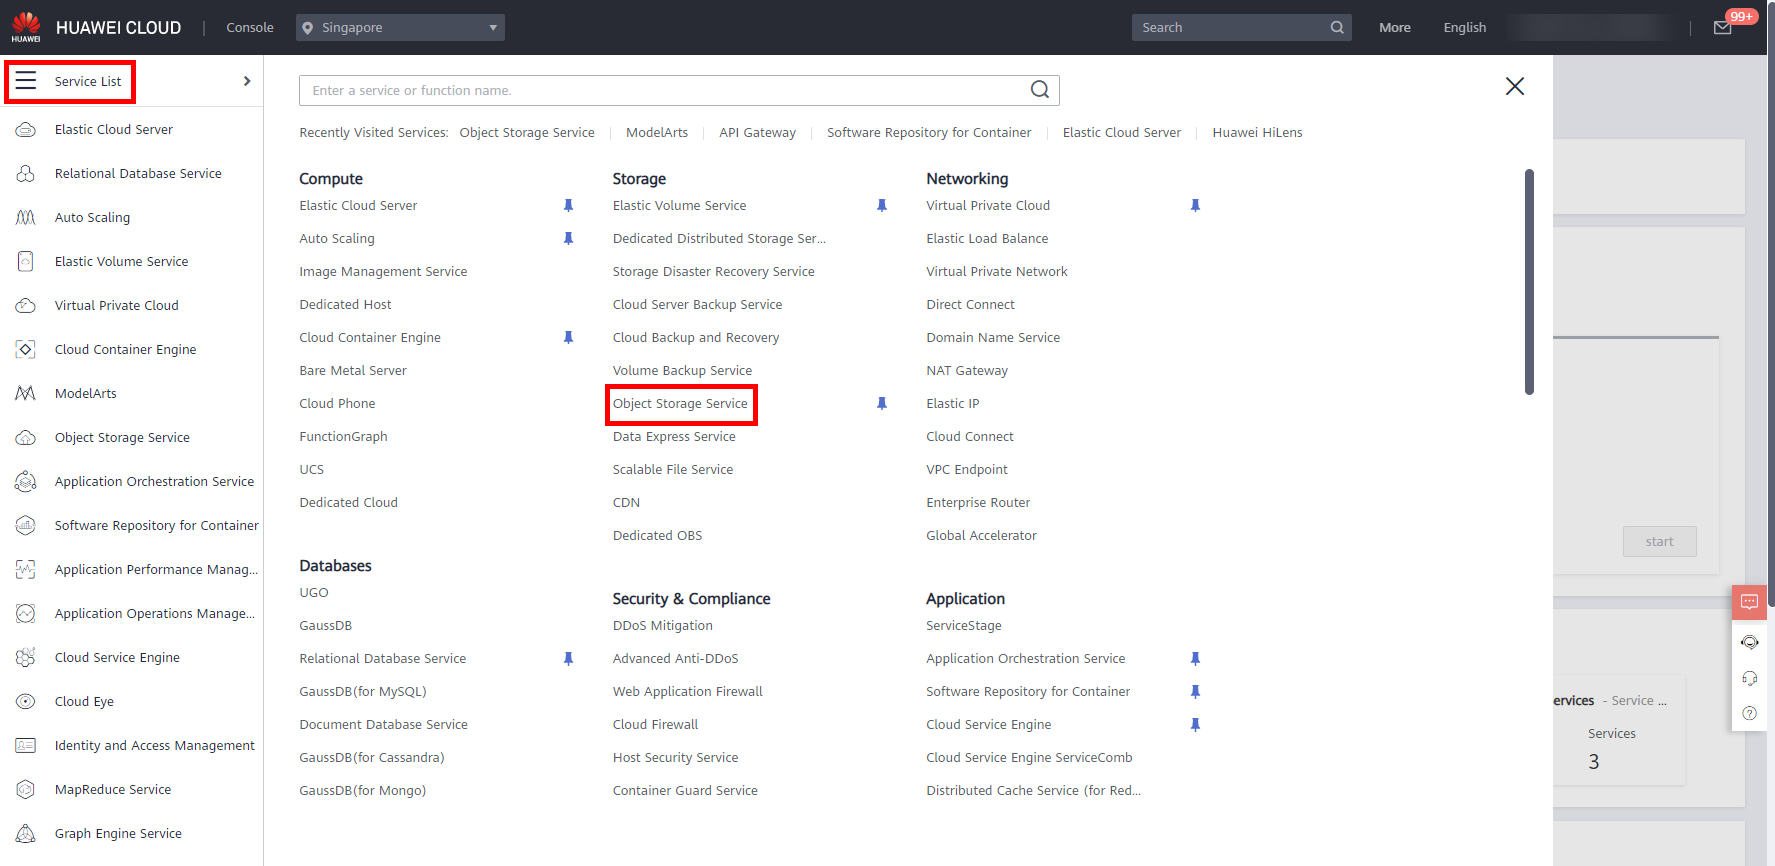
Log in to the HUAWEI CLOUD console, move the cursor to the left navigation bar, and in the pop-up menu bar,click Service List > Storage > Object Storage Service, as shown below.
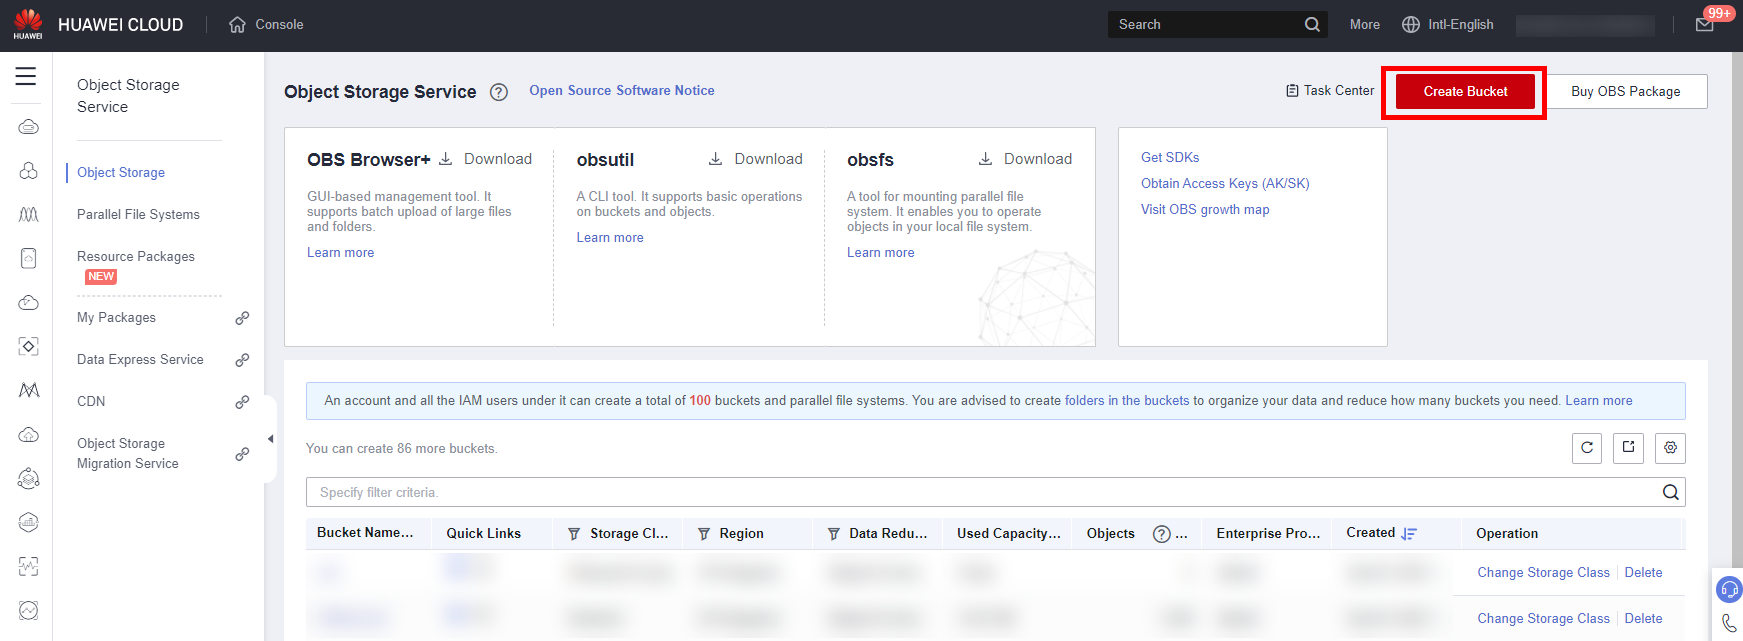
Click Create Bucket to access the creation page.
Now let’s start creating the OBS bucket, with the following parameters:
● Region: AP-Singapore
● Bucket Name: user-defined, which will be used in subsequent steps.
● Data Redundancy Policy: Single-AZ storage
● Default Storage Class: Standard
● Bucket Policy: Private
● Default Encryption: Keep Default
Click Create Now > OK to complete the creation of the Bucket.
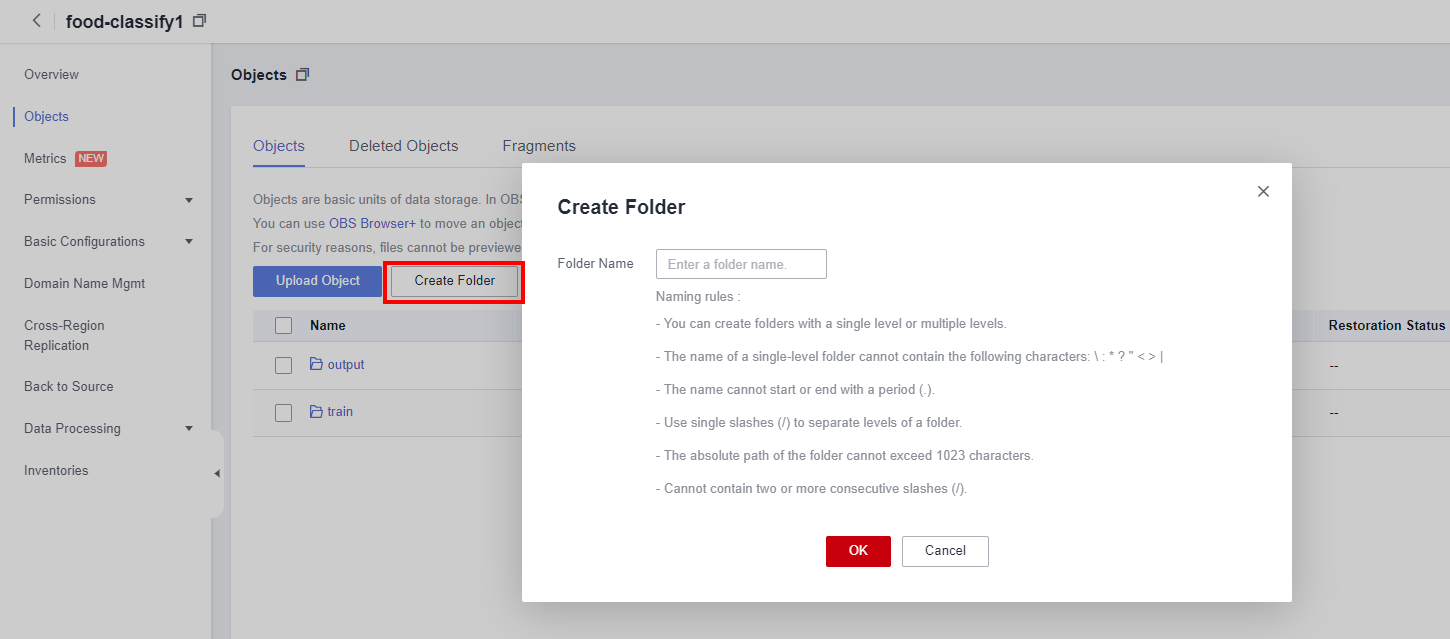
Click Bucket Name > Object > Create Folder to create two folders named train, output, which is used to store the input and output of experiment data.
1.4 Update Dataset
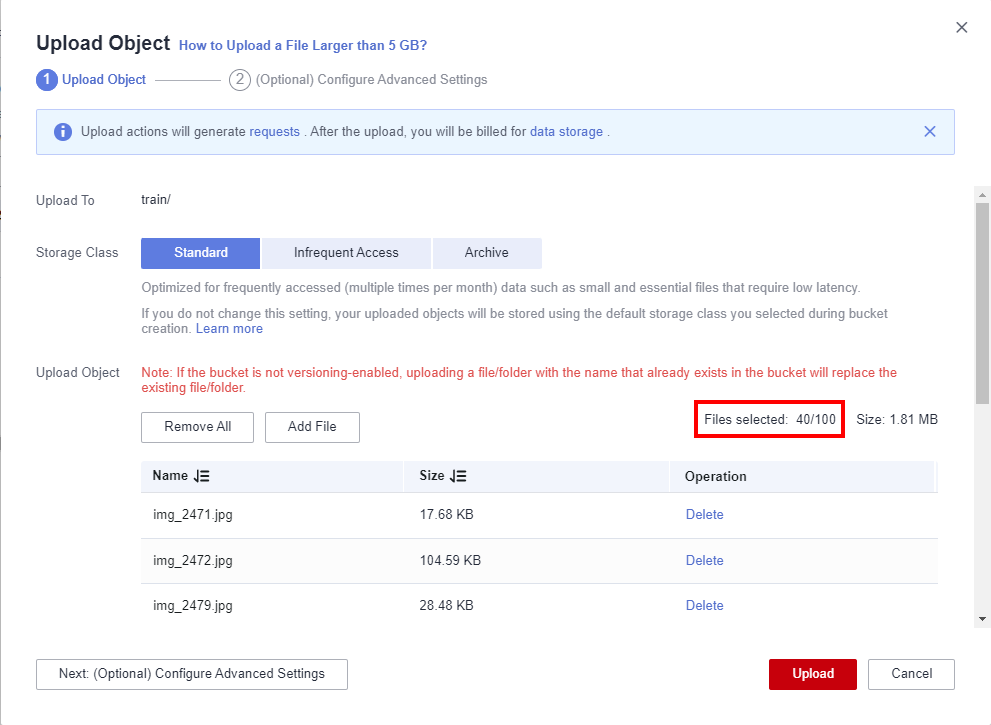
Go to the train directory in OBS, select the food_recognition folder in local and click Upload Object> add file to upload the image files in the train directory to the OBS object named train. Select the path./foods_recognition/train/ for storing the downloaded and decompressed dataset. Press CTRL + A to select all files.
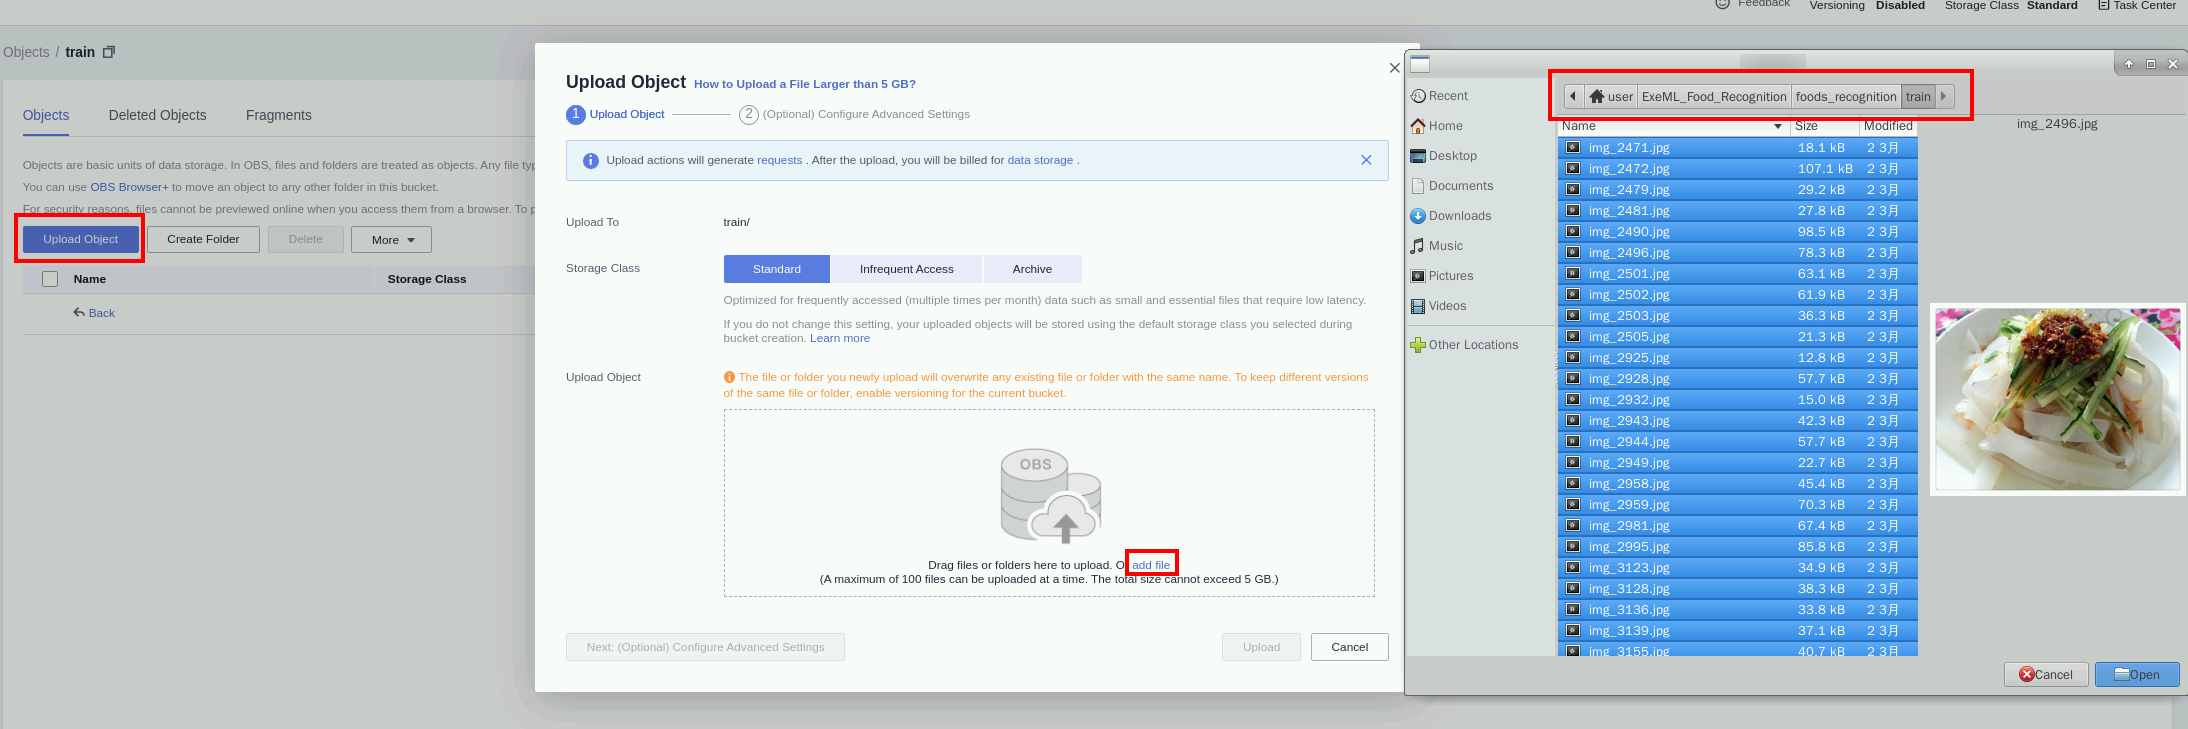
Then click Upload and wait until the data upload is complete.
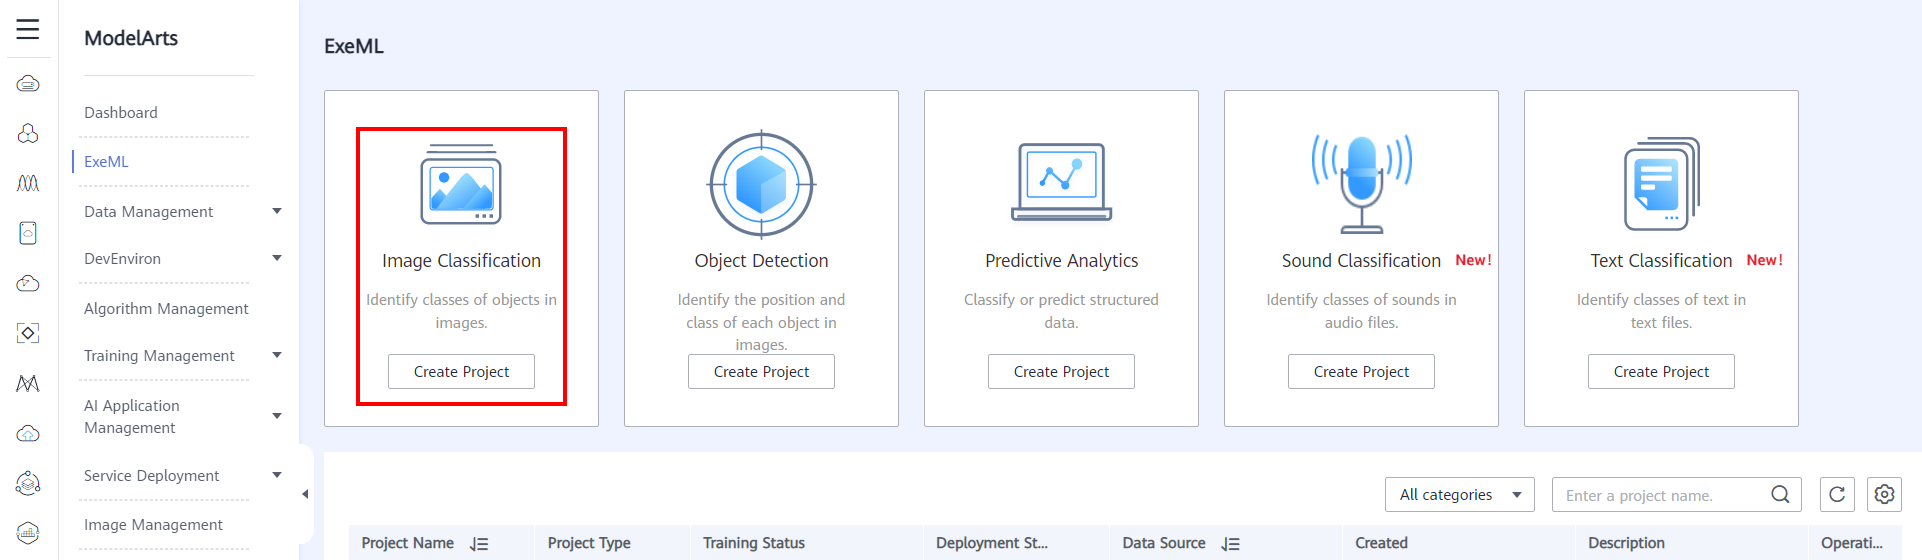
2 Creating an image classification ExeML project
Back to Modelarts Console Page, click ExeML to enter ExeML list page. And click Image Classification to create a project.
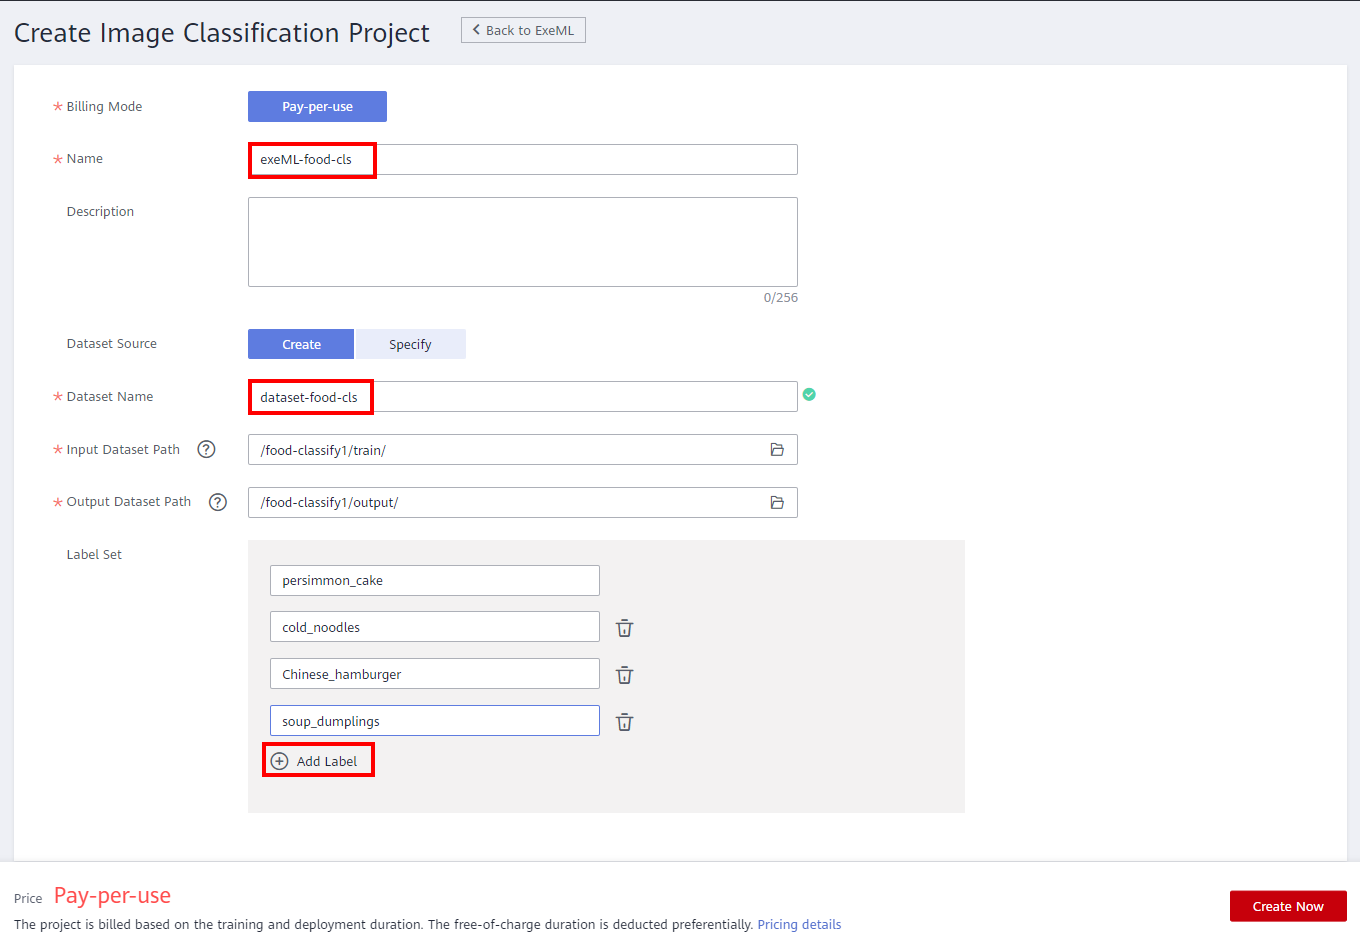
Set the parameters as follows:
● Name: exeML-food-cls
● Data Source: New Dataset
● Dataset Name: dataset-food-cls
● Input Dataset Path: Choose Folder > your Bucket name > train
● Output Dataset Path: Choose Folder > your Bucket name > output.
Click Add label to add persimmon_cake, cold_noodles, Chinese_hamburger, soup_dumplings, and click the Create Now to complete the image classification project creation.
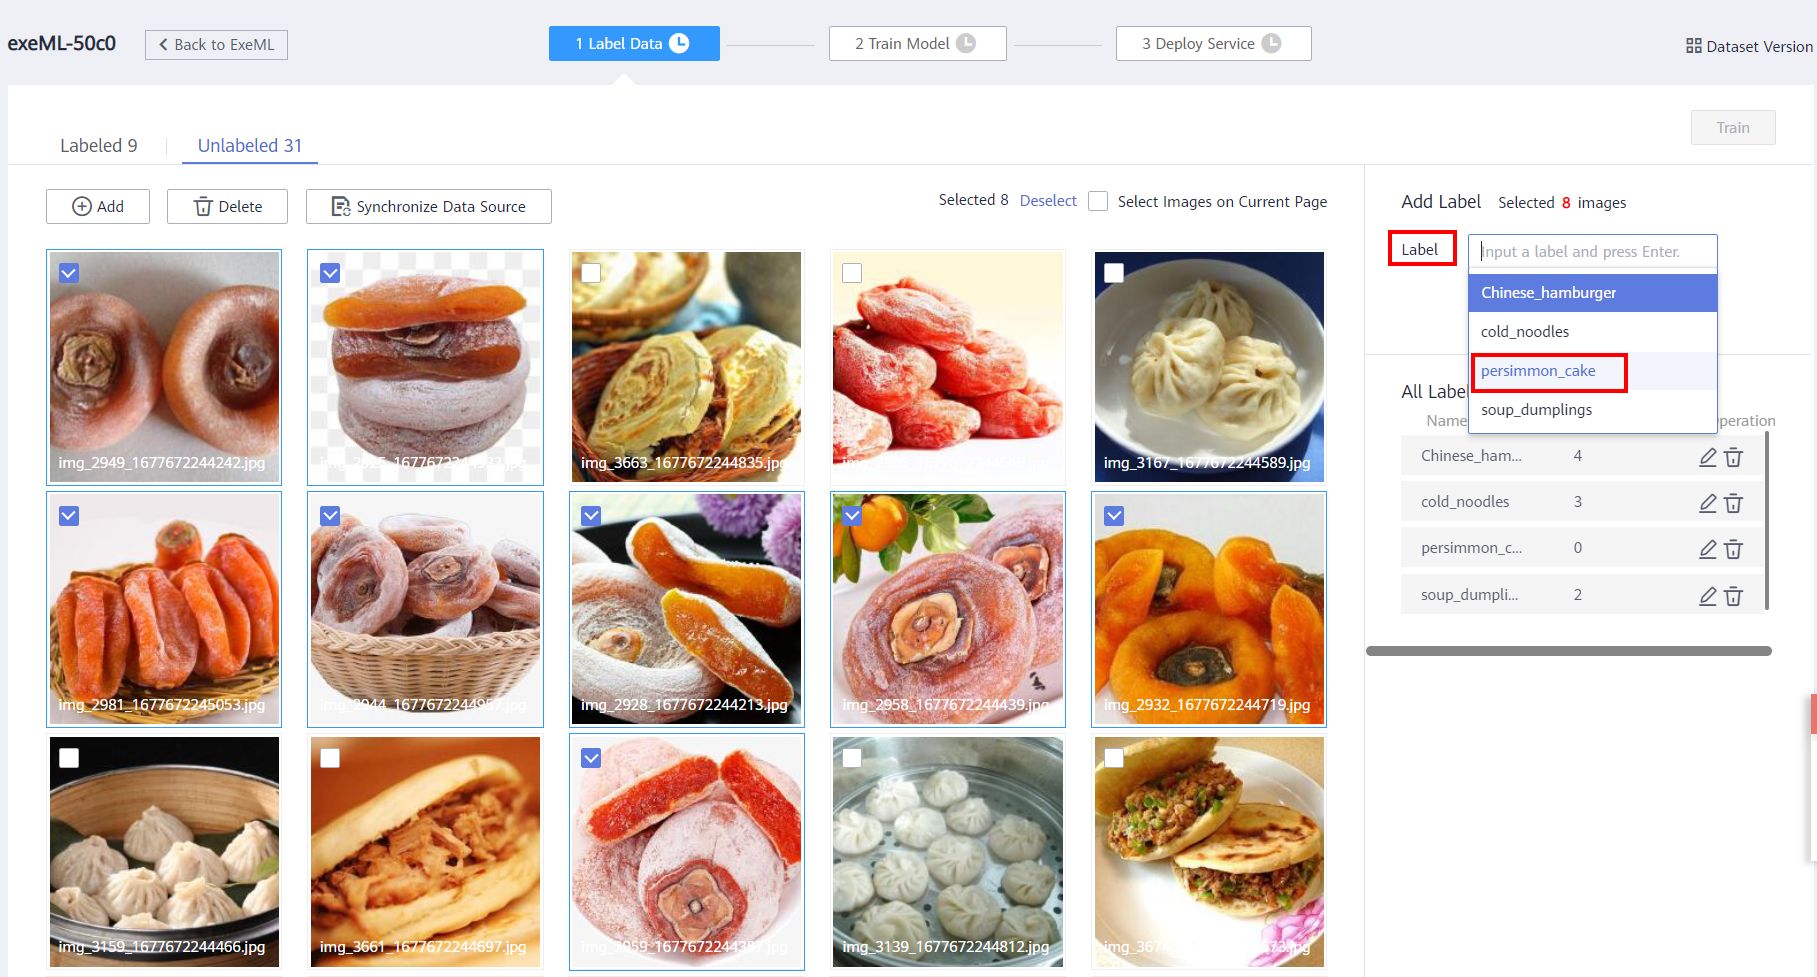
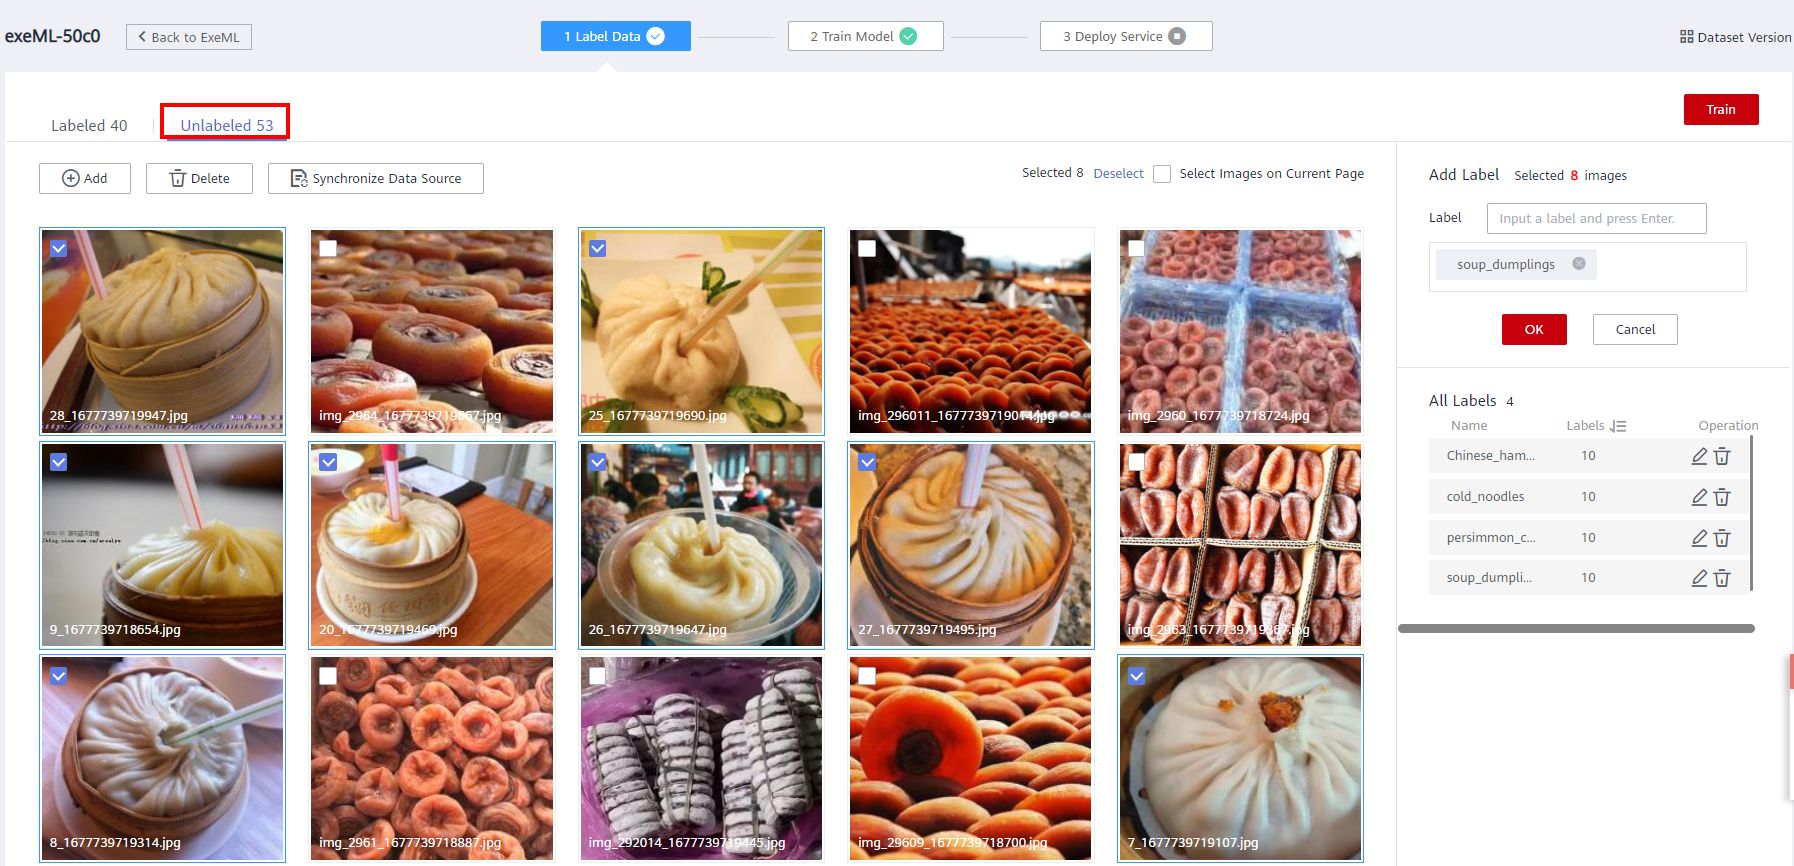
3 Data Image Labeling
Click Unlabeled to enter the Unlabeled page. Select images of the same type in batches, add labels, and click OK. As shown in the following figure:
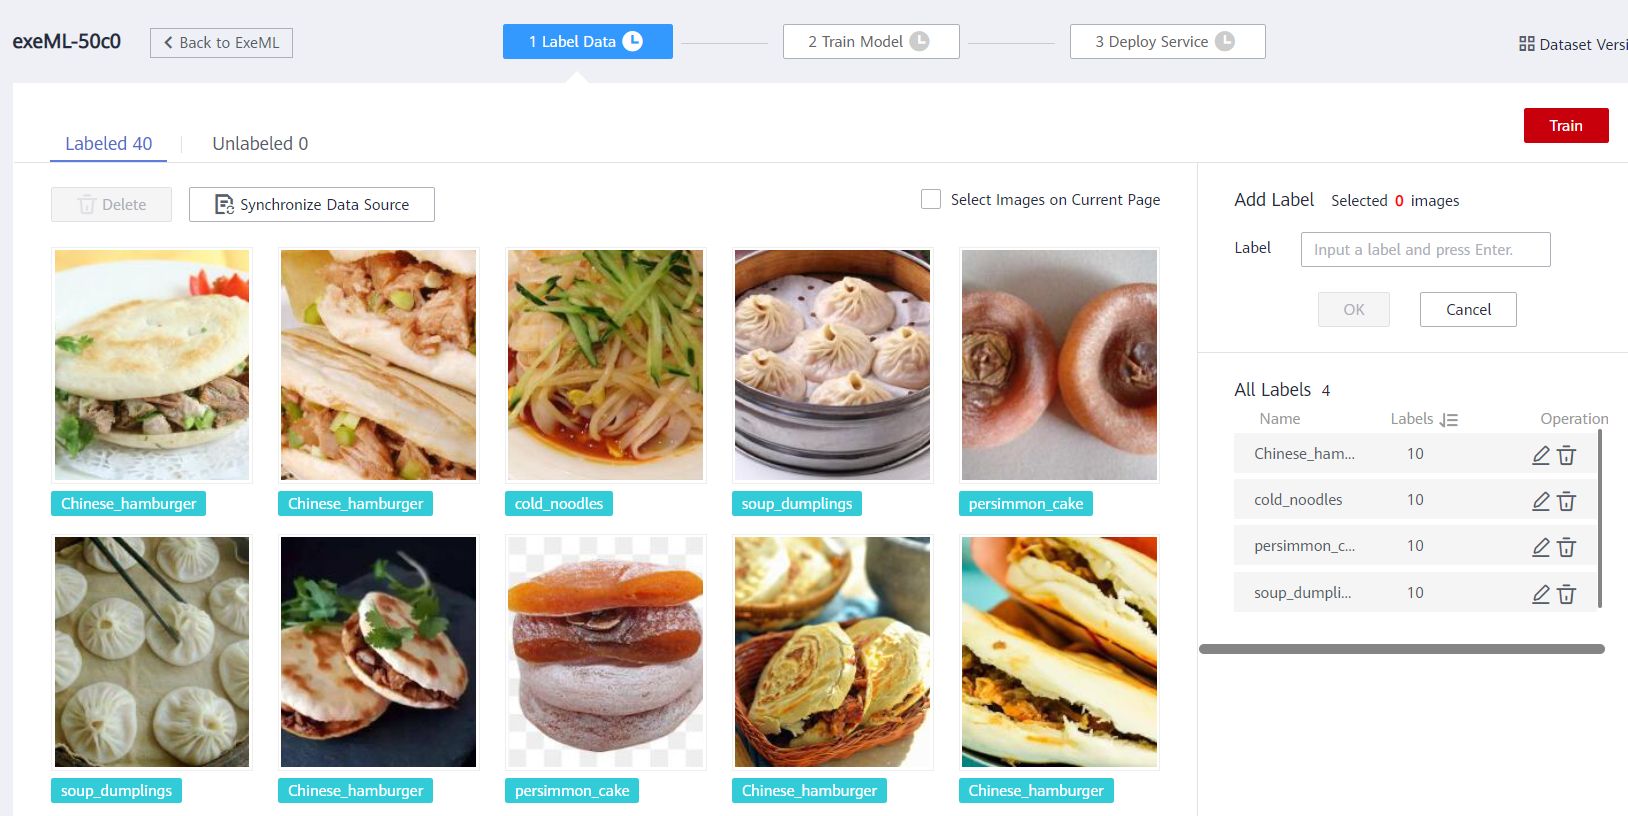
All labels and the number of images under each label are listed in the Labeled Tab page. After labeling all images, the Labeled page is displayed. You can verify the image label on this page. If the label is incorrect, you can modify the label on this page. If the label is incorrect, select the image and reselect the label.
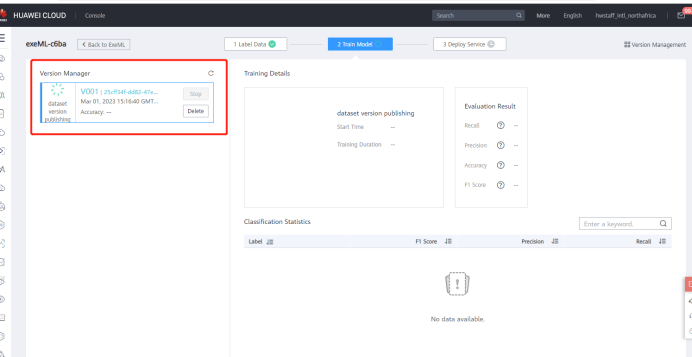
4 Model training
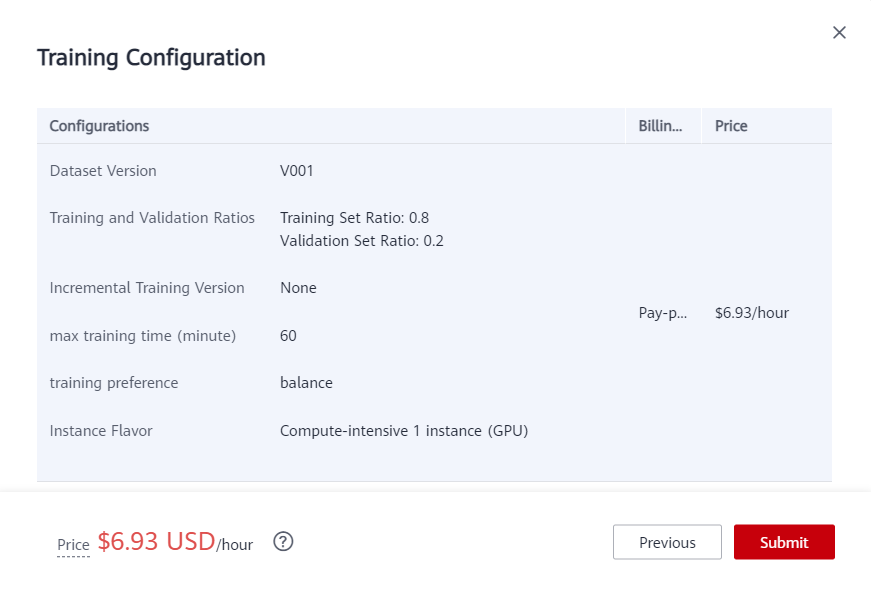
After labeling, click Train. Set the parameters as follows:
Dataset version name: V001
Training and Validation Ratios: Default training set ratio: 0.8; Verification set ratio: 0.2
Instance Flavor:Comput-intensive 1 instance (GPU)
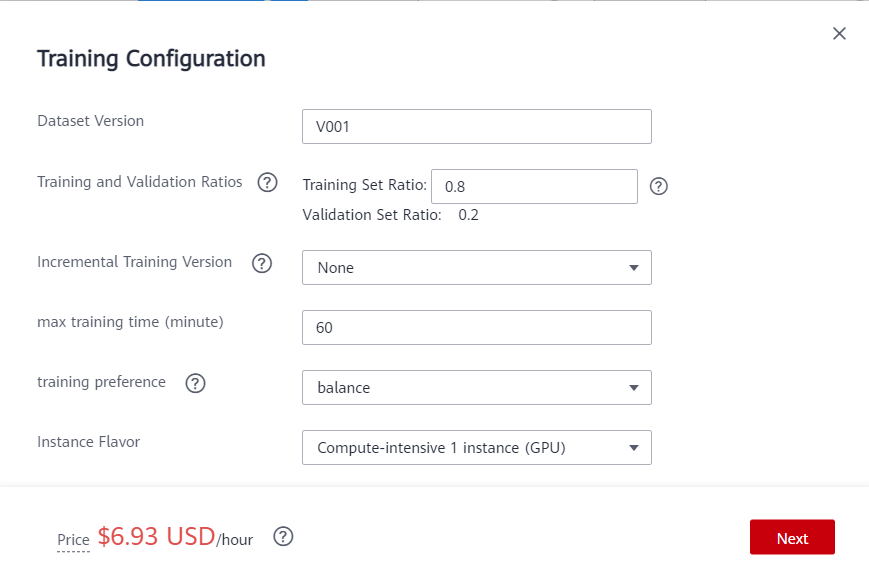
Then click Next > Submit.
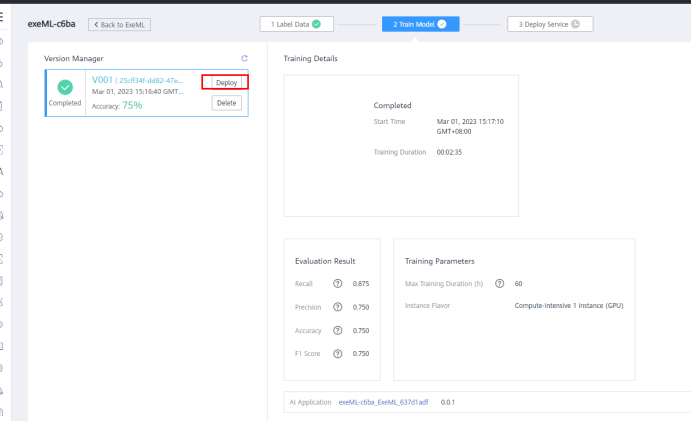
5 Model deployment
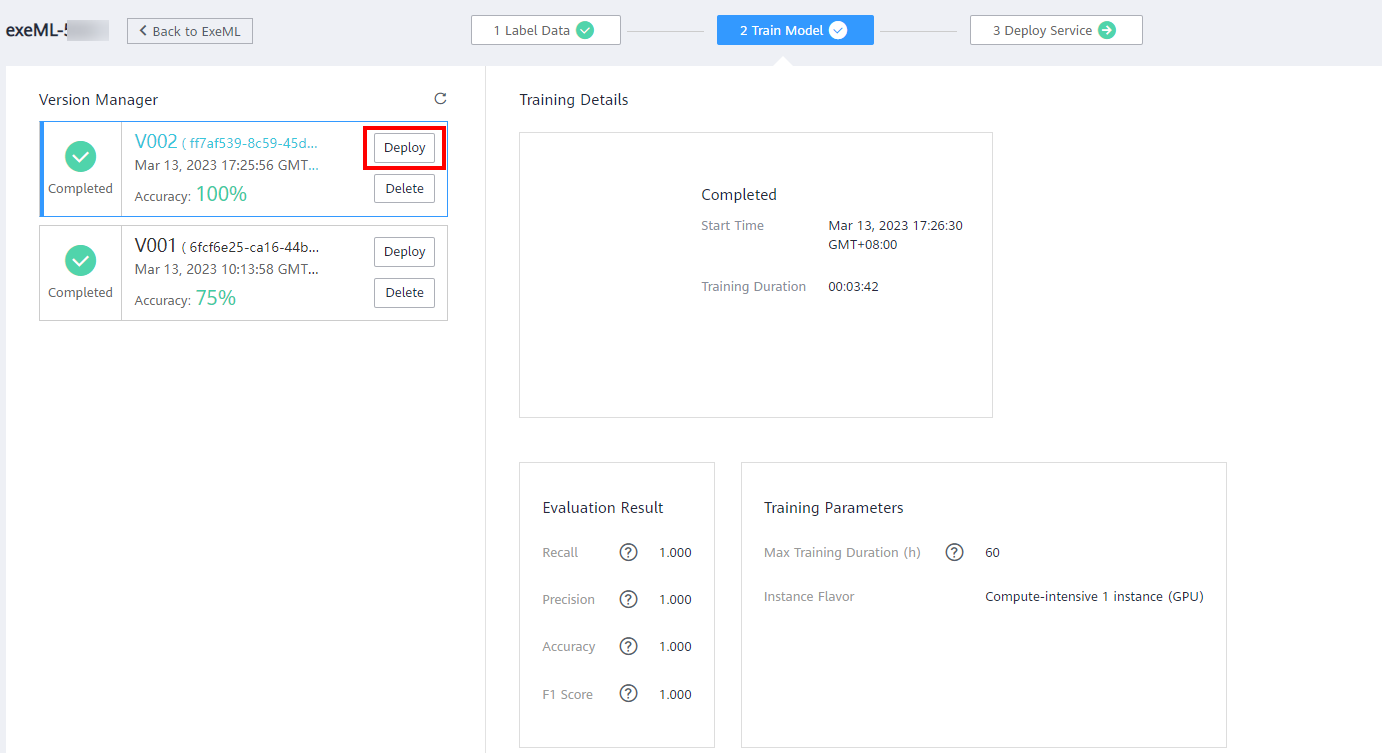
On the Model Training page, wait for about 3 minutes until the training is complete and view the model accuracy.
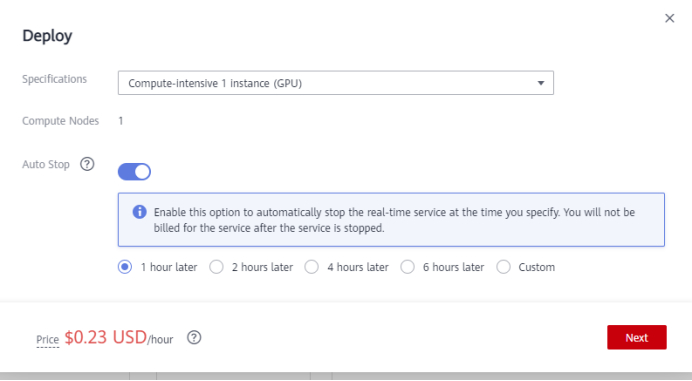
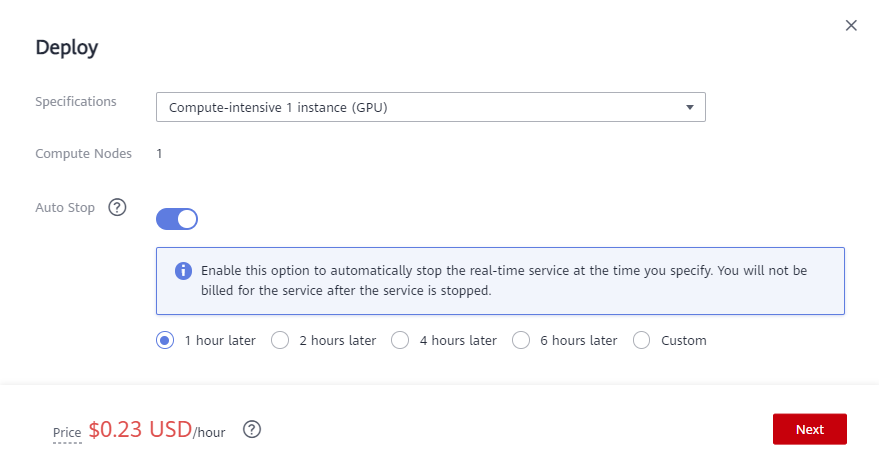
Click Deploy, select Compute-intensive 1 instance (GPU), and click Next > Submit to deploy the model as an real-time service. Wait for about 2 minutes.
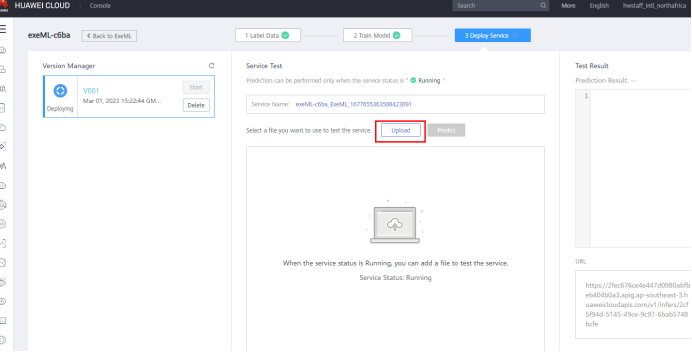
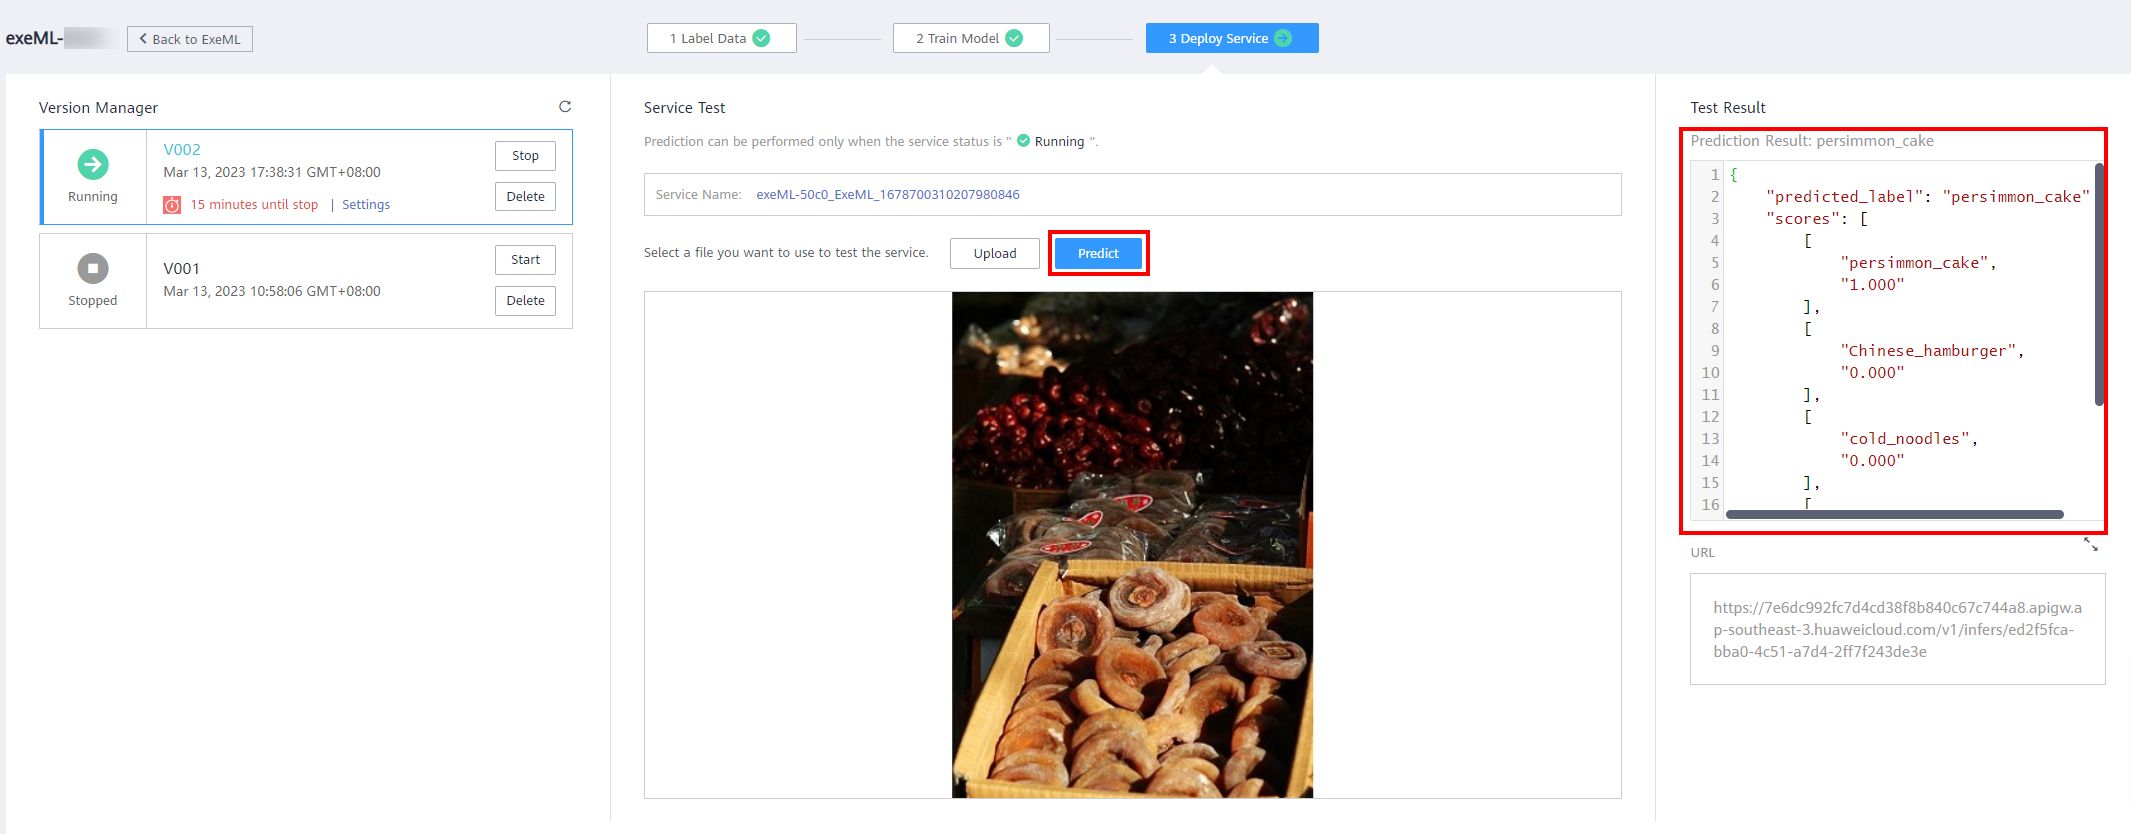
6 Service Test
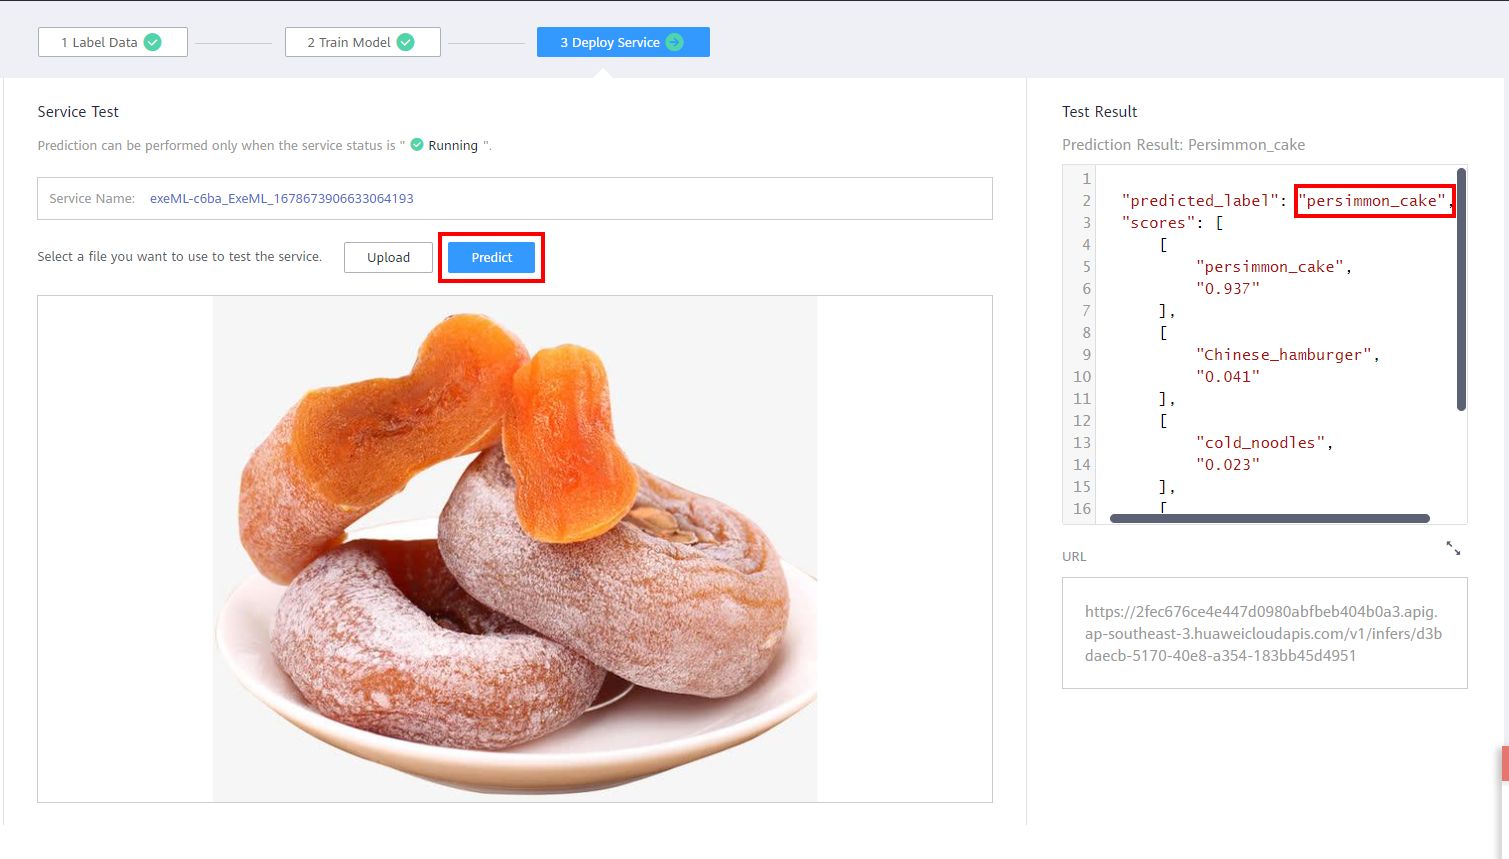
The real-time service is essentially a RESTful API that can be accessed through HTTP requests. This experiment tests real-time services on a web page. On the Deploy Service page, wait until the service is successfully deployed. After the deployment is successful, click Upload to upload a local test image selected from the test directory. As shown in the following figure:
Choose to upload an image of the test dataset that you downloaded locally. Click Precict, and then you can view the test result.
7 Model Optimization
In the above introduction, you have trained a four-category food classification model using 40 images. If you do not train to 100% accuracy, you find the following prediction errors when using other images: (Pay attention to the picture content and the prediction result in the red box in the upper right corner.)
The experiment provides an additional dataset named foods_recognition_assi in the previously unzipped folder that you can test again.
Upload test dataset image and find prediction error.
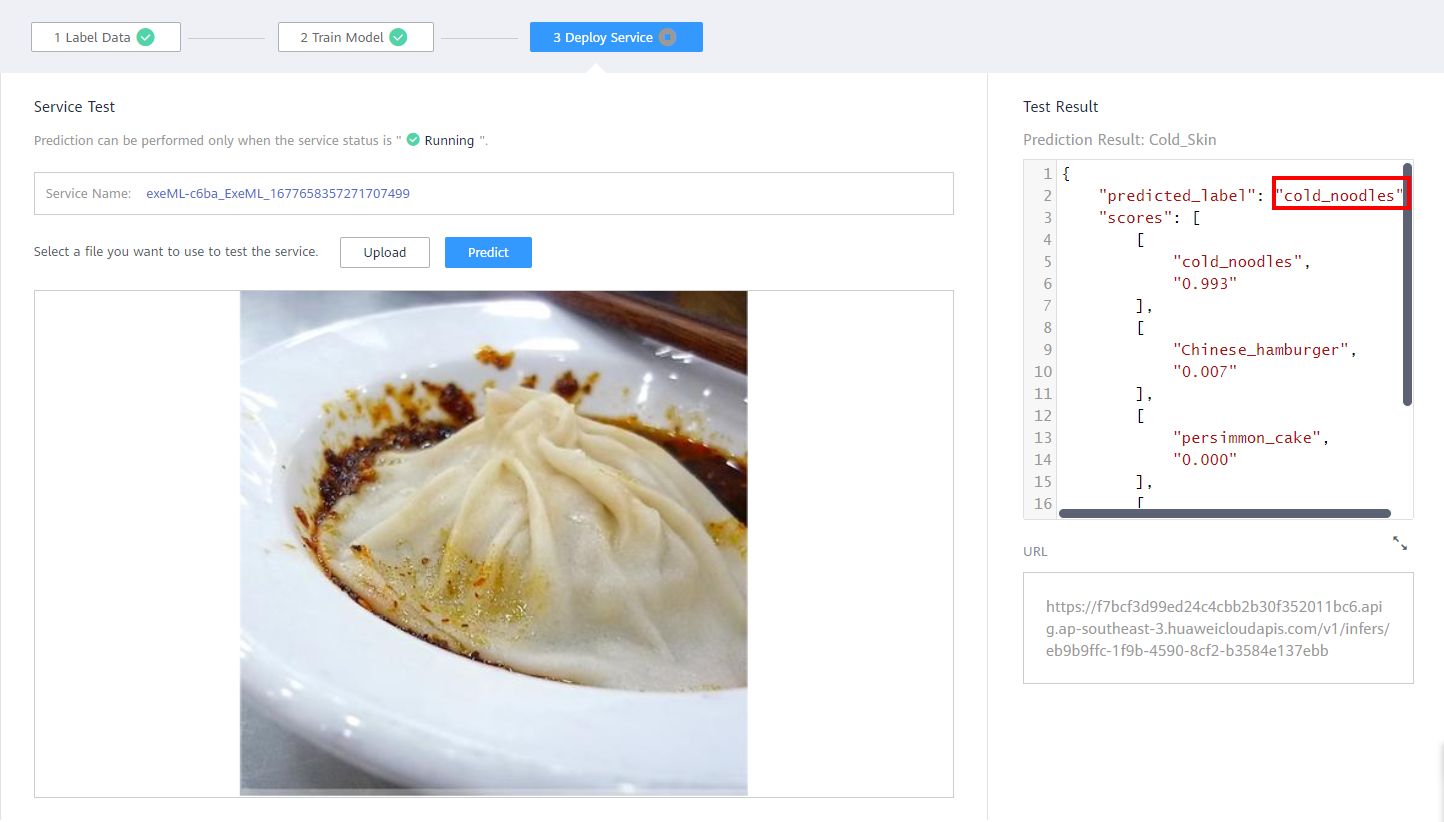
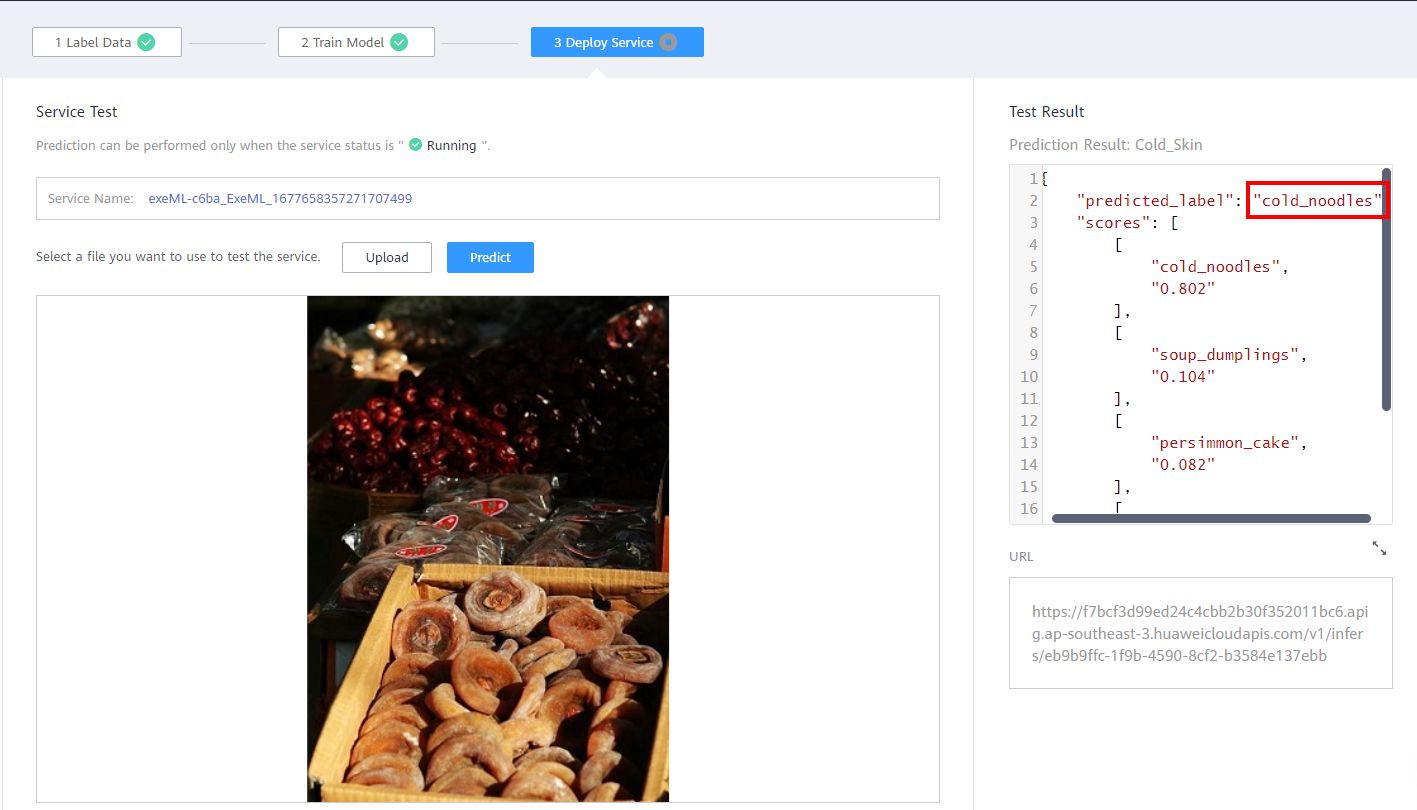
From the above picture, you can find that the first one is the soup dumplings image, was wrongly identified as cold noodles, the second one is the persimmon cake image, was wrongly identified as cold noodles. By analyzing the foregoing two incorrect prediction pictures, the following rules can be found:
(1) The mispredicted soup dumpling is a close-up shot of a single soup dumpling, which appears large in the picture. However, looking at the training set, you can find that the training pictures are of multiple soup dumplings, and there is no single soup dumpling, as shown in the following figure. There is no close-up view of a single soup dumpling in the training set, so the model does not learn the ability to predict a single soup dumpling.
(2) The second mispredicted persimmon cake image is a picture of many persimmon cakes piled together, while the persimmon cake in the training dataset is a small number of persimmon cakes piled together. The training dataset does not have many persimmon cakes piled together, so the model can not predict such graphs.
In a word, the capability of deep learning models comes from the training dataset. Only the pictures “seen” in the training dataset can the model recognize. Images that are completely “unseen” and are a little different are prone to mistakes. Now that the causes of the prediction error have been analyzed, how can the model be optimized so that the new model can predict the above two graphs correctly? So you need to add a training dataset containing persimmon cake and soup dumplings.
7.1 Data Filling
Back to OBS, go to the created bucket, and upload 53 images of two types in the local path: ./foods_recognition_assi/train to the train folder.
Wait until the image upload is complete.
Back to the ModelArts console page, click ExeML and the created project, switch to the Label Data page, and click Synchronize Data Source.
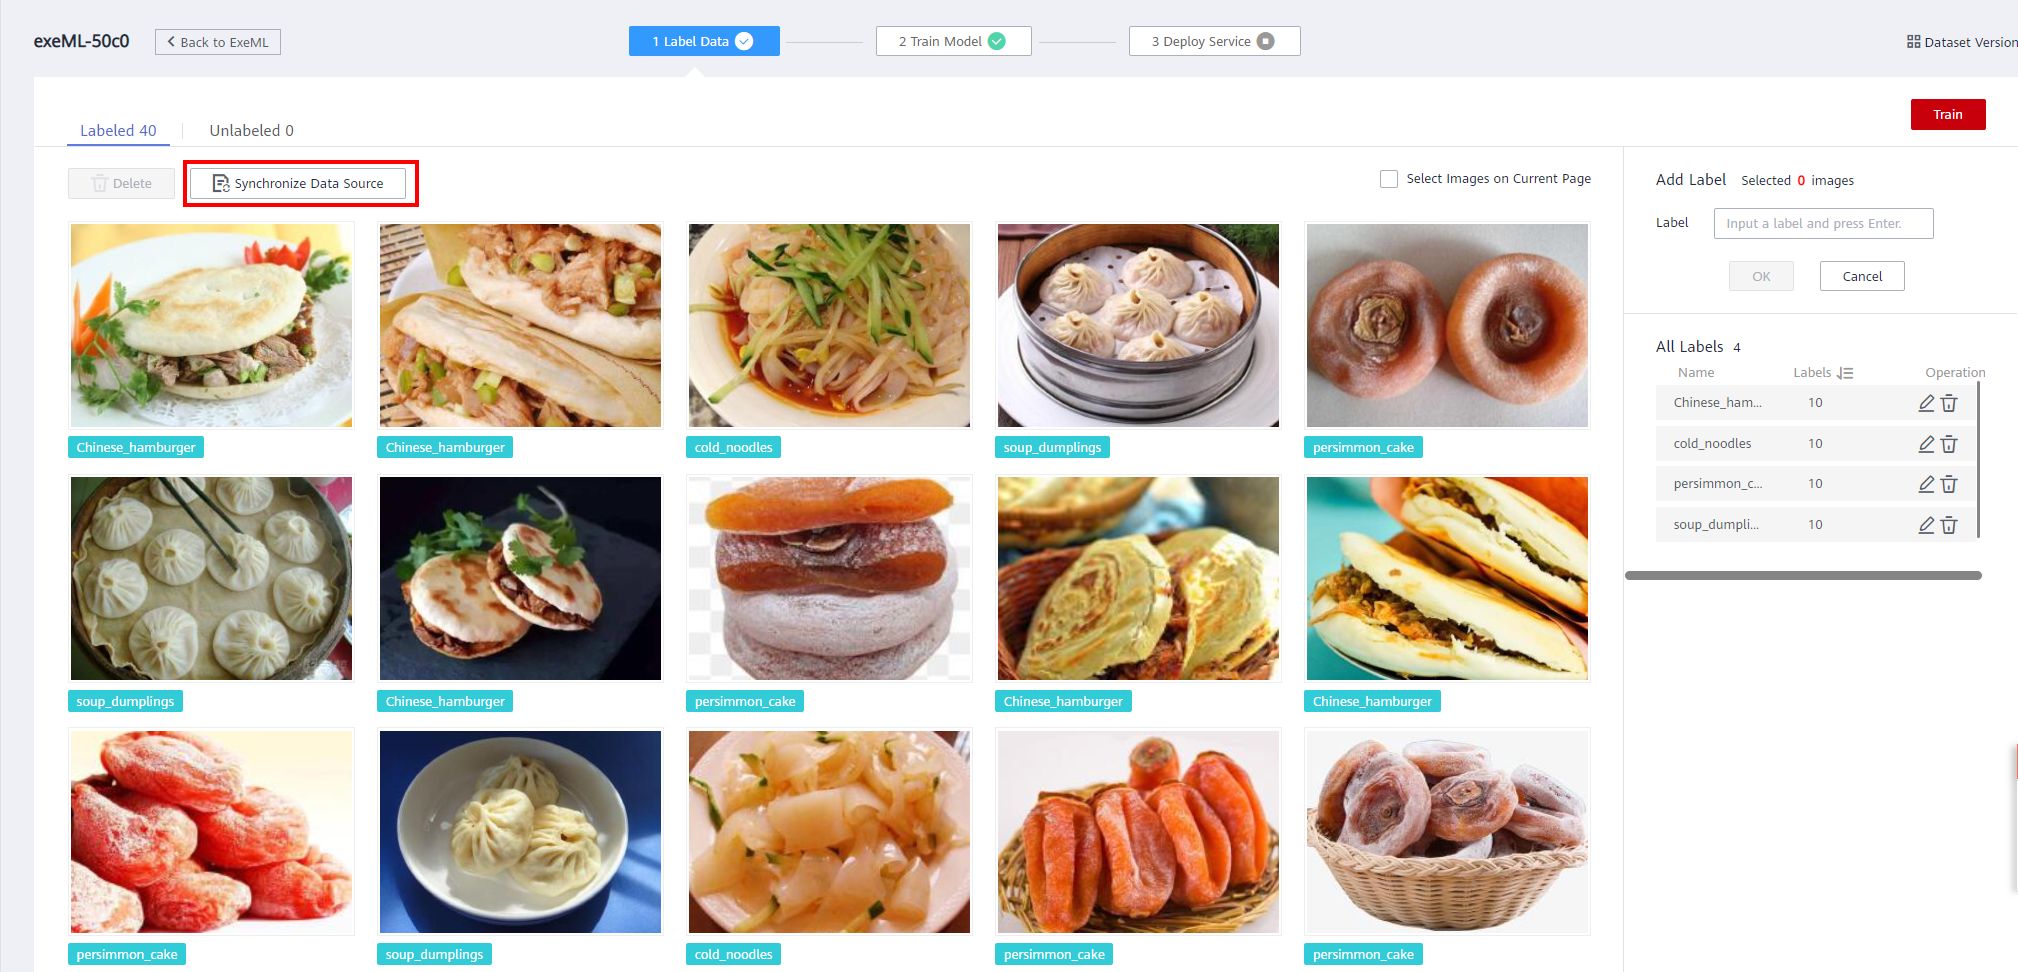
Then you can see that there are 53 extra images on Unabled page.
7.2 Data image labeling
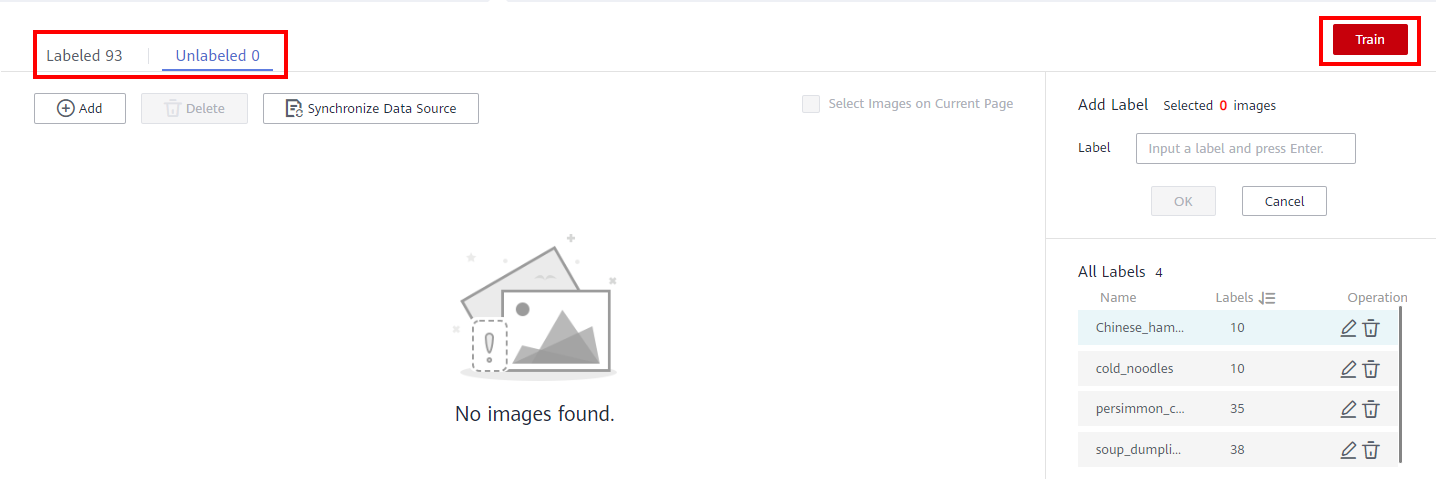
Click the Unlabled tab page to manually label the new dataset as before.
Until the number of Unlabeled page is 0.
Then click Train > Next. After confirming the parameter specifications, click Submit.

7.3 Model deployment
The Train Model takes about 4 minutes until the training is complete, click Deploy.
Set parameters as the following figure:
After confirming the parameter specifications, click Submit.
On the Deploy Service page, wait until the service is successfully deployed. After the deployment is successful, click Upload to select a test image, and then click Predict. You can select the image downloaded and decompressed in the test folder from the local path.
Then you can view the test result.
According to the preceding test results, the model trained by adding new images has been improved. The image that is incorrectly identified by the previous model can be correctly identified, and the score of the corresponding category increases.
Generally, the training process of deep learning models is random. The trained model may correctly predict some images in the preceding two figures, but the score of the corresponding category is low. This is normal. You can continue to improve the model by yourself.
So far, the experiment is complete.

- 点赞
- 收藏
- 关注作者
评论(0)