docker-部署 redis 主从复制(一主,一从)tag:redis:6.2.6

【摘要】
前言 在分布式情况下,我们可以考虑使用主从模式进行提高数据的读写效率,并且可以利用主从复制可以做到数据的高可用。把数据写入多个节点会提高数据的冗余备份,也更加安全。
目录
环境准备拉取redis...
前言
在分布式情况下,我们可以考虑使用主从模式进行提高数据的读写效率,并且可以利用主从复制可以做到数据的高可用。把数据写入多个节点会提高数据的冗余备份,也更加安全。
小编的理解
环境准备
拉取redis:6.2.6 镜像
docker pull redis:6.2.6
- 1
新建文件夹
mkdir redis
-在home文件夹下新建redis文件夹

- 在redis文件夹下新建下图目录
//执行如下命令即可
mkdir -p /home/redis/ conf data redis02Data


新建配置文件
进入/home/redis/conf 目录下新建两个配置文件如下
//执行如下命令,新建配置文件。
touch myredis.conf
myredis.conf
 # nd 192.168.1.100 10.0.0.1
# bind 127.0.0.1 ::1
bind 0.0.0.0
# 取消保护模式
protected-mode no
# 端口号
port 6379

tcp-backlog 511
# 密码
requirepass ksh@@@

timeout 0

tcp-keepalive 300

daemonize no

supervised no

pidfile /var/run/redis_6379.pid

loglevel notice

logfile ""

databases 30

always-show-logo yes

save 900 1
save 300 10
save 60 10000

stop-writes-on-bgsave-error yes

rdbcompression yes

rdbchecksum yes

dbfilename dump.rdb

dir ./

replica-serve-stale-data yes

replica-read-only yes

repl-diskless-sync no

repl-disable-tcp-nodelay no

replica-priority 100

lazyfree-lazy-eviction no
lazyfree-lazy-expire no
lazyfree-lazy-server-del no
replica-lazy-flush no

appendonly yes

appendfilename "appendonly.aof"

no-appendfsync-on-rewrite no

auto-aof-rewrite-percentage 100
auto-aof-rewrite-min-size 64mb

aof-load-truncated yes

aof-use-rdb-preamble yes

lua-time-limit 5000

slowlog-max-len 128

notify-keyspace-events ""

hash-max-ziplist-entries 512
hash-max-ziplist-value 64

list-max-ziplist-size -2

list-compress-depth 0

set-max-intset-entries 512

zset-max-ziplist-entries 128
zset-max-ziplist-value 64

hll-sparse-max-bytes 3000

stream-node-max-bytes 4096
stream-node-max-entries 100

activerehashing yes

hz 10

dynamic-hz yes

aof-rewrite-incremental-fsync yes

rdb-save-incremental-fsync yes
- 1
- 2
- 3
- 4
- 5
- 6
- 7
- 8
- 9
- 10
- 11
- 12
- 13
- 14
- 15
- 16
- 17
- 18
- 19
- 20
- 21
- 22
- 23
- 24
- 25
- 26
- 27
- 28
- 29
- 30
- 31
- 32
- 33
- 34
- 35
- 36
- 37
- 38
- 39
- 40
- 41
- 42
- 43
- 44
- 45
- 46
- 47
- 48
- 49
- 50
- 51
- 52
- 53
- 54
- 55
- 56
- 57
- 58
- 59
- 60
- 61
- 62
- 63
- 64
- 65
- 66
- 67
- 68
- 69
- 70
- 71
- 72
- 73
- 74
- 75
- 76
- 77
- 78
- 79
- 80
- 81
- 82
- 83
- 84
- 85
- 86
- 87
- 88
- 89
- 90
- 91
- 92
- 93
- 94
- 95
- 96
- 97
- 98
- 99
- 100
- 101
- 102
- 103
- 104
//执行如下命令,新建配置文件。
touch myredis02.conf
myredis02.conf
 # nd 192.168.1.100 10.0.0.1
# bind 127.0.0.1 ::1
bind 0.0.0.0

protected-mode no

port 6379

tcp-backlog 511

requirepass ksh@@@

timeout 0

tcp-keepalive 300

daemonize no

supervised no

pidfile /var/run/redis_6379.pid

loglevel notice

logfile ""

databases 30

always-show-logo yes

save 900 1
save 300 10
save 60 10000

stop-writes-on-bgsave-error yes

rdbcompression yes

rdbchecksum yes

dbfilename dump.rdb

dir ./

replica-serve-stale-data yes

replica-read-only yes

repl-diskless-sync no

repl-disable-tcp-nodelay no

replica-priority 100

lazyfree-lazy-eviction no
lazyfree-lazy-expire no
lazyfree-lazy-server-del no
replica-lazy-flush no

appendonly yes

appendfilename "appendonly.aof"

no-appendfsync-on-rewrite no

auto-aof-rewrite-percentage 100
auto-aof-rewrite-min-size 64mb

aof-load-truncated yes

aof-use-rdb-preamble yes

lua-time-limit 5000

slowlog-max-len 128

notify-keyspace-events ""

hash-max-ziplist-entries 512
hash-max-ziplist-value 64

list-max-ziplist-size -2

list-compress-depth 0

set-max-intset-entries 512

zset-max-ziplist-entries 128
zset-max-ziplist-value 64

hll-sparse-max-bytes 3000

stream-node-max-bytes 4096
stream-node-max-entries 100

activerehashing yes

hz 10

dynamic-hz yes

aof-rewrite-incremental-fsync yes

rdb-save-incremental-fsync yes
- 1
- 2
- 3
- 4
- 5
- 6
- 7
- 8
- 9
- 10
- 11
- 12
- 13
- 14
- 15
- 16
- 17
- 18
- 19
- 20
- 21
- 22
- 23
- 24
- 25
- 26
- 27
- 28
- 29
- 30
- 31
- 32
- 33
- 34
- 35
- 36
- 37
- 38
- 39
- 40
- 41
- 42
- 43
- 44
- 45
- 46
- 47
- 48
- 49
- 50
- 51
- 52
- 53
- 54
- 55
- 56
- 57
- 58
- 59
- 60
- 61
- 62
- 63
- 64
- 65
- 66
- 67
- 68
- 69
- 70
- 71
- 72
- 73
- 74
- 75
- 76
- 77
- 78
- 79
- 80
- 81
- 82
- 83
- 84
- 85
- 86
- 87
- 88
- 89
- 90
- 91
- 92
- 93
- 94
- 95
- 96
- 97
- 98
- 99
- 100
- 101
- 102
- 103
- 104
master(主节点,以写为主)
Run
docker run -d --name myredis -p 6379:6379 -v /home/redis/conf/myredis.conf:/etc/redis/redis.conf -v /home/redis/Data/:/data redis:6.2.6 /etc/redis/redis.conf
- 1
如下效果
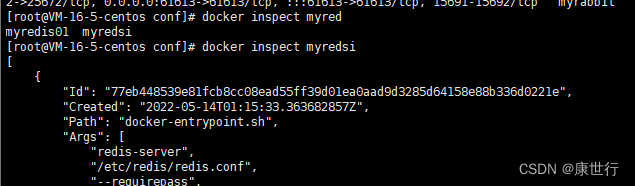
主节点成功运行

slave(从节点,以读为主)
查看主节点ip地址
docker inspect myredsi
- 1
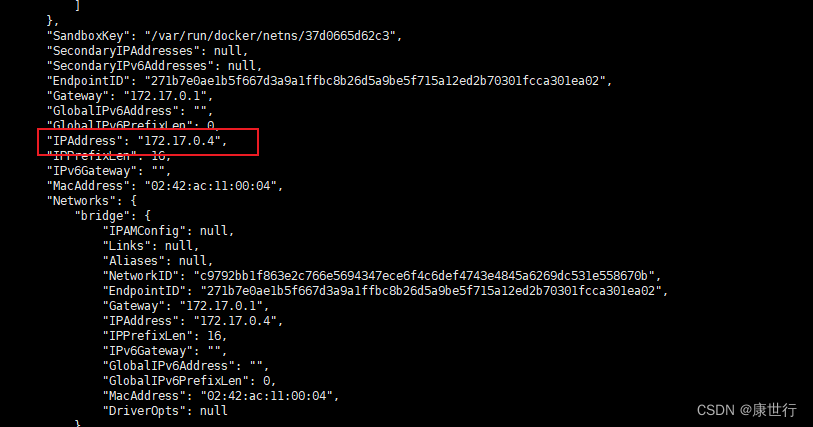
配置从节点指向主节点配置,修改myredis02.conf 配置文件 。在末尾添加下面内容
 # 主从复制-指向主节点地址:ip:端口号,都可以从上面查询ip地址处获取
replicaof   主节点ip 6379
# 由于主节点设置了密码,所以需要使用主节点的密码
masterauth  ksh@@@
- 1
- 2
- 3
- 4
Run
docker run -d --name myredis01 -p 6378:6379 -v /home/redis/conf/myredis02.conf:/etc/redis/redis.conf -v /home/redis/redis02Data/:/data redis:6.2.6 /etc/redis/redis.conf
- 1
如下效果
从节点运行成功

验证此节点是否已经指向01 主节点
 //连接redis02 客户端指向如下命令
info replication
- 1
- 2
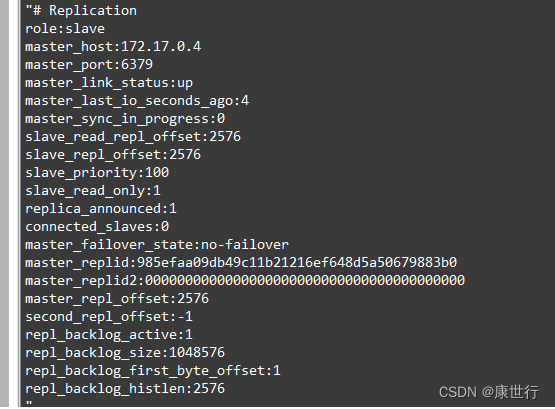
从上面图片中可以看出,当前节点已经从master 状态切换为slave 状态
使用infoReplicatio查看主节点状态
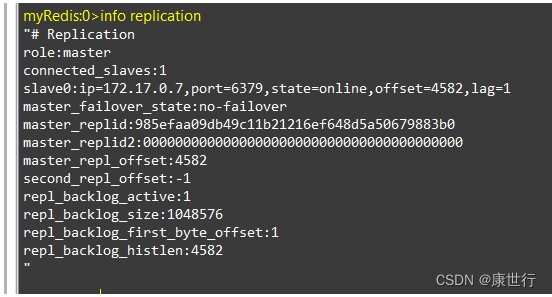
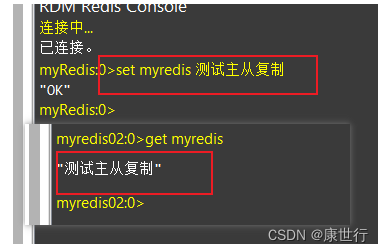
验证效果
此时可以在主节点写入一个内容,在从节点获取
感谢阅读~docker部署redis主从复制(一主,一从)到此结束!
文章来源: kangshihang.blog.csdn.net,作者:康世行,版权归原作者所有,如需转载,请联系作者。
原文链接:kangshihang.blog.csdn.net/article/details/125460248

【版权声明】本文为华为云社区用户转载文章,如果您发现本社区中有涉嫌抄袭的内容,欢迎发送邮件进行举报,并提供相关证据,一经查实,本社区将立刻删除涉嫌侵权内容,举报邮箱:
cloudbbs@huaweicloud.com
- 点赞
- 收藏
- 关注作者
评论(0)