Qt实战:基于Qt的简易人脸识别功能

【摘要】 基于Qt的简易人脸识别功能
Qt实战:基于Qt的简易人脸识别功能
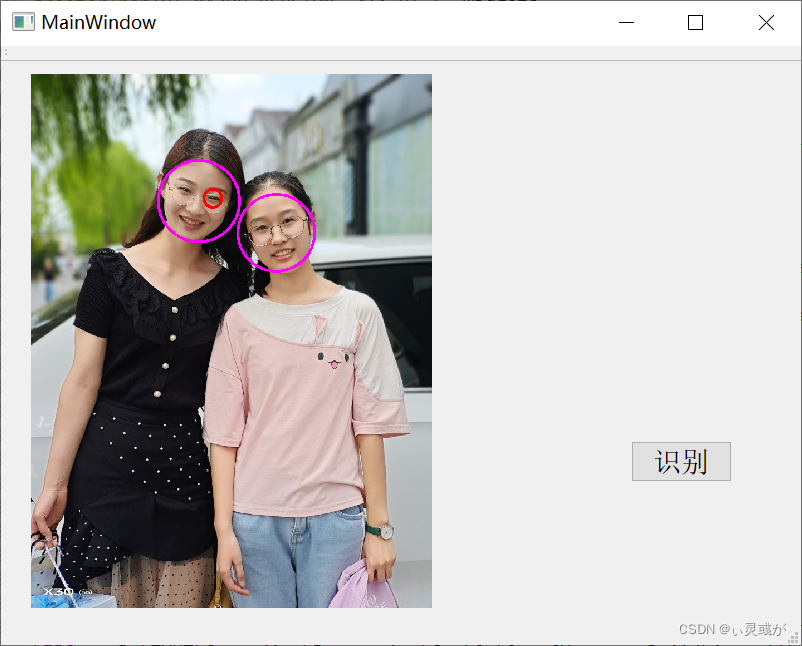
一、效果图
如图1所示,为我用Qt所做的一个简易的人脸识别代码,点击识别即可自动识别出照片中的人脸。
二、使用步骤
项目架构:

1. .pro部分
代码如下:
#-------------------------------------------------
#
# Project created by QtCreator 2021-08-01T20:37:50
#
#-------------------------------------------------

QT       += core gui

greaterThan(QT_MAJOR_VERSION, 4): QT += widgets

TARGET = OpencvFace
TEMPLATE = app

# The following define makes your compiler emit warnings if you use
# any feature of Qt which has been marked as deprecated (the exact warnings
# depend on your compiler). Please consult the documentation of the
# deprecated API in order to know how to port your code away from it.
DEFINES += QT_DEPRECATED_WARNINGS

# You can also make your code fail to compile if you use deprecated APIs.
# In order to do so, uncomment the following line.
# You can also select to disable deprecated APIs only up to a certain version of Qt.
#DEFINES += QT_DISABLE_DEPRECATED_BEFORE=0x060000    # disables all the APIs deprecated before Qt 6.0.0


SOURCES += \
        main.cpp \
        mainwindow.cpp

HEADERS += \
        mainwindow.h

FORMS += \
        mainwindow.ui
INCLUDEPATH += D:\TYUT\C-yunding\ProgramApp\C++\Qt\OpenCV_3.4.3-Build\install\include
LIBS += D:\TYUT\C-yunding\ProgramApp\C++\Qt\OpenCV_3.4.3-Build\install\x86\mingw\bin\libopencv_*.dll
2. .h部分
代码如下:
#ifndef MAINWINDOW_H
#define MAINWINDOW_H

#include <QMainWindow>
#include "opencv2/opencv.hpp"
#include <vector>
using namespace cv;
using namespace std;

namespace Ui {
class MainWindow;
}

class MainWindow : public QMainWindow
{
    Q_OBJECT

public:
    explicit MainWindow(QWidget *parent = 0);
    ~MainWindow();
    void initMainWindow();
    void imgProc();
    void imgShow();

private slots:
    void on_detectPushButton_clicked();

private:
    Ui::MainWindow *ui;
    Mat myImg;
    QImage myQImg;
};

#endif // MAINWINDOW_H
3. .cpp部分
代码如下:
#include "mainwindow.h"
#include "ui_mainwindow.h"

MainWindow::MainWindow(QWidget *parent) :
    QMainWindow(parent),
    ui(new Ui::MainWindow)
{
    ui->setupUi(this);
    initMainWindow();
}

MainWindow::~MainWindow()
{
    delete ui;
}

void MainWindow::initMainWindow()
{
    QString imgPath = "ly.jpg";//你要识别的图片,所在位置需与pro文件在同级目录
    Mat imgData = imread(imgPath.toLatin1().data());
    cvtColor(imgData,imgData,COLOR_BGR2RGB);
    myImg = imgData;
    myQImg = QImage((const unsigned char*)(imgData.data),imgData.cols,imgData.rows,QImage::Format_RGB888);
    imgShow();
}

void MainWindow::imgShow()
{
    ui->viewLabel->setPixmap(QPixmap::fromImage(myQImg.scaled(ui->viewLabel->size(),Qt::KeepAspectRatio)));
}

void MainWindow::imgProc()
{
    CascadeClassifier face_detector;
    CascadeClassifier eyes_detector;
    string fDetectorPath = "haarcascade_frontalface_alt.xml";
    face_detector.load(fDetectorPath);
    string eDetectorPath = "haarcascade_eye_tree_eyeglasses.xml";
    eyes_detector.load(eDetectorPath);
    vector<Rect> faces;
    Mat imgSrc = myImg;
    Mat imgGray;
    cvtColor(imgSrc,imgGray,CV_RGB2GRAY);
    equalizeHist(imgGray,imgGray);
    face_detector.detectMultiScale(imgGray,faces,1.1,2,0 | CV_HAAR_SCALE_IMAGE,Size(30,30));
    for(int i=0; i<faces.size(); i++)
    {
        Point center(faces[i].x + faces[i].width * 0.5,faces[i].y + faces[i].height * 0.5);
        ellipse(imgSrc,center,Size(faces[i].width * 0.5,faces[i].height * 0.5),0,0,360,Scalar(255,0,255),4,8,0);
        Mat faceROI = imgGray(faces[i]);
        vector<Rect> eyes;
        eyes_detector.detectMultiScale(faceROI,eyes,1.1,2,0 | CV_HAAR_SCALE_IMAGE,Size(30,30));
        for(int j=0; j<eyes.size(); j++)
        {
            Point center(faces[i].x + eyes[j].x + eyes[j].width * 0.5,faces[i].y + eyes[j].y + eyes[j].height * 0.5);
            int radius = cvRound((eyes[j].width + eyes[i].height) * 0.25);
            circle(imgSrc,center,radius,Scalar(255,0,0),4,8,0);
        }
        Mat imgDst = imgSrc;
        myQImg = QImage((const unsigned char*)(imgDst.data),imgDst.cols,imgDst.rows,QImage::Format_RGB888);
        imgShow();
    }
}
void MainWindow::on_detectPushButton_clicked()
{
    imgProc();
}
4. .ui部分:
代码如下:
<?xml version="1.0" encoding="UTF-8"?>
<ui version="4.0">
 <class>MainWindow</class>
 <widget class="QMainWindow" name="MainWindow">
  <property name="geometry">
   <rect>
    <x>0</x>
    <y>0</y>
    <width>800</width>
    <height>600</height>
   </rect>
  </property>
  <property name="windowTitle">
   <string>MainWindow</string>
  </property>
  <widget class="QWidget" name="centralWidget">
   <widget class="QLabel" name="viewLabel">
    <property name="geometry">
     <rect>
      <x>30</x>
      <y>10</y>
      <width>401</width>
      <height>541</height>
     </rect>
    </property>
    <property name="text">
     <string/>
    </property>
   </widget>
   <widget class="QPushButton" name="detectPushButton">
    <property name="geometry">
     <rect>
      <x>630</x>
      <y>380</y>
      <width>101</width>
      <height>41</height>
     </rect>
    </property>
    <property name="font">
     <font>
      <pointsize>14</pointsize>
     </font>
    </property>
    <property name="text">
     <string>识别</string>
    </property>
   </widget>
  </widget>
  <widget class="QMenuBar" name="menuBar">
   <property name="geometry">
    <rect>
     <x>0</x>
     <y>0</y>
     <width>800</width>
     <height>17</height>
    </rect>
   </property>
  </widget>
  <widget class="QToolBar" name="mainToolBar">
   <attribute name="toolBarArea">
    <enum>TopToolBarArea</enum>
   </attribute>
   <attribute name="toolBarBreak">
    <bool>false</bool>
   </attribute>
  </widget>
  <widget class="QStatusBar" name="statusBar"/>
 </widget>
 <layoutdefault spacing="6" margin="11"/>
 <resources/>
 <connections/>
</ui>
总结
以上是部分Qt关于功能优化的部分,希望能帮助到大家,感谢大家支持~( ̄▽ ̄~)~

【声明】本内容来自华为云开发者社区博主,不代表华为云及华为云开发者社区的观点和立场。转载时必须标注文章的来源(华为云社区)、文章链接、文章作者等基本信息,否则作者和本社区有权追究责任。如果您发现本社区中有涉嫌抄袭的内容,欢迎发送邮件进行举报,并提供相关证据,一经查实,本社区将立刻删除涉嫌侵权内容,举报邮箱:
cloudbbs@huaweicloud.com
- 点赞
- 收藏
- 关注作者
评论(0)