快速上手apache shiro
概念和架构
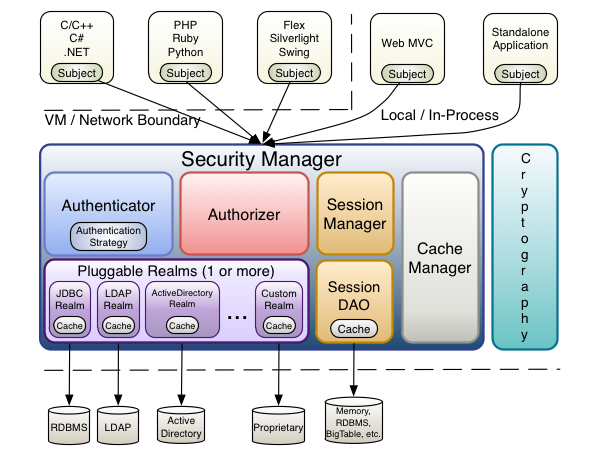
参考官网架构: https://shiro.apache.org/architecture.html

三个概念理解:
- subject: 所有需要使用安全验证的"东西",包括各种应用程序、用户、其他.
- securityManager: 核心中的核心,负责管理shiro的身份验证、鉴权等一系列核心功能. 可以认为subject只是对组件的抽象,而securityManager才是shiro的核心功能
- realm: 一种dao,提供查询subject数据的通道,可以理解为对数据源查询的封装.
详细架构

针对上面这个详细架构图,可以很容易理解上面三个概念
- subject:
- 第一层中的各种应用程序,个人理解其实就是请求.
- securityManger
- Authenticator 身份验证(登录)组件
- Authorizer 权限访问控制组件
- SessionManager 会话管理组件,默认是Servlet的Session,如果有其他会话机制,可以通过SessionDAO定制,比如存储到redis等缓存容器
- CacheManager: 一般来说,安全校验框架都会引入缓存,shiro通过CacheManger来管理缓存组件,可以快速引入其他缓存实现.
- Realm
- 可以看到realm其实包含在SecurityManager中,其实realm的作用就是被SecurityManager调用,来作为Autherticator的一部分使用的.
其他还有cryptography,是属于加密算法.
简单总结:
从总体上简单理解shiro的工作原理及组件,有助于学习shiro.
shiro其中包含的组件并不多,主要理解SecurityManager中的配置应该就可以.
身份验证
参考官网集成springboot: https://shiro.apache.org/spring-boot.html
我们先用shiro做一个身份验证的测试.
依赖引入
<dependency>
  <groupId>org.apache.shiro</groupId>
  <artifactId>shiro-spring-boot-web-starter</artifactId>
  <version>1.10.1</version>
</dependency>
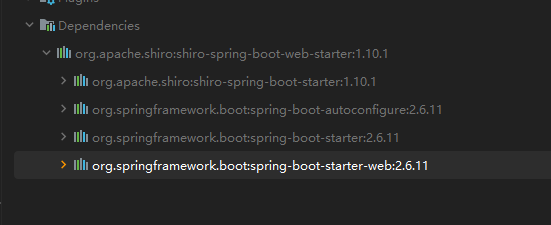
目前最新版本为1.10.1,注意其中默认适配SpringBoot版本为2.7.4,如果与项目的SpringBoot版本不一致,需要统一指定SpringBoot版本.

分析一下这个引入的依赖包,发现其中已经包含有spring-boot-starter-web包了,不需要在重复引入了.
基本配置
我们引用的是shiro的starter,基本配置都已经有了,我们只需要配置一下Realm和过滤器链即可.
Realm
Realm是对dao查询subject数据的封装,我们自定义realm就是做一下查询操作
而Realm也提供了一些实现,看下Realm的实现图

我们根据需要继承AuthorizingRealm和AuthenticatingRealm两个类中的一个即可.
AuthenticatingRealm是用来身份验证的
AuthorizingRealm是用来身份验证和鉴权的.
一般继承AuthorizingRealm重写身份验证和鉴权的方法即可.
package com.zy.login.realm;

import org.apache.shiro.authc.AuthenticationException;
import org.apache.shiro.authc.AuthenticationInfo;
import org.apache.shiro.authc.AuthenticationToken;
import org.apache.shiro.authc.SimpleAuthenticationInfo;
import org.apache.shiro.authz.AuthorizationInfo;
import org.apache.shiro.realm.AuthenticatingRealm;
import org.apache.shiro.realm.AuthorizingRealm;
import org.apache.shiro.realm.Realm;
import org.apache.shiro.subject.PrincipalCollection;
import org.springframework.stereotype.Component;

/**
 * @Author: Zy
 * @Date: 2022/12/7 18:26
 */
@Component
public class UserRealm extends AuthorizingRealm {

    @Override
    protected AuthenticationInfo doGetAuthenticationInfo(AuthenticationToken authenticationToken) throws AuthenticationException {
        SimpleAuthenticationInfo simpleAuthenticationInfo = new SimpleAuthenticationInfo("testUserId","testPassword","test");
        return simpleAuthenticationInfo;
    }

    @Override
    protected AuthorizationInfo doGetAuthorizationInfo(PrincipalCollection principals) {
        return null;
    }

}
主要重写了doGetAuthenticationInfo,也就是身份验证,
正常情况下这个方法应该回去查询数据库或者通过其他方式进行用户身份数据的查询.
我这里就简单的直接返回一个定义的账号,即只要使用testUserId就可以登录成功.
配置类
配置类里主要是:
- 把自定义的Realm注入容器
- 注入自定义的SecurityManager,使用我们自定义的Realm
- 配置过滤路径
package com.zy.login.config;

import com.zy.login.realm.UserRealm;
import org.apache.shiro.realm.Realm;
import org.apache.shiro.spring.web.config.DefaultShiroFilterChainDefinition;
import org.apache.shiro.spring.web.config.ShiroFilterChainDefinition;
import org.apache.shiro.web.mgt.DefaultWebSecurityManager;
import org.springframework.context.annotation.Bean;
import org.springframework.context.annotation.Configuration;

/**
 * @Author: Zy
 * @Date: 2022/12/7 17:58
 */
@Configuration
public class ShiroConfig {
    /**
     * 指定自己的Realm实现,注入spring
     *
     * @return org.apache.shiro.realm.Realm
     * @author Zy
     * @date 2022/12/7
     */
    @Bean
    public Realm realm() {
        return new UserRealm();
    }

    /**
     * 注入SecurityManger
     *
     * @param realm 上面注入的realm
     * @return org.apache.shiro.mgt.SecurityManager
     * @author Zy
     * @date 2022/12/7
     */
    @Bean
    public DefaultWebSecurityManager securityManager(Realm realm) {
        DefaultWebSecurityManager defaultSecurityManager = new DefaultWebSecurityManager();
        defaultSecurityManager.setRealm(realm);
        return defaultSecurityManager;
    }

    /**
     * 配置过滤路径
     *
     * @return org.apache.shiro.spring.web.config.ShiroFilterChainDefinition
     * @author Zy
     * @date 2022/12/8
     */
    @Bean
    public ShiroFilterChainDefinition shiroFilterChainDefinition() {
        DefaultShiroFilterChainDefinition chainDefinition = new DefaultShiroFilterChainDefinition();

        chainDefinition.addPathDefinition("/error", "anon");

        // logged in users with the 'admin' role
        chainDefinition.addPathDefinition("/admin/**", "authc, roles[admin]");

        // logged in users with the 'document:read' permission
        chainDefinition.addPathDefinition("/docs/**", "authc, perms[document:read]");

        // all other paths require a logged in user
        chainDefinition.addPathDefinition("/**", "authc");


        return chainDefinition;
    }


}
测试
随便访问一个url,可以看到后台进入鉴权,如果写的有登录页面,也可以借助登录页面来访问.
登录成功后会自动转入登录成功页面,shiro是可以配置的:
如下配置文件
shiro:
  loginUrl: "/login"
  successUrl: "/login/success"

logging:
  level:
    root: debug
loginUrl是登录路径
successUrl是登录成功跳转路径
总结
简单使用和配置了shiro,后续要深入学习使用shiro源码.
- 点赞
- 收藏
- 关注作者


评论(0)