【JAVAEE框架】SpringMVC 项目起步讲解

【摘要】 > 哈喽~大家好呀,>> >> >> 🥇个人主页:[个人主页](https://blog.csdn.net/aasd23?spm=1000.2115.3001.5343) >> 🥈 系列专栏:[【云原生系列】](https://blog.csdn.net/aasd23/category_11852592.html?spm=1001.2014.3001.5482)>>...
> 哈喽~大家好呀,
>
>
>
>
>
> 🥇个人主页:[个人主页](https://blog.csdn.net/aasd23?spm=1000.2115.3001.5343)
>
> 🥈 系列专栏:[【云原生系列】](https://blog.csdn.net/aasd23/category_11852592.html?spm=1001.2014.3001.5482)
>
> 🥉与这篇相关的文章:
>
>
>
> | | |
> | ---- | ---- |
> | | |
> | | |
一、前言
JavaEE 体系结构包括四层,从上到下分别是应用层、Web层、业务层、持久层。SpringMVC 是 Web 层的框架,Spring 是业务层的框架,MyBatis 是持久层的框架。
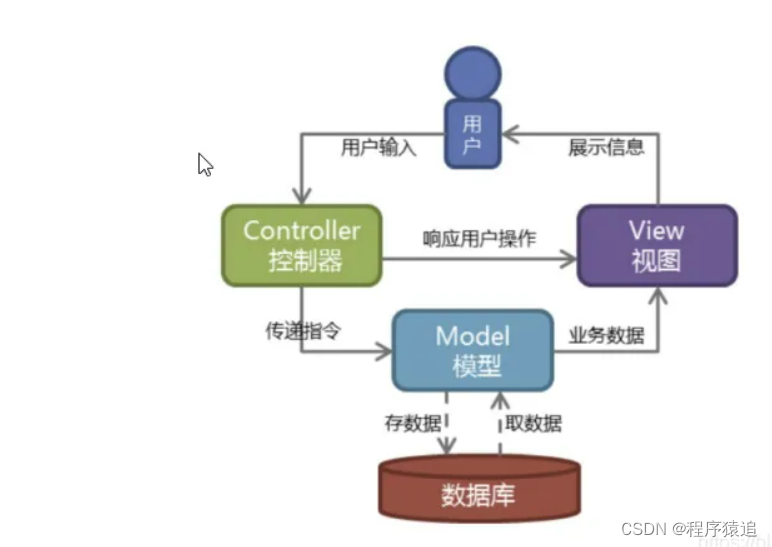
经典MVC模式中,M是指业务模型,V是指用户界面,C则是控制器,使用MVC的目的是将M和V的实现代码分离,从而使同一个程序可以使用不同的表现形式。其中,View的定义比较清晰,就是用户界面。
流程如图所示
编辑
SpringMVC架构
流程如图所示
编辑
SpringMVC 的核心架构
编辑
SpringMVC 体系结构
编辑
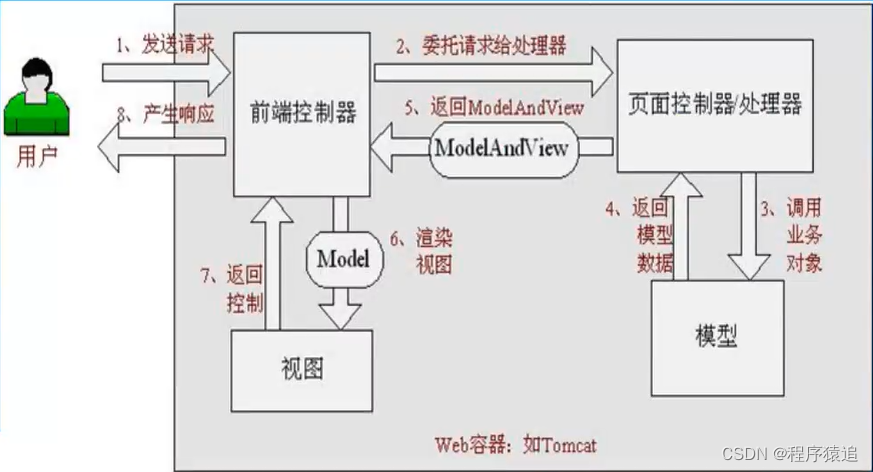
具体流程:
1、用户在页面进行操作,浏览器发送请求,发送到 DispatcherServlet(前端控制器),前端控制器收到后自己不处理,去交给其他解析器去解析
2、DispatcherServlet 将请求发给 HandlerMapping(处理器映射器),处理器映射器将请求映射为 HandlerExecutionChain 对象
3、DispatcherServlet 到 HandlerAdapter(处理器适配器),处理器适配器将会把处理器包装为适配器,从而就有了支持多种类型的处理器,即适配器设计模式的应用,从而很容易支持很多类型的处理器;
4、HandlerAdapter 到 Handler,调用处理器相应功能处理方法,经过数据的一些处理,并返回一个 ModelAndView(模型数据、逻辑视图名)
5、ModelAndView 对象(Model 部分是业务对象返回的模型数据,View 部分为逻辑视图名)到 ViewResolver(视图解析器), 视图解析器将把逻辑视图名解析为具体的 View;
6、View ——> 渲染,View会根据传进来的 Model 模型数据进行渲染,此处的 Model 实际是一个Map 数据结构;
7、View 渲染之后,由 View 返回响应给用户,相应的页面展现给用户看,到此一个流程结束。
二、入门程序
pom 文件写入依赖
```XML
<!--SpringMVC jar-->
<dependency>
<groupId>org.springframework</groupId>
<artifactId>spring-web</artifactId>
<version>5.2.22.RELEASE</version>
</dependency>
<dependency>
<groupId>org.springframework</groupId>
<artifactId>spring-webmvc</artifactId>
<version>5.2.22.RELEASE</version>
</dependency>
```

web.xml 文件
```XML
<?xml version="1.0" encoding="UTF-8"?>
<web-app xmlns="http://xmlns.jcp.org/xml/ns/javaee"
xmlns:xsi="http://www.w3.org/2001/XMLSchema-instance"
xsi:schemaLocation="http://xmlns.jcp.org/xml/ns/javaee http://xmlns.jcp.org/xml/ns/javaee/web-app_4_0.xsd"
version="4.0">
<servlet>
<servlet-name>dispatcherServlet</servlet-name>
<servlet-class>org.springframework.web.servlet.DispatcherServlet</servlet-class>
<init-param>
<param-name>contextConfigLocation</param-name>
<param-value>classpath:springMVC.xml</param-value>
</init-param>
</servlet>
<servlet-mapping>
<servlet-name>dispatcherServlet</servlet-name>
<url-pattern>/</url-pattern>
</servlet-mapping>
<!-- 打开默认页面-->
<welcome-file-list>
<welcome-file>userText.html</welcome-file>
</welcome-file-list>
</web-app>
```

DispatcherServlet
DispatcherServlet是前置控制器,配置在 web.xml 文件当中的,拦截匹配的请求,Servlet 拦截匹配规则要自己定义,将拦截下来的请求按照相应的规则分发到目标 Controller 来处理,是配置spring MVC的第一步。
<url-pattern>/</url-pattern>
看官方文档可知,如果我们的项目中配置了"/",会覆盖掉 tomcat 中的默认 servlet,当其他的 url-pattern 匹配不上时都会走这个 servlet。意思就是说,页面来的所有请求都会走这个 servlet,也就是 DispatcherServlet。
springMVC.xml 文件
```XML
<?xml version="1.0" encoding="UTF-8"?>
<beans xmlns="http://www.springframework.org/schema/beans"
xmlns:xsi="http://www.w3.org/2001/XMLSchema-instance"
xmlns:context="http://www.springframework.org/schema/context"
xmlns:mvc="http://www.springframework.org/schema/mvc"
xsi:schemaLocation="http://www.springframework.org/schema/beans
http://www.springframework.org/schema/beans/spring-beans-4.0.xsd
http://www.springframework.org/schema/context
http://www.springframework.org/schema/context/spring-context-4.0.xsd
http://www.springframework.org/schema/mvc
http://www.springframework.org/schema/mvc/spring-mvc-4.0.xsd
">
<!-- spring注解-->
<!-- component-scan 的作用:扫描包内及其子包内的所有“类”(不包含接口),并为添加了@Service、@Component、@Controller、@Repository修饰的类创建对象并存入 IOC 容器-->
<!-- @Service、@Component、@Controller、@Repository修饰的类中含有@Autowired修饰的成员变量,则创建对象时会从IOC容器中取值为该成员变量赋值-->
<context:component-scan base-package="com.itxzw">
<context:exclude-filter type="regex" expression="com.itxzw.util"/>
</context:component-scan>
<!--SpringMVC相关配置-->
<!--视图解析器,他的作用是在Controller返回的时候进行解析视图-->
<bean class="org.springframework.web.servlet.view.InternalResourceViewResolver">
<property name="prefix" value="/WEB-INF/view/"/>
<property name="suffix" value=".html" />
</bean>
<!--启动SpringMVC注解-->
<!-- 主要用于spring mvc 中的 annotation 注解功能,作用是帮我们注入一些内置bean,例如RequestMappingHandlerMapping
和 RequestMappingHandlerAdapter等,这些类是Aware的子类,能完成特定的供能,例如:
RequestMappingHandlerMapping负责解析@RequestMapping("/helloworld")注解。
主要是解析spring mvc的一些标签和语法!
-->
<mvc:annotation-driven />
<mvc:default-servlet-handler/>
</beans>
```

@Component注解的用法
注解本质上就是一个类,开发中我们可以使用注解取代xml配置文件。
@component是spring中的一个注解,它的作用就是实现bean的注入。在Java的web开发中,提供3个@Component注解衍生注解(功能与@component一样)分别是:
1、@Controller 控制器(注入服务) 用于标注控制层,相当于struts中的action层。
2、@Service 服务(注入dao) 用于标注服务层,主要用来进行业务的逻辑处理
3、@Repository(实现dao访问) 用于标注数据访问层,也可以说用于标注数据访问组件,即DAO组件
而@Component泛指各种组件,就是说当我们的类不属于各种归类的时候(不属于@Controller、@Services等的时候),我们就可以使用@Component来标注这个类。
context:component-scan
作用:扫描包内及其子包内的所有“类”(不包含接口),并为添加了@Service、@Component、@Controller、@Repository修饰的类创建对象并存入IOC容器,@Service、@Component、@Controller、@Repository修饰的类中含有@Autowired修饰的成员变量,则创建对象时会从IOC容器中取值为该成员变量赋值
context:include-filter
排除类,排除不需要扫描的类
InternalResourceViewResolver
视图解析器,他的作用是在Controller返回的时候进行解析视图
mvc:annotation-driven
主要用于 spring mvc 中的 annotation 注解功能,作用是帮我们注入一些内置 bean,例如RequestMappingHandlerMapping 和 RequestMappingHandlerAdapter 等,这些类是 Aware 的子类,能完成特定的供能,例如:RequestMappingHandlerMapping 负责解析@RequestMapping("/helloworld")注解。主要是解析spring mvc的一些标签和语法。
<mvc:default-servlet-handler/>
我们在配置 dispatchServlet 时配置<url-pattern>/</url-pattern>拦截所有请求,这时候dispatchServlet完全取代了default servlet,将不会再访问容器中原始默认的servlet,而对静态资源的访问就是通过容器默认servlet处理的,故而这时候静态资源将不可访问。
换句话说我们用了 这个 <url-pattern>/</url-pattern>, html就文件访问不了了,如果想要解决访问静态资源问题,就要加上<mvc:default-servlet-handler/>
自定义处理器
```java
// @Controller 是Spring框架提供的注解。
// @Controller标识的类,该类代表控制器类(控制层/表现层)。
// 这里控制层里面的每个方法,都可以去调用@Service标识的类(业务逻辑层),
@Controller
// 在Spring MVC 中使用 @RequestMapping 来映射请求,也就是通过它来指定控制器可以处理哪些URL请求,相当于Servlet中在web.xml中配置
@RequestMapping("/user")
public class UserAction {
@RequestMapping("/userText")
public String userText(){
return "userText";
}
}
```

@Controller
是Spring框架提供的注解。@Controller标识的类,该类代表控制器类(控制层/表现层)。 这里控制层里面的每个方法,都可以去调用@Service标识的类(业务逻辑层)。
@RequestMapping
在Spring MVC 中使用 @RequestMapping 来映射请求,也就是通过它来指定控制器可以处理哪些URL请求,相当于Servlet中在web.xml中配置。可以理解为访问路径。
userText.html 前端页面
```html
<!DOCTYPE html>
<html lang="en">
<head>
<meta charset="UTF-8">
<title>测试</title>
</head>
<body>
<p>我是测试1</p>
<p>我是测试2</p>
</body>
</html>
```

项目名
day09_SpringMvc01
测试地址
```html
http://localhost:8080/day09_SpringMvc01/user/userText
```

三、有参数的传递
自定义处理器
```java
@RequestMapping(value = "/test02")
public String test02(User user){
System.out.println(user);
return "userList";
}
```

User 实体类
```java
@Data
@AllArgsConstructor
@NoArgsConstructor
@ToString
public class User {
private String username;
private String password;
private int age;
private String gender;
private String[] hobby;
}
```

index.jsp 请求页面
```html
<html>
<body>
<form action="/day09_SpringMvc01/user/test02" method="post">
姓名:<input type="text" name="username" /> <br>
密码:<input type="text" name="password" /><br>
产品名称:<input type="text" name="proname" /><br>
爱好:唱<input type="checkbox" name="hobby" value="sing">
跳<input type="checkbox" name="hobby" value="dance">
rap<input type="checkbox" name="hobby" value="rap">
篮球<input type="checkbox" name="hobby" value="basketball">
<br>
<input type="submit" value="登录">
</form>
</body>
</html>
```

测试
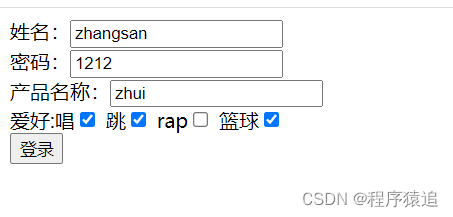编辑
效果

如果想让结果显示在另外一个页面上呢?
index.jsp 前端页面
```html
<%@ page contentType="text/html;charset=UTF-8" language="java" %>
<html>
<body>
<form action="/day09_SpringMvc01/user/test03" method="post">
姓名:<input type="text" name="username" /> <br>
密码:<input type="text" name="password" /><br>
产品名称:<input type="text" name="proname" /><br>
爱好:唱<input type="checkbox" name="hobby" value="sing">
跳<input type="checkbox" name="hobby" value="dance">
rap<input type="checkbox" name="hobby" value="rap">
篮球<input type="checkbox" name="hobby" value="basketball">
<br>
<input type="submit" value="登录">
</form>
</body>
</html>
```

自定义处理器
```java
@RequestMapping("/test03")
public ModelAndView test03(User user){
ModelAndView mv = new ModelAndView();
mv.addObject("user",user);
mv.setViewName("userDetail");
return mv;
}
```

userDetail.jsp 接收页面
```html
<%@ page contentType="text/html;charset=UTF-8" language="java" %>
<html>
<head>
<title>Title</title>
</head>
<body>
<h1>用户详情页</h1>
<h1>姓名:${user.username}</h1>
<h1>密码:${user.password}</h1>
<h1>爱好:${user.hobby}</h1>
</body>
</html>
```

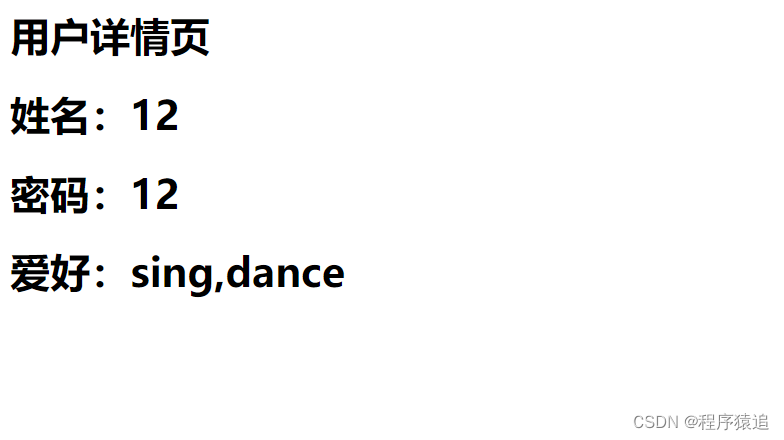
测试
访问路径
```html
http://localhost:8080/day09_SpringMvc01/index.jsp
```

编辑
效果
编辑
扩:@GetMapping 与 @PostMapping
首先要了解一下@RequestMapping注解。
@RequestMapping用于映射url到控制器类的一个特定处理程序方法。可用于方法或者类上面。也就是可以通过url找到对应的方法。
@RequestMapping有8个属性。
value:指定请求的实际地址。
method:指定请求的method类型(GET,POST,PUT,DELETE)等。
consumes:指定处理请求的提交内容类型(Context-Type)。
produces:指定返回的内容类型,还可以设置返回值的字符编码。
params:指定request中**必须**包含某些参数值,才让该方法处理。
headers:指定request中必须包含某些指定的header值,才让该方法处理请求。
@getMapping与@postMapping是组合注解。
> @GetMapping是一个组合注解,是@RequestMapping(method = RequestMethod.GET)的缩写
>
> @postMapping 是一个组合注解,是@RequestMapping(method = RequestMethod.POST)的缩写
@RequestParam
主要用于将请求参数区域的数据映射到控制层方法的参数上。
什么意思?
举个例子,user实体类有两个成员变量(username 与 password),正常情况下我传一个username,不传password,username 就有值,password就是默认的值,如果加了@RequestParam 就必须要传值,如果加了,则默认一定要传参,如果不想传值,可以@RequestParam(required = false)
```java
@RequestMapping("/test03")
public String test03(@RequestParam(name = "id",required = false) String ids ){
System.out.println(ids);
return "userList";
}
```


【声明】本内容来自华为云开发者社区博主,不代表华为云及华为云开发者社区的观点和立场。转载时必须标注文章的来源(华为云社区)、文章链接、文章作者等基本信息,否则作者和本社区有权追究责任。如果您发现本社区中有涉嫌抄袭的内容,欢迎发送邮件进行举报,并提供相关证据,一经查实,本社区将立刻删除涉嫌侵权内容,举报邮箱:
cloudbbs@huaweicloud.com
- 点赞
- 收藏
- 关注作者
评论(0)