RK3588 AI 应用开发 (InceptionV3-图像分类)【玩转华为云】

【摘要】 本章介绍了基于RK3588平台的InceptionV3图像分类应用开发全流程,包括模型训练与格式转换、Gradio界面设计、推理代码实现、批量预测处理及Flask服务部署,实现了从本地到Web端的高效AI推理应用。
RK3588 AI 应用开发 (InceptionV3-图像分类)
一、模型训练与转换
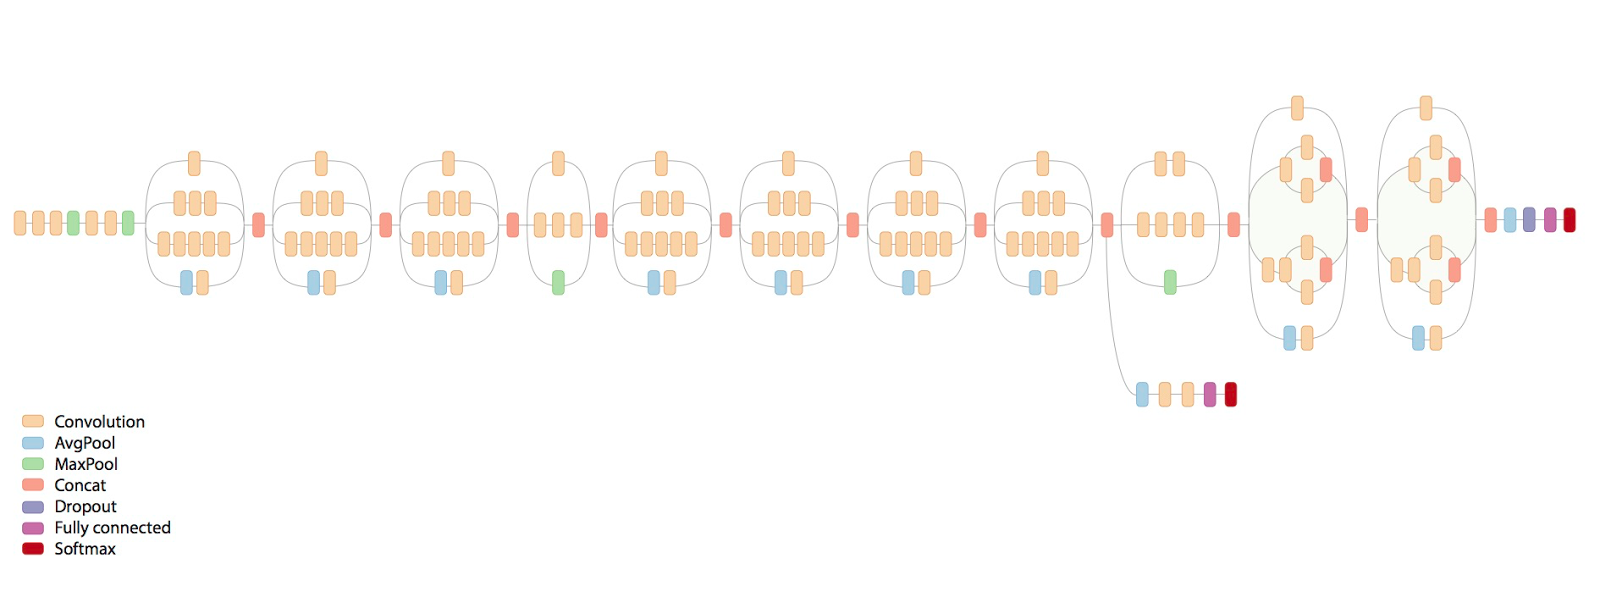
Inception V3,GoogLeNet的改进版本,采用InceptionModule和全局平均池化层,v3一个最重要的改进是分解(Factorization),将7x7分解成两个一维的卷积(1x7,7x1),3x3也是一样(1x3,3x1),这样的好处,既可以加速计算(多余的计算能力可以用来加深网络),又可以将1个conv拆成2个conv,使得网络深度进一步增加,增加了网络的非线性。
模型的训练与转换教程已经开放在AI Gallery中,其中包含训练数据、训练代码、模型转换脚本。

在ModelArts的Notebook环境中训练后,再转换成对应平台的模型格式:onnx格式可以用在Windows设备上,RK系列设备上需要转换为rknn格式。
二、应用开发
1. 开发 Gradio 界面
import cv2
import json
import base64
import requests
import numpy as np
import gradio as gr
def test_image(image_path):
try:
image_bgr = cv2.imread(image_path)
image_string = cv2.imencode('.jpg', image_bgr)[1].tobytes()
image_base64 = base64.b64encode(image_string).decode('utf-8')
params = {"image_base64": image_base64}
response = requests.post(f'http://{ip}:{port}{url}', data=json.dumps(params),
headers={"Content-Type": "application/json"})
if response.status_code == 200:
image_base64 = response.json().get("image_base64")
image_binary = base64.b64decode(image_base64)
image_array = np.frombuffer(image_binary, dtype=np.uint8)
image_rgb = cv2.imdecode(image_array, cv2.IMREAD_COLOR)
else:
image_rgb = None
except Exception as e:
return None
else:
return image_rgb
if __name__ == "__main__":
port = 8000
ip = "127.0.0.1"
url = "/v1/InceptionV3"
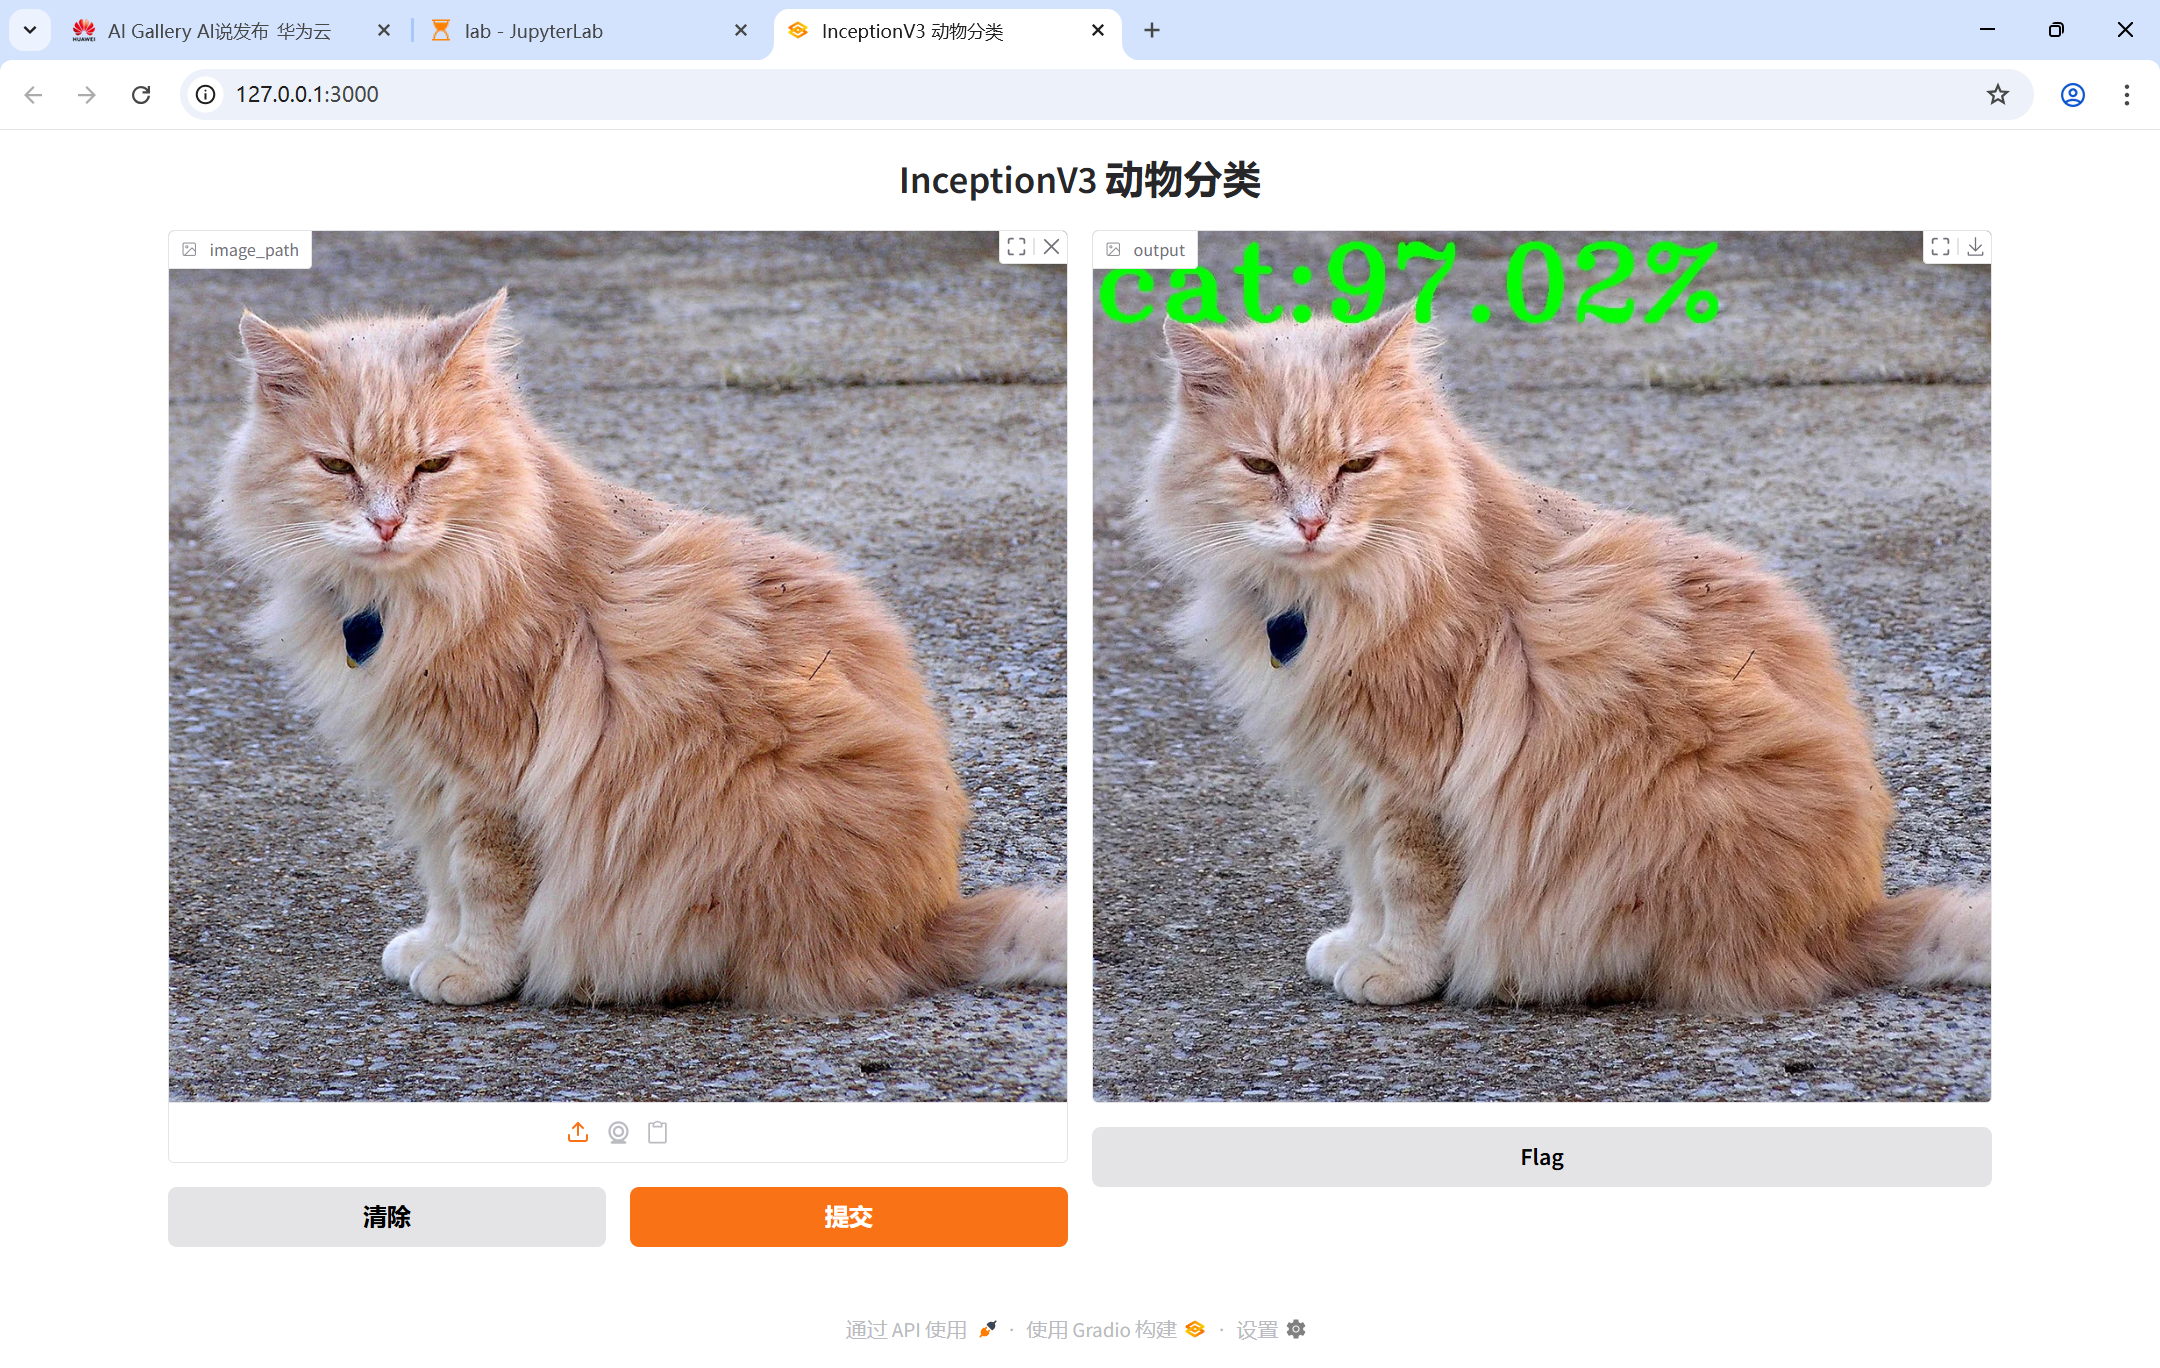
demo = gr.Interface(fn=test_image, inputs=gr.Image(type="filepath"), outputs=["image"], title="InceptionV3 动物分类")
demo.launch(share=False, server_port=3000)
/home/orangepi/miniconda3/envs/python-3.10.10/lib/python3.10/site-packages/tqdm/auto.py:21: TqdmWarning: IProgress not found. Please update jupyter and ipywidgets. See https://ipywidgets.readthedocs.io/en/stable/user_install.html
  from .autonotebook import tqdm as notebook_tqdm
* Running on local URL:  http://127.0.0.1:3000
* To create a public link, set `share=True` in `launch()`.
2. 编写推理代码
class InceptionV3:
    def __init__(self, model_path):
        self.rknn_lite = RKNNLite()
        self.rknn_lite.load_rknn(model_path)
        self.rknn_lite.init_runtime(core_mask=RKNNLite.NPU_CORE_0_1_2)
        self.label = ['antelope', 'badger', 'bat', 'bear', 'bee', 'beetle', 'bison',
                      'boar', 'butterfly', 'cat', 'caterpillar', 'chimpanzee',
                      'cockroach', 'cow', 'coyote', 'crab', 'crow', 'deer', 'dog',
                      'dolphin', 'donkey', 'dragonfly', 'duck', 'eagle', 'elephant',
                      'flamingo', 'fly', 'fox', 'goat', 'goldfish', 'goose', 'gorilla',
                      'grasshopper', 'hamster', 'hare', 'hedgehog', 'hippopotamus',
                      'hornbill', 'horse', 'hummingbird', 'hyena', 'jellyfish',
                      'kangaroo', 'koala', 'ladybugs', 'leopard', 'lion', 'lizard',
                      'lobster', 'mosquito', 'moth', 'mouse', 'octopus', 'okapi',
                      'orangutan', 'otter', 'owl', 'ox', 'oyster', 'panda', 'parrot',
                      'pelecaniformes', 'penguin', 'pig', 'pigeon', 'porcupine',
                      'possum', 'raccoon', 'rat', 'reindeer', 'rhinoceros', 'sandpiper',
                      'seahorse', 'seal', 'shark', 'sheep', 'snake', 'sparrow', 'squid',
                      'squirrel', 'starfish', 'swan', 'tiger', 'turkey', 'turtle',
                      'whale', 'wolf', 'wombat', 'woodpecker', 'zebra']


    def preprocess(self, image):
        image = image[:, :, ::-1]
        image = cv2.resize(image, (224, 224))
        return np.expand_dims(image, axis=0)


    def rknn_infer(self, data):
        outputs = self.rknn_lite.inference(inputs=[data])
        return outputs[0]


    def post_process(self, pred):
        clsse = np.argmax(pred, axis=-1)
        score = pred[0][clsse[0]].item()
        return self.label[clsse[0]], round(score * 100, 2)


    def predict(self, image):
        # 图像预处理
        data = self.preprocess(image)
        # 模型推理
        pred = self.rknn_infer(data)
        # 模型后处理
        label, score = self.post_process(pred)
        # 绘制识别结果
        print(f'{label}:{score}%')
        image = cv2.putText(image, f'{label}:{score}%', (0, 100),
                           cv2.FONT_HERSHEY_TRIPLEX, 4, (0, 255, 0), 8)
        return image[..., ::-1]

    def release(self):
        self.rknn_lite.release()
3. 图片批量预测
import os
import cv2
import numpy as np
import matplotlib.pyplot as plt
from rknnlite.api import RKNNLite

model = InceptionV3('model/InceptionV3.rknn')

for image in os.listdir("image"):
    image = cv2.imread(os.path.join("image", image))
    image = model.predict(image)
    plt.imshow(image)
    plt.axis('off')
    plt.show()

model.release()
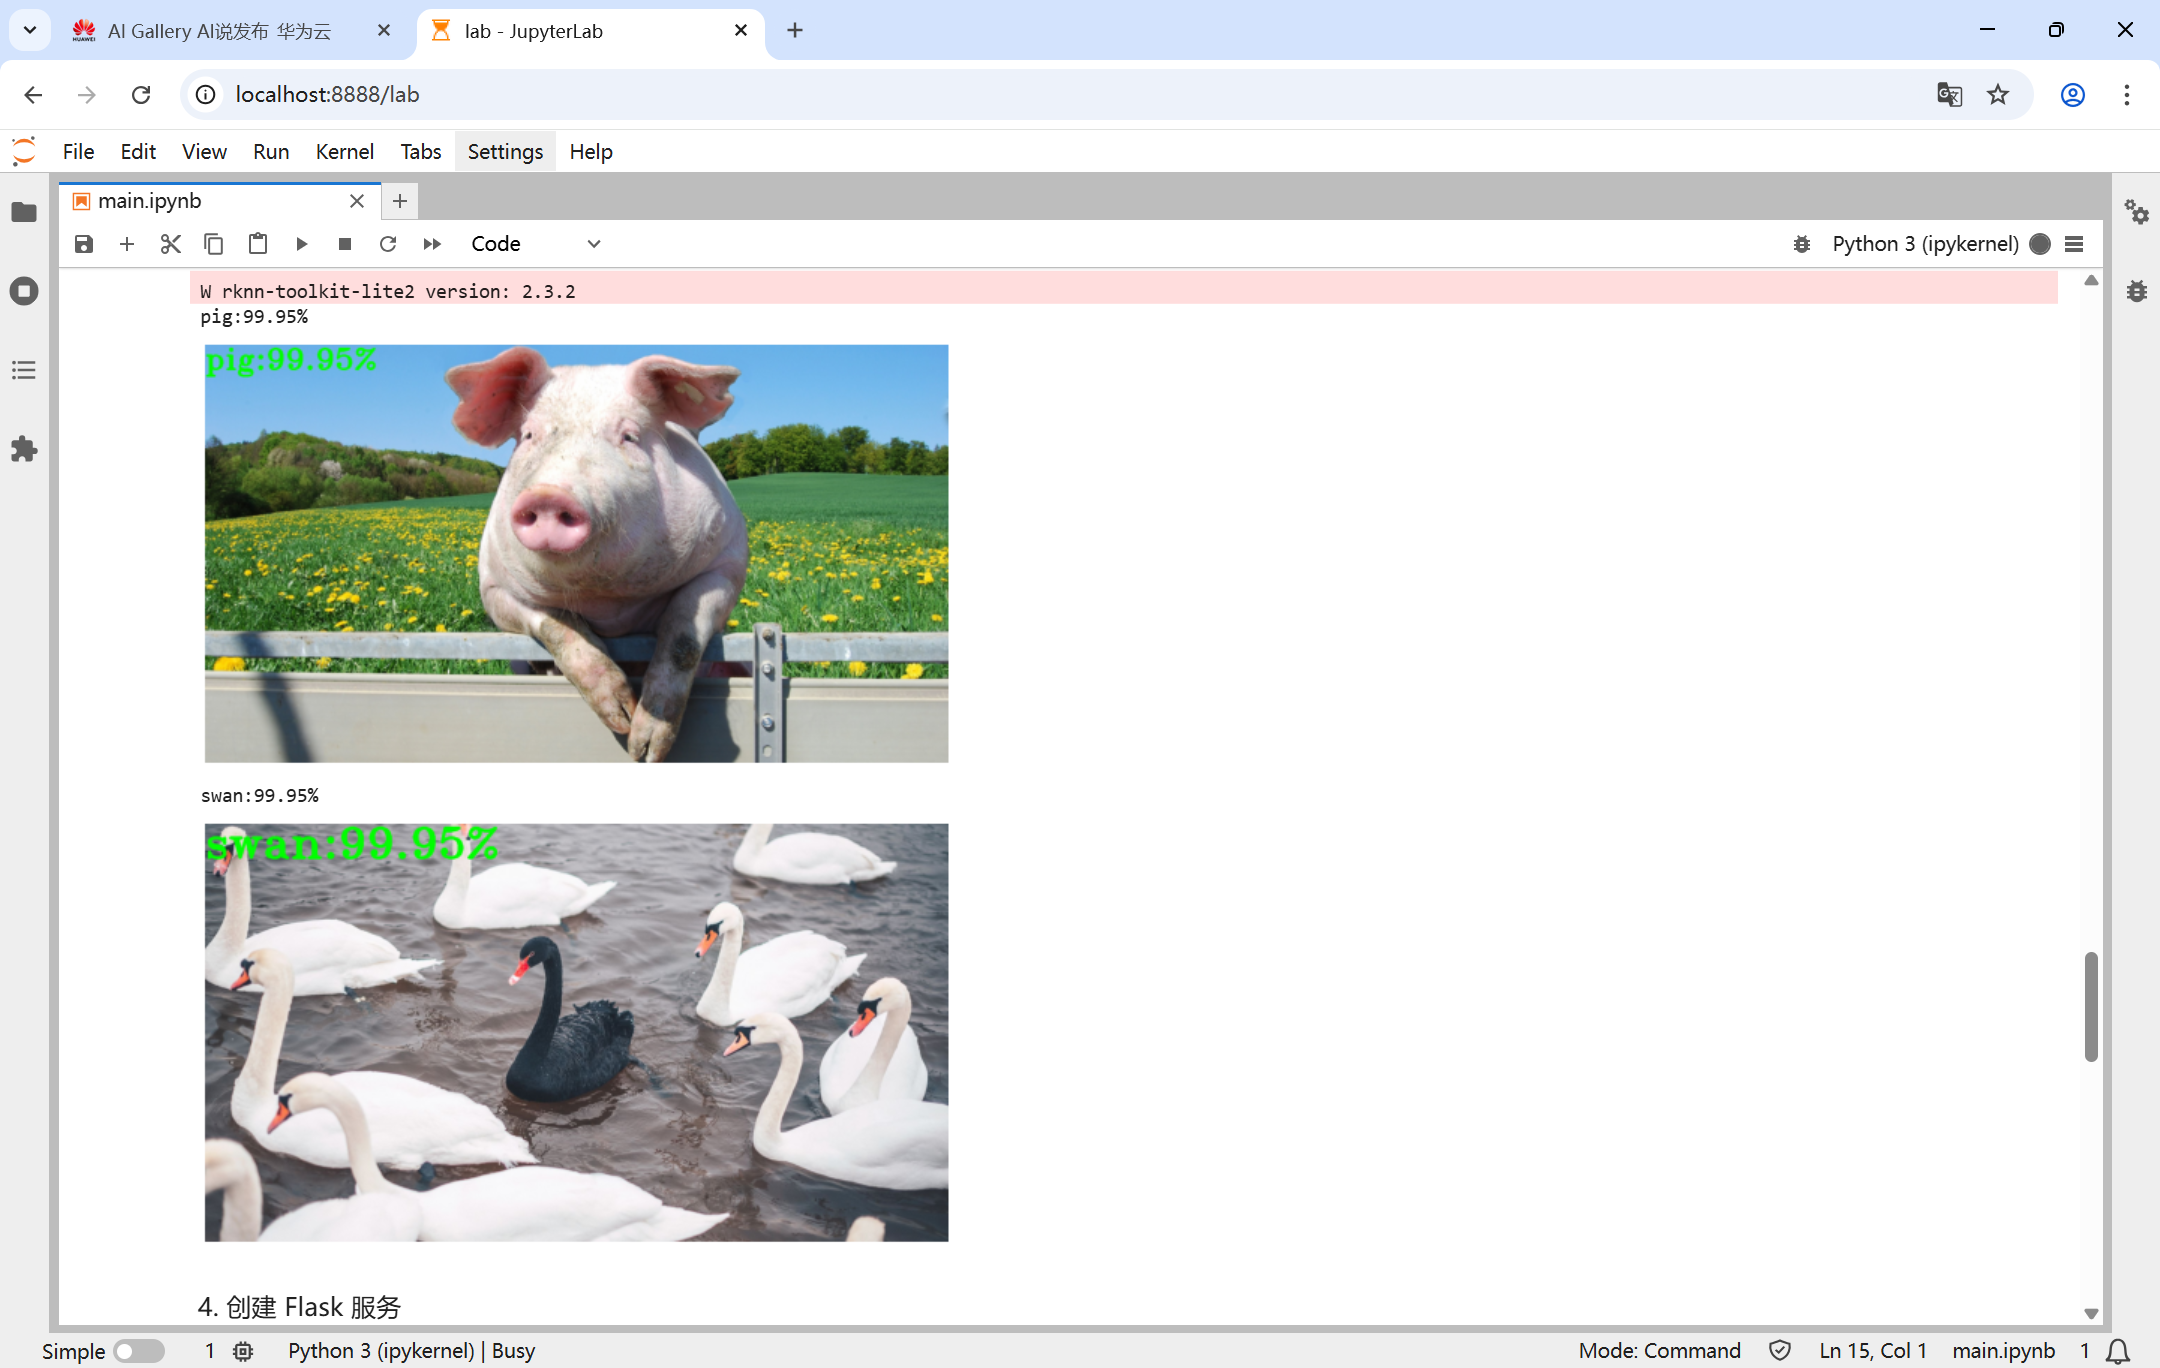
4. 创建 Flask 服务
import cv2
import base64
import numpy as np
from rknnlite.api import RKNNLite
from flask import Flask, request, jsonify
from flask_cors import CORS

app = Flask(__name__)
CORS(app)

@app.route('/v1/InceptionV3', methods=['POST'])
def inference():
    data = request.get_json()
    image_base64 = data.get("image_base64")
    image_binary = base64.b64decode(image_base64)
    image_array = np.frombuffer(image_binary, dtype=np.uint8)
    image_bgr = cv2.imdecode(image_array, cv2.IMREAD_COLOR)

    image_rgb = model.predict(image_bgr)

    image_string = cv2.imencode('.jpg', image_rgb)[1].tobytes()
    image_base64 = base64.b64encode(image_string).decode('utf-8')

    return jsonify({
        "image_base64": image_base64
    }), 200

if __name__ == '__main__':
    model = InceptionV3('model/InceptionV3.rknn')
    app.run(host='0.0.0.0', port=8000)
    model.release()
W rknn-toolkit-lite2 version: 2.3.2
 * Serving Flask app '__main__'
 * Debug mode: off
WARNING: This is a development server. Do not use it in a production deployment. Use a production WSGI server instead.
 * Running on all addresses (0.0.0.0)
 * Running on http://127.0.0.1:8000
 * Running on http://192.168.3.50:8000
Press CTRL+C to quit
127.0.0.1 - - [01/May/2025 20:37:00] "POST /v1/InceptionV3 HTTP/1.1" 200 -
pig:99.95%
127.0.0.1 - - [01/May/2025 20:37:09] "POST /v1/InceptionV3 HTTP/1.1" 200 -
swan:99.95%
127.0.0.1 - - [01/May/2025 20:37:20] "POST /v1/InceptionV3 HTTP/1.1" 200 -
cat:97.02%
5. 上传图片预测
三、小结
本章介绍了基于RK3588平台的InceptionV3图像分类应用开发全流程,包括模型训练与格式转换、Gradio界面设计、推理代码实现、批量预测处理及Flask服务部署,实现了从本地到Web端的高效AI推理应用。

【声明】本内容来自华为云开发者社区博主,不代表华为云及华为云开发者社区的观点和立场。转载时必须标注文章的来源(华为云社区)、文章链接、文章作者等基本信息,否则作者和本社区有权追究责任。如果您发现本社区中有涉嫌抄袭的内容,欢迎发送邮件进行举报,并提供相关证据,一经查实,本社区将立刻删除涉嫌侵权内容,举报邮箱:
cloudbbs@huaweicloud.com
- 点赞
- 收藏
- 关注作者
评论(0)